To install an outlet outside, first turn off the power, then drill a hole for the cable through the wall, secure a weatherproof box, and connect the wires to the outlet terminals. After that, insert the outlet into the box, secure it, and attach the cover.
Finally, turn the power back on and test the outlet. Are you looking to install an outlet outside? Whether you need to power up tools in your backyard or set up outdoor lighting, having an outlet can be incredibly convenient.
However, installing an outlet outside requires careful attention to detail to ensure safety and proper functionality. In this guide, we will walk you through the step-by-step process of installing an outlet outside your home. From turning off the power to testing the outlet, we’ve got you covered. So, let’s start exploring the process of installing an outdoor outlet.
Assessing Electrical Needs For Outdoor Area
Before installing an outdoor outlet, it is essential to assess the electrical needs of your outdoor area. This will help ensure that you have the appropriate power supply for your appliances and lighting. By determining power requirements and identifying suitable locations for outdoor outlets, you can create a safe and functional outdoor space.
Determining power requirements for outdoor appliances and lighting
When it comes to selecting an outdoor outlet, it is crucial to determine the power requirements of your outdoor appliances and lighting. Different appliances and lighting fixtures have varying wattage and voltage needs. By calculating the total power consumption, you can determine the appropriate size and capacity of the outdoor outlet. Here are a few steps to follow:
- Make a list of all the outdoor appliances and lighting fixtures you plan to use.
- Check the labels or specifications of each item to find their wattage or voltage requirements.
- Add up the wattage or voltage requirements to get the total power consumption.
- Consider any future additions or upgrades to your outdoor electrical setup for proper planning.
Identifying suitable locations for outdoor outlets
Once you have determined your power requirements, the next step is to identify suitable locations for outdoor outlets. This involves considering both convenience and safety factors. Here are some tips to help you find the right spots:
- Locate areas where you will frequently use outdoor appliances or require lighting.
- Ensure the outlets are easily accessible and protected from the elements.
- Position the outlets at a safe distance from water sources like pools, ponds, or sprinklers.
- Consider installing outlets on different sides of the house to make it easier to power various areas of your outdoor space.
- Consult local electrical codes and regulations for specific guidelines on outdoor outlet placement.
By carefully assessing your electrical needs and identifying suitable locations for outdoor outlets, you can create a seamless and efficient outdoor space. Proper planning and installation will ensure the safety and functionality of your outdoor electrical setup for years to come.
Ensuring Safety And Compliance
Checking local electrical codes and regulations for outdoor installations
Before undertaking any outdoor electrical installation, it’s crucial to familiarize yourself with the local electrical codes and regulations in your area. These codes are put in place to ensure the safety of both the installer and the end user. Failure to comply with these regulations not only poses a safety risk but can also result in hefty fines or penalties.
To begin, research the specific electrical codes and regulations set by your city or state. These can typically be found on the official website of your local government or electrical regulatory body. Look for information regarding outdoor electrical installations, including any specific requirements or restrictions.
Once you have a clear understanding of the regulations, it’s important to follow them diligently during the installation process. This may include obtaining permits, submitting plans to the local authorities, or hiring a licensed electrician to oversee the installation.
Understanding proper grounding and protection measures
Proper grounding and protection measures are essential for outdoor electrical installations to prevent electrical shocks, fires, or other hazards. Grounding provides a pathway for electrical current to flow safely into the ground, while protection measures such as ground fault circuit interrupters (GFCIs) safeguard against electrical faults.
When installing an outlet outside, it’s crucial to ensure that it is properly grounded. This typically involves connecting a ground wire to a grounding rod buried in the ground or a metal water pipe. The grounding wire should be securely connected to the grounding terminal of the outlet to provide a safe pathway for electrical current in case of a fault.
In addition to grounding, GFCIs are essential for outdoor outlets as they provide an extra layer of protection. GFCIs detect imbalances in electrical currents and immediately cut off power to prevent electrical shocks. These devices should be installed in any outdoor outlet to ensure the safety of individuals using the electrical system.
Remember, when it comes to outdoor electrical installations, safety should always be the top priority. By adhering to local electrical codes and regulations and understanding proper grounding and protection measures, you can ensure a safe and compliant outdoor outlet installation.
Gathering Essential Electrical Materials
When it comes to installing an outlet outside, it is crucial to gather the necessary electrical materials to ensure safety and functionality. These materials are specially designed for outdoor use and are built to withstand varying weather conditions. In this section, we will discuss the key materials required for installing an outlet outside. Let’s get started!
Outdoor-rated electrical conduit and wiring
One of the essential materials you will need for installing an outdoor outlet is outdoor-rated electrical conduit and wiring. This serves as a protective covering for the wiring, preventing any damage from external elements. The conduit ensures that the wiring remains secure and insulated, even when exposed to moisture, UV rays, and extreme temperatures.
Weatherproof electrical box and cover
Another vital component for outdoor outlet installation is a weatherproof electrical box and cover. This box acts as a housing to protect the outlet, wiring, and connections from moisture, dust, and debris. It is specifically designed to withstand the outdoor elements, preventing any potential risks associated with water penetration or accidental damage. The weatherproof cover further enhances the protection, ensuring that the outlet remains safe and functional in all weather conditions.
GFCI (Ground Fault Circuit Interrupter) outlet
When installing an outdoor outlet, it is crucial to use a GFCI (Ground Fault Circuit Interrupter) outlet. This type of outlet provides an additional layer of safety by detecting any abnormal electrical flow or ground faults. It instantly interrupts the circuit to prevent electrical shock, making it particularly important for outdoor use where moisture and other hazards are present. Installing a GFCI outlet ensures the safety of anyone using the outdoor outlet and helps protect against potential accidents.
Necessary Tools For Installation
When it comes to installing an electrical outlet outside, having the necessary tools is crucial for a successful installation. In this section, we will discuss the important tools you will need to have on hand to ensure a smooth and safe installation process.
Screwdriver
A screwdriver is essential for removing and securing screws during the installation process. Make sure you have a screwdriver with interchangeable tips, as different screws may require different types of heads. Having both flathead and Phillips-head screwdriver tips will ensure versatility and ease of use.
Wire cutter and stripper
A wire cutter and stripper are necessary tools for cutting and preparing wires for connection. Look for wire cutters with built-in stripping capabilities to save time and effort. This tool will enable you to cut wires cleanly and strip off the insulation without damaging the conductive core.
Electrical tape
Electrical tape is a key component of any electrical installation, including outdoor outlets. This insulating tape is used to protect exposed wires and connections from moisture, dust, and other external factors that could lead to electrical hazards. Make sure the electrical tape is rated for outdoor use to withstand exposure to elements.
Drill with appropriate drill bits
A drill is necessary to create holes for mounting the outlet box and other necessary components. Choose a drill with variable speed settings for better control and precision. Use drill bits suitable for the material you are drilling into, whether it’s wood, concrete, or any other surface type.
In conclusion, having the right tools for installing an outlet outside is vital to ensure a safe and successful installation. Make sure you have a screwdriver with interchangeable tips, a wire cutter and stripper, electrical tape, and a drill with appropriate drill bits. By equipping yourself with these essential tools, you will be well-prepared to tackle the installation process with confidence.
Preparing The Electrical Source
Before you start installing an outlet outside, it is crucial to properly prepare the electrical source. This ensures safety and efficient electrical supply to the outlet. Follow these steps to ensure a smooth and hassle-free installation process.
Shutting off power to the electrical circuit
Before you begin working on the outlet, it is important to shut off power to the electrical circuit. Failure to do so can lead to electrocution or damage to the electrical system. Follow these steps to shut off power:
- Locate the electrical panel in your house. It is usually found in the basement, utility room, or garage.
- Open the panel door and look for the circuit breaker corresponding to the outlet you wish to install. Each circuit breaker is labeled to indicate which area or room it supplies power to.
- Identify the breaker labeled for the specific area where you plan to install the outlet.
- Flip the breaker switch to the “off” position by pushing it towards the opposite side from where it is currently positioned. This will cut off the power supply to the outlet.
- Once the breaker is off, it is always a good idea to double-check by plugging in a small appliance or using a voltage tester to ensure that the power is indeed off.
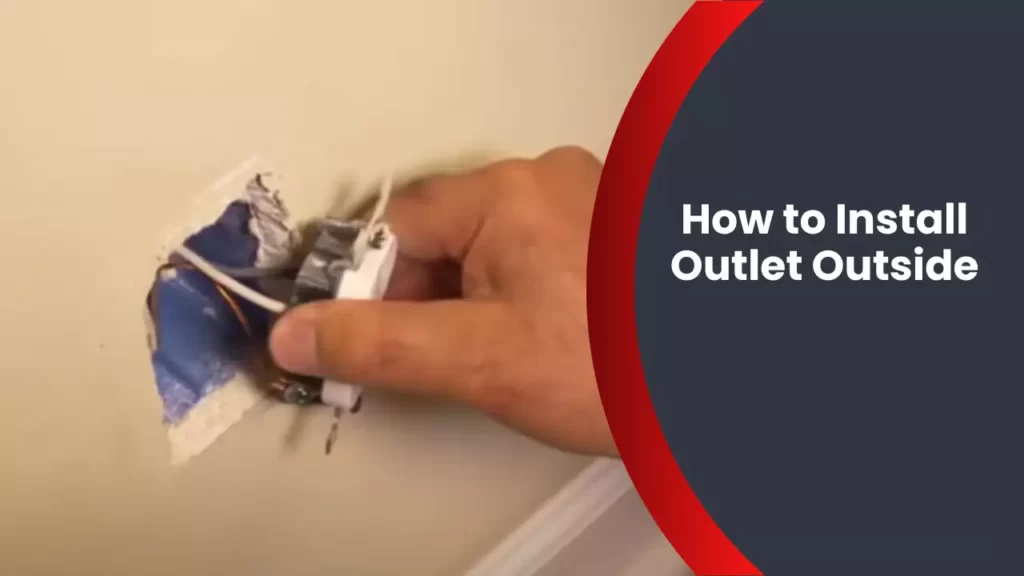
Removing the existing electrical outlet cover
After making sure the power is off, it’s time to remove the existing electrical outlet cover. This will allow access to the wiring so you can safely connect the new outlet. Follow these steps to remove the cover:
- Using a flathead screwdriver, carefully unscrew the screws holding the cover plate in place.
- Once the screws are removed, gently pull the cover plate away from the wall, exposing the outlet and the wiring behind it.
- Note that the outlet may still be secured to the electrical box with more screws or mounting brackets. Use the appropriate tools to remove any additional fastenings.
- After removing all the screws and fastenings, carefully detach the outlet from the electrical box by gently pulling it forward. Take caution not to damage the wiring.
By following these steps, you can safely prepare the electrical source for installing an outlet outside. Remember to exercise caution and always prioritize safety to avoid any mishaps.
Installing The Outdoor Electrical Box
Installing an outdoor electrical outlet can be a convenient and practical addition to your home. Whether you want to power up your garden lights or plug in your power tools outside, a properly installed outdoor electrical box is essential for both safety and functionality. In this guide, we will walk you through the process of installing the outdoor electrical box, ensuring you have the necessary information to complete the task successfully.
Choosing a suitable location for the box
Before you begin the installation process, it is crucial to select a suitable location for the outdoor electrical box. Here are a few key considerations to keep in mind:
- Proximity to electrical sources: Ensure the location is close to an existing electrical source, such as an indoor outlet or junction box. This will make it easier and more efficient to connect the outdoor box to a power supply.
- Accessibility: Choose a spot that is easily accessible and convenient for your needs. Consider the distance from areas where you will most likely use electrical appliances or equipment.
- Protection from the elements: Select a location that offers some protection from the elements, such as under an eave or next to a wall. This will help shield the electrical box from rain, snow, and other harsh weather conditions, reducing the risk of damage and ensuring its longevity.
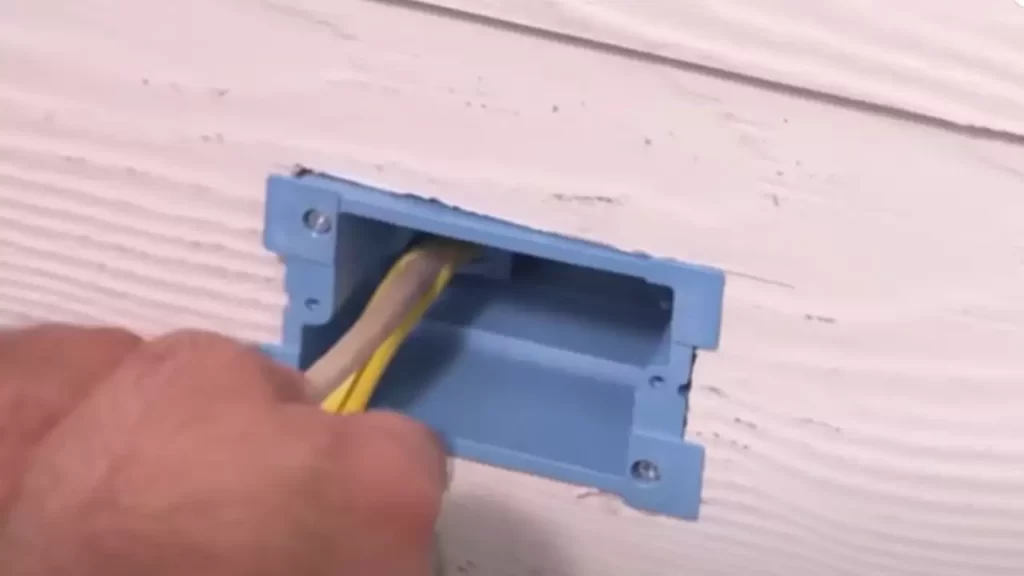
Mounting the electrical box securely to the exterior surface
Once you have chosen the ideal location for your outdoor electrical box, the next step is to mount it securely to the exterior surface. Follow these steps to ensure a reliable installation:
- Prepare the surface: Clean the area where you plan to mount the electrical box, removing any dirt, debris, or loose paint. This will ensure a firm and stable attachment.
- Choose appropriate screws: Select screws that are suitable for outdoor use and can withstand exposure to the elements. Stainless steel or weather-resistant screws are generally recommended for this purpose.
- Position the electrical box: Place the box against the wall in the chosen location, ensuring it is level and aligned with any nearby structures or features.
- Mark the mounting holes: Using a pencil or marker, mark the positions of the mounting holes on the exterior surface. This will serve as a guide for drilling the holes.
- Drill the holes: Carefully drill pilot holes at the marked positions, using a drill bit suitable for the type of surface you are mounting the box on. Take care not to drill too deep or with excessive force.
- Secure the box: Line up the mounting holes on the box with the pilot holes you drilled, then attach the box to the wall using the appropriate screws. Ensure the box is tightly secured to the surface, but be cautious not to overtighten, as this may damage the box or the surrounding area.
Following these steps will help ensure that your outdoor electrical box is properly mounted and securely attached to the exterior surface, providing a stable and reliable source of power for your outdoor needs. Now that you have successfully installed the outdoor electrical box, you can move on to connecting the wiring and installing the outlet, which we will cover in our next section.
Running Electrical Wiring
Running electrical wiring is an important step when installing an outlet outside. This process involves feeding the electrical wire through conduit and connecting it to the GFCI outlet. By following the correct procedures, you can ensure a safe and functional outdoor electrical outlet.
Feeding the electrical wire through the conduit
Before you can connect the wiring to the GFCI outlet, you need to feed the electrical wire through a conduit. The conduit serves as a protective covering for the wire, keeping it safe from weather elements and physical damage. Here is how you can do it:
- Start by selecting the appropriate conduit material, such as PVC or metal, based on the specific requirements of your outdoor area.
- Measure the distance from the power source to the location where you want to install the outlet. This will determine the length of the conduit and the amount of wire you will need.
- Once you have the conduit and wire ready, begin by attaching one end of the wire to a string or fish tape.
- Insert the string or fish tape into the conduit, pushing it through until it reaches the other end.
- Hold onto the other end of the wire and carefully pull it back through the conduit, making sure it slides smoothly.
- Once the wire is completely pulled through, ensure that there are no kinks or damage to the wire.
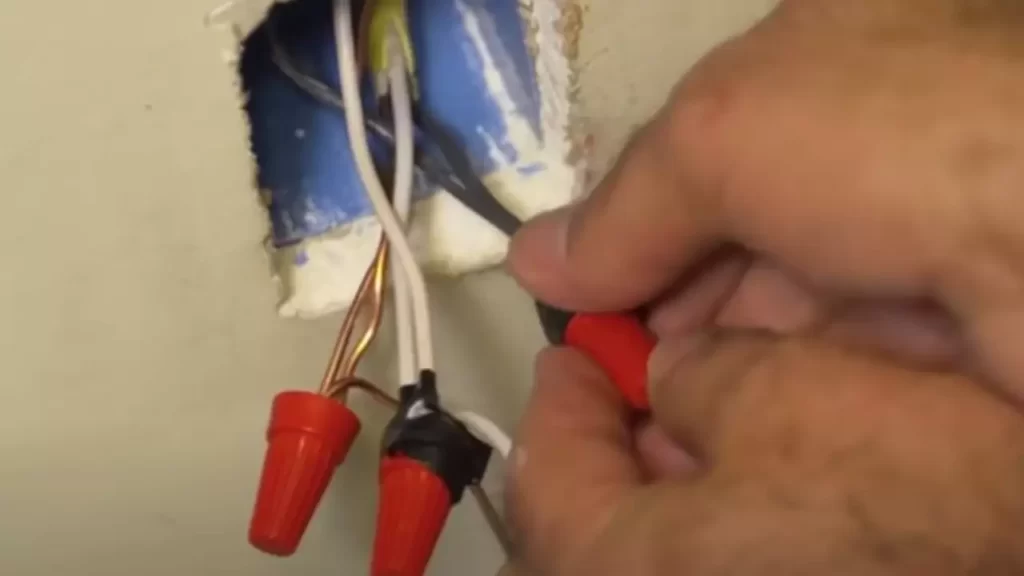
Connecting the wiring to the GFCI outlet
After successfully feeding the electrical wire through the conduit, the next step is to connect it to the GFCI outlet. This is a crucial step that ensures the outlet is properly powered and protected against electrical faults. Follow these steps for a secure connection:
- Start by turning off the power to the circuit you will be working on, either at the circuit breaker or by removing the fuse.
- Remove the cover plate from the GFCI outlet and loosen the screws holding the outlet in place.
- Identify the hot wire (usually black), neutral wire (usually white), and ground wire (usually green or bare copper) in the electrical wire you fed through the conduit.
- Strip off about 1 inch of insulation from the ends of the wires using wire strippers.
- Connect the hot wire to the brass-colored terminal screw on the GFCI outlet, the neutral wire to the silver-colored terminal screw, and the ground wire to the green-colored terminal screw. Tighten the screws securely.
- Carefully tuck the wires and GFCI outlet back into the electrical box, making sure there is no undue stress on the wires.
- Secure the GFCI outlet in place by tightening the screws and install the cover plate.
- Finally, turn the power back on at the circuit breaker or by reinstalling the fuse.
Once you have completed these steps, you have successfully run the electrical wiring and connected it to the GFCI outlet outside. Remember, safety is paramount when dealing with electricity, so it’s important to double-check your work and consult a professional if you are unsure about any step in the process.
Grounding And Protecting The Outdoor Outlet
Grounding and protecting the outdoor outlet is crucial to ensure the safety and functionality of your electrical system. Without proper grounding, the risk of electrical shocks and fire hazards increases significantly. Additionally, installing a weatherproof cover and housing for the outlet prevents water damage and prolongs the lifespan of the outlet. In this section, we will explore the steps to ensure proper grounding of the electrical system, as well as the installation of a weatherproof cover and housing for the outdoor outlet.
Ensuring proper grounding of the electrical system
Proper grounding of the electrical system is essential to protect against electrical shocks and ensure the proper functioning of the outdoor outlet. Here are the steps to ensure the grounding of your electrical system:
1. Check the main electrical panel: Start by locating your main electrical panel and making sure it is properly grounded. The main panel should have a grounding wire connected to a metal rod or pipe driven into the ground outside your home.
2. Install a ground rod: If your main electrical panel is not grounded or if you are installing a new outdoor outlet far away from the panel, you may need to install a ground rod. To do this, drive a copper or galvanized rod into the ground near the location of the outdoor outlet. Make sure the rod is at least 8 feet in length and is driven deep enough to ensure proper grounding.
3. Connect the grounding wire: Once you have installed the ground rod, connect a grounding wire from the outdoor outlet to the ground rod. This wire should be a green or bare copper wire and should be securely connected to both the outlet and the ground rod.
It is crucial to ensure that all connections are tight and secure to maintain proper grounding. Any loose or faulty connections can compromise the grounding of the system, so it is recommended to double-check all connections before proceeding.
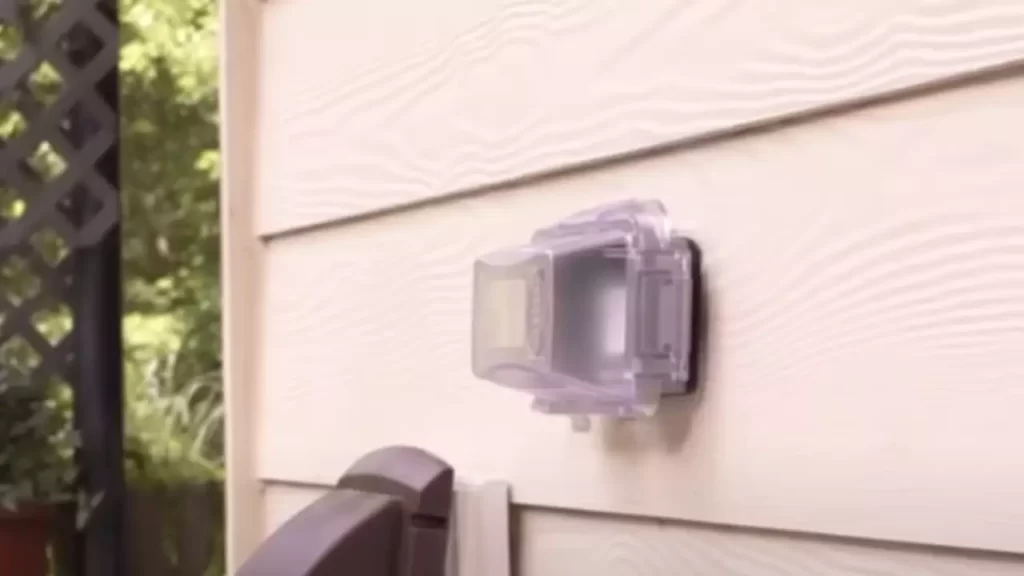
Installing weatherproof cover and housing for the outlet
A weatherproof cover and housing for the outdoor outlet is essential to protect it from environmental elements such as rain, snow, and dust. Here are the steps to install a weatherproof cover and housing:
1. Choose a weatherproof cover: Select a weatherproof cover that is specifically designed for outdoor use and is compatible with your outlet. These covers are typically made of durable materials such as plastic or metal and feature a gasket or seal to prevent water from entering the outlet.
2. Turn off the power: Before installing the weatherproof cover and housing, make sure to turn off the power to the outlet from the main electrical panel. This step is crucial for your safety and to avoid any electrical accidents during the installation process.
3. Remove the old cover: Remove the existing cover from the outlet by unscrewing the screws that secure it. Keep these screws as you will need them to secure the new weatherproof cover.
4. Install the weatherproof housing: Once the old cover is removed, position the weatherproof housing over the outlet and align the screw holes. Use the screws from the old cover to secure the housing in place. Ensure that the housing fits snugly and that all edges are properly sealed.
5. Attach the weatherproof cover: Finally, attach the weatherproof cover to the housing, making sure it sits securely and provides complete protection. Test the cover by opening and closing it to ensure smooth operation.
By following these steps, you can effectively ground your outdoor outlet and protect it from the elements with a weatherproof cover and housing. Remember to prioritize safety during the installation process and consult a professional if you are unsure about any electrical work.
Restoring Power To The Electrical Circuit
Once you have successfully installed the outdoor outlet, the next step is to restore power to the electrical circuit. This is an important step that ensures the outlet will function properly and provide the power you need for your outdoor devices. In this section, we will discuss how to turn the power back on at the electrical panel and how to test the outdoor outlet to ensure it is functioning correctly.
Turning the power back on at the electrical panel
Before you can use the outdoor outlet, you need to turn the power back on at the electrical panel. Follow these steps to do so:
- Locate the electrical panel in your home.
- Open the panel door by carefully removing the screws that secure it.
- Look for the circuit breaker that corresponds to the outdoor outlet. It may be labeled as “outdoor” or “external.”
- Find the breaker switch that controls the circuit and ensure it is in the “off” position.
- Flip the breaker switch to the “on” position. You should hear a click sound indicating that the power has been restored.
- Close the panel door and securely tighten the screws to ensure it is properly sealed.
Testing the outdoor outlet to ensure proper functionality
Now that the power has been restored to the electrical circuit, it’s time to test the outdoor outlet to ensure it is functioning correctly. Follow these steps to test the outlet:
- Plug a device, such as a lamp or phone charger, into the outlet.
- Turn on the device to check if it is receiving power from the outlet.
- If the device does not turn on, double-check the breaker switch at the electrical panel to make sure it is in the “on” position.
- If the breaker switch is in the correct position and the device still does not turn on, there may be an issue with the wiring or installation of the outlet. It’s best to contact a licensed electrician for further assistance.
- If the device turns on and functions properly, congratulations! Your outdoor outlet is now ready for use.
By following these steps, you can confidently restore power to the electrical circuit and test the outdoor outlet to ensure proper functionality. Enjoy the convenience and flexibility of having power outdoors for all your electrical needs.
Securing And Waterproofing The Installation
When it comes to installing an electrical outlet outside your home, one of the most crucial aspects is securing and waterproofing the installation. This step is vital to ensure the safety and longevity of the outlet, as it protects it from the elements and prevents any potential electrical hazards. In this section, we will discuss how to secure the electrical wiring and conduit in place, as well as how to apply weatherproof sealant around the outlet and electrical box.
Securing the Electrical Wiring and Conduit in Place
To secure the electrical wiring and conduit in place, follow these steps:
- Begin by mounting the electrical box onto a sturdy surface, such as a wall or post. Make sure the box is positioned at the desired height and location.
- Next, secure the conduit to the electrical box using appropriate clamps or connectors.
- Carefully guide the electrical wiring through the conduit, ensuring it is properly aligned and secured.
- Use cable ties or clamps to secure the wiring to the conduit at regular intervals, preventing any movement or strain on the connections.
- Finally, make sure to tighten all connections and securely fasten any exposed wiring to the electrical box.
Applying Weatherproof Sealant Around the Outlet and Electrical Box
To ensure the outlet and electrical box are properly sealed and protected against the elements, follow these steps:
- First, clean the surface of the electrical box and surrounding area to remove any dirt, debris, or moisture.
- Apply a generous amount of weatherproof sealant around the edges of the electrical box, creating a tight seal between the box and the wall or post.
- Next, insert the outlet into the electrical box, making sure it fits securely and snugly.
- Apply additional sealant around the outlet, sealing any gaps or openings.
- Smooth out the sealant using a caulking tool or your finger to ensure a clean and even finish.
- Allow the sealant to dry and cure according to the manufacturer’s instructions.
By following these steps, you can effectively secure and waterproof your outdoor outlet installation. Remember to always prioritize safety and consult a qualified electrician if you are unsure about any aspect of the installation process. Now that you have successfully secured and waterproofed your outdoor outlet, you can confidently enjoy the convenience of power in your outdoor living space.
Final Inspection And Safety Checks
After you have completed the installation process for your outdoor electrical outlet, it is essential to conduct a final inspection and perform necessary safety checks. This step is crucial to ensure that the installation has been done correctly and that it complies with local electrical codes. By doing so, you can have peace of mind knowing that your outdoor outlet is safe and functional.
Conducting a visual inspection of the installation
Once you have finished installing the outdoor electrical outlet, the first step of your final inspection is to visually inspect the entire installation. Take a close look at all components, including the outlet box, the wiring connections, and any conduit or weatherproof coverings. Look for any signs of damage, such as exposed wires or loose connections, which could pose safety hazards or affect the functionality of the outlet.
If you notice any issues during this visual inspection, it is crucial to address them immediately. Replace damaged components, tighten loose connections, and ensure that all wiring is properly secured. By taking care of these issues promptly, you can maintain the safety and efficacy of your outdoor outlet.
Verifying compliance with local electrical codes
Aside from the visual inspection, it is equally important to verify that your outdoor electrical outlet adheres to local electrical codes. These codes are in place to ensure the proper and safe operation of electrical installations. Failure to comply with these codes may result in electrical hazards or regulatory violations.
Consult your local building codes or electrical regulations to determine the specific requirements for outdoor electrical outlets in your area. Some common code requirements include the distance between the outlet and nearby water sources, the use of appropriate weatherproof coverings, and the capacity of the outlet to handle the intended load. Ensure that your installation meets these requirements to ensure safe and code-compliant operation.
To verify compliance, you may also consider contacting a licensed electrician or scheduling an inspection by a certified professional. Their expertise will help confirm that your installation aligns with all applicable electrical codes and standards.
| Key Points for Visual Inspection: | Key Points for Compliance Verification: |
|---|---|
|
|
By conducting a visual inspection and verifying compliance with local electrical codes, you are taking the necessary steps to ensure the safety and functionality of your outdoor electrical outlet. Following these final inspection and safety checks will give you peace of mind and help you enjoy your outdoor electrical amenities with confidence.
Frequently Asked Questions
Can You Install A Regular Outlet Outside?
Yes, you can install a regular outlet outside. However, it is crucial to use a weatherproof outlet cover and ensure proper grounding to protect against moisture and other environmental elements. Also, consider hiring a licensed electrician to ensure the installation is done safely and according to local electrical codes.
What Do I Need To Install An Outdoor Outlet?
To install an outdoor outlet, you will need the following: outdoor outlet box, weatherproof cover, electrical wire, electrical connectors, a grounding rod and clamp, a circuit breaker, and a GFCI outlet. Make sure to follow local codes and regulations for installation.
How Much Does It Cost To Add An Electrical Outlet Outside?
The cost of adding an electrical outlet outside typically ranges from $200 to $500. This includes the installation of the outlet, wiring, and labor charges. Prices may vary based on factors like the location of the outlet, distance from the electrical panel, and complexity of the installation.
How Do I Change An Indoor Outlet To An Outdoor Outlet?
To change an indoor outlet to an outdoor outlet, follow these steps: 1. Turn off the power to the outlet from the breaker panel. 2. Install a weatherproof electrical box in place of the current indoor box. 3. Run weatherproof conduit from the box to the outdoor location.
4. Connect the wiring to the new outdoor outlet, following electrical codes. 5. Securely mount the outlet and cover with a weatherproof cover plate.
Conclusion
Installing an outdoor outlet can be a simple and rewarding project that enhances the functionality and convenience of your outdoor space. By following the step-by-step instructions outlined in this blog post, you can safely and effectively install an outlet outside.
Remember to prioritize safety and consult with a professional if you are unsure about any step of the process. Adding an outdoor outlet can make your outdoor activities more enjoyable and bring added value to your home. So get started today and elevate your outdoor living experience!