To install an outlet for an electric stove, you need to follow these steps: turn off the power, determine the location for the outlet, run the electrical wiring from the breaker box to the outlet location, install the outlet box and cover plate, connect the wiring to the outlet, and finally, test the outlet for proper functionality. Installing an outlet for an electric stove is a relatively simple process, but it requires careful attention to detail and adherence to safety precautions.
By following these steps, you can ensure that your electric stove is properly powered and ready to use.
Tools And Materials Needed
Before you begin installing an outlet for your electric stove, it’s important to gather all the necessary tools and materials. Having everything prepared in advance will save you time and ensure a smooth installation process. Below are the essential tools and materials you will need:
Tools:
- A screwdriver (both flathead and Phillips)
- A wire stripper
- A wire cutter
- A voltage tester
- A drill (if required for wall mounting)
- A level (if required for wall mounting)
- A measuring tape
- An electrical tape
- A pair of pliers
Materials:
- An electrical outlet box
- A GFCI outlet
- An outlet cover plate
- Electrical wire (make sure it matches the voltage and amperage requirements of your electric stove)
- Wire connectors
- A junction box (if necessary)
- Mounting screws
- Wire staples (if necessary for cable management)
With these tools and materials at your disposal, you are now ready to proceed with installing an outlet for your electric stove. Remember to prioritize safety, follow local electrical codes, and consult a professional if you are unsure about any aspect of the installation process.
Assessing Electrical Requirements
Assessing the electrical requirements is a crucial step when it comes to installing an outlet for an electric stove. It ensures that you have the appropriate electrical circuit and wiring in place to safely power your stove and prevent any mishaps or electrical failures. In this section, we will walk you through the process of understanding the electrical requirements and determining the right circuit for your stove outlet. Let’s get started!
Understand the electrical requirements for installing the outlet for an electric stove.
Before you begin the installation process, it is important to familiarize yourself with the electrical requirements for your electric stove. This will help you determine the appropriate voltage, amperage, and wiring specifications needed for your stove outlet.
Here are some key factors to consider:
- Voltage: Electric stoves generally require a 240-volt power supply. Make sure your electrical system can provide this voltage.
- Amperage: The amperage rating for your electric stove will depend on its size and power requirements. Check the manufacturer’s specifications or refer to the stove’s user manual to find the recommended amperage.
- Wiring: You will need to ensure that the wiring in your electrical system is compatible with the amperage and voltage requirements of your electric stove. If necessary, consult a professional electrician to assess and upgrade your wiring if needed.
Determine the appropriate electrical circuit for the stove outlet.
Once you have a clear understanding of the electrical requirements, the next step is to determine the appropriate electrical circuit for your stove outlet. This involves assessing the amperage and voltage requirements, as well as the location of the outlet.
Here are some guidelines to follow:
- An electric stove typically requires a dedicated circuit, which means it should have its own dedicated circuit breaker in your electrical panel.
- The amperage rating of the circuit breaker should match the amperage rating specified by the stove manufacturer.
- The wiring from the circuit breaker to the stove outlet should be sized appropriately to handle the load.
- Consider the location of the stove outlet in relation to the electrical panel. It should be positioned in a convenient and accessible location, while also considering safety precautions.
By understanding the electrical requirements and determining the appropriate electrical circuit, you can ensure a safe and efficient installation of an outlet for your electric stove. If you’re unsure about any aspect of the process, don’t hesitate to consult a professional electrician for guidance and assistance.
Planning The Installation
Before you start installing an outlet for your electric stove, it is important to carefully plan the process. This involves choosing the location for the outlet, measuring the distance from the main electrical panel to the installation site, and considering safety regulations and clearances. By properly planning the installation, you can ensure a safe and efficient setup for your electric stove.
Choose the location for the outlet
First and foremost, you need to choose the most appropriate location for the outlet. This will depend on a few factors such as the layout of your kitchen, the proximity to the stove, and the availability of space on the wall. It is essential to select a location that is easily accessible and does not interfere with any existing structures or appliances. Keep in mind that the outlet should be within a reasonable distance from the stove so that the power cord can reach without any issues.
Measure the distance from the main electrical panel to the installation site
Next, you need to measure the distance from the main electrical panel to the planned installation site. This step is important to determine the length of the wiring and the necessary materials for the installation. Take accurate measurements, ensuring there are no obstacles or obstructions along the path. It is recommended to add some extra length to allow for flexibility during the installation process.
Consider safety regulations and clearances for the installation
When installing an outlet for an electric stove, it is crucial to consider safety regulations and clearances. These regulations are in place to ensure the safe operation of the stove and minimize the risk of electrical hazards. Make sure to adhere to the minimum clearances specified by the manufacturer and local electrical codes. This includes maintaining sufficient clearance from combustible materials and other appliances. Additionally, ensure that the outlet is protected by a properly sized circuit breaker for the stove’s power requirements.
By carefully planning the installation of an outlet for your electric stove, you can create a safe and efficient electrical setup in your kitchen. Remember to choose a suitable location for the outlet, measure the distance from the main electrical panel, and adhere to safety regulations and clearances. Stay tuned for the next steps in installing an outlet for your electric stove.

Shutting Off Power And Preparing The Area
HTML Format Writing:
When it comes to installing an outlet for an electric stove, it is crucial to prioritize safety. Shutting off the power supply to the area where the installation will take place is the first step in ensuring a safe and successful installation process. Additionally, clearing the work area and creating a safe working environment is essential. In this blog post, we will guide you through these important steps to help you install an outlet for your electric stove efficiently and securely.
Turn off the power supply to the area where the installation will take place
The foremost step in the installation process is to turn off the power supply. This is vital to avoid any electrical hazards during the installation. In order to do this, you will need to locate the circuit breaker box in your home. Once you have found it, follow these steps:
- Identify the circuit breaker dedicated to the stove’s electrical outlet.
- Switch the circuit breaker to the “off” position (usually by flipping the switch to the opposite side).
- Ensure that the power has been successfully shut off by testing the outlet with a multimeter or plugging in a small electrical device and checking if it works.
Clear the work area and ensure a safe working environment
After shutting off the power supply, it is crucial to clear the work area and prepare a safe working environment. This will help prevent accidents and ensure a smooth installation process. Here are some important steps to follow:
- Remove any appliances or obstacles near the area where you will be installing the outlet.
- Ensure there is sufficient lighting in the area to see what you are doing clearly.
- Wear appropriate safety gear, such as gloves and goggles, to protect yourself from any potential hazards.
- Keep a fire extinguisher nearby, just in case of an emergency.
By taking these precautionary measures, you can create a safe environment for the installation process. Following these steps will help you install an outlet for your electric stove securely, minimizing any potential risks or accidents.
Installing The Electrical Outlet Box
Installing an electrical outlet box for your electric stove is an important step in ensuring the safety and functionality of your appliances. The electrical outlet box provides a secure connection point for the stove’s power supply, allowing you to power your stove efficiently and without any issues. In this guide, we will walk you through the necessary steps to install the electrical outlet box at the chosen location and secure it properly.
Install the electrical outlet box at the chosen location
To start with, you need to choose a suitable location for installing the electrical outlet box. It should be conveniently located near the electric stove for easy access. However, make sure to follow the local building codes and guidelines to ensure compliance and safety.
Once you have identified the ideal location, mark it on the wall using a pencil or marker. Take into consideration the distance from other appliances and the height that will allow for easy plug insertion.
Follow the necessary steps to mount the box securely
Now that you have determined the location, it’s time to mount the electrical outlet box securely. Here are the steps to follow:
- Turn off the power supply to the area where you will be working. This is crucial to prevent any electrical accidents or injuries.
- If there is already an existing electrical outlet box, remove it from the wall. Use a screwdriver to loosen the screws and gently pull the outlet box out from the wall.
- Prepare the new electrical outlet box by removing any excess packaging materials and accessories that might be included.
- Hold the electrical outlet box against the marked location on the wall and use a pencil to trace its outline.
- Use a stud finder to locate the nearby studs in the wall. This will help you determine where to secure the electrical outlet box.
- Align the electrical outlet box with the traced outline and mark the positions of the mounting holes on the wall.
- Using a power drill, create pilot holes at the marked positions. Make sure the drill bit size matches the screws or anchors you will be using.
- Secure the electrical outlet box to the wall by inserting screws or anchors into the pilot holes. Ensure the box is tightly attached and does not wobble.
- Double-check the alignment and stability of the electrical outlet box before proceeding further.
By following these steps, you can successfully install the electrical outlet box for your electric stove. This will not only ensure a safe and reliable power supply but also make it convenient for you to use your electric stove without any hassles.
Remember, if you are unsure about any step or encounter any difficulties, it is always recommended to consult a professional electrician to ensure proper installation and adherence to safety standards.
Wiring The Outlet
Connect the electrical wires to the outlet box according to the circuit requirements
When it comes to wiring the outlet for your electric stove, it is essential to follow the circuit requirements to ensure safe and efficient operation. This involves connecting the electrical wires to the outlet box correctly. Before you begin, make sure you have the necessary tools and materials such as wire strippers, pliers, electrical tape, and a screwdriver.
To start, turn off the power supply to the circuit at the main electrical panel to avoid any accidents. Identify the circuit breaker that controls the stove and switch it off. Double-check with a voltage tester to ensure that there is no power flowing to the outlet.
Now, carefully remove the cover plate and unscrew the screws holding the old outlet in place. Gently pull the outlet out of the box, being cautious not to disturb any wires connected to it. After removing the old outlet, it’s time to connect the new one.
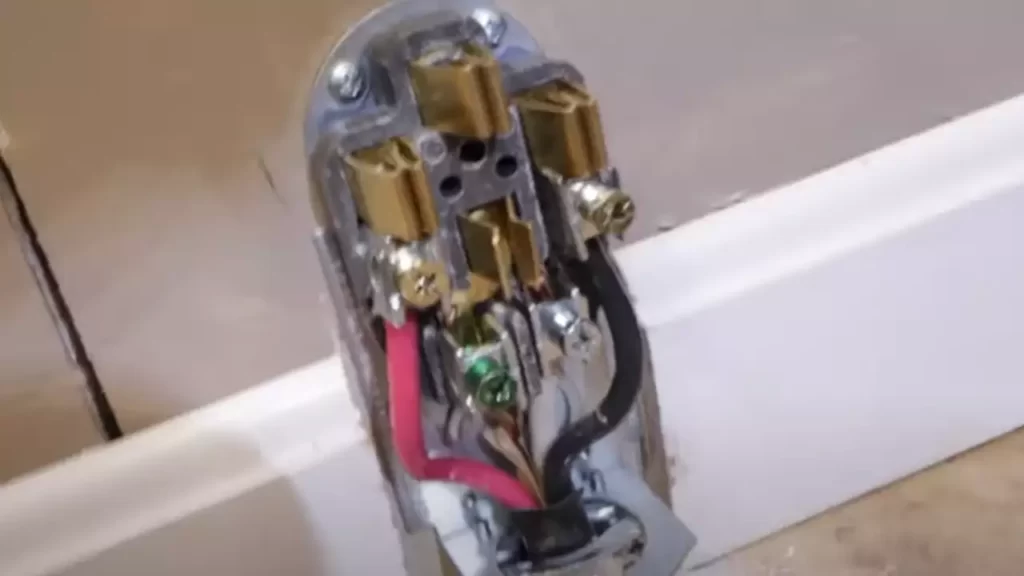
Take note of the wiring instructions provided with the new outlet. Most commonly, you will have three wires to work with: a black (hot) wire, a white (neutral) wire, and a bare copper or green (ground) wire.
Step 1: Strip about ¾ inch of insulation from the ends of each wire using wire strippers.
Step 2: Connect the black wire to the brass or dark-colored terminal screw on the outlet. Loosen the screw, wrap the wire clockwise around it, and tighten it securely.
Step 3: Connect the white wire to the silver or light-colored terminal screw on the outlet. Again, loosen the screw, wrap the wire clockwise around it, and tighten it firmly.
Step 4: Connect the bare copper or green wire to the green screw or grounding terminal on the outlet, ensuring proper grounding for safety. Tighten the screw to secure the wire.
Step 5: Make sure there are no loose strands of wire or exposed copper, as this could lead to electrical issues. Gently push the wires back into the outlet box, being careful not to overcrowd it.
Once the wires are securely connected, carefully push the outlet into the outlet box, ensuring that it sits flush with the wall. Fasten it in place with the screws provided.
Remember, electrical work should always adhere to safety standards and regulations. If you are unsure about any step or encounter any complications while wiring the outlet, it is best to consult a professional electrician.
Ensure proper grounding for safety
Proper grounding is crucial when installing an outlet for your electric stove. It provides a safe pathway for electrical currents to flow, minimizing the risk of electric shock or damage to the appliance. To ensure proper grounding, follow these steps:
1. Connect the bare copper or green wire to the grounding terminal on the outlet, or to a grounding wire or screw in the outlet box.
2. Securely tighten the screw to ensure a solid connection.
3. Check for any loose strands of wire or exposed copper, as these can compromise the grounding.
4. Verify that the outlet box itself is properly grounded. Ensure that it is securely fastened to a grounded metal junction box or that it is properly grounded through the electrical system’s grounding conductor.
Remember, proper grounding is not only essential for safety but also helps protect the electrical system and appliances in your home. If you have any doubts or concerns about grounding or electrical work in general, it is wise to seek professional assistance from a licensed electrician.
Connecting The Outlet To The Main Electrical Panel
Once you have successfully run the wiring from the outlet to the main electrical panel of your home, it’s time to connect them together. This step is crucial for ensuring the safe and efficient operation of your electric stove. Follow the necessary steps below to make the connection:
Run the wiring from the outlet to the main electrical panel
To connect the outlet to the main electrical panel, you first need to run the wiring from the outlet location to the panel. This will involve carefully routing the electrical cables through walls, floors, or ceilings to ensure they are hidden and protected.
Here are the steps to run the wiring:
- Locate the shortest and least obstructed pathway between the outlet location and the main electrical panel.
- Plan the routing of the cables, taking into consideration any obstacles or obstructions in the way.
- Measure and cut the electrical conduit or cable protectors to the appropriate lengths, allowing extra length for connections.
- Secure the conduit or cable protectors in place using appropriate fasteners, such as straps or clips.
- Carefully feed the electrical cables through the conduit or cable protectors, ensuring they are not damaged or twisted.
- Ensure that the cables are properly secured and protected along their entire length.
Follow the necessary steps to make the connection
Now that you have successfully run the wiring, it’s time to make the connection between the outlet and the main electrical panel. Follow these steps:
- Turn off the power to the main electrical panel at the circuit breaker or disconnect switch.
- Remove the cover of the main electrical panel to access the wiring and circuit breakers.
- Locate the appropriate circuit breaker for the electric stove outlet. If there isn’t one, you may need to install a dedicated circuit breaker.
- Connect the black or red wire from the outlet to the terminal of the circuit breaker.
- Connect the white wire from the outlet to the neutral bus bar in the electrical panel.
- Connect the bare copper or green wire from the outlet to the grounding bus bar in the electrical panel.
- Ensure all connections are tight and secure.
- Replace the cover of the main electrical panel.
- Turn on the power to the main electrical panel.
After completing these steps, your outlet should be properly connected to the main electrical panel, allowing you to safely and conveniently power your electric stove. Remember to always prioritize safety when dealing with electrical connections and, if in doubt, consult with a professional electrician.
Testing And Troubleshooting
Testing and Troubleshooting
Once you have successfully installed the outlet for your electric stove, it’s important to test its functionality and troubleshoot any potential issues that may arise. This step ensures that the outlet is properly installed and ready to be used safely and efficiently. In this section, we will guide you through the process of testing the outlet and provide troubleshooting tips in case you encounter any problems.
Test the outlet for functionality
To test the outlet for functionality, follow these steps:
- Make sure the electric stove is unplugged and turned off.
- Insert a multimeter into the outlet to measure the voltage. Set the multimeter to AC voltage mode and the appropriate range.
- Place the multimeter probes into the slots of the outlet – the black (negative) probe into the smaller slot and the red (positive) probe into the larger slot.
- Read the measurement displayed on the multimeter. In most cases, it should read around 240 volts for a typical electric stove.
- If the measurement is significantly lower or higher than the expected voltage, there may be an issue with the installation or the wiring. In this case, it is recommended to seek assistance from a qualified electrician to rectify the problem.
- Before moving on to troubleshooting, remove the multimeter probes from the outlet and ensure the stove is still unplugged.
Troubleshoot any potential issues that may arise
In some cases, you may encounter issues when testing the outlet or using the electric stove. Here are some troubleshooting tips to help you identify and resolve any problems:
- If the multimeter reading shows no voltage or a very low voltage (less than 100 volts), check the circuit breaker panel to ensure the breaker for the stove outlet is in the “ON” position. If it is off, switch it on and retest the outlet.
- If the voltage is still low or absent after verifying the circuit breaker, there may be a problem with the wiring. Inspect the outlet and surrounding wiring for any signs of damage or loose connections. If you are unsure or uncomfortable working with electrical wiring, contact a licensed electrician.
- In some cases, the issue may lie with the electric stove itself. Check the stove’s power cord for any damage or loose connections. If necessary, replace the power cord with a new one that is compatible with your stove model.
- If none of the above steps resolve the issue, it is advisable to consult a professional electrician who can evaluate the wiring and troubleshoot any complex problems that may be causing the malfunction.
Remember, safety should always be a top priority when working with electrical systems. If you are unsure or uncomfortable with any aspect of installing or troubleshooting the outlet for your electric stove, don’t hesitate to seek assistance from a trained professional.
Finishing Touches And Safety Measures
Now that you have successfully installed an outlet for your electric stove, it’s time to focus on the finishing touches and most importantly, the safety measures. These steps are crucial to ensure the longevity and efficient functioning of your stove, while also safeguarding your home from any potential electrical hazards. In this section, we will discuss how to securely mount the outlet cover and implement safety measures for a worry-free cooking experience.
Securely mount the outlet cover
Securing the outlet cover is essential to protect the electrical connections from dust, debris, and accidental tampering. You don’t want any loose wires or exposed outlets causing any mishaps. Follow these steps to securely mount the outlet cover:
- Ensure the power to the outlet is turned off before proceeding. Safety should always be your top priority.
- Remove the screws on the cover plate and set them aside. Keep them in a safe place to avoid losing them.
- Align the cover plate over the outlet and carefully screw it back into place. Make sure it sits flush against the wall without any gaps.
- Tighten the screws firmly, but avoid overtightening to prevent damaging the cover plate or the outlet itself.
By securely mounting the outlet cover, you not only enhance the aesthetics of your kitchen but also ensure the safety of everyone in your household.
Implement safety measures to prevent any electrical hazards in the future.
While the installation process is important, it’s equally crucial to take precautionary measures to prevent any potential electrical hazards in the future. Here are some safety measures you should implement:
- Keep the area around the outlet clear: Avoid placing any flammable objects, liquids, or other electrical appliances near the outlet to minimize the risk of fires or electrical shocks.
- Regularly inspect the outlet: Periodically check the outlet for any signs of wear, damage, or loose connections. If you notice anything unusual, it’s advisable to seek professional assistance.
- Install a ground fault circuit interrupter (GFCI) outlet: Installing a GFCI outlet provides an additional layer of protection by instantly cutting off the power supply if it detects any ground faults.
- Train household members on electrical safety: Educate everyone in your household, including children, about the importance of electrical safety, emphasizing the need to avoid tampering with outlets or electrical cords.
By following these safety measures, you can minimize the risk of electrical accidents and promote a safe cooking environment in your kitchen.
Final Verification And Safety Inspection
Once you have completed all the necessary steps to install an outlet for your electric stove, it is crucial to perform a final verification and safety inspection to ensure that everything is in perfect working order. This will not only give you peace of mind but also ensure the safety of your home and family. In this section, we will discuss the importance of double-checking all connections and securing them properly. Additionally, we will consider the option of hiring a professional for a safety inspection, if desired.
Double-check all connections and ensure everything is secured properly
It is essential to double-check all the connections you have made during the installation process. This includes verifying that the wires are properly connected and secured to the outlet, breaker, and stove. Loose connections can not only cause the stove to malfunction but also pose a significant safety hazard. Therefore, take the time to ensure that all the connections are tight and secure.
Here are a few key steps to follow:
- Inspect the wiring connections*tables for HTML
- Check for any loose or exposed wires
- Tighten all terminal screws securely
- Ensure all wire nuts are properly fastened
- Verify that the wires are connected to the correct terminals
By meticulously reviewing each connection and employing these measures, you can be confident that your electric stove outlet is installed correctly and will function safely.
Consider hiring a professional for a safety inspection if desired
If you have any doubts or concerns about the installation process or your ability to perform a comprehensive safety inspection, it is highly recommended to hire a professional electrician. A licensed electrician will have the expertise and knowledge to assess the installation thoroughly and verify that all electrical components meet the necessary safety requirements.
Benefits of hiring a professional include:
- Expertise in electrical systems and safety protocols
- Compliance with local electrical codes and regulations
- Potential identification of any hidden safety hazards
- Verification of proper grounding
While hiring a professional might entail an additional cost, it is a small price to pay for the peace of mind that comes with knowing your electric stove outlet is installed safely and correctly.
In conclusion, the final verification and safety inspection of your installed outlet for an electric stove are of utmost importance. Double-checking all connections and ensuring they are secured properly will minimize the risk of any electrical issues. Additionally, considering the option of hiring a professional electrician can provide an extra layer of security and assurance. By taking these steps, you can enjoy cooking with your electric stove with the peace of mind that your electrical system is safe and reliable.
Frequently Asked Questions
Do Electric Stoves Need A Special Outlet?
No, electric stoves do not require a special outlet. They can be plugged into a standard 120-volt outlet.
Can You Plug An Electric Stove Into Any Outlet?
No, an electric stove requires a specific outlet with higher voltage and amperage. Using a regular outlet can cause damage or fire hazards. Always consult a professional electrician for the correct installation.
How Much Does It Cost To Install A 240V Outlet For A Stove?
The cost of installing a 240v outlet for a stove can range from $200 to $500, depending on factors such as location and electrical work needed. It is best to consult with a licensed electrician for an accurate estimate.
Where Should Electric Stove Outlets Be Placed?
Electric stove outlets should be placed in a location that allows easy access for plugging in the stove. It is recommended to install the outlet close to the stove, preferably within reach but not directly above it, to prevent any accidental contact with water or other liquids.
Additionally, hiring a professional electrician for installation is advised to ensure safety and compliance with electrical codes.
Conclusion
To sum it up, installing an outlet for an electric stove is a relatively straightforward process that can be done with a few steps. By ensuring you have the right tools, following the necessary safety precautions, and carefully connecting the wires, you can have a functional outlet in no time.
Remember to always consult a professional if you’re unsure about any steps or need assistance. With this guide, you’ll be able to enjoy cooking on your electric stove hassle-free.