To install an Ethernet jack, first, locate the desired location on the wall and carefully measure and mark the spot. Then, drill a hole through the wall and feed the Ethernet cable through.
Lastly, attach the Ethernet jack to the wall plate and connect the wires following the specified color scheme. Ensure a secure connection by tightening the appropriate screws and test the connection for functionality. Installing an Ethernet jack is a straightforward process that can significantly improve the speed and reliability of your internet connection.
Whether you’re setting up a home office or expanding your network, having a wired connection can provide a stable and high-speed connection for your devices. In this guide, we will walk you through the step-by-step process of installing an Ethernet jack on your wall. By following these simple instructions, you’ll be able to enjoy a seamless and efficient wired internet connection in no time. So let’s get started!
Gathering The Necessary Tools And Materials
Before you begin the installation process for an Ethernet jack, it is essential to gather all the necessary tools and materials to ensure a smooth and successful installation. Having everything prepared in advance will prevent delays and frustration during the process. In this section, we will outline the tools and materials you will need.
Ethernet jack
An Ethernet jack is the main component that will enable you to connect your devices to the network. Ensure that you have a high-quality Ethernet jack that is compatible with your network requirements. This could be a Cat5e, Cat6, or Cat6a jack, depending on the speed and performance you desire. Make sure to choose an Ethernet jack that matches your needs.
Ethernet cable
An Ethernet cable is the physical connection that will transfer data between your devices and the network. You will need an Ethernet cable of the appropriate length to reach from the Ethernet jack to your network devices. It is recommended to use a high-quality, shielded Ethernet cable for better performance and reliability.
Wall plate
A wall plate acts as a secure and neat enclosure for your Ethernet jack. It provides a professional finish to the installation and protects the Ethernet jack from accidental damage. Make sure to choose a wall plate that matches the design and specifications of your Ethernet jack. It should also have appropriate ports to accommodate the number of Ethernet jacks you wish to install.
Screwdriver
A screwdriver is an essential tool for attaching the Ethernet jack and wall plate to the wall or surface. Make sure to use a suitable screwdriver with the correct size and type of screws provided with your Ethernet jack and wall plate. Using the right screwdriver will ensure a secure installation and prevent any damage to the wall or surface.
Cable tester
A cable tester is an invaluable tool to ensure that your Ethernet cable is properly connected and functioning. It allows you to verify the integrity of the cable and detect any faults or connectivity issues. Having a cable tester will help you troubleshoot and fix any problems that may arise during or after the installation process. Make sure to have a reliable cable tester to ensure a successful installation.
By gathering these tools and materials, you will be ready to proceed with the installation process confidently. Having everything prepared will save you time and ensure that your Ethernet jack installation is done securely and professionally.

Understanding The Ethernet Jack
Understanding the Ethernet Jack is essential for anyone looking to install a wired network connection. The Ethernet jack, also known as an RJ-45 jack, is used to connect Ethernet cables to devices such as computers, routers, and switches. In this section, we will explore what an Ethernet jack is, the different types available, and how it works.
What is an Ethernet jack?
An Ethernet jack, formally known as a Registered Jack 45 (RJ-45), is a connector that allows you to plug in an Ethernet cable and establish a wired network connection. It is the industry standard for Ethernet connections and is widely used in both residential and commercial networking.
Designed with eight pins, the Ethernet jack provides a reliable and secure connection, ensuring high-speed data transfer between devices. It follows a specific wiring configuration, which we will discuss in more detail later.
Different types of Ethernet jacks
There are various types of Ethernet jacks available, each catering to different networking requirements. The most commonly used types include:
| Type | Description |
|---|---|
| Cat 5e jack | Compatible with Category 5e cables, which support up to gigabit Ethernet speeds. |
| Cat 6 jack | Designed for Category 6 cables, capable of handling up to 10 gigabit Ethernet speeds. |
| Cat 6a jack | Specifically made for Category 6a cables, enabling even faster 10 gigabit Ethernet speeds over longer distances. |
| Cat 7 jack | The highest category for Ethernet cables, providing superior performance and shielding against interference. |
Choosing the right type of Ethernet jack depends on your network requirements and the speed you wish to achieve. It’s essential to match the jack with the corresponding cable category to ensure optimal performance.
How does an Ethernet jack work?
The Ethernet jack works by establishing a physical connection between devices through the Ethernet cable. The eight pins inside the jack align with the corresponding wires within the cable, creating a pathway for data transmission.
When the Ethernet cable is inserted into the jack, the pins make contact with the wires, creating a continuous electrical connection. This allows the flow of data signals between devices, enabling communication and file sharing on the network.
The Ethernet jack follows a specific wiring scheme known as T568A or T568B, which ensures proper connectivity and compatibility with Ethernet standards. Each pin within the jack connects to a specific wire within the Ethernet cable, facilitating the transfer of data in the correct order.
In conclusion, understanding the Ethernet jack is crucial when it comes to installing a wired network connection. It serves as the key component for establishing a reliable and high-speed Ethernet connection. By selecting the appropriate type of Ethernet jack and following the correct wiring scheme, you can create a robust network infrastructure that meets your connectivity needs.

Planning The Installation
Planning the Installation
Installing an Ethernet jack requires careful planning to ensure a smooth and efficient process. Taking the time to plan before starting the installation will save you time and frustration later on. This section will cover the essential steps in planning the installation, including choosing the location and measuring and marking the spot.
Choosing the Location
Before installing an Ethernet jack, it’s crucial to choose the right location. Consider the following factors when selecting the spot for your Ethernet jack:
- Proximity to the main network source: Choose a location that is as close as possible to the main network source, such as your router or modem. This will help ensure a strong signal and faster connection speeds.
- Accessibility: Select a location that is easily accessible and convenient for connecting your devices. Avoid areas that are obstructed by furniture, walls, or other obstacles.
- Noise interference: Avoid areas with high levels of electrical interference, such as near electrical outlets or appliances. This can cause signal degradation and affect network performance.
- Future expansion: Consider whether you may need to expand your network in the future. Choosing a central location with enough space for additional Ethernet jacks allows for easy expansion.
Measuring and Marking the Spot
Once you have chosen the location for your Ethernet jack, the next step is to measure and mark the spot where it will be installed. Follow these steps to ensure accurate measurements:
- Measure the distance from the main network source to the installation location. Use a measuring tape to determine the exact length of Ethernet cable you will need.
- Clear the area around the installation spot. Remove any furniture or items that may obstruct the installation process.
- Using a pencil or marker, mark the exact spot where the Ethernet jack will be installed. Double-check the measurements and ensure the spot aligns with the chosen location.
- Prepare the necessary tools and materials for the installation, such as a drill, wall plate, Ethernet cable, and a punch-down tool.
With these planning steps taken care of, you are now ready to move on to the next phase of the installation process. Planning is vital to ensure a seamless installation and optimal network performance. Take the time to choose the right location and measure and mark the spot accurately. In the next section, we will cover the installation process in detail, guiding you through each step.
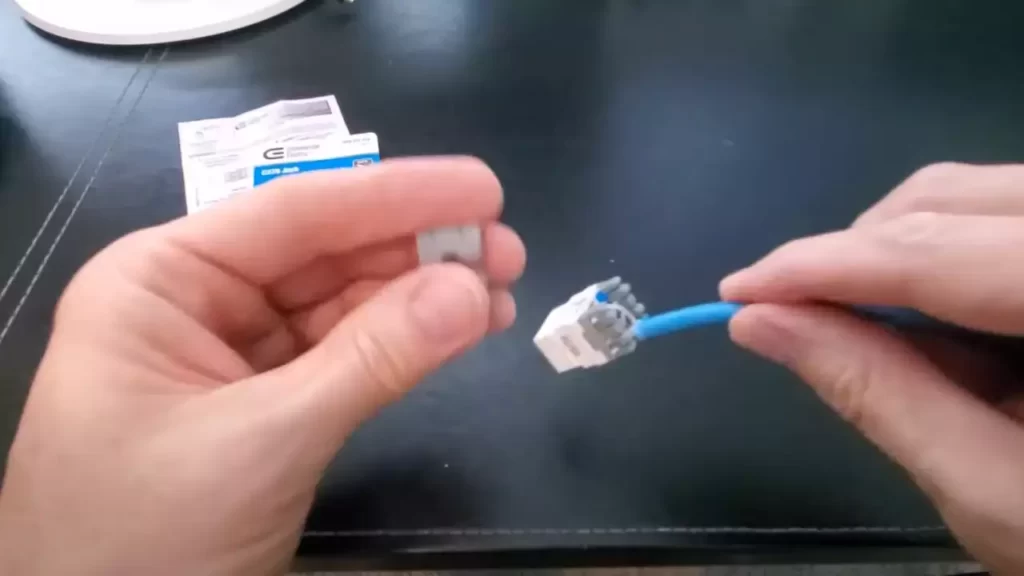
Wiring The Ethernet Jack
Installing an Ethernet jack can seem like a daunting task, but with a little guidance, you can do it yourself. It’s essential to wire the Ethernet jack correctly to ensure a reliable and fast internet connection. In this section, we will walk you through the steps of wiring the Ethernet jack, including stripping the Ethernet cable, identifying the color codes, connecting the wires to the jack, and securing the connections. Let’s get started!
Stripping the Ethernet cable
Before you begin wiring the Ethernet jack, you’ll need to strip the outer protective covering of the Ethernet cable. This step is crucial as it exposes the inner wires required for the connection. Here’s how you can do it:
- Using a cable stripper, carefully score the outer covering of the Ethernet cable.
- Gently pull the scored part of the cable, separating the outer insulation from the inner wires.
- Continue pulling until you have a few inches of the inner wires exposed.
Identifying the color codes
Now that you have exposed the inner wires, it’s time to identify the color codes. Each wire within the Ethernet cable has a different color and serves a specific purpose. Here are the color codes you’ll commonly encounter:
| Color Code | Wire Function |
|---|---|
| Blue | Data Positive (TD+) |
| Blue-White | Data Negative (TD-) |
| Orange | Data Positive (RD+) |
| Orange-White | Data Negative (RD-) |
| Green | Power over Ethernet (PoE) |
| Green-White | Power over Ethernet (PoE) |
| Brown | Unused wire |
| Brown-White | Unused wire |
Connecting the wires to the jack
Now that you know the color codes and their corresponding functions, it’s time to connect the wires to the Ethernet jack. Follow these steps:
- Untwist the inner wires of the Ethernet cable.
- Arrange the wires in the order specified by the Ethernet jack (usually T568B or T568A standard).
- Trim the excess wire ensuring each wire is approximately 0.5 inches in length.
- Insert the wires into their respective slots following the color code scheme.
Securing the connections
To ensure a seamless connection, it’s crucial to secure the connections properly. Here’s how you can do it:
- Using a crimping tool, press down firmly on the Ethernet jack to secure the wires in place.
- Inspect each wire to ensure it is fully inserted into its assigned slot.
- Double-check the color codes to confirm accurate placement.
- Once you are confident in the connections, give the Ethernet jack a gentle tug to ensure it stays in place.
By following these steps, you’ll have successfully wired your Ethernet jack. Now you can enjoy a reliable and fast internet connection for all your devices!

Mounting The Ethernet Jack
Mounting the Ethernet jack is a crucial step in installing a reliable and efficient network connection in your home or office. By correctly positioning the jack on the wall plate, you ensure seamless connectivity and prevent any potential issues down the line. In this guide, we will walk you through the process of mounting the Ethernet jack onto the wall plate, ensuring a secure and professional installation.
Installing the wall plate
The first step in mounting the Ethernet jack is to install the wall plate. Before you begin, ensure that you have all the necessary tools, including a screwdriver, wall plate, and Ethernet jack. To install the wall plate, follow these steps:
- Start by identifying the ideal location for the Ethernet jack. Choose a spot that is easily accessible and near the desired network connection.
- Once you have determined the location, hold the wall plate against the wall and mark the screw holes with a pencil.
- Using a screwdriver, insert the screws into the marked holes and firmly attach the wall plate to the wall.
Mounting the Ethernet jack onto the wall plate
After successfully installing the wall plate, it’s time to mount the Ethernet jack onto it. Follow these steps to ensure a secure and efficient connection:
- Position the Ethernet jack so that the wiring connections align with the corresponding ports on the wall plate.
- Securely attach the Ethernet jack to the wall plate by inserting the screws through the holes on the jack and tightening them with a screwdriver.
- Check the connection to ensure that the Ethernet jack is firmly mounted and does not move or wiggle. This will prevent any potential disconnections or interruptions in your network connection.
By effectively mounting the Ethernet jack onto the wall plate, you create a stable and reliable connection for your network. Taking the time to properly position and secure the jack will save you from future headaches and ensure a seamless networking experience.
Testing The Ethernet Connection
Testing the Ethernet Connection
To ensure that your Ethernet jack installation is successful and functioning properly, it is important to test the Ethernet connection. Testing the connection not only confirms that the installation was done correctly but also helps identify any potential issues or problems that may arise. In this section, we will discuss the importance of using a cable tester to check the connection, troubleshooting common issues, and ensuring a stable and reliable Ethernet connection.
Using a Cable Tester to Check the Connection
One of the most effective ways to test the Ethernet connection is by using a cable tester. A cable tester is a handy tool that helps identify wiring faults and confirms the connectivity of the Ethernet cable. To use a cable tester, follow these simple steps:
1. Connect the cable tester to one end of the Ethernet cable that is plugged into the Ethernet jack on both ends.
2. Activate the cable tester and wait for the results.
3. The cable tester will display the status of the Ethernet connection, indicating whether it is working properly or if there are any issues, such as open circuits or crossed wires.
If the cable tester detects any problems with the wiring, you may need to inspect and re-terminate the connections to fix the issue. It is important to ensure that the Ethernet cable is correctly terminated, with each wire securely attached to its corresponding pin.
Troubleshooting Common Issues
Sometimes, even after a successful installation, you may encounter issues with your Ethernet connection. Here are some common problems you may encounter and how to troubleshoot them:
1. No connectivity: If the Ethernet connection is not working at all, first ensure that both ends of the cable are securely plugged in. You can also try using a different Ethernet cable or testing the cable with another device to determine if the issue lies with the cable itself.
2. Slow or intermittent connection: If you are experiencing slow or intermittent connection issues, it could be due to network congestion, interference, or outdated equipment. Try restarting your modem and router, ensuring they are up to date with the latest firmware. Additionally, check for any potential sources of interference, such as other electronic devices or physical obstructions, and relocate your equipment if necessary.
3. Inconsistent speeds: If you are not getting the expected speeds from your Ethernet connection, consider factors such as the quality of the Ethernet cable, the capability of your devices, and the speed of your internet service provider. Upgrading to a higher-quality Ethernet cable and ensuring your devices can handle higher speeds may help improve your connection’s performance.
Ensuring a Stable and Reliable Connection
To ensure a stable and reliable Ethernet connection, it is essential to consider the following:
1. Use high-quality Ethernet cables: Investing in high-quality Ethernet cables can make a significant difference in the stability and reliability of your connection. Opt for cables that are certified for the desired speed and length requirements.
2. Proper cable management: Avoid tangling or bending Ethernet cables excessively, as these can cause signal degradation. Use cable ties or clips to secure and organize the cables neatly.
3. Avoid interference: Keep your Ethernet cables away from potential sources of interference, such as power cables, fluorescent lights, and electronic devices. This helps minimize signal disturbances and ensures a more stable connection.
In summary, testing the Ethernet connection is crucial to verify a successful installation and identify any issues that may affect the connection’s performance. Using a cable tester, troubleshooting common issues, and implementing measures for a stable and reliable connection can optimize your Ethernet setup. By following these steps, you can enjoy a seamless and efficient network experience.
Frequently Asked Questions
How Do You Wire An Ethernet Jack?
To wire an Ethernet jack, follow these steps: 1. Strip the cable’s outer insulation. 2. Separate the cable’s twisted pairs. 3. Arrange the wires according to the assigned color code. 4. Insert the wires into the Ethernet jack’s terminals. 5.
Use a punch-down tool to secure the wires in place.
Can I Get An Ethernet Port Installed?
Yes, you can have an Ethernet port installed. It allows you to connect your device to a wired network for faster and more stable internet access. Contact a professional to install the Ethernet port for you.
Do You Need Ethernet Jack For Wifi?
No, you don’t need an Ethernet jack for WiFi. WiFi is wireless and does not require a physical connection like Ethernet.
How Much Does It Cost To Install An Ethernet Jack?
Installing an Ethernet jack typically costs around $100 to $200, depending on the complexity of the installation and the location of the jack.
Conclusion
Installing an Ethernet jack may seem daunting, but with the right guidance, it can be a breeze. By following simple steps and using the right tools, you can have a functioning Ethernet connection in no time. From planning the installation to connecting the wires and testing the connection, this blog post has provided you with a comprehensive guide.
So, go ahead and give it a try! Start enjoying faster, more reliable internet speeds and make your online experience seamless.