To install an outlet box, first, turn off the power supply. Next, remove the cover plate and disconnect the old outlet.
Then, mount the new box and connect the wires securely. Finally, attach the cover plate and restore the power supply. Are you looking to add an outlet box to your home’s electrical system? It’s a fairly straightforward process that can be done with a few basic tools and some electrical know-how.
In this guide, we’ll walk you through the step-by-step instructions for installing an outlet box in your home. From turning off the power supply to securely connecting the wires, we’ll cover all the necessary steps to ensure a safe and successful installation. So, let’s get started and make your home electrical system more functional with a new outlet box.
Tools And Materials Needed
When it comes to installing an outlet box, having the right tools and materials is essential. By following a few simple steps and equipping yourself with the necessary items, you can successfully complete this task. In this section, we will discuss the tools and materials you will need to get started.
Screwdriver
A screwdriver is one of the most commonly used tools when it comes to electrical work. It is essential for loosening and tightening screws, which are often found on outlet covers and electrical devices. To ensure a secure connection, it’s crucial to have a screwdriver that matches the size of the screws you will be working with.
Whether it’s a flat-head or a Phillips-head screwdriver, make sure it’s within reach before you begin.
Wire strippers
Wire strippers are a must-have tool when it comes to working with electrical wiring. They are designed to safely strip the insulation from the wires, exposing the conductive metal underneath. Without wire strippers, it can be difficult to properly connect the wires to the outlet box.
Ensure you have wire strippers in your toolkit to make the installation process smoother and more efficient.
Wire nuts
Wire nuts, also known as wire connectors, are small plastic caps used to join and protect electrical connections. They come in various sizes to accommodate different wire gauges. These nuts make it easier to secure and insulate the connections, preventing any loose wires or exposed conductors.
Make sure you have a few wire nuts on hand to complete the installation securely.
Outlet box
The outlet box is the main component that holds the electrical devices in place. It provides a safe and secure enclosure for the wires, protecting them from external elements and preventing any potential hazards. Outlet boxes are available in different sizes and types, so choose one that suits your specific requirements.
Ensure you have the right type and size of outlet box before starting the installation.
Electrical tape
Electrical tape is an essential item when working with electrical connections. It provides insulation, protection, and identification for the wires. By wrapping the exposed wires with electrical tape, you reduce the risk of short circuits or accidental contact. It is essential to use electrical tape designed specifically for this purpose.
Make sure you have electrical tape in your toolkit to secure and protect the wires during the installation process.
Step-By-Step Guide
Installing an outlet box may seem like a daunting task, but with the right knowledge and tools, it can be a straightforward process. In this step-by-step guide, we will walk you through each stage of the installation, from choosing the right location to final testing and cleanup. So let’s get started!
Choosing the Right Location for the Outlet Box
The first step in installing an outlet box is to determine the ideal location for it. Consider factors such as accessibility, convenience, and safety. You want to choose a spot that is easily reachable and meets the electrical code requirements. Ideally, the outlet box should be placed near a power source and away from any water sources. Take your time to select the perfect location before moving on to the next step.
Preparing the Area and Turning Off the Power
Before you start any electrical work, safety should be your top priority. Begin by shutting off the power supply to the area where you will be installing the outlet box. Locate your circuit breaker and switch off the corresponding circuit. Once the power is off, use a voltage tester to verify that the electricity is indeed disconnected. Then, clear the area around the intended installation spot, ensuring that there are no obstructions or potential hazards.
Marking the Location for the Electrical Box
Now that you have determined the ideal location and taken the necessary safety precautions, it’s time to mark the spot for your electrical box. Use a pencil or marker to outline the exact position where the box will be installed. Make sure your markings are precise and clearly visible to guide you during the next steps.
Cutting the Hole for the Box
With the location marked, grab a keyhole saw or a drywall saw, and carefully cut a hole that matches the size of the electrical box. Take your time and work slowly to ensure a clean and accurate cut. Be sure to wear appropriate safety gear such as goggles and gloves while handling tools.
Attaching the Box to the Wall
Once the hole is cut, it’s time to attach the electrical box to the wall. Insert the box into the hole and secure it in place using screws or nails. Ensure that the box is level and flush with the wall surface. Use a level to make any necessary adjustments and double-check the positioning before proceeding.
Preparing the Wires
With the box securely in place, it’s time to prepare the wires for connection. Carefully strip the insulation from the ends of the wires using wire strippers, exposing the bare copper inside. Trim any excess wire length if needed. Take extra care to avoid damaging or nicking the wires during this process.
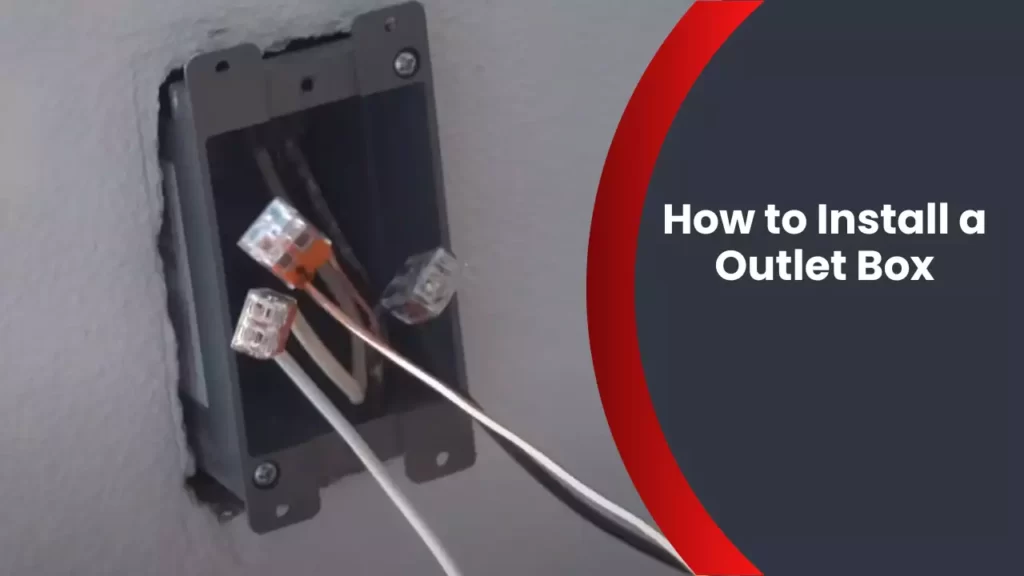
Connecting the Wires to the Outlet Box
Now comes the part where you connect the wires to the outlet box. Inside the box, you will find screw terminals labeled for each wire connection. Attach the black (hot) wire to the brass screw terminal, the white (neutral) wire to the silver screw terminal, and the green or bare wire (ground) to the green screw terminal. Tighten the screws securely to ensure a proper connection.
Mounting the Outlet and Cover Plate
With the wires connected, it’s time to mount the outlet itself. Carefully attach the outlet to the electrical box, ensuring that the screw terminals align with the corresponding wires. Tighten the screws to secure the outlet in place. Then, attach the cover plate by aligning it with the screw holes and securing it with the provided screws. Ensure that the cover plate sits flush against the wall surface.
Final Testing and Cleanup
Before you wrap up the installation, perform a final testing of the outlet. Switch the power back on at the circuit breaker and use a circuit tester to verify that the outlet is functioning correctly. Test all outlets and ensure there are no signs of loose connections, sparks, or abnormal heat. If everything checks out, securely fasten the outlet box to the wall and neatly tuck the wires inside. Clean up any debris or dust around the installation area, and you’re done!
By following this step-by-step guide, you’ll be able to install an outlet box safely and confidently. Always remember to prioritize electrical safety and consult a professional if you encounter any difficulties or uncertainties during the installation process.

Choosing The Right Location For The Outlet Box
When it comes to installing an outlet box, choosing the right location is crucial. The location will determine the functionality and convenience of the outlet, as well as comply with electrical codes and safety guidelines. In this section, we will explore the factors to consider when determining the optimal location for your outlet box.
Considering the purpose and accessibility of the outlet
Before you start installing an outlet box, you should carefully consider the purpose of the outlet and how accessible it needs to be. Think about the devices and appliances you plan to connect to the outlet and whether they will be used frequently or occasionally.
If the outlet will be used to power devices that require constant access, such as kitchen appliances or electronic gadgets, it is best to choose a location that is easily reachable and convenient. On the other hand, if the outlet is intended for occasional use or to power devices that do not require immediate access, you can opt for a less prominent location.
Furthermore, it is important to consider the accessibility of the outlet for individuals with physical limitations. Place the outlet box in a position that can be easily reached without the need to stretch or bend excessively, ensuring that people of all abilities can safely use the outlet.
Ensuring compliance with electrical codes and safety guidelines
When selecting the location for your outlet box, it is essential to adhere to electrical codes and safety guidelines set by relevant authorities. These regulations are put in place to ensure the safety of individuals and prevent electrical hazards.
Here are a few key points to keep in mind:
- Ensure there is sufficient clearance around the outlet box to allow for safe installation and access.
- Do not install outlets in areas prone to moisture, such as bathrooms or outdoor locations, unless they are specifically designed for such environments.
- Consider the proximity of flammable materials and avoid installing outlets in areas where they may pose a fire hazard.
- Keep outlets away from heat sources or areas where they may be exposed to excessive heat.
- Ensure the outlet is not overloaded with too many devices, as this can lead to overheating and potential electrical hazards.
By adhering to these electrical codes and safety guidelines, you can ensure that your outlet box is installed in a location that is both safe and functional for everyday use.
Preparing The Area And Turning Off The Power
Preparing the area and turning off the power is an essential step when installing an outlet box. By properly following these precautions, you can ensure a safe and efficient installation process. In this section, we will guide you through the necessary steps to clear the workspace of any obstructions and switch off the power to the designated circuit at the circuit breaker.
Clearing the workspace of any obstructions
Before you begin installing the outlet box, it is crucial to clear your workspace of any obstructions. This will help you have unrestricted access to the area and make the installation process much easier. Consider the following steps to ensure a clutter-free workspace:
- Remove any furniture, appliances, or other items that may hinder your access to the electrical panel or the area where you will be working.
- Store these items in a safe location away from your workspace to prevent any potential damage.
- If there are any loose cables or wires in the vicinity, take extra caution to secure or move them out of the way to prevent tripping hazards or interference during the installation process.
Switching off the power to the designated circuit at the circuit breaker
Now that your workspace is clear, the next crucial step is to turn off the power to the designated circuit at the circuit breaker. This ensures your safety while working with electrical components. Follow these steps to switch off the power effectively:
- Locate the circuit breaker box in your house. It is usually found in the basement, utility room, or garage.
- Identify the circuit that supplies power to the area where you will be installing the outlet box. This can be done by referring to the electrical panel’s labeling or by testing each circuit individually.
- Once you have identified the correct circuit, switch it off by flipping the corresponding circuit breaker to the “off” position. Double-check that you have selected the correct circuit by testing the power in the designated area using a non-contact voltage tester.
- Leave a note or tag on the circuit breaker to alert others that work is being done, and the power to that circuit should not be turned back on until the installation is complete and deemed safe.
By clearing the workspace of any obstructions and switching off the power to the designated circuit at the circuit breaker, you are taking the necessary precautions to ensure a safe and successful installation of your outlet box. Remember, safety should always be the top priority when working with electrical components.
Marking The Location For The Electrical Box
When it comes to installing an outlet box, one of the first steps is marking the location where it needs to be placed. Properly marking the location is crucial for ensuring a secure and functional installation. In this section, we will discuss how to use a pencil and a level to mark the desired height and position of the outlet box. We will also explore the importance of ensuring proper alignment with nearby electrical components.
Using a pencil and a level to mark the desired height and position of the outlet box
Before you begin marking the location, gather the necessary tools – a pencil and a level. These tools will help you achieve accuracy in marking the desired height and position of the outlet box.
Start by determining the height at which you want the outlet box to be installed. Consider factors such as convenience and accessibility when deciding on the height. Once you have determined the height, place the level against the wall and use the pencil to mark a horizontal line at the desired height. This will serve as your reference point for the outlet box.
Next, determine the position of the outlet box. Look for nearby electrical components such as switches or existing outlet boxes. It is important to ensure proper alignment with these components to maintain an organized and efficient electrical system. Using the level and pencil, mark the positions of these nearby components on the wall.
Now, take the outlet box and align it with the marked horizontal line and nearby electrical components. Make sure it is centered and level by using the level tool. Adjust the marks if necessary to achieve proper alignment.
Once you are satisfied with the alignment, proceed to the next steps of installing the outlet box, such as cutting a hole in the wall and securing the box.
In conclusion, marking the location for the electrical box is a critical step in the installation process. By using a pencil and a level, you can accurately determine the desired height and position of the outlet box. Additionally, ensuring proper alignment with nearby electrical components will help maintain an organized and efficient electrical system.
Cutting The Hole For The Box
Using a drywall saw or a utility knife to carefully cut out the marked area
To install an outlet box, one of the first steps is cutting the hole in the wall for the box. This ensures that the electrical wires can be connected and safely housed within the box. The process of cutting the hole requires precision and care to avoid any damage to the surrounding wall. There are two common tools you can use for this task: a drywall saw or a utility knife.
Using a drywall saw is a popular choice for cutting holes in drywall. This tool has a serrated blade specifically designed for cutting through plasterboard. To begin, hold the saw firmly and align it with the marked area where the outlet box will be installed. Apply gentle pressure and start sawing back and forth along the marked lines, gradually working your way around the perimeter of the hole.
Another option is using a utility knife, which offers more control and precision. Begin by scoring the marked area lightly with the knife blade, applying consistent pressure. Once the initial score is made, increase the pressure slightly and continue scoring along the lines. Be sure to maintain a steady hand and follow the marked outline carefully.
Removing any excess drywall or debris to create a clean opening
After cutting the hole, it is essential to remove any excess drywall or debris to create a clean opening for the outlet box. This step ensures a proper fit and secure positioning of the box. To remove the excess material, follow these steps:
1. Use a utility knife or drywall rasp to carefully shave off any rough edges or protruding drywall from the opening. This smooths out the edges and helps the box fit snugly into the wall.
2. Check for any loose drywall debris inside the hole and remove it using a vacuum cleaner or a dry cloth. It’s important to have a clean and debris-free opening to avoid interference with the electrical connections.
3. Inspect the walls surrounding the hole for any loose or uneven sections. If you find any, use a putty knife or sandpaper to smooth them out. This ensures the outlet box can be securely mounted.
Creating a clean opening not only facilitates the installation of the outlet box but also provides a neat and professional finish to your electrical project. Take your time during this step to ensure a solid and secure foundation for your electrical connections.
Attaching The Box To The Wall
After positioning the outlet box in the cutout, the next step is to securely attach it to the wall. This is crucial to ensure stability and prevent any safety hazards. In this section, we will discuss how to align the box with the marks on the wall, as well as the methods to firmly secure it using screws or nails.
Positioning the Outlet Box in the Cutout and Aligning it with the Marks
To start, make sure the outlet box is properly positioned in the cutout you have created on the wall. This will depend on the specific requirements of your electrical installation.
Follow these steps to align the outlet box with the marks:
- Double-check the positioning: Take a moment to reconfirm that the box is centered correctly in the cutout and aligned with any guidelines or markings you have made.
- Verify the depth: Ensure that the box is flush with the wall surface or slightly recessed, depending on your specific needs.
- Adjust if necessary: If the box needs any adjustments in terms of positioning or alignment, carefully make the required changes before moving on.
Using Screws or Nails to Secure the Box Firmly to the Wall or the Stud
Once the outlet box is properly positioned and aligned, it’s time to secure it firmly to the wall or the stud. This ensures that the box remains in place and provides a secure base for your electrical connections.
Here are the steps to follow:
- Choose the appropriate fasteners: Depending on the material of the wall and your preference, you can use either screws or nails to secure the box. Make sure the chosen fasteners are suitable for the weight and size of the box.
- Locate the mounting holes: Most outlet boxes have pre-drilled mounting holes. Identify these holes, as they will be used for attaching the box to the wall.
- Align the holes with the wall or stud: Position the box against the wall or stud, ensuring that the mounting holes align correctly.
- Insert and tighten the fasteners: With the mounting holes aligned, insert the screws or nails into the holes and tighten them using a screwdriver or hammer. Make sure the box is securely attached, but be cautious not to over-tighten and damage the box or the wall.
- Test the stability: After securing the box, gently but firmly check its stability. It should be firmly fixed to the wall or stud, without any noticeable movement.
By following these steps, you can effectively attach the outlet box to the wall or stud, ensuring a secure base for your electrical connections. Remember to always prioritize safety by using appropriate fasteners and checking the stability of the box once installed.
Preparing The Wires
Preparing the wires is a crucial step when it comes to installing an outlet box. This step involves identifying the existing wiring for the circuit and cutting and stripping the wires to the appropriate length for connection.
Identifying the existing wiring for the circuit
Before you start cutting and stripping the wires, it’s essential to identify the existing wiring for the circuit. This will help you understand the electrical layout and determine the appropriate connections for the outlet box.
To identify the existing wiring for the circuit, follow these steps:
- Turn off the power supply to the circuit at the main electrical panel.
- Use a voltage tester to ensure that the power is completely off.
- Examine the outlets or switches on the circuit to locate the wires. Take note of the color-coded wires (typically black, white, and bare copper or green).
- If there are junction boxes, open them to identify the wires connected inside.
- Sketch a quick diagram of the wiring layout to help you visualize the connections.
By following these steps, you’ll gain a clear understanding of the existing wiring for the circuit, which will make the installation process smoother and safer.
Cutting and stripping the wires to the appropriate length for connection
Once you’ve identified the existing wiring, the next step is cutting and stripping the wires to the appropriate length for connection. To do this correctly, follow these guidelines:
- Start by measuring the distance between the outlet box and the connection point.
- Add a few extra inches to the measurement to have enough wire for the connections.
- Use wire cutters to trim the wires to the calculated length.
- To strip the wires, use a wire stripper tool and carefully remove the insulation from the ends of the wires.
- Ensure that about 1/2 inch to 3/4 inch of bare wire is exposed for proper connection.
- Repeat the cutting and stripping process for each wire that will be connected to the outlet box.
Remember to handle the wires with caution, as they carry electrical current. Double-check the connections and make sure the stripped ends are clean without any frayed wires. This will ensure secure and reliable electrical connections.
By following these steps to prepare the wires, you’ll be ready to connect the outlet box, taking another step towards successfully installing an outlet box in your home.
Connecting The Wires To The Outlet Box
When it comes to installing an outlet box, one of the most important steps is connecting the wires. This ensures that electricity can flow safely and effectively to power your appliances and devices. In this section, we will discuss two crucial aspects of connecting the wires to the outlet box: matching the color-coded wires and using wire nuts to secure the connections, as well as ensuring proper grounding for safety.
Matching the color-coded wires and using wire nuts to secure the connections:
Before you begin connecting the wires to the outlet box, it’s essential to match the color-coded wires correctly. This helps ensure that you connect the right wires together and prevent any potential electrical hazards. In most electrical systems, you will find three different colored wires: black, white, and green or bare copper.
| Wire Color | Function |
|---|---|
| Black | The black wire is the “hot” wire that carries electricity from the power source to the outlet. |
| White | The white wire is the “neutral” wire that returns the electricity back to the power source. It usually does not carry any electrical load. |
| Green or Bare Copper | The green or bare copper wire is the “ground” wire that protects you from electrical shock. It provides a safe path for electricity to flow to the earth in case of a fault. |
Once you have identified the color-coded wires, you can use wire nuts to secure the connections. Wire nuts are twist-on connectors that join the wires together. To connect the wires, strip off about 3/4 inch of the insulation from each wire end. Twist the exposed wires together clockwise, making sure they are tightly wrapped. Then, place a wire nut over the twisted wires and twist it on clockwise until it is secure. Make sure to tug gently on the wires to ensure they are well connected.
Ensuring proper grounding for safety:
Proper grounding is essential to ensure electrical safety in your home. It helps prevent electric shocks and protects your appliances and devices. To ensure proper grounding, you need to connect the green or bare copper wire to the grounding screw on the outlet box.
- First, locate the grounding screw on the outlet box. It is usually green and located on the side or bottom of the box.
- Next, strip off about 3/4 inch of insulation from the end of the green or bare copper wire.
- Wrap the stripped end of the wire around the grounding screw in a clockwise direction.
- Tighten the grounding screw securely to establish a solid connection.
Once you have connected the wires with wire nuts and ensured proper grounding, you can proceed with installing the outlet itself and securing the outlet box in place. Remember to follow all safety precautions, such as turning off the electricity before working on any electrical connections, and consult a professional if you are unsure about any step of the installation process.
Mounting The Outlet And Cover Plate
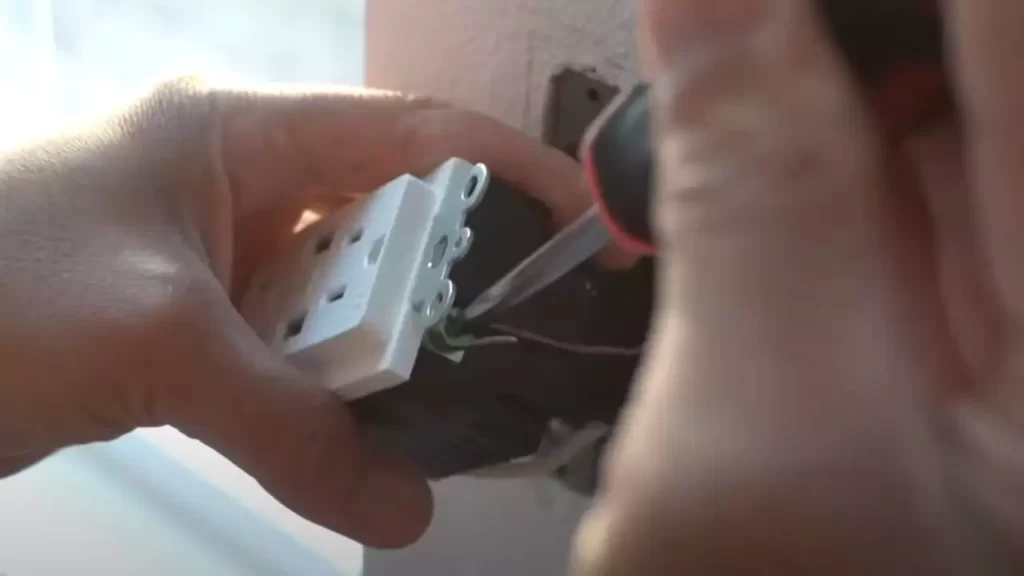
Attaching the outlet to the box and tightening the screws
Once the outlet box is securely mounted, it’s time to attach the outlet itself. This step is crucial as it ensures a safe and reliable connection for your electrical devices.
To begin, locate the screws on the sides of the outlet and align them with the holes on the outlet box. Insert the screws into the holes, making sure they are properly lined up. Take a screwdriver or a drill and tighten the screws until they are snug, but be careful not to overtighten as it may damage the outlet or strip the screw threads. A gentle and firm tightening is sufficient to secure the outlet in place.
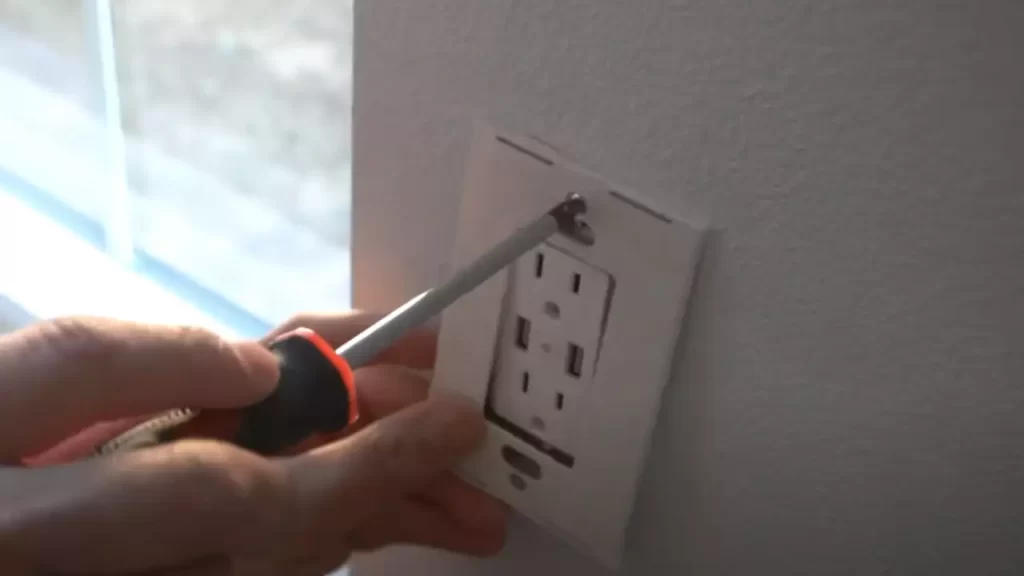
Placing the cover plate over the outlet and securing it with screws
Once the outlet is securely attached, the next step is to place the cover plate over it. The cover plate not only adds a finished look to the outlet but also provides protection against accidental touch and physical damage.
First, align the cover plate with the outlet box and ensure that it sits flush against the wall. Then, take the cover plate screws and insert them into the holes on the plate. Using a screwdriver, tighten the screws until they are snug, but again, avoid overtightening as it may damage the cover plate or strip the screw threads. It’s important to secure the cover plate firmly but not excessively tight.
Remember, when mounting the outlet and cover plate, precision and attention to detail are crucial. Take your time to ensure everything is properly aligned and tightened. This will not only improve the aesthetics of your electrical installation but also enhance safety for you and your family.
Final Testing And Cleanup
Restoring the power at the circuit breaker
Once you have successfully installed the outlet box and made all the necessary electrical connections, it’s time to restore the power at the circuit breaker. This step is crucial to ensure that the newly installed outlet box is receiving electricity and functioning properly.
To restore power, follow these steps:
- Locate the circuit breaker panel in your home. It is usually found in the basement, garage, or utility room.
- Open the circuit breaker panel and identify the breaker that corresponds to the outlet box you just installed. Look for labels indicating the area or room served by the breaker.
- Switch the breaker to the “ON” position. You may hear a clicking sound when you do this, indicating that power has been restored to the circuit.
Testing the outlet with a voltage tester
Now that the power is restored, it’s important to test the outlet using a voltage tester. This will help ensure that the outlet is functioning correctly and is safe to use.
To test the outlet, follow these steps:
- Obtain a voltage tester, which is a small handheld device used to detect the presence of electrical current.
- Insert the prongs of the voltage tester into the slots of the outlet. Be sure to touch both the hot and neutral slots.
- Observe the voltage tester. If it lights up or produces a sound, this indicates that the outlet is receiving electricity.
- Double-check the outlet by plugging in a small electrical device, such as a lamp or phone charger, to confirm that it is functioning properly.
- If the voltage tester does not light up or make a sound, or if the device does not work when plugged into the outlet, there may be an issue with the electrical connection. In this case, it is recommended to consult a professional electrician for further inspection and troubleshooting.
Cleaning up any debris and ensuring the area is safe and tidy
With the final testing complete, it’s time to clean up the work area and ensure everything is safe and tidy. This step is crucial for maintaining a neat and organized space, as well as minimizing potential hazards.
Follow these tips to clean up and ensure a safe environment:
- Dispose of any packaging materials, scraps of wire, or other debris that may have accumulated during the installation process.
- Wipe down the area surrounding the outlet box to remove any dust or dirt.
- Check for any loose wires or exposed connections and secure them properly.
- Ensure that there are no trip hazards, such as loose cables or tools left lying around.
- Take a step back and inspect the area from a safety standpoint. Look for any potential fire hazards, water leaks, or other dangers that may require attention.
By following these steps, you can complete the final testing and cleanup process with confidence. Your newly installed outlet box will be ready for use, providing you with a safe and reliable source of electrical power.
Frequently Asked Questions
Do You Need An Electrician To Install An Outlet Box?
Yes, an electrician is needed to install an outlet box.
How Do You Install An Outlet Box In Drywall?
To install an outlet box in drywall, follow these steps: 1. Measure and mark the desired location for the box. 2. Cut a hole in the drywall using a keyhole saw. 3. Insert the outlet box into the hole and secure it with screws.
4. Connect the electrical wires to the outlet box. 5. Finally, attach the outlet cover plate and test the outlet for functionality.
Does Outlet Box Have To Be Attached To Stud?
Outlet boxes do not necessarily have to be attached to a stud, but it is recommended for added stability and support.
Can You Install An Outlet Without A Junction Box?
No, it is not safe or code-compliant to install an outlet without a junction box. Junction boxes protect electrical connections and prevent hazards like electrical shock or fires. Always use a junction box and consult a professional electrician for proper installation.
Conclusion
To sum up, installing an outlet box is a straightforward process that can be accomplished with a few simple steps. By following the guidelines outlined in this blog post, you can ensure a safe and efficient installation. Remember to always prioritize safety and double-check your work before closing up the box.
With the right tools and a little know-how, you’ll have a new outlet box in no time. Happy DIYing!