To Install a 60 Amp breaker, turn off the power to the breaker panel, remove the panel cover, mount the breaker in an available slot, connect the circuit wires to the breaker, and reinstall the panel cover. Installing a 60 Amp breaker is a crucial task for homeowners or electricians who want to add new circuits or upgrade existing ones.
Whether you need to power a high-capacity appliance or accommodate additional electrical loads, a 60 Amp breaker can be a suitable solution. This guide will provide you with clear instructions on how to safely and effectively install a 60 Amp breaker in your breaker panel.
By following these steps, you can ensure a smooth installation process and maintain a reliable electrical system in your home or building. Let’s dive into the details of how to install a 60 Amp breaker.
Understanding The Basics Of A 60 Amp Breaker
What is a 60 Amp Breaker and its function?
A 60 Amp breaker is an electrical switching device designed to protect an electrical circuit from overcurrent. It is rated to handle a maximum current of 60 Amperes. The function of a 60 Amp breaker is to automatically disconnect the circuit when the current exceeds the safe operating limit, preventing potential hazards such as overheating, fires, and electrical damage.
Different types of breakers and their uses
There are multiple types of breakers available, each designed for specific electrical applications. Here are some common types:
- Miniature Circuit Breakers (MCBs): MCBs are commonly used in residential and commercial settings. They provide protection against overcurrents, short circuits, and ground faults.
- Residual Current Circuit Breakers (RCCBs): RCCBs are used to protect against electric shock and ground faults. They trip the circuit when a current imbalance is detected between the phase and neutral conductors.
- Arc Fault Circuit Interrupters (AFCIs): AFCIs are designed to detect dangerous arcing conditions that can lead to electrical fires. They are often used in bedrooms, living rooms, and other areas where fire risks may be high.
These are just a few examples, and there are other specialized breakers available based on specific needs and code requirements. It’s important to choose the right type of breaker for your electrical system.
Why choose a 60 Amp Breaker?
When selecting a breaker for your electrical system, it is crucial to choose the appropriate rating. A 60 Amp breaker is a popular choice for certain applications due to its capacity to handle higher electrical loads. Here are a few reasons why you might consider selecting a 60 Amp breaker:
- Ample capacity: A 60 Amp breaker provides more current-carrying capacity compared to lower-rated breakers, allowing you to power larger electrical devices and appliances.
- Flexibility: The 60 Amp rating offers flexibility by accommodating various electrical loads while still providing protection against overcurrents.
- Compliance with electrical codes: In certain situations, electrical codes may require the installation of a 60 Amp breaker to ensure the electrical system meets safety standards.
- Potential future expansion: Choosing a 60 Amp breaker allows for potential future expansion or upgrades to your electrical system, reducing the need for later modifications.
By understanding the basics of a 60 Amp breaker and its advantages, you can make an informed decision when selecting and installing the appropriate breaker for your electrical needs.
Assessing Electrical Capacity And Safety Precautions
Evaluating the electrical panel’s capacity for a 60 Amp Breaker
In order to safely install a 60 Amp breaker, it is crucial to evaluate the electrical panel’s capacity. Take the following steps:
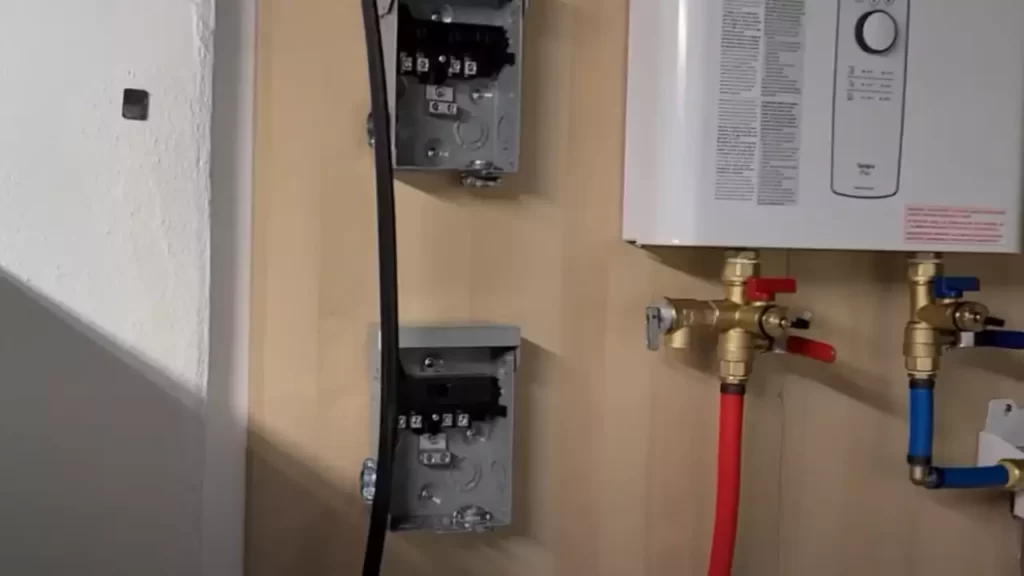
- Identify the electrical panel: Locate the electrical panel in your home. It is usually found in the basement, garage, or utility room.
- Check the panel’s label: Look for the panel’s label, usually located on the inside of the door. This label provides important information about the panel’s capacity and available slots for breakers.
- Determine the electrical load: Calculate the total electrical load in your home to ensure that adding a 60 Amp breaker will not overload the system. Consider appliances, lighting, heating, cooling, and other electrical devices.
- Compare the load to the panel’s capacity: Compare the total load to the panel’s capacity. If the load is close to the panel’s maximum capacity, it may be necessary to upgrade the panel or redistribute the load.
Necessary safety precautions before starting the installation process
Prior to installing a 60 Amp breaker, it is crucial to follow these safety precautions:
- Turn off the main power: Before working on the electrical panel, shut off the main power supply to avoid the risk of electrical shock.
- Wear protective gear: Always wear safety glasses, gloves, and appropriate clothing to protect yourself from potential hazards.
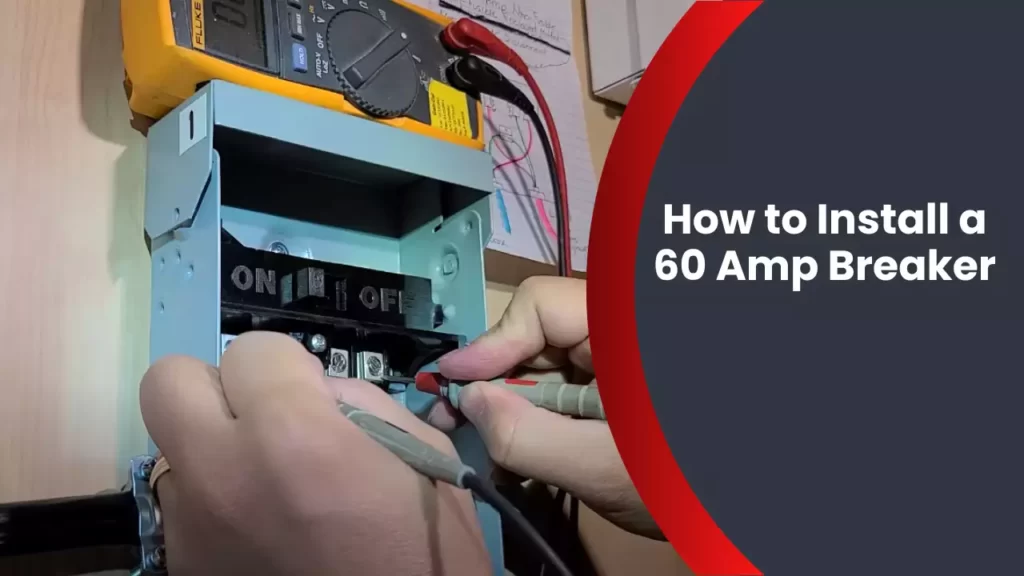
- Use a voltage tester: Test each circuit to ensure that it is not energized before working on it. This will help prevent electrical accidents.
- Work in a well-lit area: Make sure you have sufficient lighting to clearly see what you are doing. This will reduce the chances of making mistakes or accidental contact with live wires.
- Follow manufacturer’s instructions: Read and follow the manufacturer’s instructions for the specific breaker model you are installing. These instructions will provide important details and guidelines for safe installation.
Tools and materials required for the installation
Before starting the installation process, gather the following tools and materials:
| Tools | Materials |
|---|---|
|
|
Having these tools and materials readily available will help streamline the installation process and ensure that you have everything you need at hand.
Step 1: Turning Off The Power And Preparing The Panel
Before you begin installing a 60 amp breaker, it is crucial to ensure your safety by turning off the main power supply and preparing the electrical panel. This step-by-step guide will walk you through the process, ensuring that you have proper knowledge and understanding.
Switching off the main power supply
The first step is to switch off the main power supply to the panel. This will prevent any electrical current from flowing while you are working on the installation. To do this, locate the main electrical service panel in your home or property and look for the main breaker switch. This switch should be labeled as the main power or main breaker.
Flip the switch into the “off” position, ensuring that it is securely in place. This will cut off the power supply to the entire panel, providing a safe environment for you to proceed with the installation.
Accessing the electrical panel safely
Now that the power supply is turned off, it is important to access the electrical panel safely. Begin by clearing any clutter or obstructions around the panel to ensure easy access. Make sure you have proper lighting in the area.
It is recommended to wear safety goggles and gloves to protect yourself from any potential hazards. Ensure that you are standing on a stable surface and that the area around the panel is dry.
Removing the panel cover and identifying the appropriate breaker slot
With safety precautions in place, carefully remove the panel cover using a screwdriver or the appropriate tools. Set aside the cover in a safe location.
Inside the panel, take a moment to familiarize yourself with its layout. You will see multiple breaker slots, which are usually labeled and numbered. Refer to the panel directory or consult an electrician if you are unsure.
Identify the appropriate breaker slot for the 60 amp breaker installation. This may be an empty slot or one that needs to be replaced with a higher amp breaker. It’s important to ensure that the chosen slot is capable of handling the increased amperage.
Note: If you are unsure about the compatibility or requirements of the breaker, it is advisable to consult a licensed electrician for guidance.
Now that you have successfully turned off the main power supply, accessed the electrical panel safely, and identified the appropriate breaker slot, you can proceed to the next steps of the installation process. Following these steps will help you complete the task with confidence and safety in mind.
Step 2: Removing The Old Breaker (If Applicable)
Now that you have identified the existing breaker that needs to be replaced, it’s time to safely disconnect it from the panel. This step is crucial to ensure a smooth installation process of your new 60 amp breaker. Follow these steps to remove the old breaker efficiently:
Identifying the existing breaker that needs to be replaced
To begin, you need to locate the breaker that requires replacement in your electrical panel. Here’s how you can identify the specific breaker:
- Start by switching off the main power supply to the panel. This will eliminate the risk of electrical shock while working with breakers.
- Next, carefully inspect the breakers and look for any labels or markings that indicate the amperage rating. In this case, you are looking for a breaker with a rating higher than 60 amps.
- If there are no clear labels, you can refer to the electrical panel’s circuit diagram or consult an electrician to help you determine which breaker needs to be replaced.
Safely disconnecting the old breaker from the panel
Once you have identified the correct breaker, it’s time to safely disconnect it from the electrical panel. Follow these steps:
- Check for any signs of damage or overheating on the breaker and its connections. If you notice any, it’s important to address them before proceeding with the removal.
- Using a screwdriver, carefully loosen the terminal screw or screws that hold the wires connected to the breaker.
- Gently pull the wires away from the breaker and set them aside, ensuring that they do not come into contact with any other live wires or metal parts in the panel.
- Finally, remove the old breaker by pulling it straight out from its slot in the panel. Be cautious not to force it or damage any surrounding components.
Tips for dealing with any challenges during removal
Removing an old breaker can sometimes present unexpected challenges. Here are a few tips to overcome common obstacles:
- If the breaker seems stuck, use gentle wiggling motions while pulling it straight out. Avoid excessive force that could cause damage to the panel.
- In some cases, the breaker might be secured with a locking tab or clip. Look for any mechanisms holding it in place and release them before attempting to remove the breaker.
- If you encounter any difficulties or are unsure about the process, it is always advisable to consult a licensed electrician for assistance. They have the expertise to handle complex situations and ensure your safety.
By following these steps and taking necessary precautions, you can successfully remove the old breaker from your electrical panel. You are now ready to proceed to the next step of installing your new 60 amp breaker.

Step 3: Preparing The 60 Amp Breaker For Installation
Now that you have selected the correct 60 Amp breaker for your electrical needs and familiarized yourself with its specific requirements, it’s time to prepare the breaker for installation. Before proceeding, it is crucial to ensure that the breaker is compatible with your panel to avoid any electrical hazards or damage. Let’s delve into the details of how to prepare the 60 Amp breaker for installation.
Selecting the correct 60 Amp Breaker for your electrical needs
When it comes to selecting the appropriate 60 Amp breaker for your electrical needs, you must consider several factors to ensure its effectiveness and safety. Firstly, you need to determine the type of circuit you want to install and the corresponding amperage it requires. This information is usually found in the electrical plans or specifications for your project. Once you have identified the specific requirements, you can proceed with choosing the breaker.
In order to avoid any compatibility issues, it is essential to select a breaker that meets the specifications outlined by your electrical panel’s manufacturer. This information can usually be found on the panel’s label or in the user manual. It is crucial to ensure that the breaker is compatible with your panel’s voltage and phase requirements as well.
Familiarizing yourself with the specific requirements of the breaker
Before installing the 60 Amp breaker, it is essential to familiarize yourself with its specific requirements. This includes understanding its physical dimensions, the number of poles it has, and any special features it may possess. By doing so, you can ensure that you have the necessary tools and materials to accommodate the breaker.
Make sure to review the manufacturer’s documentation or datasheet for any additional instructions or precautions. It is also advisable to double-check the breaker’s voltage and current rating to confirm that it matches your electrical system’s specifications.
Ensuring the breaker is compatible with your panel
Once you have selected the correct 60 Amp breaker and familiarized yourself with its requirements, it is crucial to ensure that it is compatible with your electrical panel. This step is essential to guarantee a safe and functional installation.
Begin by identifying the make and model of your panel. This information is typically located on the panel’s door or inside the electrical panel itself. Refer to the manufacturer’s documentation or user manual to determine the compatibility of the breaker with your specific panel model.
If you are unsure about the compatibility or installation process, it is highly recommended to consult a licensed electrician. They possess the necessary expertise to assess your panel, ensure compatibility, and safely install the 60 Amp breaker.
By following these guidelines and adhering to the specific requirements of the breaker, you can now confidently prepare the 60 Amp breaker for installation.
Step 4: Installing The 60 Amp Breaker
Now that you have prepared the electrical panel and determined the correct placement for your 60 amp breaker, it’s time to install it. Follow these guidelines to ensure a proper installation:
Guidelines for inserting the breaker into the correct slot
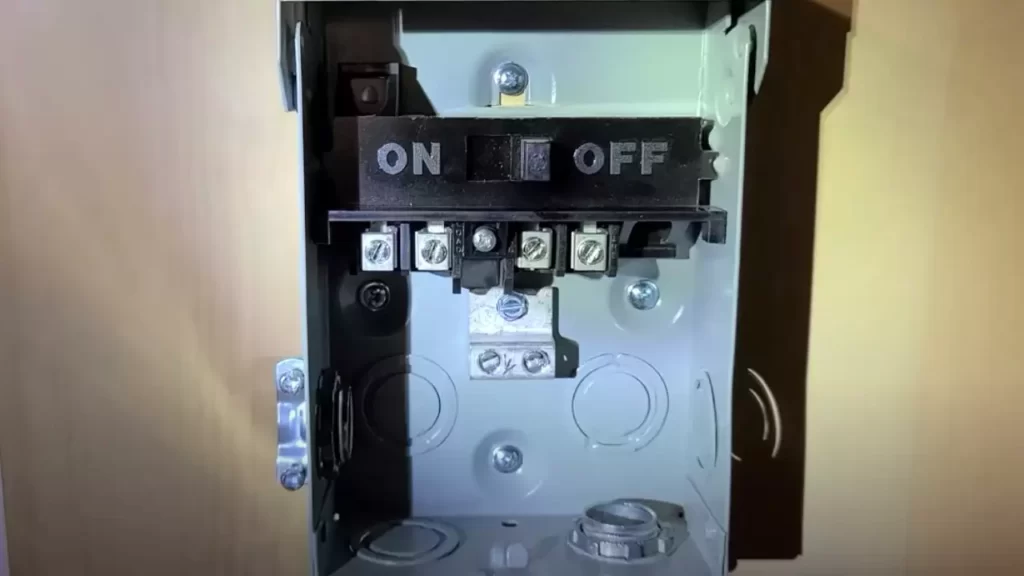
Before inserting the 60 amp breaker into the electrical panel, locate the appropriate slot. This slot should be labeled for 60 amp breakers and be the correct size to accommodate the breaker. Make sure the power to the panel is turned off to avoid any electrical accidents. Once the power is off, firmly push the breaker into the designated slot until it is fully seated.
Properly aligning the breaker with the panel’s bus bar
Once you have inserted the breaker, it’s crucial to ensure that it is properly aligned with the panel’s bus bar. The bus bar is a metal strip located inside the panel that distributes the electrical current. Carefully inspect the breaker’s positioning and adjust it if needed, so it sits flush against the bus bar. Proper alignment will provide a solid electrical connection between the breaker and the bus bar, enabling the uninterrupted flow of electricity.
Ensuring a secure and tight fit of the breaker
After aligning the breaker with the bus bar, it’s important to make sure it is securely and tightly attached. This will prevent any loose connections that can lead to electrical issues. Double-check that the breaker is properly seated in the slot and fastened securely to the panel. Use caution, as overtightening can cause damage. A snug fit will guarantee a reliable electrical connection and minimize the risk of any potential hazards.
By following these steps and guidelines, you can confidently install a 60 amp breaker in your electrical panel. Remember, the safety and functionality of your electrical system should be prioritized, so if you are unsure or uncomfortable with the installation process, consult a licensed electrician for assistance.
Step 5: Connecting The Wires To The Breaker
Connecting the wires to a 60 amp breaker is a crucial step in the installation process. It ensures that electrical power is properly distributed and protected within your home. In this step, we will guide you through understanding the different wire connections on the breaker, attaching the wires to the breaker terminals, and properly tightening and securing the wire connections.
Understanding the different wire connections on the breaker
Before you proceed with connecting the wires to the breaker, it’s important to understand the different wire connections present on the breaker. A 60 amp breaker typically consists of three wire connection points:
- Line connection: This is where the incoming electrical power from the main panel is connected to the breaker.
- Load connection: This is where the outgoing electrical power to various circuits is connected. It carries the current to the different parts of your home.
- Ground connection: This is where the grounding wire is connected to ensure safety and protect against electrical faults.
Attaching the wires to the breaker terminals
Once you have identified the different wire connections on the breaker, it’s time to attach the appropriate wires to the corresponding terminals. Follow these steps closely:
- Strip the insulation from the ends of the wires to expose the bare conductor.
- Identify the Line, Load, and Ground connections on the breaker.
- With a screwdriver, loosen the terminals on the breaker.
- Insert the stripped end of the wire into the appropriate terminal, ensuring that it is securely and tightly connected.
- Tighten the terminal screws using the screwdriver. Be careful not to overtighten, as it may damage the wires or the breaker.
Properly tightening and securing the wire connections
After attaching the wires to the breaker, it’s crucial to ensure that the wire connections are properly tightened and secured. This helps prevent loose connections, which can lead to electrical issues or even fires. Follow these tips:
- Make sure the wires are positioned correctly and are not touching each other or any other conductive materials.
- Double-check that the terminal screws are tightened firmly, but not excessively so.
- Inspect the wire connections for any signs of damage, such as frayed wires or loose terminal screws. If any issues are found, address them before proceeding.
- Lastly, gently tug on the wires to ensure they are firmly secured. They should not come loose or disconnect easily.
By carefully following these steps, you’ll be able to confidently connect the wires to your 60 amp breaker, promoting safe and efficient electrical power distribution within your home.
Step 6: Replacing The Electrical Panel Cover And Restoring Power
Now that you have successfully installed the 60 Amp breaker, it’s time to restore power to your electrical panel and get everything back up and running. Follow these simple steps to complete the process.
Placing the panel cover back on and securing it
Begin by carefully placing the electrical panel cover back onto the panel box. Make sure it aligns properly with the box and all the screw holes match up. Using a screwdriver, secure the cover by tightening the screws in place. This will help protect the breakers and wires from any potential damage or accidental contact.
Turning on the main power supply switch
Now that the panel cover is back on and secured, it’s time to restore power. Locate the main power supply switch, which is usually a large breaker labeled “main” or “main power.” Carefully flip the switch into the “on” position to turn the power back on. You may hear a slight humming or buzzing sound as the electricity flows back into the panel.
Verifying the successful installation of the 60 Amp Breaker
Before considering the task complete, it’s crucial to double-check that the installation of the 60 Amp breaker was successful. Confirm that the breaker is firmly seated in the panel and in the “off” position. Take a moment to inspect the wiring connections to ensure they are secure and tightly fastened. Lastly, scan the panel for any signs of damage or abnormal indications.
Congratulations! You have now installed a 60 Amp breaker and restored power to your electrical panel. Remember to always exercise caution when working with electricity, and if you encounter any issues or uncertainties, consult a qualified electrician for assistance.
Testing And Verifying The Functionality Of The 60 Amp Breaker
Once you have successfully installed a 60 Amp breaker, it is essential to test and verify its functionality to ensure optimal performance and safety. Conducting basic tests, troubleshooting any issues, and keeping safety considerations in mind are crucial steps in this process. In this section, we will guide you through each of these aspects to ensure your breaker is functioning correctly.
Conducting basic tests to ensure the breaker is functioning correctly
After installing the 60 Amp breaker, it is important to conduct some basic tests to verify its functionality. These tests will help identify any potential issues or faults that may have occurred during the installation process. Follow the steps below:
- Make sure the breaker is in the ‘Off’ position before starting any tests.
- Using a voltage tester, check for the presence of electrical current at the terminal screws of the breaker. This will confirm whether or not it is receiving power.
- If power is detected, turn the breaker to the ‘On’ position and test the continuity of the circuit using a multimeter. This will determine if the breaker is allowing the flow of electricity correctly.
- If the breaker passes these tests, it is likely functioning correctly. However, it is still important to move to the next step to troubleshoot any potential issues.
Troubleshooting any issues that may arise after installation
While conducting the basic tests, if you encounter any issues or notice anomalous behavior, it is crucial to troubleshoot the problem promptly. Troubleshooting will help identify the cause of the issue and enable you to find a suitable solution. Consider the following steps:
- Double-check the wiring connections and ensure they are securely attached and properly tightened.
- Inspect the breaker for any visible signs of damage or defects, such as frayed wires or loose components.
- If everything appears to be in order, carefully review the installation instructions provided by the manufacturer to ensure all steps were followed correctly.
- If the problem persists and you are unable to troubleshoot successfully, it may be necessary to seek professional assistance to avoid any potential hazards.
Safety considerations when using a 60 Amp Breaker
When working with a 60 Amp breaker, it is essential to prioritize safety to protect yourself and your property from potential risks. Consider the following safety guidelines:
- Always turn off the main power supply before installing or working on a breaker.
- Wear appropriate protective gear, such as gloves and safety glasses, to protect yourself from any potential electrical hazards.
- Ensure the breaker is compatible with the electrical load it will be servicing. Use a breaker that meets the required specifications to prevent overloading and potential damage.
- In case of any doubts or uncertainties, consult with a qualified electrician to ensure proper and safe installation.
By following these testing procedures, troubleshooting steps, and safety considerations, you can ensure the functionality and safety of your 60 Amp breaker installation.
Frequently Asked Questions
What Size Wire Do I Need For A 60 Amp Breaker?
For a 60 amp breaker, you will need a wire size of at least 6 AWG (American Wire Gauge) copper or 4 AWG aluminum. This ensures proper electrical capacity and safety.
Can I Add A 60 Amp Breaker To My Panel?
Yes, you can add a 60 amp breaker to your panel as long as the electrical panel is rated for it. However, it’s important to consult with a licensed electrician to ensure the panel can handle the additional load and to ensure compliance with local building codes and safety regulations.
Can I Put A 60 Amp Breaker In A 100 Amp Main Panel?
Yes, it is possible to put a 60 amp breaker in a 100 amp main panel. However, it is important to consult an electrician to ensure it meets electrical code requirements and does not overload the panel. Safety should always be a priority when modifying electrical systems.
What Is A 60 Amp Circuit Breaker Used For?
A 60 amp circuit breaker is used to protect electrical circuits that have a maximum load of 60 amperes. It automatically shuts off the power when there is an overload or short circuit, preventing any damage to the electrical system.
Conclusion
To wrap up, installing a 60 Amp breaker can be a simple process if you follow the necessary steps. By adhering to safety precautions and using the right tools, you can ensure a smooth installation. Remember to shut off the power and consult the manufacturer’s instructions for specific guidelines.
With the right knowledge and attention to detail, you’ll have your electrical circuit up and running in no time. Happy wiring!