To install a 220 outlet for a dryer, follow these steps: Turn off the power at the electrical panel, remove the electrical cover plate, connect the white and ground wires to the respective terminals, attach the red and black wires to the circuit breaker, insert the breaker into the panel, and test the outlet for proper voltage using a multimeter. Are you planning to install a new dryer and need a 220 outlet?
Installing a 220 outlet might seem daunting, but with the right guidance, it can be a straightforward task. We will provide you with a step-by-step guide on how to install a 220 outlet for a dryer. From turning off the power to testing the outlet, we will cover everything you need to know to successfully complete this installation.
So, let’s dive in and get started on creating a safe and efficient power supply for your dryer.
Understanding The Basics Of A 220 Outlet
When it comes to installing a 220 outlet for a dryer, it’s important to have a clear understanding of the basics. In this post, we’ll cover what a 220 outlet is, how it differs from a regular outlet, and why it is necessary for a dryer. By the end, you’ll have all the knowledge you need to successfully install a 220 outlet and save yourself the hassle of laundry days without power.
What is a 220 outlet?
A 220 outlet, also known as a 240-volt outlet, is a type of electrical outlet that provides a higher voltage than a regular outlet. While a regular outlet typically supplies 120 volts, a 220 outlet delivers double the voltage, which is essential for powering appliances that require more energy, such as dryers, ovens, and air conditioners.
How does a 220 outlet differ from a regular outlet?
The main difference between a 220 outlet and a regular outlet lies in the voltage they provide. As mentioned earlier, a regular outlet supplies 120 volts, which is suitable for smaller appliances like lamps, televisions, and phone chargers. On the other hand, a 220 outlet delivers 240 volts, making it capable of handling high-power appliances that need more electrical current to operate efficiently.
Another visible difference between the two is the shape and configuration of the outlets themselves. While regular outlets typically have two vertical slots, a 220 outlet has four slots: two vertical slots, one horizontal slot below them, and a round grounding hole above the vertical slots.
Why is a 220 outlet necessary for a dryer?
A 220 outlet is necessary for a dryer due to the increased power requirements of this appliance. Dryers need a substantial amount of energy to generate heat and spin the drum effectively, and a 220 outlet provides the higher voltage needed for smooth and efficient operation.
Attempting to power a dryer through a regular outlet would result in insufficient power supply, leading to poor performance and potential damage to the machine. Therefore, installing a dedicated 220 outlet for your dryer is crucial to ensure optimal functioning and avoid any electrical hazards.

Tools And Materials Needed For Installation
Installing a 220 outlet for your dryer requires the right tools and materials to ensure a safe and successful installation. By gathering all the necessary equipment in advance, you can streamline the process and avoid any unnecessary delays. In this section, we will provide you with a comprehensive list of the tools and materials you will need.
List of tools required for the installation
To start with the installation of a 220 outlet, make sure you have the following tools at your disposal:
- Screwdriver – A flathead or Phillips screwdriver will be needed to remove any existing outlet covers.
- Wire stripper – This tool is essential for removing the insulation from the wires.
- Wire cutter – Use this to cut the wires to the necessary length.
- Needle-nose pliers – These pliers can be helpful for shaping and bending wires.
- Multi-meter – A multi-meter allows you to check the voltage and continuity of the wires.
- Level – You’ll need a level to ensure that your outlet is installed straight.
- Tape measure – Use a tape measure to accurately measure the distance between the outlet and the electrical panel.
List of materials required for the installation
In addition to the tools mentioned above, you will also need the following materials for the installation:
- 220V outlet – Purchase a suitable 220V outlet that is compatible with your dryer’s electrical requirements.
- Electrical wire – Ensure that you have enough electrical wire to connect the outlet to the electrical panel.
- Outlet box – An electrical outlet box is essential for safely housing the wires and connecting the outlet.
- Wire connectors – Use wire connectors to securely connect the wires together.
- Outlet cover – Once the installation is complete, you’ll need an outlet cover to protect the outlet and minimize any potential hazards.
- Mounting screws – These screws are necessary for securing the outlet and outlet cover to the wall.
Safety precautions to take before starting the installation
Before you begin the installation process, it is vital to prioritize safety. Taking the necessary precautions can protect you from electrical hazards and ensure a smooth installation. Here are some safety measures to consider:
- Turn off the power – Before doing anything, turn off the power to the circuit you will be working on. This can be done by switching off the breaker in your electrical panel.
- Double-check for live wires – Use a non-contact voltage tester to confirm that the wires are not live before proceeding.
- Wear protective gear – Put on safety glasses and insulated gloves to protect yourself from any potential electrical shocks.
- Work in a well-lit area – Ensure that your work area is well-lit, allowing you to see and work with precision.
- Follow electrical codes and regulations – Familiarize yourself with local electrical codes and adhere to them throughout the installation process.
By following these safety precautions and gathering the necessary tools and materials, you can confidently proceed with installing a 220 outlet for your dryer. Remember, if you feel unsure or uncomfortable with any aspect of the installation, it is always best to seek assistance from a qualified electrician.

Step-By-Step Guide To Installing A 220 Outlet For A Dryer
Installing a 220 outlet for a dryer may seem like a complex task, but with the right guidance, it can be easily accomplished. In this step-by-step guide, we will walk you through the process of installing a 220 outlet for your dryer. From preparing the electrical panel to testing the outlet for proper installation, each step is carefully explained to ensure a successful outcome. By following these instructions, you can set up a safe and efficient power source for your dryer.
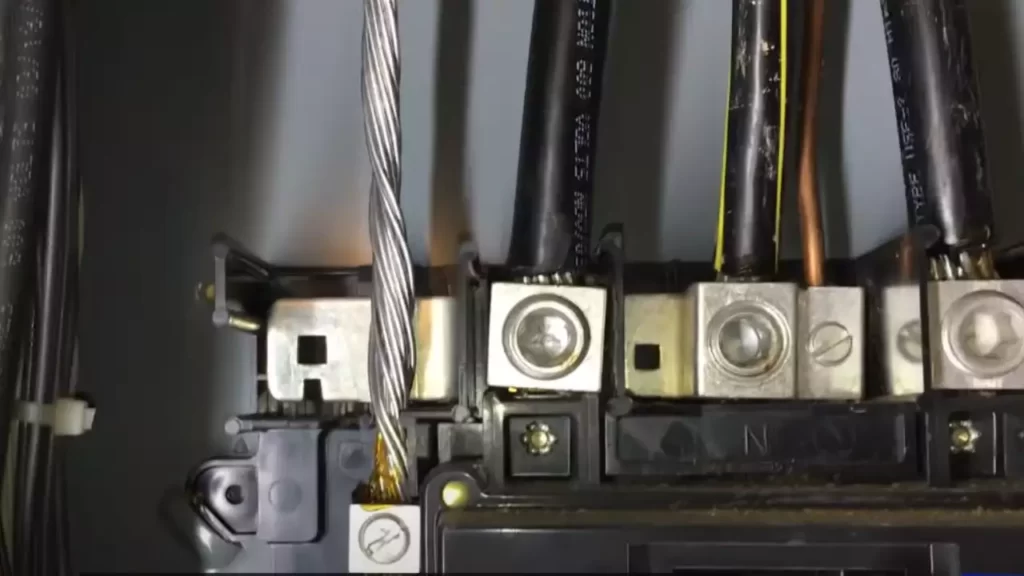
Preparing the electrical panel for the installation
Before you begin the installation process, it’s essential to prepare the electrical panel to ensure a smooth and safe installation. Here’s what you need to do:
- Turning off the power to the designated circuit
- Removing the panel cover
- Identifying the correct circuit breaker
Installing the 220 outlet
Once the electrical panel is prepared, you can start installing the 220 outlet for your dryer. Here are the steps to follow:
- Choosing the ideal location for the outlet
- Mounting the outlet box
- Running the electrical cable to the outlet location
- Connecting the wires to the outlet
Test and verify the installation
After completing the installation of the 220 outlet, it’s crucial to test and verify its functionality. The following steps will guide you:
- Reconnecting the power at the circuit breaker
- Testing the outlet with a voltage tester to ensure proper installation
By taking these steps, you can ensure that your 220 outlet for the dryer is installed correctly and ready to safely power your appliance. Following this step-by-step guide will provide you with the confidence and knowledge needed to complete the installation process without any difficulties.
Common Mistakes To Avoid During Installation
When it comes to installing a 220 outlet for a dryer, there are a few common mistakes that people often overlook. These mistakes can pose serious safety hazards and may result in damage to your electrical system or appliances. To ensure a successful and safe installation, it is crucial to be aware of these common mistakes and avoid them at all costs.
Overlooking Safety Precautions
One of the most important aspects of installing a 220 outlet for a dryer is to prioritize safety. Failure to follow proper safety precautions can lead to electric shock, fires, or other dangerous situations. It is essential to wear appropriate safety gear, such as gloves and safety glasses, when working on electrical systems. Additionally, it is crucial to turn off the power to the area you are working on at the breaker box and use a voltage tester to verify that there is no electricity flowing through the wires.
Using Incorrect Wire Size
Another common mistake during the installation of a 220 outlet for a dryer is using incorrect wire size. The wire size you choose is dependent on the amperage rating of your dryer. Using wires that are too small can lead to overheating, melting, or even electrical fires. On the other hand, using wires that are too large for your dryer’s power requirements can be wasteful and unnecessary. Always refer to the manufacturer’s guidelines and consult a qualified electrician to determine the appropriate wire gauge.
Improper Grounding
Proper grounding is essential for the safe operation of any electrical system. Grounding provides a path for electricity to flow safely to the ground in the event of a fault or short circuit. Failing to properly ground your 220 outlet can result in electrical shocks and other hazards. Make sure to connect the grounding wire from the outlet to a suitable ground, such as a grounding rod or water pipe, following the local electrical code.
Inadequate Cable Management
During the installation process, it is crucial to pay attention to cable management. Inadequate cable management can lead to tangled or exposed wires, which can increase the risk of accidents. Securely fasten the cables and use appropriate cable clips or conduits to protect them. Keeping the cables organized and out of the way will not only enhance the aesthetics of your installation but also prevent potential damage to the wires and ensure safe and efficient operation.
By avoiding these common mistakes during the installation of a 220 outlet for a dryer, you can ensure a safe and reliable electrical connection. Always prioritize safety, use the correct wire size, ensure proper grounding, and maintain adequate cable management. If in doubt, consult a professional electrician to ensure a successful installation.

Troubleshooting And Maintenance Tips
Installing a 220 outlet for a dryer is an essential step in setting up your laundry room. However, like any other electrical component, it is not immune to occasional issues. In this section, we will explore common troubleshooting tips to help you identify and resolve problems with your 220 outlet. Additionally, we will discuss regular maintenance practices that will keep your outlet in excellent condition. Let’s dive in!
Troubleshooting common issues with a 220 outlet
When using your dryer, you may encounter some problems that stem from the 220 outlet. By understanding these common issues, you can troubleshoot and fix them efficiently. Here are a few problems you might encounter:
| Issue | Possible Cause | Solution |
|---|---|---|
| No power to the outlet | Faulty breaker or wiring | Check the breaker and wiring for any signs of damage or malfunction. Replace or repair as necessary. |
| Intermittent power supply | Loose connections or worn-out parts | Tighten all connections and inspect for any worn-out components. Replace as needed. |
| Burning smell or sparks | Overheating or faulty wiring | Turn off the power and immediately seek professional assistance to avoid risk of electrical fire or injury. |
Regular maintenance to keep the outlet in good condition
To ensure your 220 outlet functions optimally and safely, regular maintenance is crucial. Here are a few maintenance tips to keep in mind:
- Inspect the outlet regularly for any signs of damage, such as cracks or discoloration.
- Tighten loose screws or connections to prevent electrical arcing.
- Remove any dust or debris that may have accumulated in the outlet.
- Test the outlet periodically using a multimeter to check the voltage and ensure proper functioning.
- Consider installing a surge protector to safeguard your dryer and outlet against power surges.
When to seek professional assistance
While troubleshooting and conducting regular maintenance can solve most issues with a 220 outlet, there are certain situations where it’s best to seek professional assistance. If you encounter any of the following scenarios, don’t hesitate to call a licensed electrician:
- Severe damage to the outlet or wiring
- Repeatedly tripping breakers or blowing fuses
- Persistent electrical arcing or sparking
- Experiencing electrical shocks when operating the dryer
Remember, safety should always be your top priority. If you are unsure or uncomfortable with handling electrical repairs, it’s better to leave it to the experts.
By troubleshooting potential issues, conducting regular maintenance, and knowing when to seek professional assistance, you can ensure the longevity and efficiency of your 220 outlet. Take care of this vital component, and your dryer will continue to serve its purpose effectively!
Frequently Asked Questions
How Much Does It Cost To Install A 220V Outlet For A Dryer?
The cost to install a 220V outlet for a dryer varies depending on factors such as location and complexity of the installation. Generally, it can range from $200 to $500. Consulting with an electrician will give you a more accurate estimate based on your specific needs.
What Kind Of Wire Do I Need For A 220 Dryer Outlet?
For a 220 dryer outlet, you’ll need a specific type of wire called a 10/3 or 10/4 cable. This cable consists of three or four wires: two hot wires (black and red), one neutral wire (white), and one ground wire (green or bare copper).
Make sure to consult an electrician for proper installation.
How To Install A 220 Outlet?
To install a 220 outlet, follow these steps: 1. Turn off the power at the circuit breaker. 2. Remove the existing outlet. 3. Install a new double-pole breaker. 4. Run new wiring to the outlet location. 5. Connect the wires to the outlet and secure it.
Finally, switch the power back on at the breaker.
What Are The Three Wires For 220?
The three wires for a 220 volt are the hot wire (carries electricity from the source), neutral wire (provides the return path), and ground wire (protects against electrical faults).
Conclusion
To conclude, installing a 220 outlet for a dryer may seem intimidating at first, but with the right guidance, it can be a straightforward process. By following the steps outlined in this blog post and ensuring your safety every step of the way, you can successfully set up a 220 outlet for your dryer, providing efficient and reliable power.
Remember to consult a professional if you are unsure or uncomfortable with any aspect of the installation. Happy drying!