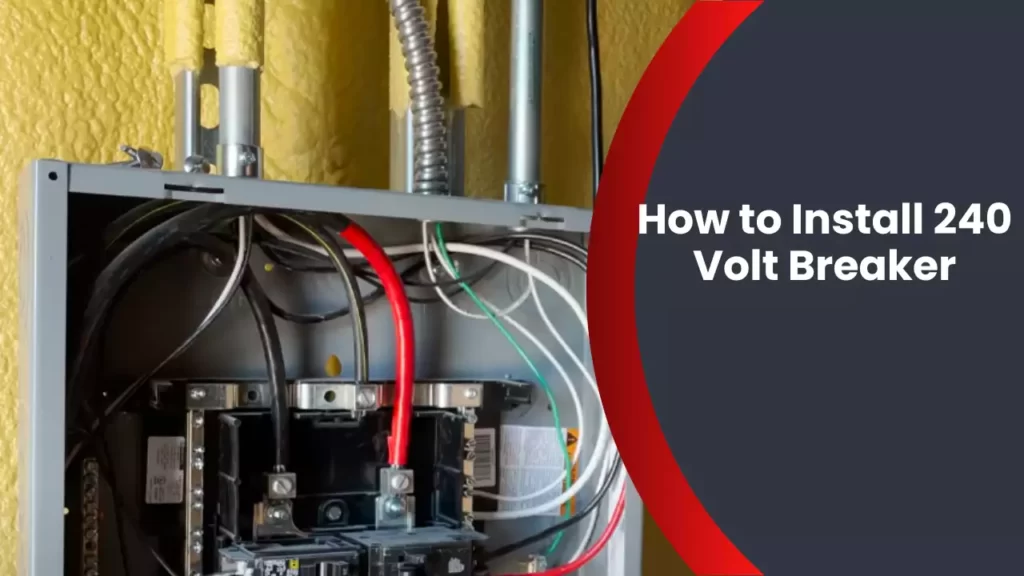
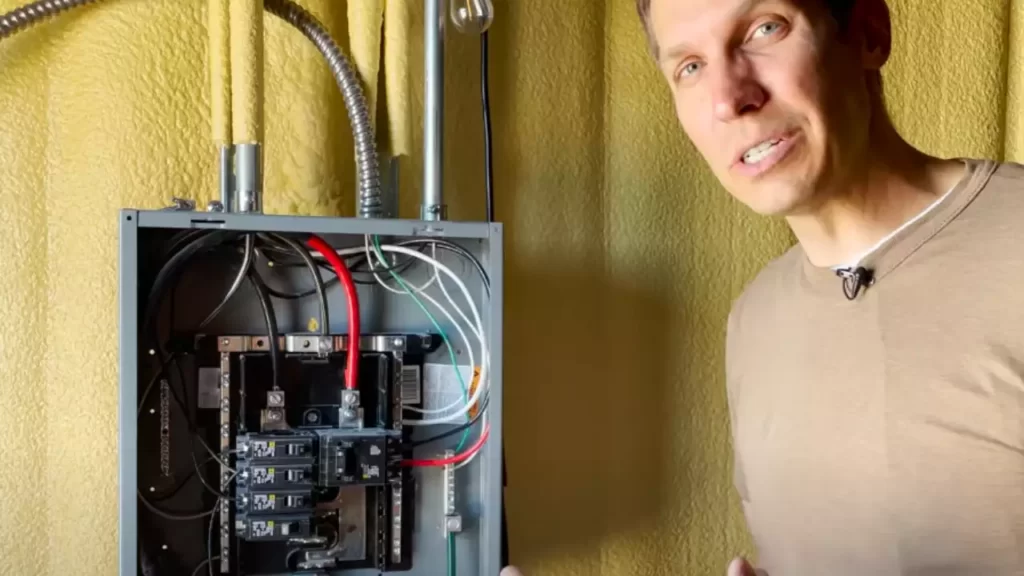
To install a 240 volt breaker, turn off power to the breaker box, remove the panel cover, and connect the breaker to the bus bar by snapping it into place. Then, attach the hot wires to the breaker terminals, secure the neutral wire to the neutral bar, and reattach the panel cover before turning the power back on.
Installing a 240 volt breaker requires proper precautions and knowledge. This article will guide you through the process, ensuring a safe and successful installation. By following these steps, you can easily connect the breaker to the bus bar and properly attach the hot wires.
With attention to detail and adherence to safety guidelines, you can quickly install the 240 volt breaker and restore power to your circuit.
Understanding The Basics Of 240 Volt Breakers
Understanding the Basics of 240 Volt Breakers
What is a 240 Volt Breaker and its Purpose?
A 240 volt breaker is an essential electrical component used to protect circuits that require higher voltage, such as household appliances like ovens, dryers, and air conditioners. Unlike standard 120-volt circuits, which are common in most homes, a 240-volt circuit provides twice the voltage, allowing for increased power capacity. The primary purpose of a 240-volt breaker is to safeguard these high-powered circuits by interrupting the electrical flow in the event of an overload or short circuit.
Different Types of 240 Volt Breakers and Their Applications
When it comes to 240 volt breakers, there are several distinct types, each designed for specific applications. It’s important to understand these variations to ensure the correct breaker is used for your electrical needs. Here are the three main types of 240-volt breakers and their applications:
1. Double-Pole Breakers:
Double-pole breakers are the most common type for 240-volt circuits. As the name suggests, they consist of two poles connected by a single breaker handle. These breakers are typically used for large appliances like electric ranges, HVAC systems, and water heaters.
2. Tandem Breakers:
Tandem breakers, also known as twin or double breakers, are two separate breakers connected by a bridge or handle tie. These breakers are useful when you need to supply power to multiple smaller circuits. They are often used in subpanels and can free up space for additional circuits without the need for additional panels.
3. GFCI Breakers:
Ground Fault Circuit Interrupters (GFCI) breakers are designed to protect against electric shocks and are commonly used in areas exposed to moisture, such as kitchens, bathrooms, and outdoor outlets. These breakers monitor the electrical flow and quickly shut off power when they detect a ground fault, preventing potential electrical hazards.
Key Safety Precautions to Take Before Installation
Before installing a 240-volt breaker, it’s crucial to prioritize safety. Here are some essential safety precautions to follow:
1. Turn Off Power: Before starting any electrical work, ensure you turn off the main power to the circuit at the electrical panel. This step protects you from potential electrocution.
2. Use Proper Tools and Equipment: Gather all the necessary tools required for the installation, including wire strippers, voltage testers, and screwdrivers. Using the correct tools not only ensures a proper installation but also minimizes the risk of accidents.
3. Verify Load Requirements: Confirm that the circuit you’re adding the 240-volt breaker to can handle the increased load. Exceeding the circuit’s capacity can lead to overheating and potential fire hazards.
4. Follow Manufacturer Instructions: Always refer to the manufacturer’s instructions for the specific breaker, as different models may have unique installation requirements. Following the instructions ensures a safe and reliable installation.
5. Seek Professional Help If Needed: If you’re unsure or uncomfortable with installing a 240-volt breaker, it’s best to consult a licensed electrician who can perform the installation correctly and safely.
By understanding the basics of 240-volt breakers, knowing their different types and applications, and adhering to key safety precautions, you can confidently install a 240-volt breaker and ensure the proper functioning of your high-powered electrical circuits. Remember, safety should always be the top priority when working with electricity.
Tools And Materials Required For Installing A 240 Volt Breaker
When it comes to installing a 240 volt breaker, having the right tools and materials is essential. This ensures that the installation process goes smoothly and safely. In this section, we will discuss the tools and materials you will need to successfully install a 240 volt breaker. Let’s get started!
Essential tools for the installation process
When installing a 240 volt breaker, you will need a few essential tools to get the job done. These tools include:
- Screwdriver set – A set of screwdrivers will come in handy for removing and securing screws during the installation process.
- Wire cutter and stripper – These tools are necessary for cutting and stripping the wires that connect to the breaker.
- Socket wrench set – A socket wrench set will be needed to tighten and loosen the bolts on the breaker panel.
- Line tester – A line tester is necessary for ensuring that the power is turned off before starting the installation process.
- Electric drill – An electric drill will make it easier to make holes in the breaker panel for mounting the breaker.
Recommended safety equipment
While installing a 240 volt breaker, it is important to prioritize safety. To ensure your safety, it is recommended to have the following safety equipment:
- Safety goggles – Safety goggles will protect your eyes from any flying debris or sparks that may occur during the installation process.
- Gloves – Wearing gloves will safeguard your hands from any sharp edges or potential electrical shocks.
- Ear protection – Using ear protection can reduce any loud noise that may occur during the installation process.
- Electrical tape – Electrical tape is essential for insulating and securing the wires to prevent any electrical hazards.
List of materials needed for the installation
To install a 240 volt breaker, you will need the following materials:
| Materials | Description |
|---|---|
| 240 volt breaker | This is the central component of the installation process. It connects to the breaker panel and provides power to the desired circuit. |
| Breaker panel | A breaker panel houses all the breakers and acts as the main electrical distribution point in a building. |
| Wires | Wires are used to connect the breaker panel to the circuit that requires 240 volts of power. |
| Conduit | A conduit is necessary to protect the wires and provide a clean, organized look to the installation. |
| Bolts and screws | Bolts and screws are used to secure the breaker panel and the 240 volt breaker in place. |
Installing a 240 volt breaker can be a straightforward process with the right tools and materials. By following proper installation procedures and ensuring safety precautions, you can successfully set up a 240 volt breaker in no time.
Step 1: Shutting Off The Power To The Circuit
When installing a 240 volt breaker, safety should always be the first priority. This begins with shutting off the power to the circuit you will be working on. By following the proper steps, you can ensure a safe and successful installation. In this article, we will guide you through Step 1: Shutting Off the Power to the Circuit.
Locating the main electrical panel
The main electrical panel is the central hub for all the electrical circuits in your home. It is usually located in the basement, garage, or utility room. To shut off the power, you will need to access this panel. Once you have located it, carefully open the panel door.
Identifying the circuit to be worked on
Before turning off the power, it is important to identify the specific circuit that you will be working on. Most panels will have a diagram or label that indicates which circuit each breaker corresponds to. Take note of the breaker number or label so that you can easily locate it.
Turning off the circuit breaker for the desired circuit
Once you have identified the circuit, it’s time to turn off the corresponding circuit breaker. Each breaker in the panel should have a switch that can be flipped to the off position. Locate the breaker that corresponds to the circuit you will be working on and firmly switch it to the off position.
It is important to double-check that you have turned off the correct breaker. You can do this by testing the circuit with a voltage tester or by turning on a light or appliance connected to the circuit and ensuring it does not turn on. Safety should always come first, so take the time to verify that the power is truly off before proceeding with any electrical work.
By following these simple steps, you can safely shut off the power to the circuit before beginning the installation of your 240 volt breaker. Remember, always prioritize safety and consult a professional if you are unsure or uncomfortable with completing the installation yourself.
Step 2: Preparing The Electrical Panel
Before installing a 240-volt breaker in your electrical panel, it is important to prepare the panel to ensure a safe and successful installation. This step involves opening the electrical panel cover, identifying the empty slots for installing the breaker, and clearing any obstructions or debris in the panel.
Opening the electrical panel cover
To begin, locate the electrical panel in your home. It is usually found in a basement, garage, or utility room. Before opening the panel cover, make sure to switch off the main power supply to avoid any potential electrical hazards.
Warning: Working with live electrical components can cause severe injury or even death. It is crucial to follow proper safety precautions, including wearing safety gloves and goggles, and to consult a professional electrician if you are unsure about any aspect of the installation process.
Once the power supply is turned off, remove the screws securing the electrical panel cover in place. Keep these screws in a safe location, as you will need them to secure the cover after the installation is complete.
Identifying the empty slots for installing the 240 volt breaker
Inside the electrical panel, you will find a series of circuit breakers and slots. Look for a section where there are vacant slots available. These slots indicate areas where new circuit breakers, such as the 240 volt breaker, can be installed.
Take note of the location and count the number of empty slots, as this will help you determine the best position for your new breaker. It is essential to choose an empty slot that is suitable for the amperage requirements of the circuit you are installing.
Clearing any obstructions or debris in the panel
Before placing the new 240 volt breaker, it is crucial to ensure that the panel is clean and free from any obstructions or debris. This will help prevent any interference or damage to the breaker or other electrical components.
Inspect the panel for any loose wires, excess dust, or foreign objects that may impede the proper functioning of the breaker. Carefully remove any debris using a soft brush or a cloth. Be cautious not to disturb any live wires or touch any components within the panel.
To summarize:
- Turn off the main power supply
- Remove the screws securing the electrical panel cover
- Identify the empty slots for installing the 240 volt breaker
- Clear any obstructions or debris in the panel
With these necessary preparations complete, you are now ready to proceed to the next step of the installation process, which involves wiring the 240 volt breaker to the electrical system.
Step 3: Installing The 240 Volt Breaker
Once you have ensured the compatibility of the breaker with your electrical panel and positioned it correctly, it is time to proceed with the installation process. Properly connecting the hot wires to the breaker terminals is crucial for ensuring the safe and efficient functioning of your electrical system. Follow these steps to install the 240 volt breaker:
Ensuring compatibility of the breaker with the electrical panel
Before installing the 240 volt breaker, it is essential to ensure that it is compatible with your electrical panel. Refer to the instructions provided by the manufacturer to determine the specific requirements for your breaker and panel. Confirm that the breaker is designed to handle the voltage and amperage of your electrical system. Using an incompatible breaker can lead to overheating, excessive wear and tear, and even electrical malfunctions.
Positioning the breaker in the correct slot
Once you have confirmed compatibility, locate the appropriate slot for the 240 volt breaker in your electrical panel. Typically, the slot for the breaker will be marked with the corresponding voltage rating. Carefully insert the breaker into the slot, ensuring that it is securely seated. The breaker should fit snugly and align with the other breakers in the panel. If there is any uncertainty about the positioning, refer to the panel’s manual or consult a professional electrician for guidance.
Connecting the hot wires to the breaker terminals
Now it’s time to connect the hot wires to the breaker terminals. Start by removing the outer insulation covering the end of each hot wire. Using a pair of wire strippers, strip about 1/2 inch of insulation from the ends of the wires. Once stripped, firmly insert each wire into the corresponding terminal on the breaker. The terminals are usually labeled as “Line” or “Load,” indicating the incoming or outgoing power respectively.
Ensure that the wires are tightly secured within the terminals and that there are no loose strands exposed. Loose connections can cause arcing and produce heat, leading to potential hazards. After connecting the wires, carefully tighten the screws on the terminals to secure them in place.
It is crucial to respect all local electrical codes and guidelines when performing any electrical work. If you are unsure about any aspect of the installation process or do not have the necessary knowledge and experience, it is advisable to consult a licensed electrician.

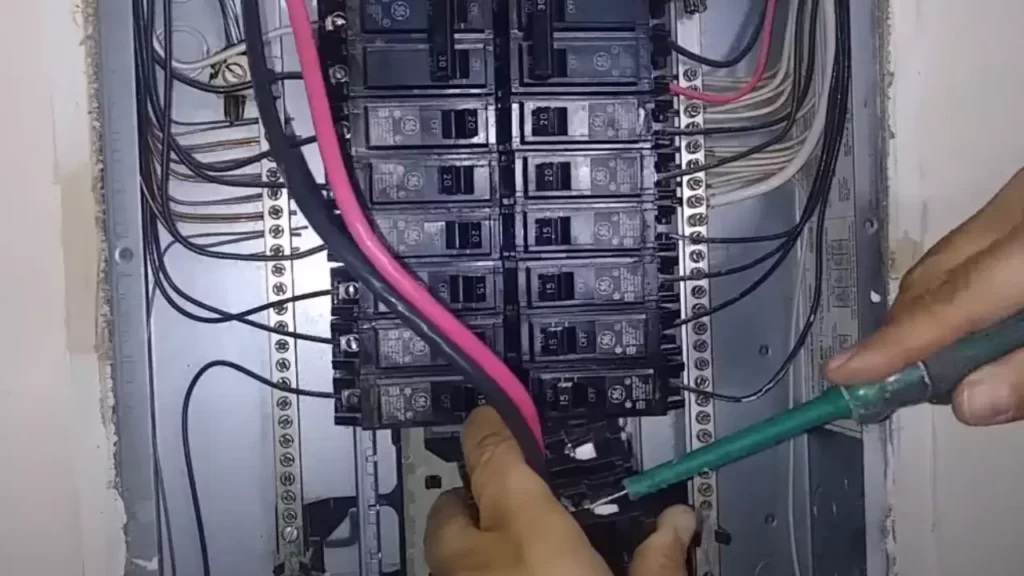
Step 4: Connecting The Circuit Wires To The Breaker
This is the crucial step where you’ll connect the circuit wires to the breaker. Make sure you follow each sub-step carefully to ensure a safe and effective installation.
Preparing the circuit wires for connection
Before connecting the wires, it’s important to prepare them appropriately. Follow these steps:
- Strip the insulation: Use a wire stripper to remove approximately 3/4 inch of insulation from the end of each circuit wire that will be connected to the breaker. This will expose the bare copper for secure connections.
- Identify the hot wires: In most cases, the black and red wires are considered hot wires. Identify the hot wires in your circuit and make sure you know which terminal they will be connected to on the breaker.
- Label the wires: To avoid confusion, it’s a good idea to label each wire. Using electrical tape or wire labels, mark each wire with its corresponding circuit designation. For example, “A” for the hot wire connected to circuit A, and so on.
- Ensure proper wire size: Double-check that the wire gauge is appropriate for the breaker’s amperage rating. Using wires that are too small can cause overheating and potentially lead to electrical hazards.
Attaching the circuit wires to the breaker terminals
Now that the wires are prepared, it’s time to connect them to the breaker terminals. Follow these steps carefully:
- Locate the terminals: Identify the terminal screws on the breaker. These are usually labeled as “Line” or “Load.”
- Attach the hot wires: Take the stripped end of each hot wire and securely attach it to the appropriate terminal screw on the breaker. Use a screwdriver to tighten the screws, ensuring a snug and secure connection. Refer to the manufacturer’s instructions or breaker labeling for detailed information.
- Connect the neutral wire: If your circuit includes a neutral wire, locate the neutral bus bar in the breaker panel. Attach the neutral wire to a neutral terminal or bus bar. Again, use a screwdriver to tighten the screw securely.
- Grounding the circuit: If a ground wire is present in your circuit, connect it to the grounding terminal or bus bar assigned for this purpose. Ensure the connection is tight and secure.
Properly securing the wires to prevent any loose connections
Loose connections can lead to dangerous situations. Ensure each wire is properly secured to prevent any issues down the line. Follow these guidelines:
- Double-check the connections: After attaching the wires, visually inspect each one to verify they are tightly secured to the breaker and bus bars.
- Tug test: Gently tug on each wire to make sure it doesn’t come loose. If any wire feels loose, tighten the terminal screw accordingly.
- Organize the wires: Use zip ties or cable clamps to bundle and secure the wires neatly. This will prevent them from dangling or getting entangled with other components inside the breaker panel.
- Inspect for insulation damage: Check all wire insulation for signs of damage. If any insulation is frayed or compromised, cut off the affected area and strip the wire again.
By carefully following these steps and ensuring secure connections, you’ll have successfully connected the circuit wires to the breaker.
Step 5: Testing The Installation
Once you have completed the previous steps of installing a 240-volt breaker, it’s crucial to ensure that your installation is working correctly. This step involves checking the connections for any signs of damage or loose wires, verifying that the breaker is firmly in place, and finally, testing the circuit for functionality.
Checking the connections for any signs of damage or loose wires
Before proceeding with testing, it’s important to visually inspect the connections for any signs of damage or loose wires. This can be done by carefully examining the wiring connected to the breaker and ensuring that all connections are secure and tightened properly. Look out for any frayed or damaged wires, as well as loose terminal screws.
Verifying that the breaker is securely in place
Next, verify that the breaker is securely installed in the panel. Double-check that it is aligned with the mounting brackets and properly inserted into the bus bar slots. Give it a gentle wiggle to ensure it is snug and firmly in place.
Turning on the power and testing the circuit for functionality
Once you have visually inspected the connections and verified the breaker’s secure installation, it’s time to turn on the power and test the circuit for functionality. Follow these steps:
- Switch the main power back on at the electrical panel by flipping the main breaker to the “on” position.
- Turn on the circuit that the 240-volt breaker is connected to by flipping the breaker switch to the “on” position.
- Test the circuit by plugging in a device that requires a 240-volt power supply, such as an appliance or tool. Ensure the device is in good working condition.
- If the device powers up and operates properly, it indicates that the installation and wiring are successful.
However, if the device does not power up or exhibits any issues, it is essential to switch off the power immediately and recheck all the connections and wiring. Make sure everything is securely connected and there are no loose or damaged wires. If you are unable to identify the problem, it’s always best to consult a qualified electrician for further assistance.
Testing the installation is a vital part of the process to ensure your 240-volt breaker is installed correctly and functioning safely. Taking the time to carefully inspect the connections, verify the breaker’s secure placement, and test the circuit’s functionality will help prevent any potential electrical problems and provide peace of mind.
Step 6: Finalizing The Installation
Step 6: Finalizing the Installation
Once you have successfully installed the 240 volt breaker, it is important to complete the final steps to ensure the safety and functionality of your electrical system. Paying attention to these details will prevent any potential hazards or confusion in the future. In this step, we will cover three important tasks: closing the electrical panel cover, labeling the new breaker for easy identification, and conducting a final inspection of the installation.
Closing the electrical panel cover
Closing the electrical panel cover is a crucial step in finalizing the installation of your 240 volt breaker. It ensures that the internal components of the panel are protected from any foreign objects or accidental contact. To close the panel cover, simply align it with the panel and firmly press it into place until you hear a click. Make sure that all the screws or latches securing the cover are tightened securely to prevent any accidental exposure to live wires. Additionally, double-check that the cover gasket is intact and properly sealing the panel to prevent any moisture or dust build-up.
Labeling the new breaker for easy identification
Labeling the new breaker is an essential step for easy identification and future maintenance of your electrical system. By clearly marking the breaker, you can quickly locate and isolate it if needed. To label the new breaker, use a permanent marker or label maker to indicate its corresponding circuit or appliance. Ensure that the label is clear and legible, allowing anyone to easily identify the purpose of the breaker. Additionally, consider including the date of installation, which can be helpful for future reference and troubleshooting.
Conducting a final inspection of the installation for safety precautions
Before considering the installation complete, it is crucial to conduct a final inspection to ensure safety precautions are met. Take a few moments to visually inspect the breaker connections, ensuring they are secure and tightly fastened. Pay attention to any signs of damage, loose wires, or improper connection that could pose a safety risk. Using a non-contact voltage tester, double-check that the power to the breaker is turned off before touching any components for inspection. Finally, ensure that all wires are neatly organized and not overcrowding the panel, as this can lead to overheating and potential hazards.
In conclusion, finalizing the installation of a 240 volt breaker involves closing the electrical panel cover, labeling the new breaker for easy identification, and conducting a final inspection for safety precautions. Following these steps will not only ensure the proper functionality of your electrical system but also provide a secure and organized setup. Take the time to complete these tasks accurately, and you can rest assured that your breaker installation is done correctly.
Additional Tips And Troubleshooting
Installing a 240 volt breaker can be a challenging task, but with the right knowledge and guidance, you can successfully complete the job. In this section, we will provide you with additional tips and troubleshooting steps that will help you ensure a smooth installation process and address any circuit breaker-related problems that may arise. Read on to learn more about common issues encountered during the installation process, troubleshooting steps for circuit breaker-related problems, and safety reminders for ongoing maintenance and future repairs.
Common Issues Encountered During the Installation Process
During the installation process of a 240 volt breaker, it’s not uncommon to encounter certain issues that may hinder progress. Below are some of the common issues to be aware of:
- Incorrect wiring: One of the most common issues is improperly wiring the breaker, which can lead to circuit breakers tripping or not functioning properly. Always refer to the manufacturer’s instructions and ensure you connect the wires correctly.
- Inadequate space in the electrical panel: Sometimes, the electrical panel may not have enough space to accommodate the new breaker. This can be a problem, as it is essential to have proper clearance and spacing to prevent overheating and ensure safety. In such cases, consulting a professional electrician is highly recommended.
- Loose connections: Loose connections can cause electrical arcing, which can be dangerous and may result in breaker malfunctions or even electrical fires. It’s crucial to double-check and tighten all connections to avoid such issues.
Troubleshooting Steps for Circuit Breaker-Related Problems
If you encounter any problems related to the circuit breaker after installing a 240 volt breaker, follow these troubleshooting steps:
- Check for tripped breakers: If the circuit breaker keeps tripping, causing a loss of power, check the breaker and see if it has switched to the “off” position. If so, reset it to the “on” position and monitor the situation. If it continues to trip, there may be an underlying issue that requires further investigation.
- Inspect for electrical overload: Electrical overloads can trip circuit breakers. Assess the appliances and devices connected to the circuit and ensure they are not exceeding the breaker’s capacity. If necessary, redistribute the load by moving certain appliances to a different circuit.
- Look for signs of damage: Inspect the circuit breaker for any signs of physical damage, such as burns or cracks. If you notice any damage, it is essential to replace the breaker immediately to prevent any safety hazards.
- Test with a multimeter: If the breaker appears to be functioning properly, but you’re still experiencing issues, you can use a multimeter to test for continuity and voltage. This can help identify any faults in the electrical circuit.
Safety Reminders for Ongoing Maintenance and Future Repairs
Even after successfully installing a 240 volt breaker, it is important to prioritize safety during ongoing maintenance and any future repairs. Here are some key safety reminders:
- Always turn off the main power supply before working on any electrical components to prevent electric shocks or injuries.
- Regularly inspect the breaker for any signs of wear or damage. Replace worn-out or faulty breakers promptly to prevent potential hazards.
- When performing any repairs or modifications to the electrical system, ensure you follow the proper procedures and adhere to local electrical codes and regulations. If unsure, consult a licensed electrician.
- Never exceed the breaker’s rated capacity. Overloading the circuit can lead to overheating, fire hazards, and damage to electrical appliances.
By following these additional tips and taking into account the troubleshooting steps and safety reminders, you can install a 240 volt breaker efficiently and enhance the overall safety and functionality of your electrical system.
Frequently Asked Questions For How To Install 240 Volt Breaker
How Do You Add A 240V Breaker To A Full Panel?
To add a 240V breaker to a full panel, follow these steps: 1. Turn off power to the panel. 2. Identify a 240V breaker spot and remove the knockout. 3. Connect the breaker’s hot wires to the panel’s bus bars.
4. Connect the breaker’s neutral wire to the panel’s neutral bar. 5. Secure the breaker in place and turn the power back on.
What Kind Of Breaker Do I Need For 240 Volts?
You need a double-pole breaker for 240 volts.
How Many Wires Are Needed For 240V?
For 240V power, two wires are needed. One is usually a hot wire (black or red), and the other is a neutral wire (white). Make sure to consult a qualified electrician for proper installation.
Does 240V Need A 2 Pole Breaker?
Yes, a 240V electrical circuit requires a 2 pole breaker.
Conclusion
To sum up, installing a 240 volt breaker doesn’t have to be a daunting task. By following the step-by-step guide provided in this blog post, you can ensure a safe and efficient installation process. Remember to always prioritize safety, double-check your work, and if you’re unsure about any step, consult a professional electrician.
Now you can confidently embark on your electrical project and enjoy the benefits of a properly installed 240 volt breaker.