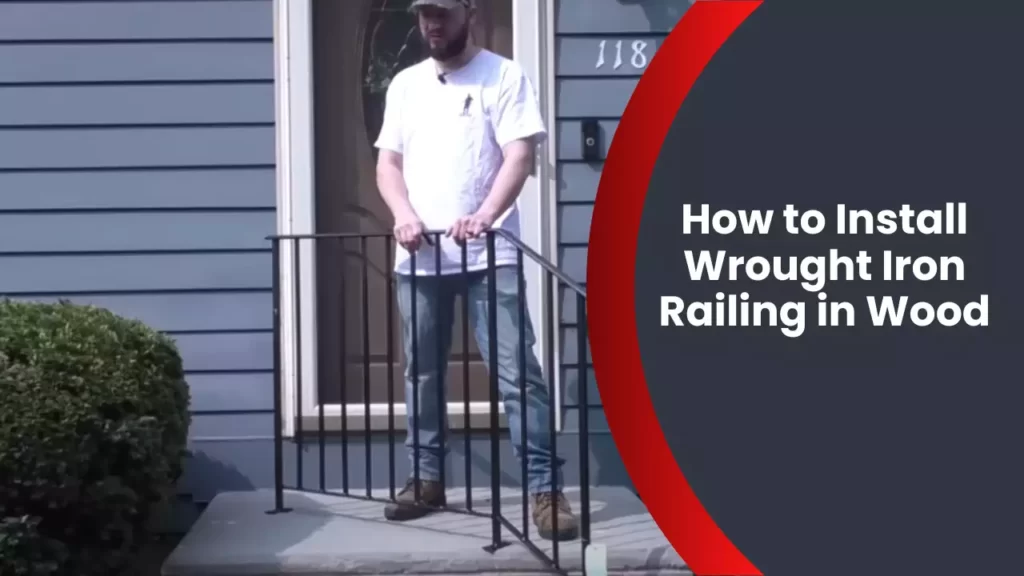
To install wrought iron railing in wood, you will need to attach the railing brackets to the wood posts and secure the railing into place using screws or bolts. Now, let’s delve into the step-by-step process of how to properly install wrought iron railing in wood.
Wrought iron railings are not only aesthetically pleasing but also enhance the safety and durability of your wooden structure. Whether you are installing a railing for stairs or a balcony, it is essential to follow the correct installation procedure to ensure its stability and longevity.
In this guide, we will provide you with a detailed walkthrough of how to install a wrought iron railing in wood, allowing you to undertake this project with confidence. By carefully following these steps, you can complete the installation successfully and enjoy the many benefits that a wrought iron railing brings.
Understanding The Benefits Of Wrought Iron Railing
Understanding the Benefits of Wrought Iron Railing
Wrought iron railing is a popular choice for enhancing both the functionality and aesthetics of your wooden staircase or balcony. This timeless and versatile material offers numerous benefits that make it a superior option compared to other railing materials. In this section, we will delve into three key advantages of installing wrought iron railing: enhancing safety and security, adding a touch of elegance and style, and increasing property value.
Enhance Safety and Security
When it comes to ensuring the safety of your family and guests, wrought iron railing proves to be an excellent investment. Its sturdy construction and durability offer unparalleled strength and security. Wrought iron is resistant to external forces, making it highly resistant to breakage and vandalism. This type of railing acts as a protective barrier, preventing accidents and falls, especially in high traffic areas such as staircases or balconies.
Furthermore, wrought iron railing provides enhanced security for your property. Its solid structure acts as a deterrent for intruders, keeping your home safe and secure. With its formidable presence, potential trespassers will think twice before attempting to access your property.
Add a Touch of Elegance and Style
If you are looking to elevate the visual appeal of your wooden structure, wrought iron railing is just the solution. Its intricate designs and ornate patterns can transform any ordinary space into a breathtaking masterpiece. From traditional to contemporary styles, there are countless design options available to suit your personal taste and complement your existing decor.
The elegance and charm that wrought iron railing imparts to your home are unparalleled. Its timeless beauty and remarkable craftsmanship are sure to capture the attention of your guests. Additionally, the material’s versatility allows for customization, enabling you to create a unique railing that perfectly matches your distinct vision.
Increase Property Value
If you are considering selling your property or simply desire to boost its market value, installing wrought iron railing is a wise investment. Potential buyers are often drawn to the allure and durability of wrought iron railing. This sought-after feature can significantly increase the overall value of your home or commercial property.
Moreover, wrought iron railing offers long-lasting performance with minimal maintenance. Its resistance to rust and weather elements ensures that it will maintain its stunning appearance for years to come.
In conclusion, the benefits of wrought iron railing are truly remarkable. With its ability to enhance safety and security, add a touch of elegance and style, and increase property value, this iconic material continues to be a popular choice for homeowners and businesses alike. By choosing wrought iron railing, you can achieve both functionality and aesthetics, creating a space that is not only safe but also visually captivating.
Choosing The Right Wrought Iron Railing For Your Wood Deck
Installing a wrought iron railing can be a great way to enhance the beauty and safety of your wood deck. With its timeless appeal and durability, wrought iron railing adds a touch of elegance while providing the necessary support. However, choosing the right wrought iron railing for your wood deck involves considering various factors. In this section, we will explore the key aspects you need to consider, including the style and design, height and length requirements, and the appropriate materials.
Consider the Style and Design
When selecting a wrought iron railing for your wood deck, it’s important to consider the style and design that will complement your overall aesthetics. The railing should blend seamlessly with the existing design elements of your deck and home exterior. Take into account the architectural style of your house and choose a railing design that complements it. Whether you prefer ornate and intricate patterns or a more minimalist and contemporary look, there are various designs available to cater to different preferences.
Determine the Height and Length Requirements
The height and length of the wrought iron railing are crucial factors to ensure it meets safety standards and provides adequate support. Making sure the railing is the right height is essential to prevent accidents and ensure compliance with building codes. Measure the height of your deck and consider the appropriate railing height that will provide proper hand support when walking up or down the steps. Additionally, consider the length of the railing needed to cover the entire span of your deck, ensuring it is securely attached at each end.
Select the Appropriate Materials
Choosing the right materials for your wrought iron railing is essential to ensure its longevity and resistance to weather conditions. Opt for high-quality wrought iron that is specifically designed for outdoor use. Look for materials that are treated to prevent rust and corrosion, as exposure to the elements can damage the railing over time. Additionally, consider the finish of the railing, whether you prefer a natural iron look or prefer a powder-coated finish that offers added protection. Taking these factors into account will help you select the appropriate materials for a durable and visually appealing wrought iron railing.
Preparing Your Wood Deck For Installation
Installing wrought iron railing on a wood deck not only enhances its aesthetic appeal but also provides safety and durability. Before you start the installation process, it is important to prepare your wood deck properly. This ensures a smooth and successful project, while also preventing any damage to your deck. In this section, we will guide you through the steps of preparing your wood deck for the installation of wrought iron railing.
Assessing the Deck’s Structural Integrity
Before beginning any installation project, it is crucial to assess the structural integrity of your wood deck. This step ensures that your deck is strong enough to support the weight and pressure of the wrought iron railing. Here are the steps you should follow:
- Inspect the deck for any signs of rot, decay, or damage. Pay close attention to the posts, beams, and joists.
- Check for loose or missing bolts, screws, or nails. Tighten or replace them as necessary.
- Look for any signs of sagging or unevenness in the deck. If you notice any areas that need reinforcement, consider consulting an expert before proceeding.
By thoroughly assessing your deck’s structural integrity, you can address any issues beforehand, ensuring a safe and secure installation of the wrought iron railing.
Cleaning and Preparing the Surface
Properly cleaning and preparing the surface of your wood deck is essential for optimal adhesion and longevity of the wrought iron railing. Follow these steps to ensure a clean and well-prepared surface:
- Sweep the deck to remove any debris, leaves, or dirt.
- Use a pressure washer or a deck cleaner to remove deep-seated dirt, mold, mildew, and stains. Follow the manufacturer’s instructions for the specific cleaner you choose.
- Allow the deck to dry thoroughly before proceeding.
- Inspect the surface for splinters or rough areas. Sand them down to create a smooth surface.
By cleaning and preparing the surface, you are creating an ideal base for the installation of the wrought iron railing, ensuring a strong and long-lasting bond.
Measuring and Marking the Installation Points
Accurate measurements and markings are crucial to ensure the proper installation of the wrought iron railing. Follow these steps to mark the installation points:
- Measure and mark the desired height of the railing at each end of the deck. Use a level to ensure the markings are straight and even.
- Using a tape measure, mark the location of each post along the deck, making sure they are evenly spaced.
- Determine the precise position and angle for each railing section. Mark these points carefully to ensure accuracy.
By measuring and marking the installation points accurately, you will have a clear guide to follow during the installation process, resulting in a visually appealing and secure wrought iron railing on your wood deck.
Installing Wrought Iron Railing Step-By-Step
When it comes to enhancing the safety and aesthetic appeal of your wood deck or staircase, installing a wrought iron railing can make a significant difference. Not only does it provide a sturdy and durable support, but it also lends a classic and timeless look to your space. If you’re wondering how to install a wrought iron railing in wood, this step-by-step guide will walk you through the process.
Step 1: Positioning and Securing the Railing Posts
Before diving into the installation process, start by determining the ideal location of the railing posts. Make sure to choose spots that provide maximum stability and accessibility. Once you’ve finalized the positions, mark them on your wood surface using a pencil or chalk. Now you are ready to secure the railing posts in place. Follow these steps:
- Drill pilot holes into the marked spots to prevent the wood from splitting.
- Insert the railing posts into the pilot holes and ensure they stand upright.
- Use a level to confirm that the posts are perfectly vertical.
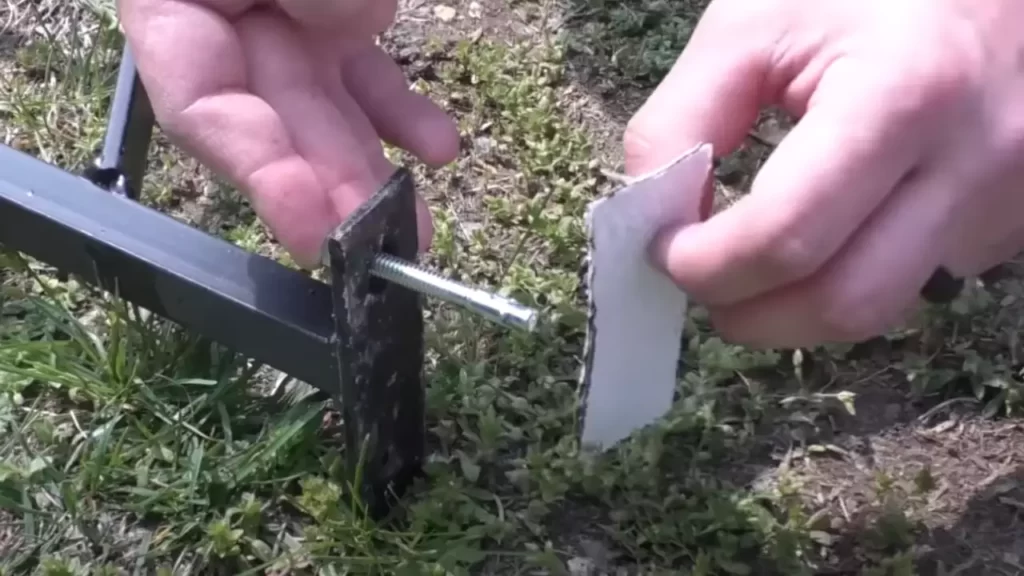
- Secure the posts by driving screws or lag bolts through the holes in the base flanges and into the wood.
Step 2: Installing the Post Caps and Base Flanges
Once the railing posts are securely in place, it’s time to add the finishing touches with post caps and base flanges. Here’s how to do it:
- Slide the post caps onto the top of each railing post to protect them from moisture and add a touch of elegance.
- Position the base flanges at the bottom of each post, ensuring they align with the railing posts.
- Secure the base flanges to the wood surface using screws or lag bolts.
Step 3: Installing the Balusters
Now that the posts and base flanges are secured, it’s time to install the balusters, which are the vertical bars that provide support and safety. Follow these steps to install the balusters:
- Measure and mark the spacing between each baluster, ensuring they are evenly spread across the railing.
- Drill pilot holes into the wood surface at the marked spots.
- Insert the balusters into the pilot holes, making sure they are vertically aligned with the posts and base flanges.
- Secure the balusters by driving screws or lag bolts through the holes in the baluster brackets and into the wood.
Step 4: Attaching the Top Rail
The final step in installing a wrought iron railing in wood is to attach the top rail, which provides an additional safety feature and acts as a handrail. Here’s how to do it:
- Measure and cut the top rail to the desired length, ensuring the ends are perfectly square.
- Position the top rail on top of the balusters, aligning it with the railing posts.
- Secure the top rail by driving screws or lag bolts through the holes in the brackets and into the wood.
By following these steps, you can easily install a wrought iron railing in wood, adding both functionality and style to your outdoor or indoor space. Remember to double-check that all components are securely fastened and conduct regular maintenance to keep your railing in top-notch condition for years to come.

Ensuring Proper Fastening And Sturdy Installation
When it comes to installing wrought iron railing in wood, ensuring proper fastening and sturdy installation is crucial. By following the right steps and using the correct materials, you can ensure that your railing will not only enhance the aesthetics of your property but also provide safety and durability for years to come. In this section, we will discuss three essential factors to consider to achieve a secure and long-lasting installation:
Using the Right Screws and Anchors
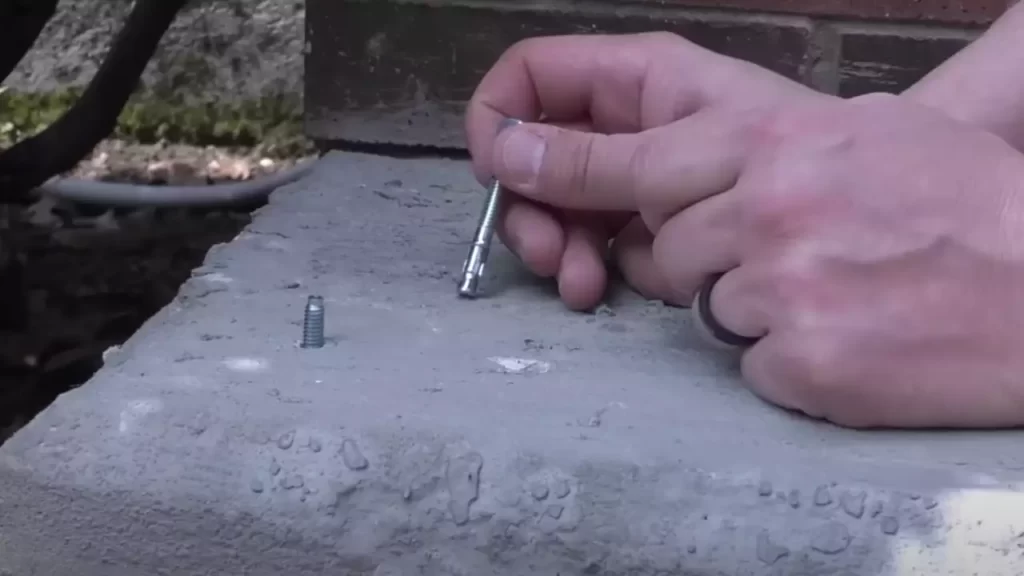
To begin the installation, it is imperative to use the right screws and anchors for mounting the wrought iron railing on the wood. Using standard wood screws may not provide the necessary strength and stability required. Consider opting for specialized screws designed specifically for this purpose, such as lag screws or structural screws. These screws have greater holding power and will help to prevent the railing from becoming loose over time.
Additionally, using anchors can further enhance the stability of the installation. Anchors create a more robust connection between the railing and the wood, minimizing the risk of any wobbling or loosening. There are various types of anchors available, such as wedge anchors or expanding anchors, which are suitable for different types of mounting surfaces. Ensure to select the appropriate anchors based on the material and strength of the wood you are working with.
Checking for Stability and Levelness
Once you have securely fastened the railing to the wood, it is crucial to check for stability and levelness. Using a level, ensure that the railing is perfectly aligned both horizontally and vertically. A level railing not only looks aesthetically pleasing but also prevents any potential accidents due to an uneven or sloping installation.
In addition to the level, gently shake or apply pressure to the railing to test its stability. If you notice any movement or wobbling, it indicates that the fastening might require reinforcement. Taking the time to identify and address any stability issues at this stage will save you from potential problems later on.
Reinforcing the Connections for Longevity
Lastly, to ensure the longevity of your wrought iron railing installation, it is vital to reinforce the connections. This includes adding extra support brackets or braces at intervals along the railing to distribute the weight and reduce stress on individual points of attachment. Reinforcing the connections will help to prevent any potential loosening or warping caused by regular use or external factors, such as strong winds or heavy impacts.
Additionally, periodically inspect the railing for any signs of wear or damage and promptly address any issues. Regular maintenance, such as tightening screws or replacing any worn-out parts, will extend the lifespan of your installation and keep it looking its best.
In conclusion, ensuring proper fastening and sturdy installation when installing wrought iron railing in wood is essential for both safety and longevity. By using the right screws and anchors, checking for stability and levelness, and reinforcing the connections, you can achieve a secure and lasting installation that adds beauty and functionality to your property for years to come.
Finishing Touches And Maintenance
After successfully installing your wrought iron railing in wood, it’s essential to pay attention to the finishing touches and maintenance to ensure its long-lasting beauty and functionality. This section will guide you through the steps of keeping your railing in pristine condition, from painting or coating the wrought iron to regular cleaning and inspections, as well as providing useful seasonal maintenance tips.
Painting or Coating the Wrought Iron Railing
One of the crucial steps in maintaining the aesthetic appeal of your wrought iron railing is painting or coating. Not only does it enhance the overall look, but it also provides a protective layer against rust and corrosion. Here’s a step-by-step guide to help you:
- Preparation: Before starting the painting process, make sure to clean the railing thoroughly to remove any dirt, dust, or debris. Use a wire brush or sandpaper to remove any existing rust or chipped paint.
- Priming: Apply a coat of rust-inhibiting primer to the entire railing. This will create a solid foundation for the paint and increase its durability.
- Painting: Choose a high-quality paint suitable for outdoor use. Apply two or three coats of paint, allowing each coat to dry completely before proceeding to the next. Use smooth and even brush strokes to ensure a professional finish.
- Finishing: Once the paint is dry, apply a clear coat or sealant to protect the paint from fading and extend its lifespan. This will also add an extra layer of protection against UV rays.
Regular Cleaning and Inspections
Regular cleaning and inspections are essential for maintaining the longevity and safety of your wrought iron railing. Follow these simple steps to keep it looking its best:
- Cleaning: Use a soft brush or cloth to remove any dirt, dust, or debris from the railing. If there are stubborn stains or bird droppings, you can mix mild soap with water to gently scrub the affected areas. Rinse thoroughly with water and dry with a clean cloth.
- Inspections: Regularly inspect the railing for any signs of damage, such as loose screws, rust spots, or chipped paint. Tighten any loose screws and address any issues promptly to prevent further damage or accidents.
Seasonal Maintenance Tips
With each changing season, slight adjustments in maintenance may be required. Here are some tips to help you keep your wrought iron railing in top shape throughout the year:
| Season | Maintenance Tips |
|---|---|
| Spring | Inspect for any weather-related damage or wear. Touch up any chipped paint or rust spots. |
| Summer | Regularly clean the railing to remove pollen, dust, and other outdoor debris. Consider applying a fresh coat of clear coat or sealant at the end of the season. |
| Fall | Remove any fallen leaves or branches that may accumulate around or cling to the railing. Inspect for any signs of rust or damage and address accordingly. |
| Winter | Keep the snow and ice away from the railing as they can cause damage. Use a plastic shovel or broom to safely remove any accumulation. |
By following these tips for finishing touches and maintenance, you can ensure that your wrought iron railing remains a stunning and secure addition to your wooden structure for years to come.
Frequently Asked Questions About Installing Wrought Iron Railing
If you’re considering adding a touch of elegance and durability to your wood deck or concrete surface, installing wrought iron railing is a great choice. However, you may have a few questions before getting started. In this section, we’ll address some common concerns regarding the installation process. Read on to find out if you can install wrought iron railing on a concrete surface, what tools you’ll need, and how long the installation typically takes on a wood deck.
Can I install wrought iron railing on a concrete surface?
If you have a concrete surface and are wondering if it’s possible to add wrought iron railing, the answer is yes! Installing wrought iron railing on concrete requires different tools and techniques compared to a wood deck installation, but it can be done. You’ll need to use specific anchors designed for concrete surfaces to secure the railing in place. These anchors provide a strong and stable connection, ensuring the safety and longevity of your wrought iron railing.
What tools do I need for the installation process?
Before you begin the installation process, it’s important to have the right tools at your disposal. Here’s a list of the essential tools you’ll need:
- Measuring tape
- Drill
- Concrete anchors (if installing on a concrete surface)
- Wrench
- Level
- Pencil
- Saw (if necessary for cutting the railing to size)
- Safety goggles and gloves
Having these tools handy will make the installation process much smoother and ensure a secure and professional-looking result.
How long does it take to install wrought iron railing on a wood deck?
The time it takes to install wrought iron railing on a wood deck can vary depending on factors such as the size of the deck, complexity of the design, and your level of experience. However, as a general guideline, it typically takes around a few hours to a day to complete the installation process.
Keep in mind that this estimate may change if you encounter any unforeseen issues or if you have additional customization requests. It’s always a good idea to set aside ample time and plan your installation accordingly, especially if you’re new to this type of project.
Frequently Asked Questions
Can You Replace Wood Spindles With Wrought Iron?
Yes, you can replace wood spindles with wrought iron.
How Much Does It Cost To Replace Wood Spindles With Wrought Iron?
The cost to replace wood spindles with wrought iron varies but typically ranges from $25 to $50 per spindle.
Is Wrought Iron Railing Cheaper Than Wood?
Yes, wrought iron railing is usually cheaper than wood railing.
How Do You Install Iron Stair Railings?
To install iron stair railings, follow these steps: 1. Measure and mark where the railings will go. 2. Secure brackets to the wall or floor. 3. Attach the railings to the brackets. 4. Ensure the railings are level and secure.
5. Test the railings for stability and make any necessary adjustments.
Conclusion
To sum up, installing wrought iron railing in wood can add both functionality and style to your home. With the right tools and approach, it is a manageable DIY project that adds value to your property. By following the step-by-step guide provided in this blog post, you can successfully enhance the safety and aesthetic appeal of your staircase or balcony.
Enjoy the process and the end result of your hard work!