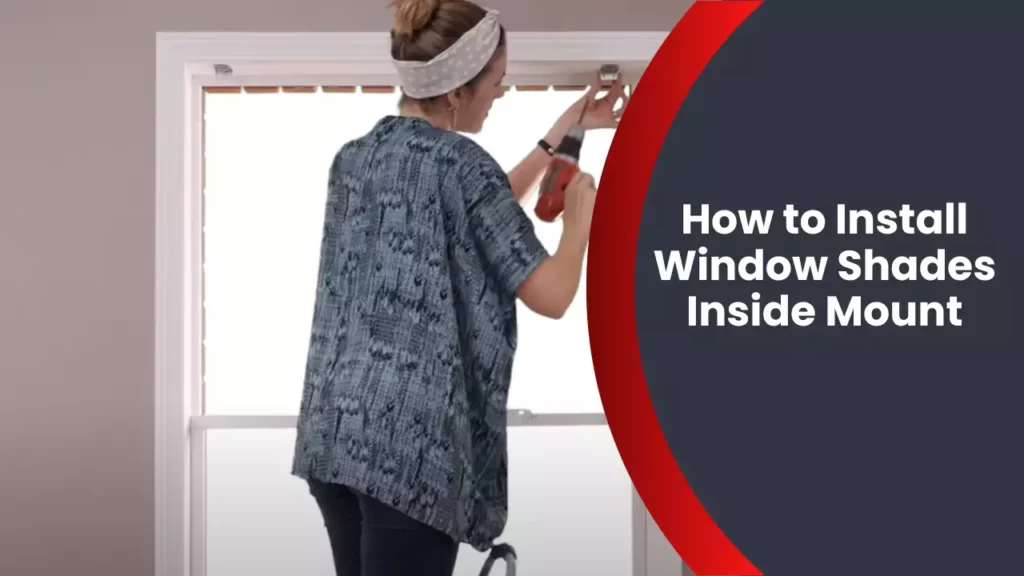
To install window shades inside mount, first, measure the window frame accurately. Then, attach the brackets securely to the top inside corners of the window frame and snap the shade into place.
Understanding Inside Mount Window Shades
When it comes to window treatments, inside mount window shades are a popular choice among homeowners. These shades are designed to fit neatly inside the window frame, providing a sleek and streamlined look. Understanding how to install inside mount window shades can bring a touch of elegance to any room. In this blog post, we will explore the benefits of installing inside mount window shades, as well as some popular types to consider.
Benefits of Inside Mount Window Shades
Inside mount window shades offer several advantages over other types of window treatments. Here are some key benefits to consider:
- 1. Enhanced Aesthetics: Inside mount window shades create a clean and polished appearance, as they fit snugly inside the window frame. This sleek design allows for a seamless integration with the existing decor, adding a touch of sophistication to the room.
- 2. Maximized Space: By installing the shades inside the window frame, you can make the most of your available space. Inside mount shades do not obstruct the window sill or trim, allowing for easy access and utilization of those areas.
- 3. Improved Privacy and Light Control: Inside mount window shades provide excellent light control and privacy. When properly installed, they fit tightly against the window, minimizing the gaps that can let unwanted light or prying eyes in.
- 4. Preserved View: With inside mount shades, you can enjoy an unobstructed view when the shades are fully raised. This is especially beneficial if you have a beautiful scenery outside your window that you don’t want to hide behind bulky window treatments.
Popular Types of Inside Mount Window Shades
When it comes to inside mount window shades, there are various options to choose from. Here are a few popular types:
| Type | Description |
|---|---|
| Roman Shades | Roman shades are a timeless and sophisticated option. They are made of fabric and can be raised and lowered using a cord system or a motorized mechanism. |
| Honeycomb/Cellular Shades | Honeycomb or cellular shades are energy-efficient and offer excellent insulation. They are composed of individual cells that trap air, providing insulation and helping regulate the temperature in your home. |
| Roller Shades | Roller shades are simple and versatile. They are made of a single piece of material that rolls up and down using a spring mechanism or a chain control. |
| Wood Blinds | Wood blinds add warmth and natural beauty to your windows. They are available in different finishes and slat sizes, allowing for customization according to your preference. |
These are just a few examples of the wide range of inside mount window shades available. When choosing the right type for your space, consider factors such as your desired level of light control, privacy requirements, and the overall aesthetic you wish to achieve.
Measuring Your Windows For Inside Mount Shades
Before you install window shades inside mount, it is important to accurately measure your windows to ensure a perfect fit. Measuring your windows correctly will not only ensure a professional-looking installation but also guarantee optimal light control and privacy. In this step-by-step guide, we will walk you through the process of measuring your windows for inside mount shades, so you can confidently shop for the perfect shades for your home.
Tools needed for accurate measurements
Before you begin measuring your windows, gather the following tools to ensure accurate measurements:
- Tape measure with both imperial and metric units
- Pencil or pen
- Paper or notebook to record measurements
Step-by-step guide to measuring your windows
Follow these steps to measure your windows for inside mount shades:
- Start with the width measurement: Measure the width of the inside of your window frame in three different locations – at the top, middle, and bottom. Record the narrowest measurement. This will ensure that your shades fit perfectly without blocking any light.
- Next, measure the height: Measure the height of the inside of your window frame in three different locations – on the left side, in the middle, and on the right side. Record the longest measurement. This will ensure that your shades cover the entire window without leaving any gaps.
- Lastly, measure the depth: Measure the depth of your window frame from the window glass to the front of the frame. This measurement will help you determine if your chosen shade will fit properly inside the window frame. Record the measurement, especially if your windows have shallow sills or if you plan to install shades that require a specific minimum depth.
By following these simple steps and using the right tools, you can accurately measure your windows for inside mount shades. Remember to take each measurement three times and record the narrowest width and longest height for the best fit. Once you have your measurements, you can confidently shop for window shades that will enhance the beauty and functionality of your space.
Purchasing The Right Size Window Shades
The key to a successful installation of window shades is purchasing the right size. Whether you opt for off-the-shelf options or decide to customize your shades, ensuring they fit perfectly is crucial to achieving the desired look and functionality. In this section, we will explore both options, starting with the off-the-shelf alternatives.
Considering the off-the-shelf options
Off-the-shelf window shades are a convenient choice for many homeowners. They come in standardized sizes that fit most windows, making the purchasing process quick and easy. When opting for this option, keep the following points in mind to ensure the best fit:
- Measure your windows: Before purchasing off-the-shelf shades, accurately measure the dimensions of your windows. Take both the width and height measurements to ensure a proper fit.
- Consult the size chart: Different manufacturers may have slightly varied sizing guidelines. Refer to the size chart provided by the manufacturer to determine the correct shade size for your window.
- Allow for some overlap: It’s advisable to choose shades that are slightly wider and longer than the actual window frame. This allows for a better light blockage and a snug fit.
By considering these factors, you can confidently navigate the off-the-shelf options and find a window shade that suits your needs.
Customizing shades for a perfect fit
If your windows have unique dimensions or you simply prefer a tailored look, customizing window shades is the way to go. Here are the steps to ensure they fit perfectly:
- Measure your windows: As with off-the-shelf shades, accurate measurements are essential. Measure both the width and height of your windows, paying attention to any irregularities or obstructions that may affect the installation.
- Consult a professional: Working with a professional window treatment specialist ensures precise measurements and expert advice on customization. Their expertise can help you determine the best style and fabric for your shades.
- Select the customization options: Customizing your window shades allows you to choose from various options, such as the type of fabric, color, and control mechanisms. Take your time to decide on the features that suit your style and functional preferences.
- Place your order: Once you have finalized your customization preferences, place an order with the window shade manufacturer or your chosen specialist. They will then create your custom shades based on your specific measurements and specifications.
- Professional installation: When your custom shades are ready, it is recommended to have them professionally installed. This ensures proper fit, function, and longevity, giving you peace of mind knowing that your window shades are installed to the highest standard.
Customizing window shades guarantees a perfect fit and the freedom to design your window treatment according to your unique style. By following these steps, you can achieve the ideal window shades installation inside mount.
Gathering The Required Tools And Materials
Before you begin installing window shades inside mount, it’s important to gather all the necessary tools and materials. Having everything you need at your fingertips will make the installation process a lot smoother and more efficient. In this section, we will discuss the essential tools for installation as well as additional materials for a seamless installation.
Essential tools for installation
When it comes to installing window shades inside mount, there are a few essential tools that you will need. Make sure you have these items on hand before you start:
- Tape measure
- Level
- Drill
- Screwdriver
- Pencil or marker
- Step ladder
Having a tape measure is crucial to ensure accurate measurements, which are essential for a proper fit. A level is necessary to ensure that your window shades are straight and aligned. A drill and screwdriver will be needed for mounting brackets. Don’t forget a pencil or marker for marking drill holes and a step ladder to reach higher windows.
Additional materials for a seamless installation
In addition to the essential tools, there are a few materials that can help make your installation process even better:
- Mounting brackets
- Screws
- Wall anchors (if needed)
- Extension brackets (if needed)
- Cord safety devices (if applicable)
Mounting brackets are necessary for attaching the window shades securely to your window frame. Be sure to have enough screws to secure the brackets firmly. If your window frame requires additional support, wall anchors may be necessary. Extension brackets can help in situations where your window frame has limited space, allowing the shades to fit perfectly. Lastly, if you have corded window shades, cord safety devices are essential for child safety.
By gathering the essential tools and additional materials mentioned above, you’ll have everything you need for a successful installation of window shades inside mount. Getting prepared beforehand will save you time and frustration during the installation process.
Preparing Your Windows For Installation
Before installing window shades inside mount, it is essential to properly prepare your windows to ensure a successful installation. This includes cleaning the windows thoroughly and removing any obstacles or obstructions that may hinder the process. Follow the steps below to prepare your windows for installation:
Cleaning the windows thoroughly
Cleaning your windows prior to installation is crucial to ensure the shades adhere properly and the overall appearance is flawless. This step eliminates dust, dirt, and any other debris that may affect the adhesion or create an unsightly finish.
- Start by wiping down the windows using a clean, lint-free cloth or a soft microfiber cloth. Avoid using abrasive materials that could damage the glass.
- Apply a suitable glass cleaner to the cloth and gently wipe the windows in a circular motion, ensuring all areas are covered.
- Focus on removing any fingerprints, smudges, or stains that may be present on the glass.
- For stubborn dirt or grime, use a mild detergent mixed with water and a non-abrasive sponge to scrub the affected areas.
- Once clean, use a separate dry cloth to dry the windows completely. This step is essential to prevent any water spots from forming.
Removing any obstacles or obstructions
Prior to installation, it is important to clear the area around the windows and remove any obstacles or obstructions that may hinder the process. This will ensure a smooth and hassle-free installation. Follow these steps to clear the space:
- Remove any furniture or objects placed near the windows that may obstruct access.
- If there are curtains or blinds already installed, take them down and set them aside for future use or disposal.
- Inspect the surrounding area for any loose or hanging wires, and secure them away from the installation site.
- Check for any protruding nails or screws on the window frame, as they may interfere with the installation. If found, carefully remove them to create a clean and even surface.
- Lastly, ensure the window frame is free from any dust or debris that may have accumulated over time. You can use a vacuum cleaner or a soft brush to gently remove any particles.
By following these simple steps to prepare your windows for installation, you can ensure a seamless and successful process. Cleaning the windows thoroughly and eliminating any obstacles or obstructions will not only enhance the appearance of your shades but also contribute to their longevity and functionality.
Installing The Window Shades
Installing window shades inside mount is a simple and effective way to enhance the aesthetic appeal of your windows and control the amount of light that enters your space. In this section, we will walk you through the step-by-step process of installing the window shades. So, let’s get started!
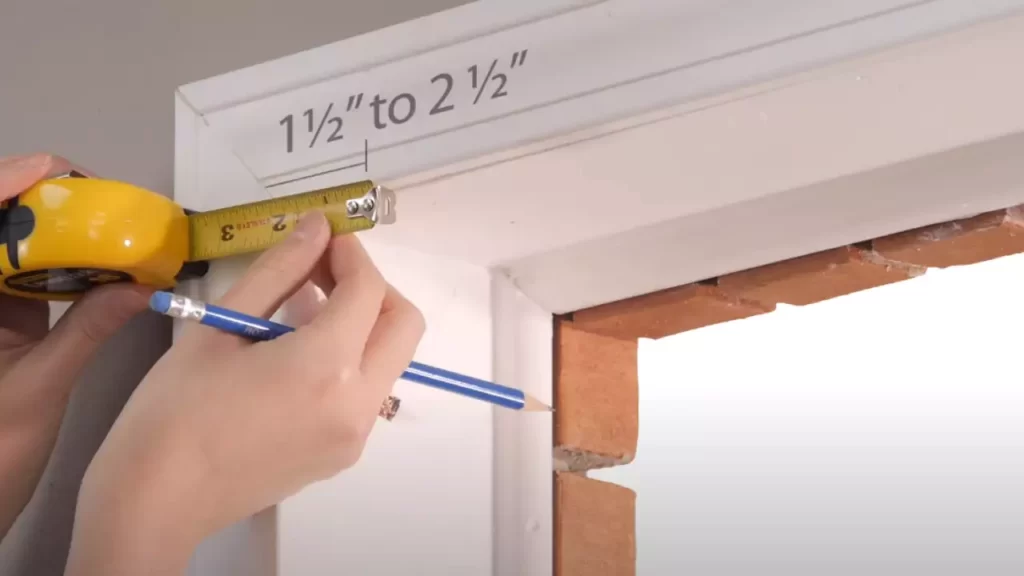
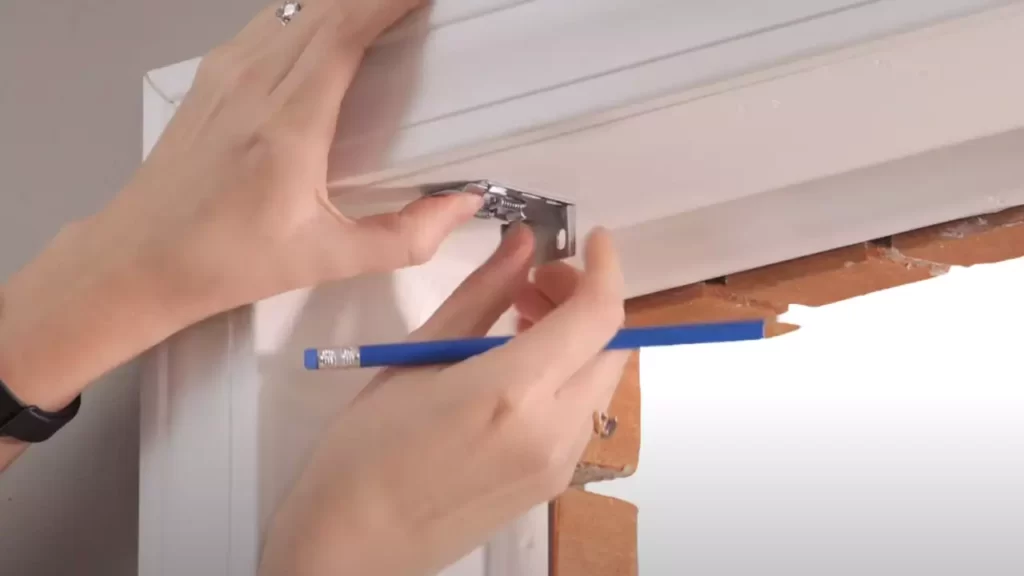
Step 1: Mounting brackets
Before attaching the shades, you need to install the mounting brackets. These brackets will securely hold the shades in place. To ensure a proper installation, follow these steps:
- Start by measuring the width of your window frame. Use a tape measure to get an accurate measurement.
- Once you have the measurement, position the brackets on each side of the window frame. Make sure they are level and aligned.
- Using a pencil, mark the screw holes on the window frame.
- Next, grab a power drill with a screwdriver bit and attach the brackets to the window frame using the provided screws. Make sure the brackets are firmly secured.
By following these steps, you will have the mounting brackets securely installed and ready for the shades.
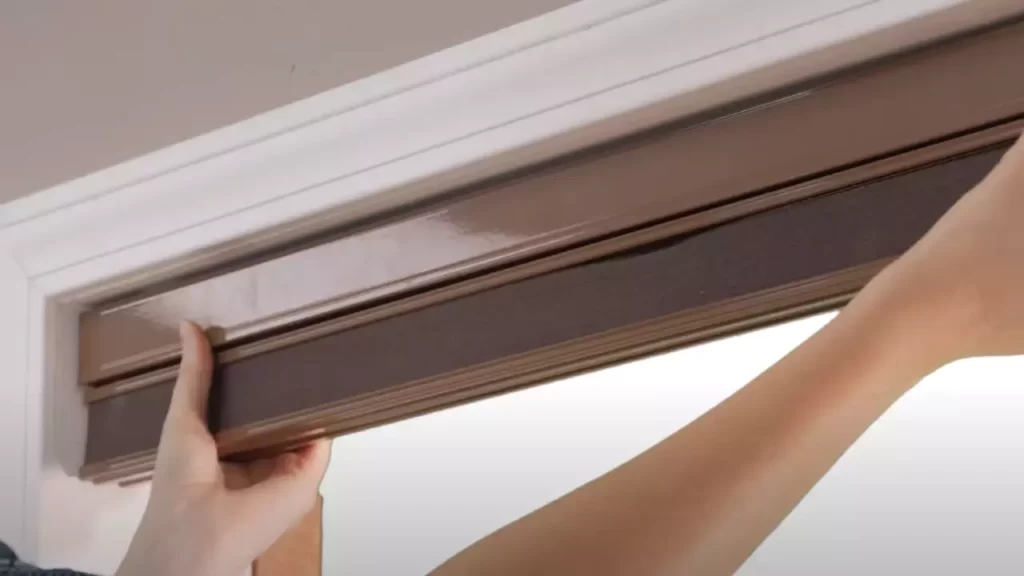
Step 2: Attaching the shades to the brackets
With the brackets in place, it’s time to attach the window shades. Here’s how you can do it:
- Start by positioning the shades in the brackets. Ensure that the shades are centered within the window frame.
- Push the front lip of the shades into the front groove of the brackets.
- Next, angle the back of the shades up and push it into the back groove of the brackets. This will lock the shades into place.
- Give each shade a gentle tug to ensure that they are secure and properly attached to the brackets.
Following these steps will ensure that the shades are securely attached to the mounting brackets, ready to provide you with privacy and shade whenever needed.
Step 3: Testing the functionality of the shades
Before calling it a day, it’s important to test the functionality of the shades to ensure they are working properly. Here’s what you should do:
- Lower the shades completely to cover the window.
- Slowly raise the shades to test if they move smoothly.
- Pay attention to any sticking or unusual noises. If you notice any issues, check the brackets and attachment to ensure everything is secure.
- Repeat the process a few times to ensure consistent functionality.
By testing the functionality of the shades, you can address any potential issues early on and enjoy a smooth and hassle-free experience with your newly installed window shades.
In conclusion, installing window shades inside mount doesn’t have to be complicated. By following these step-by-step instructions, you can easily mount the brackets, attach the shades, and test their functionality. Now you can sit back, relax, and enjoy the benefits of your stylish and functional window shades!
Troubleshooting Common Installation Issues
Installing window shades inside mount can be a simple and effective way to enhance the aesthetic appeal of your windows. However, like any DIY project, there can be some common installation issues that may arise. Don’t worry, we’ve got you covered! In this section, we will discuss some troubleshooting tips for two common installation issues: uneven shade alignment and problems with bracket installation.
Uneven shade alignment
One of the most common issues you may face during the installation of window shades inside mount is uneven shade alignment. This can be a major headache, as it not only affects the appearance of the shade but also its overall functionality. To ensure that your shades are aligned perfectly, follow these troubleshooting tips:
- Check your measurements: Double-check your measurements to ensure that the window opening is perfectly squared. Even a slight deviation can result in uneven shade alignment.
- Adjust the brackets: In some cases, uneven alignment may be due to the brackets. Loosen the brackets and gently adjust the shade until it is level. Once aligned, tighten the brackets securely.
- Use a leveling tool: If you’re unsure whether your shades are aligned correctly, use a leveling tool. This will help you determine if the shades are straight and aligned properly.
- Seek professional help: If you are unable to resolve the issue on your own, don’t hesitate to seek professional assistance. A professional installer will have the expertise to correctly align your shades.
Problems with bracket installation
Another common issue that may arise during the installation of window shades inside mount is problems with bracket installation. This can lead to instability and make the shades prone to falling or wobbling. To ensure secure bracket installation, follow these troubleshooting tips:
- Confirm the right bracket type: Ensure that you are using the correct type of brackets provided with your window shades. Using incompatible brackets can result in improper installation.
Order and install brackets conveniently.
| Bracket Type | Description |
|---|---|
| Standard brackets | These brackets are the most common type and are suitable for most installations. They provide stability and support for the shades. |
| Extension brackets | These brackets are used when your window has a deep recess or obstructions that require the shade to be installed away from the window frame. |
- Refer to the manufacturer’s instructions: Each window shade brand may have specific instructions for bracket installation. Make sure to read and follow these instructions carefully to avoid any installation mishaps.
- Double-check the bracket position: Ensure that the brackets are positioned at the correct height and distance apart as specified by the manufacturer. Using a measuring tape can help you achieve accurate placement.
- Secure the brackets properly: Use screws or anchors that are provided with your window shades to securely attach the brackets to the wall or window frame. Tighten the screws until they are snug, but be careful not to overtighten and damage the frame.
- Test the stability: After installing the brackets, give the shades a gentle tug to ensure they are firmly secured. If there is any wobbling or instability, recheck the bracket installation and make necessary adjustments.
By following these troubleshooting tips, you can overcome common installation issues and achieve a seamless and functional window shade installation inside mount.
Regular Cleaning And Dusting
Regular Cleaning and Dusting
Regular cleaning and dusting of your window shades is essential to keep them looking fresh and to prolong their lifespan. Over time, dust, dirt, and other residue can accumulate on the fabric, making your shades appear dull. By following a few simple cleaning techniques, you can ensure that your window shades remain clean and well-maintained.
Recommended Cleaning Solutions
When it comes to cleaning your inside mount window shades, it’s crucial to use the right cleaning solutions to avoid damage and maintain their quality. Here are some recommended cleaning solutions:
| Cleaning Solution | Usage |
|---|---|
| Mild Dish Soap | Combine a small amount of mild dish soap with warm water, dampen a soft cloth or sponge, and gently wipe the surface of the shades. |
| Vinegar Solution | Mix equal parts of white vinegar and water in a spray bottle. Lightly mist the shades and wipe them down with a soft cloth. |
Proper Dusting Techniques
Dusting your window shades regularly helps to prevent the buildup of dust and allergens, ensuring a clean and healthy environment. Here are some proper dusting techniques to follow:
- Use a feather duster or a static duster to gently remove dust from the surface of the shades.
- Alternatively, you can also use a soft, dry microfiber cloth to wipe away the dust. Make sure to fold the cloth regularly to expose a clean section.
- If your shades are made of delicate material, such as silk or velvet, consider using a vacuum cleaner with a soft brush attachment. Set the vacuum cleaner on low suction and run it lightly over the shades.
- Avoid using harsh brushes or abrasive materials, as they can damage the fabric and revoke the warranty.
By following these recommended cleaning solutions and proper dusting techniques, you can keep your inside mount window shades looking pristine and maintain their functionality for years to come.
Addressing Specific Shade Materials
The installation of window shades inside mount can vary depending on the material of the shades. From fabric shades to vinyl shades, each material requires specific attention and care. In this section, we will address the specific shade materials and provide cleaning tips for fabric shades and vinyl shades.
Fabric Shades Cleaning Tips
When it comes to fabric shades, it’s important to handle them with care to maintain their quality and appearance. Here are some cleaning tips:
- Dust the fabric shades regularly using a soft, lint-free cloth or a feather duster. This will help prevent dirt and debris from settling on the fabric.
- For deeper cleaning, vacuum the fabric shades with a brush attachment. Gently glide the brush over the fabric to remove any accumulated dust or dirt.
- If there are stains or spills on the fabric, it’s important to address them promptly. Use a mild detergent or fabric cleaner and a damp cloth to spot clean the affected area. Avoid using harsh chemicals or abrasive cleaners as they can damage the fabric.
- Avoid soaking the fabric shades or saturating them with water. Excessive moisture can cause the fabric to shrink or warp.
- Allow the fabric shades to air dry completely before reinstalling them.
Vinyl Shades Cleaning Tips
Vinyl shades are known for their durability and easy maintenance. To keep them looking their best, follow these cleaning tips:
- Regularly dust the vinyl shades using a soft cloth or a feather duster. This will prevent dirt and debris from accumulating on the surface.
- If there are stains or spills on the vinyl, wipe them off immediately using a damp cloth. For stubborn stains, mild soap and water can be used.
- Avoid using abrasive cleaners or solvents on the vinyl shades as they can cause discoloration or damage the material.
- Do not submerge the vinyl shades in water or wash them in a washing machine. Instead, spot clean the affected areas and dry them thoroughly.
- Inspect the vinyl shades regularly for any signs of damage or wear. If any issues are identified, contact the manufacturer or a professional to address them.
By following these cleaning tips for fabric shades and vinyl shades, you can ensure that your window shades remain in great condition and provide a beautiful addition to your home.
Repairing And Replacing Damaged Parts
If your window shades have been through wear and tear or have encountered unexpected accidents, it’s important to know how to repair and replace damaged parts. By addressing these issues promptly, you can ensure that your window shades continue to provide the necessary privacy and protection for your space. In this section, we will guide you on how to fix loose brackets, replace damaged cords or strings, and restore your window shades to their optimal functionality.
Fixing loose brackets
If you notice that the brackets holding your window shades are loose, it’s crucial to secure them properly to prevent any further damage or accidents. Follow these steps to tighten loose brackets:
- Start by removing the window shade from the brackets.
- Inspect the brackets to identify any screws that need tightening.
- Using a screwdriver or appropriate tool, tighten the screws on each bracket.
- Make sure the brackets are leveled and aligned correctly before reinstalling the window shade.
- Slide the window shade back into the brackets and ensure it fits securely.
- Test the stability of the brackets by gently pulling down on the shade to check for any movement or slippage.
Replacing damaged cords or strings
In the event that the cords or strings of your window shade become damaged or worn out, it’s important to replace them to maintain proper functionality. Here’s how you can do it:
- Start by taking down the window shade from the brackets.
- Examine the cord or string to identify any signs of fraying, breakage, or knots.
- Locate the end of the cord or string attached to the bottom of the window shade.
- Unwind and remove the damaged cord or string by carefully releasing it from any attachments.
- Measure and cut a replacement cord or string of the same length, ensuring it matches the functionality and durability of the original.
- Thread the new cord or string through the necessary loops and mechanisms, following the same path as the old one.
- Secure the end of the replacement cord or string to the bottom of the window shade, ensuring a tight and secure connection.
- Reinstall the window shade back into the brackets and test the functionality of the newly replaced cord or string.
Enjoying A Beautiful And Functional Window Treatment
Enjoying a Beautiful and Functional Window Treatment
Installing window shades can transform your home by enhancing its aesthetics and providing functional benefits. When it comes to installing window shades, one popular option is inside mount installation. Not only does it offer a sleek and tailored look, but it also maximizes your window’s natural beauty. In this article, we will explore the benefits of inside mount window shades and how to ensure their longevity and functionality.
Benefits of Inside Mount Window Shades
Inside mount window shades offer several advantages that make them an excellent choice for your home. Here are some key benefits:
- Seamless Integration: Inside mount shades fit neatly within the window frame, creating a seamless integration with your window and maintaining a clean, unobstructed view. This sleek look adds a touch of sophistication to any room.
- Enhanced Light Control: By installing shades inside the window frame, you can have better control over the amount of light entering your space. These shades block out unwanted sunlight, reducing glare and creating a more comfortable atmosphere.
- Increased Privacy: Inside mount shades offer enhanced privacy by covering the entire window opening. They prevent outsiders from peering into your home while still allowing natural light to filter through.
- Preserving Window Trim and Molding: By opting for inside mount installation, you can showcase the architectural features of your window, such as trim and molding. This not only adds visual appeal but also maintains the integrity of your window design.
- Versatility: Inside mount window shades come in various styles, materials, and colors, allowing you to find the perfect match for your interior design. Whether you prefer roller shades, cellular shades, or Roman shades, there is an inside mount option that will suit your style.
Maintaining the Longevity of Your Shades
Proper maintenance is essential for ensuring the longevity and functionality of your inside mount window shades. Here are some tips:
- Regular Cleaning: Keep your shades clean by dusting them regularly or using a vacuum cleaner with a soft brush attachment. For deeper cleaning, gently wipe them with a damp cloth or sponge and mild soap.
- Handling with Care: When raising or lowering your shades, do so with care to prevent any unnecessary strain on the mechanisms or fabric. Ensure that they are fully open before attempting to raise them.
- Avoid Excessive Force: Do not force the shade to move if it gets stuck. Instead, check for any obstructions or tangled cords that may be causing the issue. If needed, seek professional assistance.
- Protecting from Sun Damage: UV rays can fade and damage your shades over time. Consider using window film or adding a lining to your shades for extra protection against harmful sun rays.
- Inspecting Regularly: Periodically inspect your shades for any signs of wear and tear, such as frayed cords or bent brackets. Promptly address any issues to prevent further damage and ensure the continued functionality of your window shades.
By following these simple maintenance practices, you can extend the lifespan of your inside mount window shades and enjoy their beauty and functionality for years to come.
Frequently Asked Questions
What Is The Difference Between An Inside And Outside Mount For Shades?
Inside mount shades are installed inside the window frame, providing a clean and sleek look. Outside mount shades are mounted on the wall or window trim, covering the entire window frame.
Do I Need Anchors For Inside Mount Blinds?
Yes, anchors are needed for inside mount blinds. They are necessary to securely attach the blinds to the window frame and prevent them from falling or shifting. Without anchors, the blinds may not stay in place and may not function properly.
How Do You Install Interior Window Blinds?
To install interior window blinds, follow these steps: Measure your window dimensions accurately. Choose the right type of blinds and buy the correct size. Install the brackets securely on the window frame or wall. Attach the blinds to the brackets and test the functionality.
Adjust them to your desired position for optimal light and privacy.
How Do You Install Vinyl Blinds Inside Mounts?
To install vinyl blinds inside mounts, follow these steps: 1. Measure the window frame carefully. 2. Purchase the correct size of blinds. 3. Attach brackets inside the frame. 4. Slide the blinds into the brackets. 5. Secure the blinds in place.
Enjoy your new vinyl blinds!
Conclusion
Installing window shades inside mount can be a simple and rewarding task. By following the step-by-step instructions and ensuring accurate measurements, you can achieve a sleek and functional window treatment. Remember to choose the right type of shade for your needs and take precautions to protect the window frame.
With a little patience and attention to detail, you can enjoy privacy, light control, and an enhanced aesthetic appeal in your living space. Happy installation!