To install vinyl flooring in a bathroom without removing the toilet, follow these steps: 1. Measure and cut vinyl to fit around the toilet base.
2. Use adhesive to secure the vinyl flooring in place. If you’re looking to give your bathroom a fresh new look without the hassle of removing the toilet, installing vinyl flooring may be the solution for you. Vinyl flooring is a durable and water-resistant option that can easily be installed around the toilet base.
By following a few simple steps, you can transform your bathroom floor and create a clean and updated space. We will guide you through the process of installing vinyl flooring in your bathroom without having to remove the toilet. So let’s get started!
Preparation And Planning
When it comes to installing vinyl flooring in your bathroom without removing the toilet, proper preparation and planning are key. By following the right steps and gathering the necessary tools and materials, you can ensure a smooth and successful installation process. In this section, we will guide you through the important steps to get your bathroom ready for vinyl flooring installation.
Measure and assess the bathroom space
Before diving into the installation, it is crucial to take accurate measurements and assess your bathroom space. Measure the length and width of the area where you intend to install the vinyl flooring. This will help you determine the amount of flooring material you need to purchase. Additionally, assess the condition of your bathroom floor. Ensure that it is clean, dry, and free from any damages or irregularities that may affect the installation process.
Choose the right type of vinyl flooring
Choosing the right type of vinyl flooring is essential for a successful installation. There are several options available, including luxury vinyl planks (LVP) and luxury vinyl tiles (LVT). Consider the overall style and design of your bathroom, as well as the durability and water resistance of the vinyl flooring. Additionally, make sure to select a vinyl flooring option that is specifically designed for installation over existing flooring without requiring removal of the toilet.
Gather necessary tools and materials
Before you begin the installation process, make sure you have all the necessary tools and materials at hand. This will help you work efficiently and avoid any unnecessary interruptions. Some of the essential tools and materials for installing vinyl flooring include:
- Vinyl flooring adhesive
- Trowel or putty knife
- Utility knife or vinyl cutter
- Measuring tape
- Safety goggles
- Pry bar
- Caulk gun
- Rolling pin
Having these tools readily available will make the installation process much smoother.
Clear the area and remove any existing flooring
Once you have gathered your tools and materials, it’s time to clear the area and remove any existing flooring. Start by removing all furniture, fixtures, and accessories from the bathroom. Clear the space as much as possible to have a clean working area. Remove the baseboards and trim to ensure a clean installation. If there is existing flooring, such as tiles or linoleum, use a pry bar and a utility knife to carefully remove it. Make sure to get rid of any adhesive residue as well. Properly preparing the subfloor will ensure a stable foundation for your vinyl flooring.
Removing The Baseboards
Removing the baseboards before installing vinyl flooring in your bathroom is an important step to ensure a seamless and professional finish. By carefully removing the baseboards, you can prevent any damage and make the installation process much easier. Here’s how you can remove the baseboards without any hassle:
Carefully remove the baseboards around the perimeter of the room
To begin, you will need a putty knife or a pry bar, which will help you lift off the baseboards gently. Start at one end of the room and work your way around the perimeter. Use the putty knife or pry bar to wedge between the baseboard and the wall, then apply gentle pressure to lift it away from the wall.
Use a putty knife or pry bar to gently lift off the baseboards
When removing the baseboards, it’s crucial to be cautious and prevent any damage to either the baseboards or the wall. Gently pry the baseboard away from the wall, moving along its length. Avoid using excessive force, as it can cause the baseboard to splinter or break. Remember, patience is key here.
Set aside the baseboards for reinstallation later
Once you have successfully removed the baseboards, set them aside in a safe area for reinstallation later. It’s essential to keep them organized, ensuring that you mark or label them to easily identify their original position. This step will make the reinstallation process much more straightforward and will help maintain the aesthetics of the room.
By following these steps and removing the baseboards carefully, you can ensure a smooth installation of vinyl flooring in your bathroom without having to remove the toilet. Remember to handle the baseboards gently, so as not to cause any damage, and keep them organized for easy reinstallation. With proper attention to detail, you can achieve a stunning result that will enhance the overall look and feel of your bathroom.

Preparing The Subfloor
Before you can install vinyl flooring in your bathroom without removing the toilet, it’s essential to properly prepare the subfloor. This step ensures that your new flooring will lay flat and securely in place, providing a smooth and attractive finish. In this section, we will guide you through inspecting the subfloor, repairing any issues, cleaning it thoroughly, and applying a primer if necessary.
Inspect the subfloor for any damage or unevenness
Before proceeding with the installation process, it’s vital to inspect your bathroom’s subfloor for any signs of damage or unevenness. This step is crucial as it helps identify any underlying issues that may affect the longevity and appearance of your vinyl flooring. Common problems to look out for include water damage, rotting wood, and dips or bumps in the subfloor.
Repair any issues with the subfloor before proceeding
If you discover any damage or unevenness during the inspection, it’s essential to address these issues before installing your vinyl flooring. Failure to repair the subfloor can result in an unstable and uneven surface, compromising the integrity and aesthetics of your new floor. Whether it’s replacing damaged sections, reinforcing weak areas, or leveling the subfloor, take the necessary steps to ensure a solid foundation for your vinyl flooring.
Clean the subfloor thoroughly to ensure a smooth surface
Once you’ve repaired any issues with the subfloor, it’s time to clean it thoroughly. A clean subfloor is essential for achieving a smooth and even installation of your vinyl flooring. Begin by removing any dirt, debris, or adhesive residues using a broom, vacuum cleaner, or scraper. For stubborn stains or adhesives, consider using a mild cleaner or solvent recommended for your specific subfloor material, following the manufacturer’s instructions.
Apply a primer if necessary to promote adhesion
In some cases, applying a primer to the subfloor may be necessary to promote proper adhesion of the vinyl flooring. A primer helps create a strong bond between the subfloor and the adhesive, ensuring a secure and long-lasting installation. Check the manufacturer’s instructions for your chosen vinyl flooring to determine if a primer is recommended and which type is suitable for your subfloor material. Apply the primer evenly, following the manufacturer’s guidelines, and allow sufficient drying time before proceeding with the installation.
Dry Fitting And Cutting Vinyl Planks
Begin by Dry Fitting the Vinyl Planks to Determine the Layout
Before installing vinyl flooring in your bathroom without removing the toilet, it is crucial to start with a dry fitting process. This step allows you to determine the layout of the vinyl planks and ensure they fit properly.
To dry fit the vinyl planks, start by clearing the bathroom floor of any obstacles. Remove rugs, bath mats, and other items that may get in the way. It’s also a good idea to thoroughly clean the floor to ensure a smooth and even surface.
Next, gather your vinyl planks and arrange them in the bathroom. Begin at one corner and lay the planks out in the desired pattern. This step will give you a visual representation of how the flooring will look once installed.
Measure and Cut the Planks Using a Utility Knife and Straightedge
Once you have determined the layout of the vinyl planks, it’s time to measure and cut them to fit the bathroom floor. To ensure accuracy, use a utility knife and a straightedge for precise cuts.
Start by measuring the dimensions of the space where the vinyl planks will be installed. Measure the length, width, and any corners or angles to ensure the planks will fit properly. Transfer these measurements onto the vinyl planks, using a pencil or marker.
With the measurements marked, use a straightedge as a guide to score the vinyl planks along the marked lines. Apply pressure and make multiple passes with the utility knife until the planks are cut through.
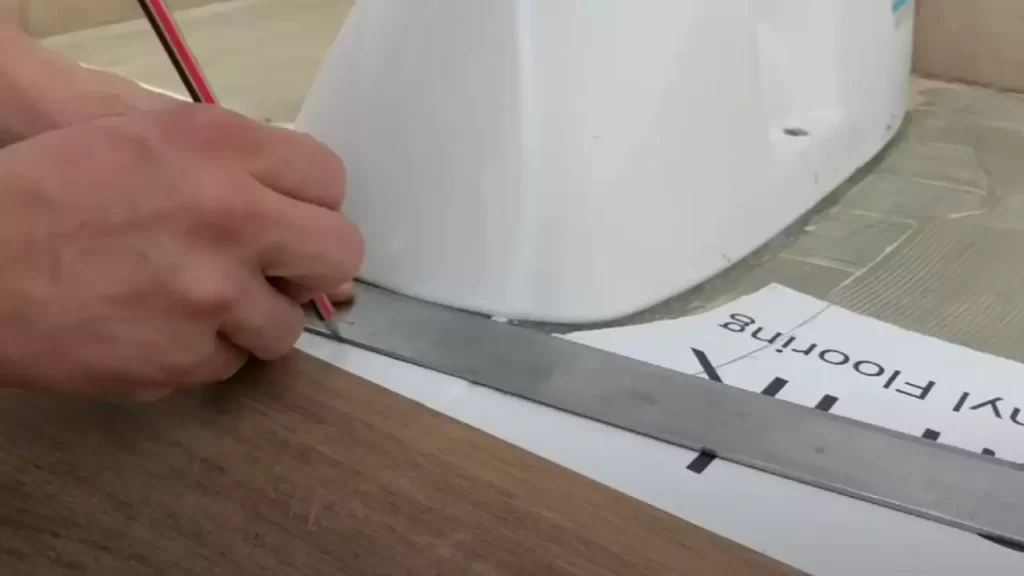
Leave a Small Gap Around the Toilet Flange for Easy Installation
When installing vinyl flooring in a bathroom without removing the toilet, it is important to leave a small gap around the toilet flange. This gap will allow for easy installation and future maintenance if needed.
To create the gap, measure the diameter of the toilet flange and subtract a small amount, typically around 1/8 inch. Use this measurement to mark a circle on the vinyl plank that will be placed around the flange.
With the circle marked, carefully cut along the line using a utility knife. Make sure the cut is clean and precise to ensure a proper fit around the toilet flange.
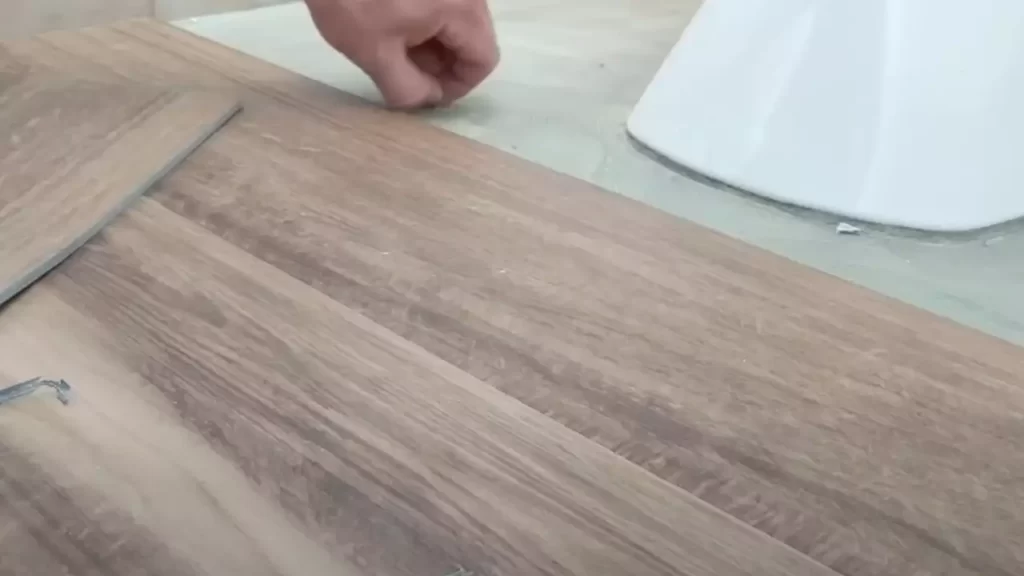
Lay out the Planks in the Desired Pattern Before Permanently Installing
Before permanently installing the vinyl planks in your bathroom, it is essential to lay them out in the desired pattern. This step allows you to make any necessary adjustments and ensure the final look is exactly as you envisioned.
Start by aligning the first row of vinyl planks against a straight wall. Use spacers to maintain a consistent gap between the planks and the wall. Then, proceed to lay out the remaining rows, following the pattern you have chosen.
Take your time during this step and ensure that each plank is properly aligned and fits snugly with the adjacent planks. This will create a seamless and professional-looking installation.
Once you are satisfied with the layout, you can begin the permanent installation process. This typically involves applying adhesive to the subfloor and pressing the vinyl planks firmly into place.
By following these steps, you can successfully install vinyl flooring in your bathroom without removing the toilet. Remember to dry fit the planks, measure and cut them accurately, leave a gap around the toilet flange, and lay them out before permanently installing. With careful planning and execution, you can achieve a beautiful and functional bathroom floor with vinyl planks.
Applying The Adhesive
When installing vinyl flooring in a bathroom without removing the toilet, applying the adhesive correctly is crucial for a successful and long-lasting installation. The adhesive ensures that the vinyl planks adhere securely to both the subfloor and each other, creating a waterproof and durable flooring solution. In this section, we will discuss the steps to apply the adhesive effectively, ensuring a seamless vinyl flooring installation.
Use a Recommended Adhesive for Vinyl Flooring Installation
Using a recommended adhesive is essential for a proper vinyl flooring installation. Each manufacturer may have specific adhesives that are designed to work best with their vinyl products. It is important to check the manufacturer’s guidelines or recommendations before purchasing or applying adhesive to ensure compatibility and performance. Using the right adhesive will help ensure the vinyl flooring stays in place and withstands the moisture-prone bathroom environment.
Follow the Manufacturer’s Instructions for Adhesive Application
Following the manufacturer’s instructions is crucial when applying adhesive for vinyl flooring installation. These instructions typically include important information regarding the suitable trowel size, drying time, and application technique. Adhering to these guidelines ensures that the adhesive is applied correctly and optimizes the performance and longevity of the vinyl flooring. It is important to carefully read and understand the manufacturer’s instructions before proceeding with the adhesive application.
Apply Adhesive to Both the Subfloor and the Back of the Vinyl Planks
Applying the adhesive to both the subfloor and the back of the vinyl planks is necessary for a secure and effective bond. Start by spreading a thin, even layer of adhesive onto the clean and dry subfloor surface. Use a trowel or roller to ensure that the adhesive is spread evenly. Then, apply a thin coat of adhesive to the back of the vinyl planks, ensuring complete coverage. This step promotes proper adhesion between the subfloor and the vinyl planks, minimizing the risk of any loose or shifting planks.
It’s crucial to allow the adhesive to dry or “tack up” according to manufacturer’s instructions before laying the vinyl planks down. This will ensure that the adhesive reaches the optimal adhesive strength for installation. Again, following the manufacturer’s specified drying time is essential to achieve the best results.
Installing The Vinyl Flooring
Installing vinyl flooring in your bathroom can be a simple and cost-effective way to update the space. And the best part is, you can do it without the hassle of removing the toilet! In this section, we will guide you through the step-by-step process of installing the vinyl flooring. Just follow these instructions and you’ll have a stunning new bathroom floor in no time.
Start by placing the first plank in the corner of the room
To begin the installation, choose a corner of the room to start laying down the vinyl planks. Make sure to clean the subfloor thoroughly and remove any debris or dirt. This will ensure a smooth and even surface for the planks. Then, apply an adhesive suitable for vinyl flooring using a trowel or a recommended method suggested by the manufacturer.
Once the adhesive is in place, carefully place the first vinyl plank in the corner of the room. Make sure to leave a small gap between the plank and the wall to allow for expansion. This gap can be covered with baseboards or quarter round molding later on.
Press the plank firmly into the adhesive, ensuring proper alignment
Once the first vinyl plank is in position, press it firmly into the adhesive to ensure a strong bond. Pay close attention to align the plank properly, making sure it is straight and parallel to the walls. Use a level to ensure accuracy. Remember, the first row needs to be perfectly aligned as it will serve as a guide for the rest of the installation.
As you go along, continue to apply the adhesive and place the remaining planks, working row by row and following the same procedure. Take your time and make sure each plank is securely attached to the floor, avoiding any gaps between the planks.
Trim and adjust the planks as needed along the edges
After completing each row, you may need to trim the last plank to fit properly along the edges of the room. Use a utility knife and a straight edge to make precise cuts. Remember to measure twice and cut once to ensure a perfect fit.
Once the last row is installed, go back and check the entire floor for any loose or uneven planks. If needed, use a roller to press down on the planks and ensure a proper bond with the adhesive.
That’s it! By following these simple steps, you can install vinyl flooring in your bathroom without the need to remove the toilet. Enjoy your new, water-resistant, and stylish bathroom floor!
Reinstalling The Baseboards
Once the vinyl flooring is fully installed, reinstall the baseboards
Reinstalling the baseboards is the final step to complete your vinyl flooring installation, giving your bathroom a polished and finished look. The process involves cutting the baseboards to fit around corners or obstacles and then either nailing or gluing them back into place. Let’s take a closer look at how to reinstall the baseboards after installing vinyl flooring in your bathroom.
Cut the baseboards to fit around any corners or obstacles
Before you reinstall the baseboards, it’s important to ensure they are the correct length and fit neatly around any corners or obstacles in your bathroom. Use a tape measure to measure the required length for each section of baseboard and make precise cuts accordingly. If you encounter corners, you may need to make miter cuts to allow the baseboards to fit seamlessly. Remember to take into account any door frames or cabinets that the baseboards need to fit around as well.
Nail or glue the baseboards back into place
Once you have cut the baseboards to the correct size and shape, it’s time to secure them back into place. You have two options for this step: nailing or gluing. If your baseboards were previously nailed in place, you can simply reuse the existing nail holes. However, if they were glued or you prefer a more secure installation, you can opt to use construction adhesive instead. Apply a thin, even layer of adhesive to the back of each baseboard section and press it firmly against the wall. Be sure to work in small sections to ensure the adhesive doesn’t dry before you can attach the baseboards.
As you reinstall the baseboards, make sure to check for any gaps or uneven sections. Use a level to ensure the baseboards are straight and adjust as necessary. You can also use finishing nails to secure any sections that may be loose or not adhering properly. Once all the baseboards are reinstalled, take a step back and admire the clean and finished appearance they bring to your newly installed vinyl flooring.
Finishing And Cleaning
Once you have successfully installed vinyl flooring in your bathroom without removing the toilet, it’s time to focus on the finishing touches and cleaning. These final steps will ensure that your vinyl flooring is well-adhered, properly cleaned, and ready for use. Let’s explore the essential tasks you need to undertake in this phase.
Use a flooring roller to ensure strong adhesion and eliminate any air bubbles
A crucial step in installing vinyl flooring is ensuring that it adheres well to the subfloor and that there are no air bubbles trapped beneath the surface. To accomplish this, use a flooring roller that helps apply even pressure across the entire floor. By rolling the vinyl flooring, you can eliminate any air pockets and enhance the bond between the floor and the adhesive.
Clean the vinyl flooring with a mild cleaner or recommended product
Proper cleaning is essential for maintaining the beauty and longevity of your vinyl flooring. Regularly cleaning your bathroom floor will help remove dirt, grime, and any other stubborn stains. You can use a mild cleaner specifically designed for vinyl floors, or you can follow the manufacturer’s recommended product for cleaning. Be sure to mop the floor gently, avoiding excessive water that can seep between the planks and cause damage.
Allow the adhesive to fully cure before using the bathroom
Patience is key when it comes to allowing the adhesive to cure properly. The curing time may vary depending on the specific type of adhesive used. It’s crucial to follow the manufacturer’s instructions regarding curing time to ensure a strong bond between the vinyl flooring and the subfloor. Avoid walking on the newly installed flooring or using the bathroom until the adhesive has fully cured. This will prevent any potential damage and ensure the longevity of your vinyl flooring.
By following these simple yet essential steps, you can complete the installation of vinyl flooring in your bathroom without the hassle of removing the toilet. Remember to use a flooring roller for strong adhesion, clean the flooring with a mild cleaner, and allow the adhesive to cure completely before using the bathroom. With these finishing and cleaning tasks, you can enjoy the beauty and durability of your new vinyl flooring for years to come.
Frequently Asked Questions
Do You Have To Remove Toilet To Install Vinyl Flooring?
No, you do not have to remove the toilet to install vinyl flooring. The vinyl flooring can be cut around the toilet and installed without any issues. Just make sure to leave a small gap around the base of the toilet for expansion.
How Do You Install Vinyl Plank Flooring Around A Toilet?
To install vinyl plank flooring around a toilet, follow these steps: 1. Clean and prepare the area around the toilet. 2. Measure and cut the vinyl planks to fit around the toilet base. 3. Apply adhesive to the back of the planks and press them firmly in place.
4. Continue laying the planks around the toilet, leaving a small gap for expansion. 5. Trim any excess flooring and secure it with molding.
How Do You Cut Vinyl Peel And Stick Flooring Around A Toilet?
To cut vinyl peel and stick flooring around a toilet: 1. Measure and mark the vinyl tiles around the toilet base using a pencil or chalk. 2. Use a utility knife or vinyl cutter to carefully cut along the markings. 3.
Start from the outer edge and work towards the toilet, ensuring a snug fit. 4. Trim any excess or uneven edges as needed. 5. Press the tiles firmly in place to secure them.
What Do You Put Under Vinyl Plank Flooring In A Bathroom?
You can put an underlayment or a vapor barrier under vinyl plank flooring in a bathroom. These help to provide a smooth and stable surface, protect against moisture, and reduce sound transmission.
Conclusion
To wrap up, installing vinyl flooring in your bathroom without removing the toilet is a convenient and cost-effective option. By following the steps outlined in this guide, you can achieve a professional-looking result without any hassle. Remember to prepare the subfloor, measure and cut the vinyl carefully, and use adhesive properly.
With a little patience and attention to detail, you can transform your bathroom into a beautiful space with durable and waterproof vinyl flooring. Happy renovating!