To install a universal ceiling fan remote, follow the instructions provided in the product manual or on the manufacturer’s website. Installing a remote typically involves making electrical connections and programming the remote to work with your fan.
Introducing a universal ceiling fan remote in your home can revolutionize the way you control your fan. Instead of using a pull chain or wall switch, a remote allows you to conveniently adjust the fan’s speed and turn it on or off from anywhere in the room.
Installing a universal ceiling fan remote is a straightforward process that can be easily accomplished by following the provided instructions. We will provide a step-by-step guide on how to install a universal ceiling fan remote in your home. So, let’s get started!
The Importance Of A Universal Ceiling Fan Remote
In today’s fast-paced world, convenience is key. Whether you’re running late for work or simply want to relax after a long day, having control at your fingertips is essential. That’s why the importance of a universal ceiling fan remote cannot be underestimated. With a universal remote, you can effortlessly control your ceiling fan from anywhere in the room, eliminating the need to get up and manually adjust the fan settings. In this blog post, we will discuss the benefits of using a universal ceiling fan remote and how it simplifies fan control.
Benefits of using a universal ceiling fan remote
A universal ceiling fan remote offers a myriad of benefits that enhance your overall comfort and convenience.
- Convenience: With a universal remote, you can control your ceiling fan without leaving the comfort of your couch or bed. No more getting up to adjust the fan speed or turning it off when you’re ready to sleep.
- Versatility: Universal ceiling fan remotes are compatible with a wide range of fan brands and models, making them a versatile option for any home.
- Simplicity: Installing a universal remote is a straightforward process that doesn’t require any professional help. With easy-to-follow instructions, you can have it up and running within minutes.
- Customization: Some universal remotes offer additional features like programmable settings, timer options, and even fan speed presets. This allows you to personalize your fan experience to suit your preferences.
How a universal ceiling fan remote simplifies fan control
A universal ceiling fan remote simplifies fan control by providing intuitive and effortless operation. Here’s how:
- Centralized control: Instead of having separate switches or pull chains for your fan’s speed, light, and direction, a universal remote brings all these functions together in one device. This eliminates confusion and streamlines the control process.
- Wireless operation: Universal remotes use wireless technology to communicate with your ceiling fan, allowing you to adjust settings from anywhere in the room.
- Remote programming: Many universal remotes allow you to program specific fan settings, such as speed and duration, so you can easily set your desired preferences with a push of a button.
Having a universal ceiling fan remote not only makes your life more convenient, but it also adds a touch of modernity and sophistication to your living space. With its user-friendly operation and versatility, it’s a must-have accessory for every ceiling fan owner. Say goodbye to the hassle of manual adjustments and enjoy ultimate control with a universal ceiling fan remote.
Choosing The Right Universal Ceiling Fan Remote
When it comes to convenience and comfort, a universal ceiling fan remote can be a game-changer. Installing a universal remote for your ceiling fan allows you to control the fan’s speed and lighting effortlessly from anywhere in the room. But before rushing into purchasing just any remote, it’s crucial to choose the right one that suits your specific needs and preferences.
Factors to consider when selecting a universal ceiling fan remote
Compatibility with different fan models and brands
The first and foremost factor to consider when choosing a universal ceiling fan remote is its compatibility with different fan models and brands. Not all remotes work with every type of ceiling fan, so it’s important to ensure that the remote you select is compatible with your specific fan model. Manufacturers usually provide compatibility information on their websites or product packaging. Additionally, you can seek assistance from a seller or customer support representative to find the right remote for your fan.
Range and signal strength
Another important consideration is the range and signal strength of the remote. Make sure the remote you choose has a strong signal with a wide range, allowing you to control your ceiling fan from a considerable distance. This is especially useful if you have a large room or want to operate the fan from different parts of the house. A remote with a weaker signal or limited range may restrict your ability to control the fan effectively.
Additional features and functionalities
Some universal ceiling fan remotes come with additional features and functionalities that can enhance your experience. These may include dimmable lighting options, programmable timers, or even compatibility with smart home systems. Assess your requirements and preferences to determine if you need any of these extra features. Remember that additional features may also affect the price, so choose accordingly based on your budget.
Installation and setup process
Consider the installation and setup process of the universal ceiling fan remote before making your final decision. Opt for a remote that is easy to install and configure, preferably with clear instructions provided. If you’re not comfortable with DIY installations, you may want to look for a remote that offers professional installation or assistance to ensure a hassle-free setup.
Reliability and durability
When investing in a universal ceiling fan remote, it’s important to choose a reliable and durable option that stands the test of time. Look for remotes made by reputable manufacturers known for their quality and longevity. Reading customer reviews and ratings can provide insight into the reliability and durability of a particular remote.
In conclusion, choosing the right universal ceiling fan remote involves considering factors such as compatibility, range and signal strength, additional features, ease of installation, and reliability. By thoroughly assessing these factors and making an informed decision, you can enjoy the convenience and comfort that a universal ceiling fan remote brings to your living space.
Step-By-Step Guide To Installing A Universal Ceiling Fan Remote
Installing a universal ceiling fan remote can greatly enhance the convenience and functionality of your ceiling fan. Rather than having to get up every time you want to adjust the speed or turn on/off the fan, a remote control allows you to control all these functions from the comfort of your couch or bed.
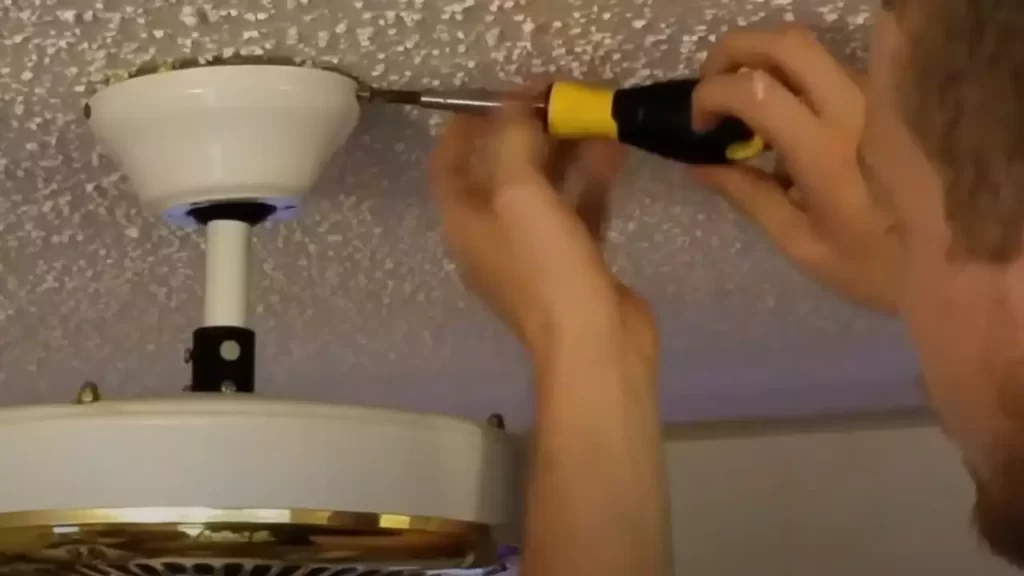
Preparing for the installation process
Before you start the installation process, make sure to turn off power to the fan. This is crucial to prevent any accidents or electrical shocks during the installation.
Gathering necessary tools and equipment
To successfully install the universal ceiling fan remote, you’ll need a few tools and equipment. These include a screwdriver, wire nuts, pliers, and a ladder or step stool to reach the fan.
Removing the fan’s existing controls
To install the universal remote, you’ll first need to remove the fan’s existing controls, which typically include a wall switch or pull chains. Use a screwdriver to detach these controls from the wall or ceiling.
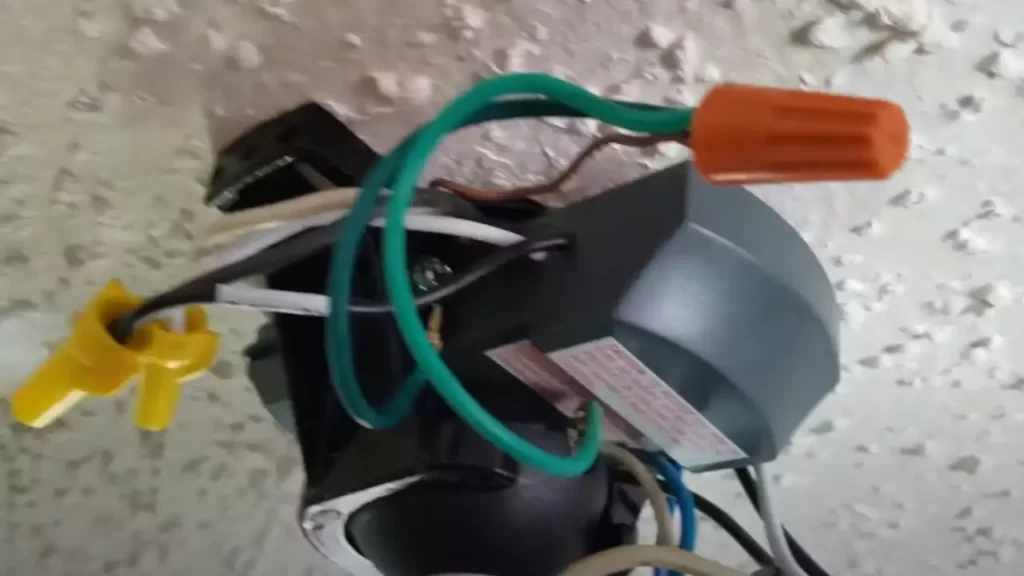
Identifying the control receiver
The control receiver is a small device that will be connected to the fan’s wiring. Locate this receiver by following the instructions provided with the universal remote kit.
Disconnecting the wiring from the existing controls
Before attaching the control receiver, you’ll need to disconnect the wiring from the fan’s existing controls. Use pliers to remove the wire nuts connecting the wires, and carefully separate them.
Wiring the universal ceiling fan remote receiver
Next, wire the universal ceiling fan remote receiver to the fan’s wiring according to the instructions provided. Make sure to connect the appropriate wires together using wire nuts.
Connecting the receiver to the fan’s wiring
Once the control receiver is wired, connect it to the fan’s wiring. Again, refer to the instructions provided with the universal remote kit for the specific wiring configuration.
Securing the wires with wire nuts
After connecting the wires, secure them with wire nuts. This ensures a safe and reliable connection between the control receiver and the fan’s wiring.
Mounting the remote control
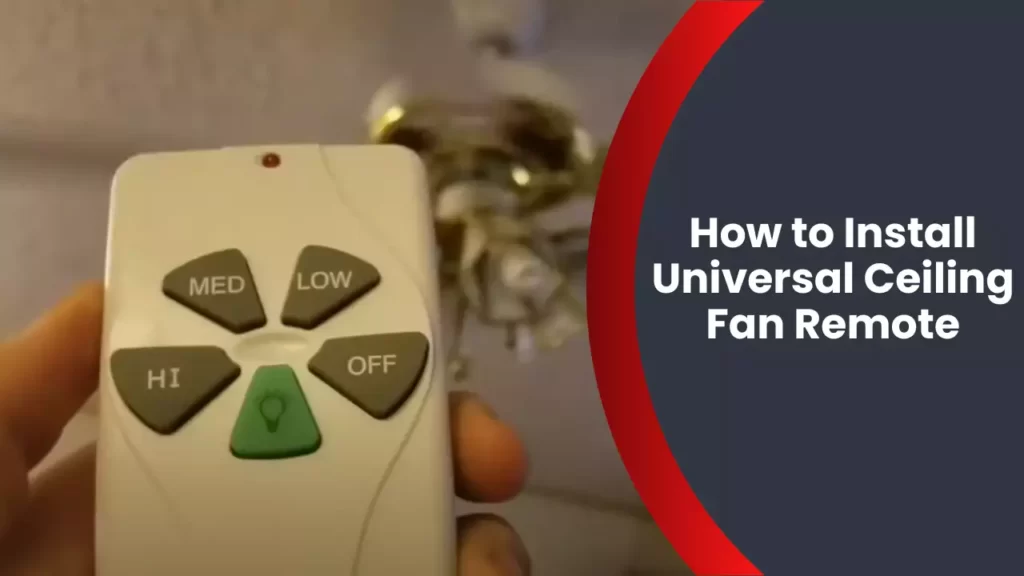
Choose a suitable location for the remote control on a nearby wall or in a convenient spot. Make sure it is easily accessible and within range of the fan.
Mounting the remote control holder or bracket
Once you have chosen the location for the remote control, mount the remote control holder or bracket securely to the wall or surface. Use screws or adhesive provided with the remote kit for this purpose.
Syncing the remote control with the fan
Before you can use the remote control, it needs to be synced with the fan. Follow the instructions provided with the remote kit to pair the control receiver and the remote control.
Programming the remote control
After syncing, program the remote control to your desired settings. This may include setting the fan speed, adjusting the light settings, or setting a timer for automatic shutoff.
Testing the remote control’s functionality
Finally, test the remote control’s functionality to ensure that it is working properly. Adjust the fan speed, turn on/off the fan, and test any additional features to ensure everything is functioning as expected.
By following this step-by-step guide, you can easily install a universal ceiling fan remote and enjoy the added convenience and comfort it provides. With just a few simple installation steps, you’ll be able to control your ceiling fan effortlessly from anywhere in the room.
Troubleshooting Common Issues With Universal Ceiling Fan Remote Installation
Remote control not responding
One of the common issues you may encounter after installing a universal ceiling fan remote is that the remote control may not respond properly. This can be frustrating, especially when you’re eagerly waiting to test out your new remote-controlled fan. But don’t worry, there are a few troubleshooting steps you can take to resolve this problem.
Firstly, ensure that the batteries in the remote control are properly inserted and not depleted. Replace the batteries if needed. Next, check if the receiver and transmitter in the fan and remote control respectively are properly paired. Refer to the manufacturer’s instructions on how to pair them correctly.
If the remote control still doesn’t respond, ensure that the receiver and transmitter have a clear line of sight with no obstructions. Obstacles such as furniture or walls can disrupt the signal. Additionally, make sure that you are within the range specified by the manufacturer for the remote control to work effectively.
If these steps don’t solve the issue, it is possible that the remote control or the receiver may be defective. In such cases, consider contacting the manufacturer or the place of purchase for further assistance.
Fan not working properly after installation
Another common issue that may arise after installing a universal ceiling fan remote is that the fan may not work properly. This can be frustrating, as it defeats the purpose of installing the remote control in the first place. However, don’t panic, as there are a few troubleshooting steps you can take to resolve this problem.
Firstly, check if the fan blades are securely attached and not loose. Loose blades can cause the fan to wobble or make noise, affecting its performance. Tighten any loose screws or nuts to ensure stability.
Next, ensure that the fan’s wires are properly connected to the receiver. Sometimes, loose or faulty connections can disrupt the fan’s functionality. Refer to the manufacturer’s instructions to ensure that the wires are connected correctly.
If the fan still doesn’t work properly, it is possible that there may be a problem with the receiver or the fan’s motor. In such cases, it may be best to contact a professional electrician or the manufacturer for further assistance.
Remote control signal interference
Sometimes, you may experience signal interference with your ceiling fan remote control. This can cause the fan to turn on or off unexpectedly or result in inconsistent performance. Fortunately, there are a few steps you can take to troubleshoot this issue.
Firstly, check if there are any other electronic devices in the vicinity that may be causing interference. Devices such as wireless routers, cordless phones, or other remote controls can disturb the signal. Try relocating these devices or turning them off temporarily to see if it resolves the issue.
If interference persists, check if the frequency settings on the remote control and receiver are properly matched. Some universal remotes allow you to change the frequency to reduce signal interference. Refer to the manufacturer’s instructions for guidance on adjusting the frequency.
In rare cases, the signal interference may be caused by external factors like neighboring buildings or strong radio signals. If this is the case, it may be challenging to eliminate the interference completely. However, you can try relocating the fan or adjusting its position to minimize the effect of the interference.
Remember, troubleshooting the common issues with universal ceiling fan remote installation requires patience and attention to detail. By following these steps, you can ensure a smooth and hassle-free experience with your ceiling fan remote control.
Frequently Asked Questions
How Do I Pair My Universal Ceiling Fan Remote?
To pair your universal ceiling fan remote, follow these steps: 1. Turn off the fan and make sure the batteries are inserted correctly. 2. Press and hold the ‘learn’ button on the remote. 3. While holding the button, press the fan’s ‘on’ button.
4. Release both buttons. Your remote should now be paired.
Can You Add A Remote Control To An Existing Ceiling Fan?
Yes, you can add a remote control to an existing ceiling fan. It can be easily installed to control the fan’s speed and light settings.
Are Ceiling Fan Remotes Interchangeable?
Ceiling fan remotes are not generally interchangeable. Each remote is designed to work with a specific fan model. Make sure to check the compatible remote options provided by the manufacturer for your specific ceiling fan.
How Do I Turn My Normal Ceiling Fan Into Remote Control?
To turn a normal ceiling fan into a remote control one, you can install a universal ceiling fan remote kit. This kit includes a receiver that connects to the fan and a handheld remote for control. Simply follow the instructions provided with the kit for easy installation.
Conclusion
To sum up, installing a universal ceiling fan remote is a simple and effective way to enhance your home’s comfort and convenience. With the step-by-step guide provided in this blog post, you can confidently tackle the installation process. Remember to turn off the power and follow the manufacturer’s instructions for a seamless installation.
Enjoy the ease of controlling your ceiling fan from anywhere in the room with your new remote. Happy DIY-ing!