To install transition molding, measure and cut the molding to fit the desired area, then secure it in place using adhesive or nails. Transition molding is an important component in flooring installations as it helps to create a smooth and seamless transition between different types of flooring.
Whether you are transitioning between hardwood and carpet, tile and laminate, or any other flooring combination, installing transition molding is a simple and effective solution. We will guide you through the easy steps involved in installing transition molding, helping you achieve a professional-looking finish in no time.
So, let’s get started and learn how to install transition molding like a pro.
Choosing The Right Transition Molding
When it comes to installing transition molding, choosing the right type is crucial to achieving a seamless and professional finish. Transition molding not only bridges the gap between different types of flooring but also provides a smooth and safe transition between rooms. To make the right choice, it’s important to consider various factors such as the type of flooring, the height difference, and the overall aesthetics of the space. In this section, we will explore the different types of transition molding materials and the factors you should consider when selecting the perfect one for your project.
Different types of transition molding materials
Transition molding comes in various materials, each offering its own unique benefits and characteristics. Here are some of the most commonly used materials in transition molding:
1. Wood: Wood transition molding is a popular choice for its versatility and aesthetic appeal. It can be stained or painted to match your flooring or create a contrasting effect. Wood molding is available in different profiles, including T-molding, reducer molding, and threshold molding.
2. Metal: Metal transition molding, such as aluminum or stainless steel, is known for its durability and sleek appearance. It is often used in commercial settings or contemporary homes to create a modern and stylish transition between different types of flooring.
3. Vinyl: Vinyl transition molding is a practical and cost-effective option that is resistant to moisture and easy to maintain. It comes in various colors and styles, including snap-together vinyl molding that provides a quick and hassle-free installation.
4. Laminate: Laminate transition molding is designed specifically for laminate flooring and is available in a range of finishes that mimic the look of wood, tile, or stone. It is easy to install and provides a seamless transition between rooms with laminate floors.
Factors to consider when selecting transition molding
When selecting transition molding, it’s essential to consider the following factors:
1. Height difference: Measure the height difference between the two types of flooring that need to be transitioned. This will help you determine the appropriate type of molding that can accommodate the height variation without causing any tripping hazards.
2. Style and finish: Consider the overall style and finish of your flooring to ensure the transition molding complements the aesthetics of the space. Whether you’re aiming for a seamless blend or a bold contrast, choosing the right color and finish is crucial.
3. Traffic and usage: Evaluate the level of foot traffic and usage in the area where the transition molding will be installed. For high-traffic areas, opt for durable materials that can withstand heavy use and provide long-lasting performance.
4. Installation method: Different types of transition molding require different installation methods. Some may require adhesive, screws, or snap-together installation systems. Consider the complexity of installation and choose a method that suits your DIY skills and time constraints.
5. Maintenance: Think about the maintenance requirements of the transition molding material. Some materials may require regular cleaning or refinishing, while others are low maintenance and only require occasional wiping.
By carefully considering these factors, you can choose the right transition molding that not only serves its functional purpose but also enhances the overall look and feel of your space.
Now that we’ve explored the different types of transition molding materials and the factors to consider when selecting them, let’s move on to the importance of balancing aesthetics and functionality in the next section.
Tools And Materials Needed
Installing transition molding is a fairly simple task that can drastically improve the look and functionality of your flooring. To ensure a successful installation, it is important to have the right tools and materials on hand. In this section, we will discuss the essential tools and required materials for installing transition molding, as well as some safety precautions to keep in mind. Let’s get started!
Essential Tools for Installing Transition Molding
Having the right tools is essential for any project, and installing transition molding is no exception. Here are the essential tools you will need:
- Measuring tape – to accurately measure the length of the transition area.
- Miter saw – to cut the molding to the correct angles.
- Utility knife – for trimming the molding to fit properly.
- Coping saw – for cutting intricate shapes or curves in the molding.
- Hammer or nail gun – for securing the molding in place.
- Screwdriver – for tightening screws or removing any existing molding.
- Pencil – for marking the areas where the molding needs to be cut or installed.
- Safety goggles – to protect your eyes from any flying debris.
Having these tools ready and easily accessible will ensure a smooth and efficient installation process.
Required Materials for a Successful Installation
In addition to the tools mentioned above, you will also need the following materials for a successful transition molding installation:
- Transition molding – choose the type and style that matches your flooring and desired look.
- Adhesive or construction adhesive – to secure the molding in place.
- Screws or nails – to fasten the molding to the subfloor or existing structure.
- A level – for ensuring that the molding is installed evenly and straight.
- A caulk gun – for applying caulk to any gaps or seams between the molding and the floor.
- A rag or paper towels – for wiping away any excess adhesive or caulk.
Having these materials prepared in advance will make the installation process much smoother and more efficient.
Safety Precautions to Keep in Mind
While installing transition molding is generally a safe task, it is important to prioritize safety throughout the process. Here are some safety precautions to keep in mind:
- Wear safety goggles to protect your eyes from any flying debris or particles.
- Use caution when handling sharp tools such as saws or knives to avoid accidental injuries.
- Ensure that the work area is well-lit to prevent any accidents or mistakes.
- If using a nail gun, always follow the manufacturer’s instructions and handle with care.
- Keep your work area clean and organized to minimize the risk of tripping or falling.
By adhering to these safety precautions, you can ensure a safe and successful transition molding installation process.
Planning And Preparation
Planning and Preparation
Proper planning and preparation are essential when it comes to installing transition molding. By taking the time to measure and assess the area, determine the direction of the transition, calculate the quantity of molding required, and prepare the surface for installation, you’ll ensure a smooth and successful project. In this section, we’ll delve into each of these steps in detail.
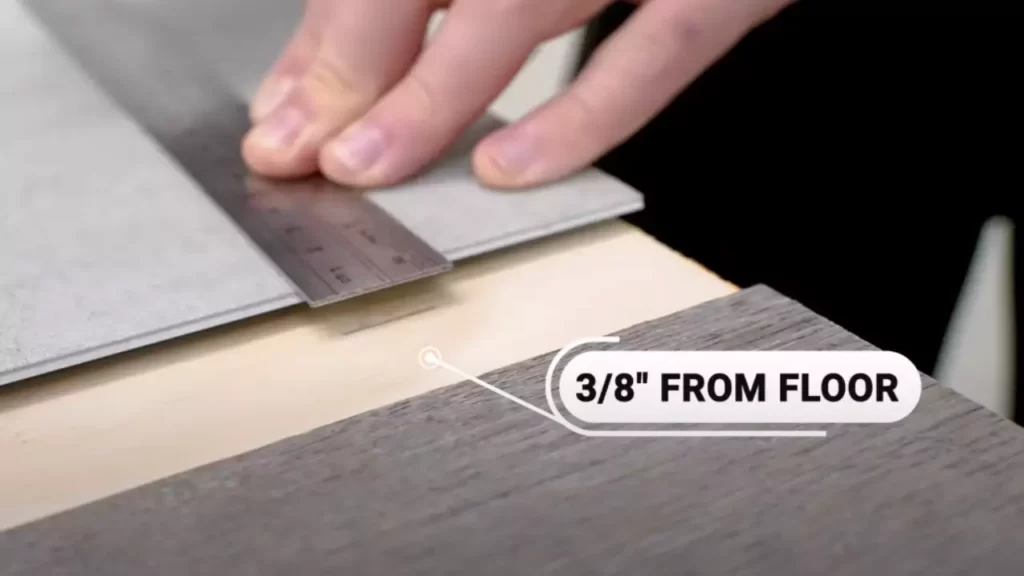
Measuring and Assessing the Area for Installation
Before you can begin installing transition molding, it’s crucial to accurately measure and assess the area where the molding will be placed. This step allows you to determine the length and width of the molding required, ensuring a precise fit. To measure the area, follow these steps:
1. Measure the length: Use a tape measure to measure the length of the transition area. Start from one end and extend the tape measure to the other, recording the measurement in feet.
2. Measure the width: Similarly, measure the width of the transition area using a tape measure. Record this measurement, again in feet.
Determining the Direction of the Transition
Next, you’ll need to determine the direction in which the transition molding will run. This decision depends on the layout of the space and the direction of the flooring. To determine the direction, consider the following:
1. Observe the flooring: Take note of how the flooring is installed in the adjacent areas. Determine whether it runs parallel or perpendicular to the transition area.
2. Choose the direction: Based on the observation, decide the most visually appealing and seamless direction for the transition molding. This step ensures a smooth and natural flow between the two flooring surfaces.
Calculating the Quantity of Transition Molding Required
To avoid any delays or shortages, it is essential to accurately calculate the quantity of transition molding required for your project. To make this calculation, follow these steps:
1. Determine the linear footage: Multiply the length of the transition area by 2 to calculate the linear footage required. This accounts for both sides of the molding.
2. Add extra for waste: It is advisable to add an additional 10% to account for waste or cutting errors. Multiply the linear footage by 1.1 to calculate the total footage required, ensuring you have enough molding to complete the installation.
Preparing the Surface for Installation
Now that you have the measurements and quantity required, it’s time to prepare the surface for the installation of the transition molding. Proper surface preparation ensures a stable and long-lasting installation. Follow these steps to prepare the surface:
1. Clean the area: Thoroughly clean the transition area, removing any dirt, debris, or adhesive residue. Use a mild detergent and warm water to effectively clean the surface. Allow the area to dry completely before proceeding.
2. Smooth out unevenness: Inspect the surface for any unevenness or protrusions. Use a sanding block or leveling compound to smooth out any imperfections. Ensuring a flat and even surface is essential for a seamless installation.
3. Remove any obstacles: Lastly, remove any obstacles or obstructions that may impede the installation process. Check the area for nails, staples, or other debris that could hinder the molding’s attachment.
By meticulously planning and preparing for the installation of transition molding, you set the foundation for a flawless finish. Taking the time to measure and assess the area, determine the direction of the transition, calculate the quantity required, and properly prepare the surface guarantees a professional installation that will enhance the overall aesthetic appeal of your space.
Installing Transition Molding On Hard Surfaces
Transition molding is an essential element when it comes to seamlessly combining different types of flooring. It not only enhances the aesthetic appeal of your space but also provides a smooth transition between different surfaces, preventing tripping hazards and protecting the edges of your floors. In this section, we will guide you through the process of installing transition molding on hard surfaces. Follow these simple steps to achieve professional-looking results.
Step 1: Cutting the transition molding to the correct size and shape
The first step in installing transition molding on hard surfaces is to cut it to the correct size and shape. Using a tape measure, carefully measure the length of the area where the molding will be installed. Mark the measurements on the molding, ensuring that it is slightly longer than the measured space to allow for a snug fit. Using a miter saw or a coping saw, cut the molding along the marked lines, taking care to achieve precise and clean cuts.
Step 2: Pre-drilling holes for fasteners, if necessary
In some cases, you may need to pre-drill holes for fasteners to secure the transition molding in place. This step ensures that the molding remains firmly attached to the hard surface and prevents any potential damage. Refer to the manufacturer’s instructions or guidelines to determine if pre-drilling holes is necessary for the specific type of molding you are using. Use a drill bit that is appropriate for the size of the fasteners, and carefully drill holes through the molding and into the hard surface.
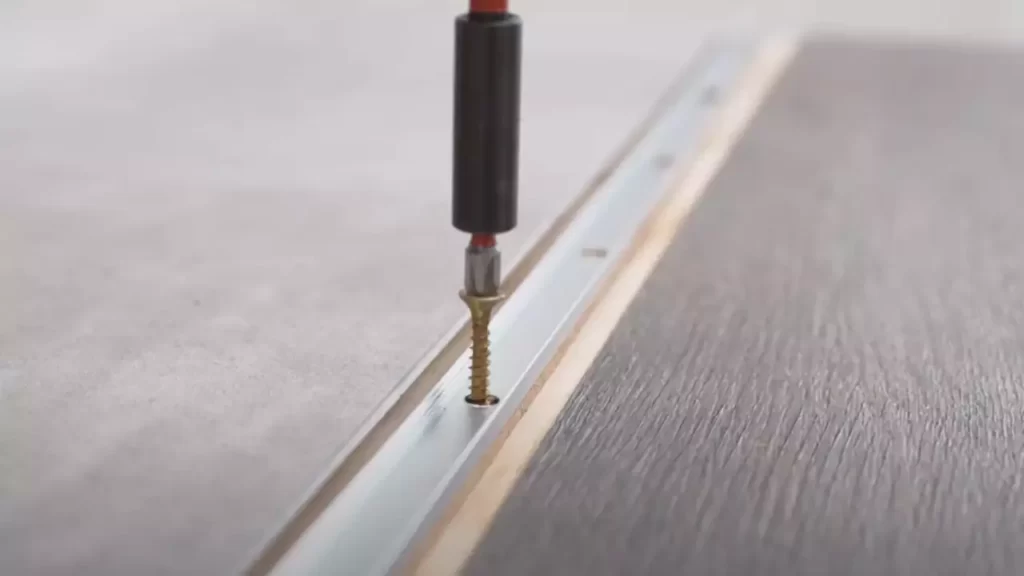
Step 3: Securing the molding using appropriate methods (nails, adhesive, etc.)
Once you have cut the molding to the right size and pre-drilled any necessary holes, it’s time to secure it to the hard surface using suitable methods. Depending on the type of transition molding and the specific requirements, you can use nails, adhesive, or a combination of both. If using nails, carefully position the molding in place and drive the nails through the pre-drilled holes or the designated areas where nails are recommended. If using adhesive, apply a thin layer on the underside of the molding and press it firmly onto the hard surface, ensuring proper adhesion.
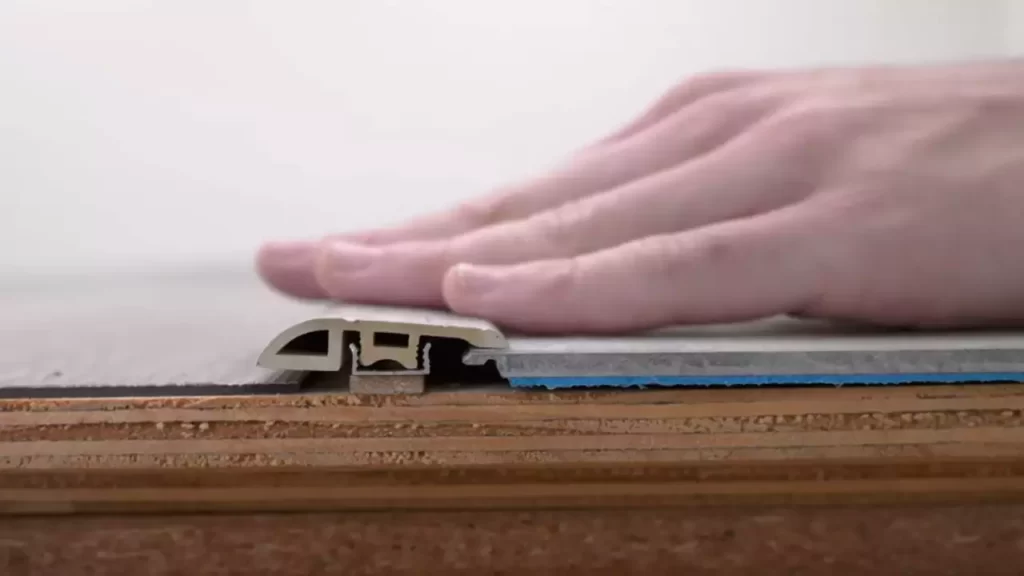
Step 4: Ensuring a snug fit and proper alignment
Finally, it is crucial to ensure a snug fit and proper alignment of the transition molding. Gently press or tap the molding into place, ensuring that it fits snugly against both surfaces without any gaps or overlaps. Use a level to check for proper alignment and make any necessary adjustments before the adhesive dries or the nails are fully secured. Taking the time to ensure a perfect fit will result in a visually appealing transition that blends seamlessly with your flooring.
Installing Transition Molding On Carpeted Surfaces
Transition molding is an essential element when it comes to seamlessly blending carpeted surfaces with hard flooring. By installing transition molding, you can create a polished and professional look while also ensuring a smooth and safe transition between different types of flooring. In this guide, we will walk you through the step-by-step process of installing transition molding on carpeted surfaces, from cutting the molding to securing it in place. Let’s get started!
Step 1: Cutting the transition molding to the correct size and shape
Before you begin installing transition molding on your carpeted surfaces, it’s crucial to ensure that the molding is cut to the correct size and shape. To do this:
- Measure the length of the carpeted area where the transition molding will be installed.
- Using a pencil and a straight edge, mark the molding according to your measurements.
- Once marked, carefully cut the molding using a saw or a miter box.
Cutting the transition molding accurately is key to achieving a seamless and professional installation.
Step 2: Preparing the carpet edge for a clean installation
To ensure a clean and secure installation, you need to prepare the carpet edge before installing the transition molding. Here’s how:
- Use a carpet knife to trim the carpet edge neatly, removing any loose or frayed fibers.
- After trimming, fold the carpet back to expose the subfloor beneath.
- Ensure that the carpet edge is smooth and free from debris or uneven padding.
Preparing the carpet edge properly sets the stage for a seamless transition between the carpet and the hard surface.
Step 3: Securing the molding using appropriate methods
Once you’ve cut the molding and prepared the carpet edge, it’s time to secure the transition molding in place. Depending on the specific type of molding you’re using, there are several methods you can use:
- Using tack strips: Position the molding parallel to the edge of the carpet, ensuring that the beveled side faces the hard surface. Use a hammer to secure the tack strip onto the subfloor and then press the molding onto the strip.
- Using adhesive: Apply a strong adhesive, such as construction adhesive, to the bottom of the molding. Press the molding firmly against the carpet and hold it in place until the adhesive sets.
- Using screws or nails: For wooden subfloors, you can secure the molding by using screws or nails at strategic points along its length.
Choosing the appropriate method of securing the molding depends on your specific project and the type of transition molding you’re using.
Step 4: Ensuring a seamless transition between carpet and hard surface
When installing transition molding on carpeted surfaces, it’s crucial to ensure a seamless transition that not only looks great but also prevents trips and falls. To achieve this, follow these tips:
- Ensure that the transition molding is flush with both the carpet and the hard surface. Use a level to check if the molding sits evenly.
- If necessary, use a file or sandpaper to smooth any rough edges or uneven surfaces on the molding.
- Clean any excess adhesive or debris that may have accumulated during the installation process, ensuring a neat and polished final result.
By paying attention to these details, you can achieve a seamless and safe transition between your carpeted surfaces and hard flooring.
Installing transition molding on carpeted surfaces doesn’t have to be a complicated process. By following these steps and paying attention to detail, you can achieve a professional-looking installation that enhances the overall aesthetic of your space. With the right tools and techniques, you’ll be able to enjoy a polished and seamless transition between your carpet and hard surface flooring.
Additional Tips And Considerations
Installing transition molding is an essential step in achieving a seamless and professional look for your flooring project. While the process itself is relatively straightforward, there are a few additional tips and considerations that can help ensure a successful installation. From customizing transition molding for unique situations to dealing with corners and uneven surfaces, as well as maintaining and cleaning the molding for longevity, these factors can make a significant difference in the final result. Let’s explore each of these aspects in detail.
Customizing transition molding for unique situations
In some cases, standard transition molding may not perfectly fit the unique dimensions or shapes of your flooring project. To address this, you may need to customize the molding to ensure a seamless transition between different types of flooring. You can achieve this by following these simple steps:
- Measure the area where you need to install the transition molding.
- Cut the molding to the required length using a miter saw or a coping saw, depending on the material of the molding.
- If needed, sand down any rough edges or uneven surfaces to ensure a smooth finish.
Remember to always double-check your measurements and make precise cuts to achieve the best fit. Customizing the molding ensures that it not only looks great but also functions effectively in providing a seamless transition.
Dealing with corners and uneven surfaces
When it comes to corners or uneven surfaces, installing transition molding requires additional attention and care. Here are some tips to make the process easier:
- For inside corners, use a coping saw to create a precise cut that matches the profile of the adjoining molding. This helps achieve a tighter fit and a more professional finish.
- For outside corners, use a miter saw to cut the molding at a 45-degree angle for a smooth and seamless appearance.
- If you encounter any irregularities or gaps between the molding and the surfaces, consider using a filler or adhesive to create a solid connection.
By addressing corners and uneven surfaces with precision and care, you can ensure that your transition molding seamlessly integrates with the surrounding flooring, leaving no room for imperfections.
Maintaining and cleaning transition molding for longevity
Once your transition molding is installed, proper maintenance and regular cleaning are key to ensuring its longevity and preserving its appearance. Follow these simple steps to keep your molding in top shape:
- Regularly sweep or vacuum the area to remove any dirt or debris that may accumulate near the molding.
- Use a damp cloth or mop with a mild detergent to clean the molding, ensuring not to saturate it with excessive moisture.
- For stubborn stains or marks, consider using a specialized cleaner recommended by the manufacturer of your molding material.
- Inspect the molding periodically for any signs of damage or wear. If necessary, replace it promptly to maintain a seamless and visually appealing transition.
By taking proper care of your transition molding, you can extend its lifespan and ensure it continues to enhance the overall aesthetics of your flooring project.
Troubleshooting Common Installation Issues
Installing transition molding can greatly enhance the appearance and functionality of your floors, providing a smooth and seamless transition between different types of flooring materials. However, like any other home improvement project, it’s not without its challenges. In this section, we will address some of the common installation issues you may face when installing transition molding and provide practical solutions.
Gaps or Misalignment in the Molding
One of the most common issues encountered during transition molding installation is gaps or misalignment between the molding and the flooring surfaces. This can occur due to uneven subflooring, inadequate adhesive application, or improper placement of the molding.
To address this issue, follow these steps:
- Ensure that the subflooring is level and free from any debris or irregularities. Use a leveling compound or sand down high spots, if necessary.
- Carefully measure and mark the correct placement of the molding before attaching it. This will help prevent uneven installation.
- Apply a generous amount of adhesive to the back of the molding, ensuring complete coverage.
- Press the molding firmly into place, using a rubber mallet or a block of wood to ensure even pressure. This will help eliminate any gaps or misalignment.
Squeaky or Loose Transition Molding
Another frustrating issue that can occur after installing transition molding is squeaky or loose molding. This can be caused by improper attachment methods or the movement of the flooring materials beneath.
To fix squeaky or loose molding, try the following:
- Remove any existing screws or nails that were used to attach the molding.
- Inspect the subflooring for any signs of damage or movement. If necessary, reinforce the subflooring using additional screws or nails.
- Apply adhesive to the back of the molding and press it firmly into place.
- Secure the molding further by using screws or finishing nails spaced evenly along its length.
- Make sure to drive the screws or nails below the surface of the molding to avoid any trip hazards.
Methods for Repairing Damaged or Worn-out Molding
Over time, transition molding may become damaged or worn-out due to regular wear and tear. Instead of replacing the entire piece, you can often repair it using simple methods.
Consider the following techniques:
| Issue | Repair Method |
|---|---|
| Scratches or Small Gouges | Fill the damaged area with a wood filler that matches the color of the molding. Sand it down once dried and apply a new finish. |
| Cracks or Splitting | Apply a small amount of wood glue to the crack or split and clamp it together until dry. Sand the area and apply a finish to match the rest of the molding. |
| Discoloration | If the molding has become discolored, sand it down lightly and apply a fresh coat of paint or stain to restore its appearance. |
By following these repair methods, you can save time and money while still maintaining the integrity and aesthetics of your transition molding.
Frequently Asked Questions
What Is The Best Adhesive For Transition Strips?
The best adhesive for transition strips is a strong construction adhesive like liquid nails or epoxy. These adhesives provide a durable bond between the strip and the floor, ensuring it stays in place securely. Always follow the manufacturer’s instructions for proper installation.
How Do You Transition Moulding?
To transition molding, follow these steps: 1. Measure and cut the molding to fit the desired area. 2. Use adhesive or nails to attach the molding securely to the wall or surface. 3. Fill any gaps or nail holes with wood filler or putty.
4. Sand the molding to achieve a smooth finish. 5. Finally, paint or stain the molding to match the surrounding decor.
Do You Have To Use Transition Strips Between Rooms?
Transition strips between rooms are not always necessary. Their use depends on factors such as the type of flooring, height differences, and personal preference. It’s recommended to consult with a professional to determine whether transition strips are required for your specific situation.
How Do You Install T Molding Between Vinyl And Carpet?
To install T molding between vinyl and carpet, follow these steps: 1. Measure the distance and cut the T molding to the required length. 2. Apply adhesive to the bottom of the T molding. 3. Place the T molding between the vinyl and carpet, ensuring it aligns with the edge of both materials.
4. Use a rubber mallet to tap the T molding gently into place. 5. Allow the adhesive to dry completely before walking on the flooring.
Conclusion
Installing transition molding is a straightforward process that can add a polished look to any room. From choosing the right type of molding to measuring and cutting it accurately, following these steps will ensure a successful installation. Remember to secure the molding firmly in place and cover any gaps or seams for a seamless finish.
With a little patience and attention to detail, you can transform your space with beautiful transition molding.