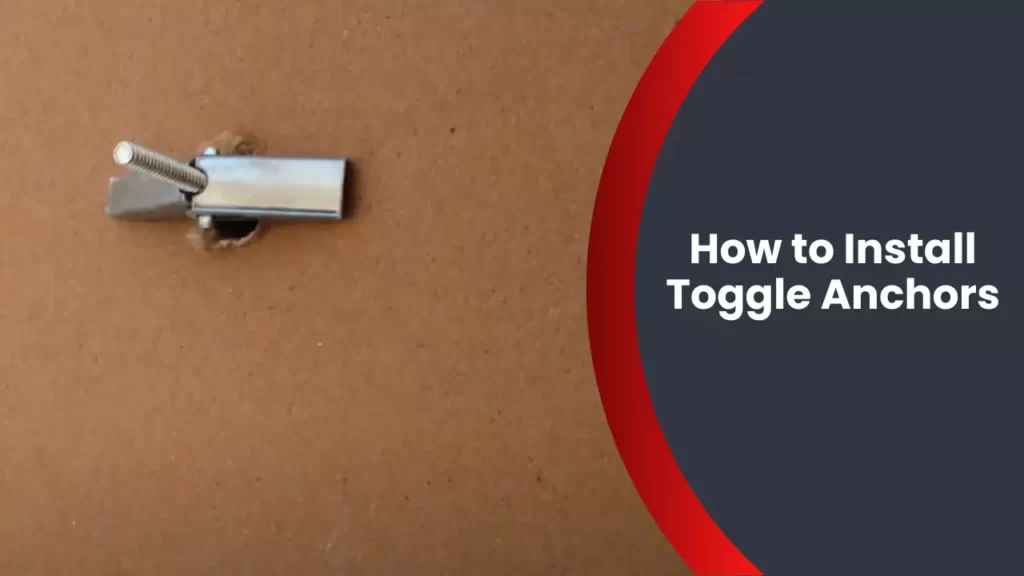
To install toggle anchors, first, drill a hole into the wall, then insert the anchor and tighten it with a screwdriver. Toggle anchors are commonly used to provide secure fastening for heavy objects on walls.
Toggle anchors are an effective way to securely hang heavy objects on walls. Whether you’re mounting a shelf, TV, or a mirror, toggle anchors provide a reliable and sturdy hold. By following a few simple steps, you can easily install toggle anchors yourself.
We will guide you through the process of installing toggle anchors, ensuring that your wall-mounting projects are successful and secure. So, let’s get started and learn how to install toggle anchors properly for maximum stability and support.
Choosing The Right Toggle Anchors For Your Project
When it comes to securing heavy objects or mounting fixtures on a wall, toggle anchors are a reliable and versatile option. These anchors provide strong support and stability, ensuring your items stay securely in place. However, with the wide variety of toggle anchors available on the market, it can be overwhelming to choose the right ones for your specific project. In this article, we will explore the different types of toggle anchors, factors to consider when selecting toggle anchors, and how to understand their weight-bearing capacities.
Different Types of Toggle Anchors
Toggle anchors come in several different types, each designed for specific installation scenarios. To choose the most appropriate toggle anchors for your project, it’s important to understand the options available:
- Toggle Bolts: Toggle bolts are one of the most commonly used types of toggle anchors. They consist of a sturdy bolt attached to a pair of spring-loaded wings. When inserted into a wall, the wings collapse and open up behind the wall, providing a secure anchor point.
- Strap Toggle Anchors: Strap toggle anchors or strap toggles are ideal for heavier loads. These anchors feature a metal strap attached to two wing-shaped brackets. Once inserted through a pre-drilled hole, the brackets fold open, securing the anchor against the wall.
- Snaptoggle Anchors: Snaptoggle anchors are quick and easy to install. They consist of a threaded bolt and a toggle fitting. As the bolt is tightened, the toggle expands against the back surface of the wall, creating a solid anchor point.
Factors to Consider When Selecting Toggle Anchors
When choosing toggle anchors for your project, you should consider several important factors:
- Load Capacity: Determine the weight of the object you need to secure and ensure the toggle anchor’s load capacity is sufficient.
- Wall Material: Different toggle anchors are designed for use on different wall materials, such as drywall, plaster, or concrete. Ensure you choose anchors suitable for your specific wall type.
- Installation Method: Consider the installation method and tools required. Some toggle anchors may need pre-drilled holes, while others can be installed directly into the wall.
- Space Limitations: If you have limited space behind the wall, choose a toggle anchor that requires minimal clearance for installation.
- Environmental Factors: Evaluate the environment where the toggle anchors will be installed. Factors such as moisture, temperature, and vibrations may affect the anchor’s performance.
Understanding Weight Bearing Capacities
To ensure your toggle anchors can handle the weight of your object, it’s crucial to understand their weight-bearing capacities. Manufacturers provide this information in their product specifications, typically stating the maximum load capacity for each anchor. Pay close attention to these guidelines and avoid overloading the anchors, as it could compromise their effectiveness and lead to potential safety hazards.
By carefully considering the different types of toggle anchors available, evaluating the necessary factors for your project, and understanding weight-bearing capacities, you can confidently choose the right toggle anchors to provide a secure installation for your wall-mounted fixtures and heavy objects.
Preparing The Wall For Toggle Anchor Installation
Preparing the wall for toggle anchor installation is an essential step to ensure a secure attachment and prevent any damage to the wall. By following a few simple steps, you can properly assess the wall material and thickness, locate the ideal installation position, and mark drill points for anchor placement. Let’s delve into each of these steps in detail.
Assessing Wall Material and Thickness
The first step in preparing the wall for toggle anchor installation is to assess the wall material and thickness. This is important because different materials and thicknesses require different types and sizes of toggle anchors for optimal results. To determine the wall material, simply knock on the wall and listen for variations in sound. A hollow sound suggests a hollow wall, while a solid sound indicates a solid wall.
Once you’ve determined the wall material, measure the thickness using a measuring tape. This will help you choose the appropriate toggle anchor size that can securely hold the weight of the item you will be mounting on the wall. It’s crucial to select the right toggle anchor size to ensure a strong and stable installation.
Locating the Ideal Installation Position
After assessing the wall material and thickness, the next step is to find the ideal installation position for your toggle anchor. Consider the weight and size of the item you’ll be mounting, as well as the height and position you want it to be in. To locate the optimal spot, use a stud finder or tapping screw method to identify any underlying studs or beams in the wall. These provide the strongest support for toggle anchors.
If you’re unable to locate any studs in the desired area, you can use a hollow wall anchor or distribute the weight across multiple toggle anchors for added stability. Additionally, ensure that there are no electrical wires or plumbing pipes behind the chosen installation position to avoid any accidents or damage.
Marking Drill Points for Anchor Placement
Once you’ve determined the wall material, thickness, and ideal installation position, it’s time to mark the drill points for anchor placement. Start by placing the item or bracket you’ll be mounting on the wall against the desired spot. Use a pencil or marker to mark the top and bottom holes of the bracket on the wall.
Measure the distance between the two marks to ensure they are level and aligned. This will guarantee a straight and aesthetically pleasing installation. If required, use a tape measure or level tool to double-check the alignment before proceeding.
Finally, using a drill bit that matches the size of your toggle anchor, carefully drill holes at the marked points. Ensure that the drill is set to the appropriate depth, which is typically the same size as the length of the toggle anchor.
By properly preparing the wall for toggle anchor installation through assessing wall material and thickness, finding the ideal installation position, and marking drill points for anchor placement, you can ensure a secure and successful installation. Remember to always follow the manufacturer’s instructions and safety guidelines for the specific toggle anchors you are using, as they may have additional recommendations or specifications for installation.
Installing Toggle Anchors: Step-By-Step Process
Installing Toggle Anchors: Step-by-Step Process
Gathering the Required Tools and Materials
Before you begin installing toggle anchors, it is important to gather all the necessary tools and materials. Ensuring you have everything you need will help you complete the installation smoothly. Here is a list of the tools and materials you will need:
– Toggle anchors (choose the appropriate size and type for your project)
– Drill (with the appropriate drill bit for the size of your toggle anchors)
– Screwdriver or drill with a screwdriver attachment
– Pencil or marker
– Level
– Measuring tape or ruler
– Protective eyewear
– Dust mask (optional, but recommended for safety)
Drilling Holes for Toggle Anchors
Once you have gathered all the required tools and materials, it is time to start the installation process. Begin by marking the location of the anchor on the wall using a pencil or marker. Use a measuring tape or ruler to ensure the anchor is placed at the desired height and distance from other objects.
Next, put on your protective eyewear and dust mask for added safety. Now, using the appropriate drill bit for your toggle anchors, carefully drill a hole into the marked spot on the wall. Make sure to drill straight and avoid applying too much pressure to prevent damaging the wall.
Inserting the Anchors into the Wall
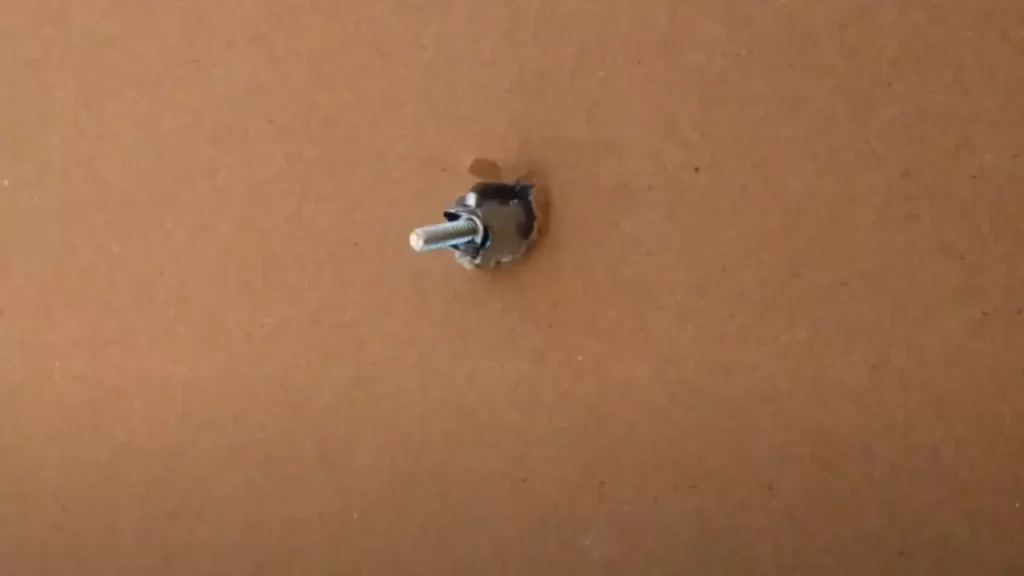
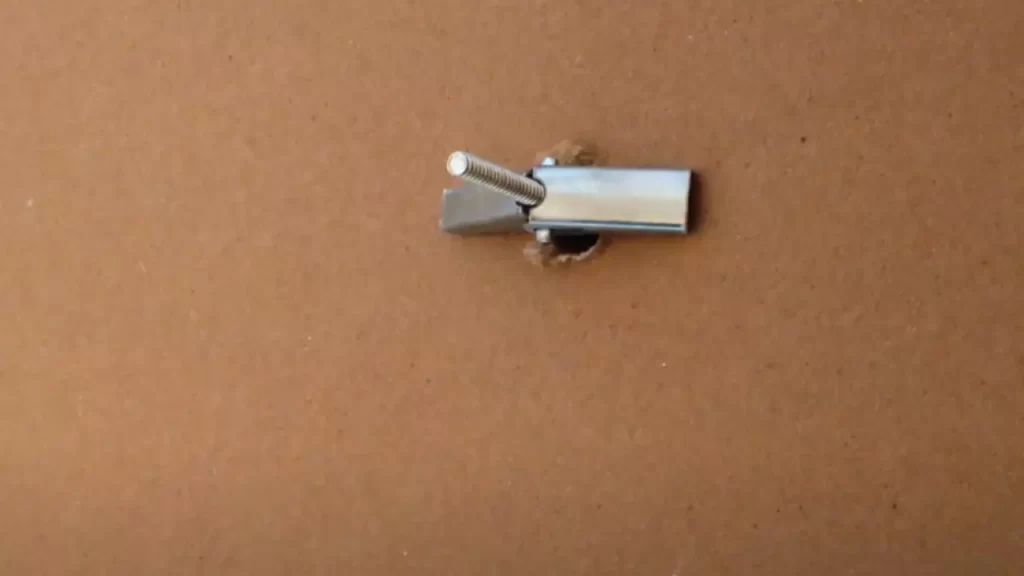
After drilling the holes, it is time to insert the toggle anchors into the wall. Take one anchor at a time and place it at the drilled hole. Insert the anchor into the hole, ensuring it goes in smoothly. If the anchor is a bit tight, gently tap it in with a hammer until it is flush with the wall.
Securing the Anchors and Setting the Toggles
Once all the toggle anchors are inserted into the wall, it’s time to secure them and set the toggles. Take your screwdriver or drill with a screwdriver attachment and insert it into the anchor. Begin by turning the screwdriver clockwise to tighten the anchor. Make sure to apply enough pressure to securely fasten the anchor to the wall, but be careful not to overtighten and strip the anchor.
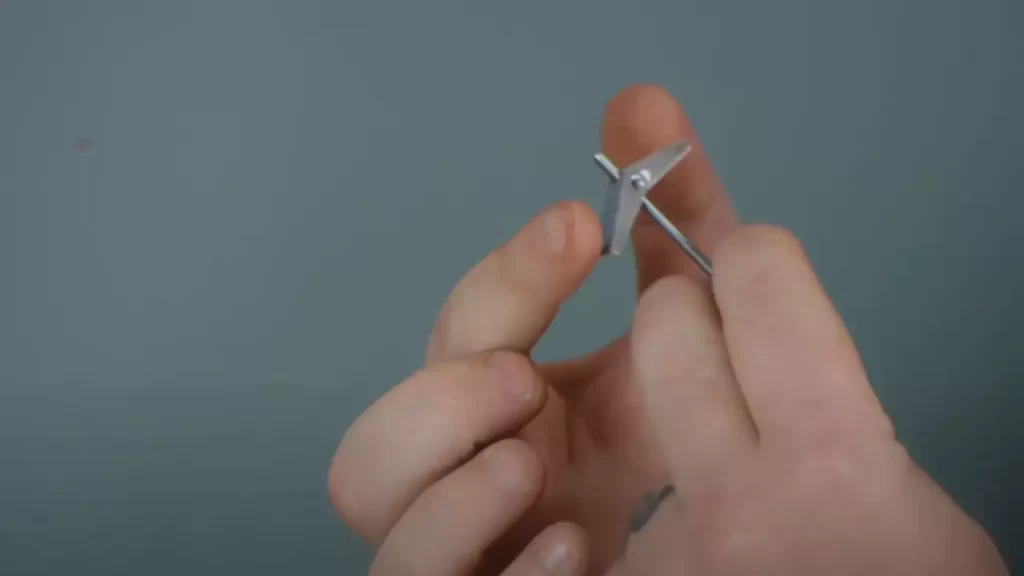
Once the anchors are secured, it’s time to set the toggles. To do this, push or pull the screw slightly to release the toggle. Once the toggle is released, gently pull on the screw to ensure it is securely in place. Repeat this process for each toggle anchor.
Tips for Ensuring Proper Anchor Placement
To ensure proper anchor placement, follow these tips:
1. Choose the right size and type of toggle anchor for your project. This will depend on the weight and type of object you are hanging.
2. Use a level to ensure the anchors are placed straight on the wall.
3. Consider the wall material when selecting the drill bit and anchor. Different types of walls may require different anchors for optimal stability.
4. If you are unsure about the thickness of the wall, use a longer drill bit to ensure the anchor goes in deep enough.
By following these step-by-step instructions and tips, you can confidently install toggle anchors for your next project. Remember to always prioritize safety by wearing protective eyewear and following proper drilling techniques. Happy anchoring!
Troubleshooting Common Issues With Toggle Anchors
When it comes to installing toggle anchors, it’s important to be aware of potential issues that may arise. In this section, we will address common problems that can occur when using toggle anchors and provide solutions to overcome them. Whether you’re dealing with loose anchors, obstacles in the wall, or damaged toggle anchors, we’ve got you covered.
Anchors Coming Loose or Failing
If you find that your toggle anchors are coming loose or failing, it can be frustrating. Fortunately, there are several factors you can consider to prevent this issue from occurring.
Firstly, ensure that you’re using the appropriate size of toggle anchor for your project. Using anchors that are too small for the weight they need to support can result in failure. Refer to the manufacturer’s guidelines or consult with a hardware professional to determine the correct size.
Secondly, double-check that the toggle anchor is properly installed. When inserting the anchor into the wall, make sure it is fully expanded before tightening the screw. Insufficient expansion can lead to the anchor coming loose over time.
Lastly, be mindful of the material the wall is made of. Some materials, such as drywall, may not provide enough strength for heavy loads. In these cases, consider using additional support, such as a wall stud, or opt for a different type of anchor more suitable for the material.
Overcoming Obstacles in the Wall
Encountering obstacles in the wall, such as pipes or electrical wiring, can pose a challenge when installing toggle anchors. However, with a few techniques, you can navigate these obstacles successfully.
Prior to drilling, carefully inspect the area where you plan to install the toggle anchor. Look for any signs of pipes or wires, such as previous installations or markings on the wall. If you suspect there may be an obstacle, it’s best to consult a professional to assess the situation.
If you come across an obstacle while drilling, stop immediately to avoid causing damage. Instead, try drilling a different spot that is clear of obstacles. You can also use a stud finder or a wire detection tool to determine the safest location for the toggle anchor.
In some cases, it may be necessary to reroute wiring or plumbing to accommodate the anchor. If this is the case, it is recommended to hire a licensed professional to handle the job properly and safely.
Replacing Damaged Toggle Anchors
If a toggle anchor becomes damaged or fails to provide the desired support, it’s crucial to replace it promptly. Follow these steps to replace a damaged toggle anchor:
- Remove the screw from the damaged toggle anchor by turning it counterclockwise.
- Pull the anchor out of the wall, carefully removing any remaining debris.
- Fill the hole left by the old anchor with spackle or drywall compound, leveling it flush with the wall surface. Allow it to dry fully.
- Once the filler has dried, select a new toggle anchor of the appropriate size and insert it into the hole, ensuring it expands fully behind the wall.
- Tighten the screw of the new toggle anchor, securing it into place.
By following these troubleshooting tips, you can overcome common issues and ensure a successful toggle anchor installation. Remember to always prioritize safety and consult professionals when needed.
Safety Considerations And Best Practices
When installing toggle anchors, it is crucial to prioritize safety and follow best practices to ensure a secure and reliable installation. By taking certain precautions and adhering to the manufacturer’s instructions, you can greatly minimize potential risks and ensure a successful outcome. In this section, we will discuss the important safety considerations and best practices that you should keep in mind during the toggle anchor installation process.
Wearing Protective Gear
Before you begin the installation, it is important to prioritize your safety by wearing the necessary protective gear. While installing toggle anchors, you may come in contact with sharp tools, flying debris, or even the potential for wall damage. To protect yourself from any potential risks, always wear safety goggles to shield your eyes from flying particles and debris. Additionally, it is advisable to wear protective gloves to safeguard your hands from sharp edges and any potential injuries.
Following Manufacturer Instructions
One of the key aspects of ensuring a safe and successful toggle anchor installation is to carefully read and follow the manufacturer’s instructions. Each toggle anchor may have specific guidelines and steps that need to be followed precisely. By referring to the manufacturer’s instructions, you can gain valuable insights into the correct installation technique, weight capacity, and other important considerations. Failure to comply with these instructions may result in an insecure installation that could potentially lead to accidents or damage.
When installing toggle anchors, make sure to:
- Identify the recommended drilling size and depth for the anchor.
- Use the appropriate drilling equipment and techniques to create a clean and accurate hole.
- Insert the toggle anchor into the hole according to the manufacturer’s instructions.
- Tighten the toggle anchor until it is securely fastened to the wall.
- Ensure that the anchor is flush with the wall surface for optimal stability.
Double-Checking Wall Integrity after Installation
After installing the toggle anchors, it is crucial to double-check the wall integrity to ensure a secure and stable anchor point. This step is essential as it allows you to identify any potential issues or weaknesses in the installation. Give the anchor a gentle tug to ensure it is firmly in place. If the wall feels loose or shows signs of cracking or damage, it is best to consult a professional to rectify the situation before proceeding further. By double-checking the wall’s integrity, you can rest assured that your toggle anchor installation is safe and reliable.
Utilizing Toggle Anchors For Various Applications
Toggle anchors are versatile and reliable fasteners that are commonly used in construction and home improvement projects. With their unique design, toggle anchors provide a secure hold in various materials, including drywall and concrete. In this blog post, we will explore how you can utilize toggle anchors for different applications, such as installing shelves and cabinets, hanging heavy mirrors and artwork, and mounting TV wall mounts. By following these steps, you can ensure that your fixtures are securely attached to the wall, providing stability and peace of mind.
Installing Shelves and Cabinets
When it comes to installing shelves and cabinets, it’s crucial to use a reliable fastening method to ensure they stay securely mounted on the wall. Toggle anchors are an excellent choice for this purpose. Follow these steps to install shelves and cabinets using toggle anchors:
- Start by determining the desired location for your shelves or cabinets. Use a level to mark the positions where the toggle anchors will be placed.
- Drill a hole using a drill bit that is appropriate for the size of the toggle anchor. Make sure the hole is deep enough to accommodate the toggle anchor.
- Insert the toggle anchor into the hole and tighten it by turning it clockwise. Ensure that the toggle anchor expands properly to create a secure hold.
- Attach the shelf or cabinet to the toggle anchor using screws or bolts, depending on the specific instructions provided by the manufacturer.
- Double-check the stability of the installed shelf or cabinet by giving it a gentle tug. If it feels secure, you’re all set!
Hanging Heavy Mirrors and Artwork
Hanging heavy mirrors and artwork can be a challenging task, especially when dealing with fragile walls. Toggle anchors offer a reliable solution for securely hanging these items. Follow these steps to hang heavy mirrors and artwork using toggle anchors:
- Choose an appropriate location on the wall for your mirror or artwork. Ensure that it is centered and at the desired height.
- Using a stud finder, locate any studs in the wall that can provide additional support.
- Once you have determined the position, mark the spots for the toggle anchors. A level can be useful to ensure that the mirror or artwork hangs straight.
- Drill holes at the marked spots using the appropriate drill bit size for the toggle anchors.
- Insert the toggle anchors into the holes and tighten them by turning clockwise. Make sure they expand fully to create a secure hold.
- Hang your mirror or artwork using appropriate hooks and hardware. Be sure to follow the manufacturer’s instructions.
- Step back and admire your newly hung heavy mirror or artwork, knowing that it is securely attached to the wall.
Mounting TV Wall Mounts
Mounting TV wall mounts requires a reliable and sturdy support system to ensure the safety and stability of your television. Toggle anchors offer excellent support, making them ideal for this application. Follow these steps to mount TV wall mounts using toggle anchors:
- Determine the ideal location on the wall for your TV. Consider factors such as viewing angle and height.
- Using a stud finder, locate any studs in the wall that can provide additional support.
- Measure and mark the positions where the toggle anchors will be placed. Ensure that they align with the TV wall mount’s mounting holes.
- Drill holes at the marked spots using the appropriate drill bit size for the toggle anchors.
- Insert the toggle anchors into the holes and tighten them by turning clockwise. Verify that they expand fully to create a secure hold.
- Attach the TV wall mount to the toggle anchors using the provided screws or bolts. Follow the manufacturer’s instructions for this step.
- Double-check the stability of the mounted TV wall mount by gently pulling on it. If it feels secure, you can confidently hang your television.
By utilizing toggle anchors, you can confidently tackle various applications around your home, from installing shelves and cabinets to hanging heavy mirrors, artwork, and mounting TV wall mounts. These reliable fasteners provide a secure hold, allowing you to enjoy the stability and peace of mind that comes with securely fastened fixtures.
Maintaining And Removing Toggle Anchors
Toggle anchors are versatile and durable wall fasteners commonly used for hanging heavy objects securely. Once installed, it’s important to inspect them periodically for wear and tear to ensure their functionality and reliability. Additionally, if you ever need to remove toggle anchors, it’s essential to do so safely to prevent damage to the wall surface. This section will guide you through the process of maintaining and removing toggle anchors, ensuring your walls stay intact.
Inspecting Anchors for Wear and Tear
Regular inspection of toggle anchors is crucial to maintain their effectiveness. Over time, these anchors may encounter stress and strain from the weight they bear. To ensure their stability and prevent any accidents, follow these steps to check for wear and tear:
- Visually examine each toggle anchor for any signs of corrosion or rust, as these can weaken the anchor and compromise its holding capacity.
- Inspect the toggle mechanism by gently pushing on it to ensure it moves freely and locks firmly. If the mechanism feels loose or stuck, it may need to be replaced.
- Check the screw threads for any signs of damage or stripping. If the threads are worn, it is advisable to replace the toggle anchor with a new one to ensure a secure grip.
By regularly inspecting toggle anchors for wear and tear, you can identify any potential issues and replace them promptly to maintain the stability of your hanging objects.
Safely Removing Toggle Anchors
There may come a time when you need to remove toggle anchors, whether due to renovations, relocation, or simply changing the arrangement of your wall-mounted items. It’s crucial to remove them safely to avoid damaging the wall surface. Follow these steps to remove toggle anchors without causing any unnecessary harm:
- Start by unscrewing the bolt from the toggle anchor. Use a screwdriver or a power drill in reverse mode to gently rotate the bolt counterclockwise until it comes out completely.
- Once the bolt is removed, the toggle anchor should be visible through the wall. Use pliers or adjustable wrenches to grip onto the toggle’s wings.
- Gently pull the toggle anchor toward you while applying steady pressure. The wings should collapse, allowing you to remove the toggle anchor from the wall.
Remember to exert pressure gently, as excessive force could damage the wall. If the toggle anchor seems stuck or difficult to remove, it’s advisable to seek professional assistance to prevent accidental wall damage.
Patching and Repairing Wall Surface
After removing toggle anchors, you may be left with holes in your wall surface. Fortunately, patching these holes is a relatively straightforward process. Follow these steps to repair and restore your wall to its previous condition:
- Remove any loose debris or excess material from the hole using a scraper or sandpaper.
- Apply a thin layer of spackling compound to the hole, ensuring it completely fills the void. Use a putty knife to smooth and level the compound, ensuring a seamless finish.
- Allow the spackling compound to dry according to the manufacturer’s instructions and sand it down until it’s flush with the wall surface.
- Once the patch is smooth and dry, you can paint or wallpaper over it to match the surrounding wall, blending the repaired area seamlessly.
Following these steps will allow you to effectively patch and repair the wall surface after removing toggle anchors, ensuring a clean and professional finish.
Frequently Asked Questions
How Do You Install Plastic Toggle Anchors?
To install plastic toggle anchors, follow these steps: 1. Drill a hole in the wall where you want to install the anchor. 2. Insert the anchor into the hole and push it flush with the wall. 3. Screw in the toggle until it’s tight against the wall.
4. Use a screwdriver to tighten the toggle anchor, expanding it behind the wall. 5. Attach your item to the anchor using screws.
How Do You Install A Pull Toggle Anchor?
To install a pull toggle anchor, first, drill a hole into the desired surface. Insert the anchor into the hole, making sure it is flush with the surface. Then, pull the anchor’s toggle until it locks securely in place. Finally, attach the desired item to the anchor using screws or hooks.
Do You Need A Drill For A Toggle Bolt?
Yes, a drill is needed for a toggle bolt. It is necessary to create a pilot hole before inserting the toggle bolt into a wall or ceiling. Using a drill ensures proper installation and prevents damage.
How Do You Properly Install Drywall Anchors?
To properly install drywall anchors, follow these steps: 1. Mark the location where the anchor will go. 2. Drill a small hole using a drill bit slightly smaller than the anchor. 3. Insert the anchor into the hole and use a screwdriver to screw it in until it is flush with the wall.
4. Insert the screw into the anchor and tighten until secure. 5. Test the anchor’s stability before hanging any items.
Conclusion
To conclude, installing toggle anchors can be a simple and effective solution for hanging objects securely on drywall. By following the step-by-step guide provided in this blog post, you can confidently complete the installation process. Additionally, understanding the weight capacity and proper placement of toggle anchors will ensure your hanging projects remain secure over time.
Incorporating these techniques into your DIY efforts will save you time and prevent damage to your walls. Embrace the convenience and reliability of toggle anchors for all your hanging needs.