To install surround sound wiring, carefully plan the placement of the speakers and run the wires along the walls or under carpets to hide them from view.
Understanding Surround Sound Systems
Introduction: Understanding Surround Sound Systems
Understanding the fundamentals of surround sound systems is essential before diving into the installation process. Surround sound adds depth and dimension to your audio experience, immersing you in a multi-dimensional soundscape. Whether you’re a movie enthusiast or a music lover, the right surround sound system can elevate your entertainment experience to new heights. Let’s explore the components of a surround sound system and the benefits of installing surround sound wiring to enhance your audio setup.
Components of a Surround Sound System
A surround sound system consists of several components working together to reproduce immersive audio. Each component plays a crucial role in delivering a seamless experience. Familiarizing yourself with these components will help you make informed decisions during the installation process. Here are the main components:
- Audio Receiver: The heart of any surround sound system, the audio receiver processes and amplifies audio signals from various sources, distributing them to the speakers.
- Speakers: Speakers are responsible for projecting sound in different directions to create a surround sound effect. They come in various configurations, including front, center, surround, and subwoofer speakers.
- Subwoofer: The subwoofer focuses on delivering low-frequency sounds, adding richness to explosions, deep bass tones, and other effects that make your audio experience more impactful.
- Source Devices: These devices provide the audio signals, such as media players, gaming consoles, Blu-ray players, or streaming devices, delivering the content you want to enjoy.
- Wiring and Cables: Proper wiring and cables connect all the components, ensuring the audio signals flow seamlessly between devices, speakers, and the audio receiver.
Benefits of Installing Surround Sound Wiring
Installing surround sound wiring offers significant advantages that can greatly enhance your entertainment space. Let’s delve into the benefits:
- Immersive Audio Experience: Surround sound wiring brings you closer to the action by creating a three-dimensional soundscape. Whether you’re watching a movie or playing video games, you’ll feel fully immersed in the audio environment.
- Enhanced Sound Quality: By properly wiring your surround sound system, you can ensure optimal signal transfer and minimize audio interference. This results in enhanced sound quality, allowing you to hear even the smallest details in your favorite content.
- Flexibility and Customization: Installing surround sound wiring allows you to position the speakers strategically to achieve the best audio coverage in your room. You can customize the placement according to your preferences and the layout of your space.
- Seamless Integration: Properly wired surround sound systems seamlessly integrate with multiple audio sources. Whether you’re playing music from your smartphone or streaming movies from your smart TV, the surround sound system provides a consistent and immersive experience.
- Increased Property Value: If you’re planning to sell your home in the future, a professionally installed surround sound system with proper wiring can significantly increase its value. It adds a desirable feature that many homebuyers appreciate.
Now that we understand the components of a surround sound system and the benefits of installing surround sound wiring, let’s move on to the installation process, where we will guide you step-by-step to achieve the audio setup you’ve always desired.
Preparing For Installation
Before you dive into installing surround sound wiring in your home, it’s essential to make sure you are adequately prepared. This will help streamline the process and ensure everything goes smoothly. In this section, we will discuss two crucial steps: evaluating the room layout and speaker placement, as well as gathering the necessary tools and materials.
Evaluating the Room Layout and Speaker Placement
One of the first things you’ll need to do is evaluate the layout of the room where you plan to install your surround sound system. This step is crucial for determining the optimal speaker placement and ultimately enhancing your audio experience. To evaluate the room layout effectively, follow these steps:
- Take note of the room’s dimensions, including the height, width, and length. This information will help you calculate speaker distances and determine optimal positioning.
- Identify any potential obstacles in the room, such as furniture, wall-mounted items, or architectural features. These obstacles may affect the sound distribution, so it’s essential to plan accordingly.
- Consider the room’s acoustics. Different materials and surfaces can significantly impact the audio quality. Factors like wall construction, flooring, and windows should be taken into account when deciding on speaker placement.
- Based on your evaluation, determine the ideal speaker placement for optimum sound distribution. Typically, surround sound systems consist of front left, front right, center, rear left, rear right, and subwoofer speakers. Ensure that the speakers are positioned strategically to create an immersive audio experience.
Gathering the Necessary Tools and Materials
Now that you have evaluated the room layout and determined the speaker placement, it’s time to gather the necessary tools and materials for the installation process. Having everything you need readily available will save you time and frustration later on. Here’s what you’ll need:
| Tools | Materials |
|---|---|
|
|
By ensuring you have all the necessary tools and materials at your disposal, you can avoid unexpected delays and finish the installation process quickly and efficiently.
Running Surround Sound Wiring
Planning the cable routes and hiding wiring
Before you start running surround sound wiring, it’s crucial to plan the cable routes and decide how you want to hide the wires for a clean and professional installation. Take some time to determine the optimal location for your speakers and receiver, considering factors such as room layout and where you’ll be sitting.
When planning the cable routes, try to find the shortest and most direct path between your speakers and audio receiver. This will not only make the installation process easier but also minimize any potential signal loss or interference. You can use floor plans or diagrams to visualize the cable routes and ensure that you have enough length for each wire.
Once you’ve determined the cable routes, think about how to hide the wiring. While hiding wires may seem like a daunting task, there are several options you can consider. One popular method is to run wires behind walls for a clean and invisible look. Alternatively, you can use wire channels or raceways to conceal the cables along baseboards or crown moldings.
Drilling holes and running wires behind walls
Running surround sound wiring behind walls can provide a sleek and clutter-free appearance. However, it requires some drilling and careful planning to ensure that the cables are correctly placed and protected. Start by identifying the areas where you’ll need to drill holes for the wires to pass through. Look for spaces behind furniture or corners where the wires can be hidden.
Before drilling any holes, make sure to turn off the power supply to prevent any electrical hazards. Use a stud finder to locate the studs in the walls, as these will serve as a guide for running the wires. Once you’ve identified the drilling points, carefully drill the holes, ensuring they are large enough for the cables to fit through. Remember to seal any drilled holes to maintain the integrity of your walls.
After the holes are drilled, you can start running the wires behind the walls. Use fish tape or a wire pulling tool to guide the cables through the holes. Take extra care to avoid any sharp objects or electrical components that may cause damage to the wires. If necessary, use PVC conduit or flexible tubing to protect and organize the cables.
Properly securing and organizing cables
Securing and organizing your surround sound wiring is essential for both safety and aesthetics. Proper cable management not only prevents tripping hazards but also ensures optimal signal transmission. Start by using cable clips or adhesive-backed hooks to secure the wires along the planned cable routes. These clips can be easily attached to baseboards, walls, or ceilings depending on your setup.
When organizing the cables, it’s important to keep them separate from power cords to minimize interference. You can use zip ties or cable wraps to bundle and group the wires, keeping them neat and organized. Additionally, consider labeling the cables at both ends to make it easier to identify and troubleshoot any issues in the future.
Another effective technique to prevent tangling and ensure a clean installation is to use cable covers or wire channels. These accessories can hide the cables and blend them with the surrounding decor. Depending on your preference, you can choose from various colors and styles to match your room’s aesthetics.
To summarize, running surround sound wiring involves careful planning, drilling holes, and properly securing and organizing the cables. By considering the cable routes, hiding options, and using the right tools and techniques, you can achieve a seamless installation that not only enhances your audio experience but also maintains a tidy and clutter-free living space.
Connecting Surround Sound Speakers
One of the essential steps in setting up your surround sound system is connecting the speakers to the AV receiver or amplifier. This crucial step ensures that you can enjoy an immersive audio experience right in the comfort of your own home. In this section, we will guide you through the process of connecting your surround sound speakers, starting with identifying the speaker terminals and wire connections.
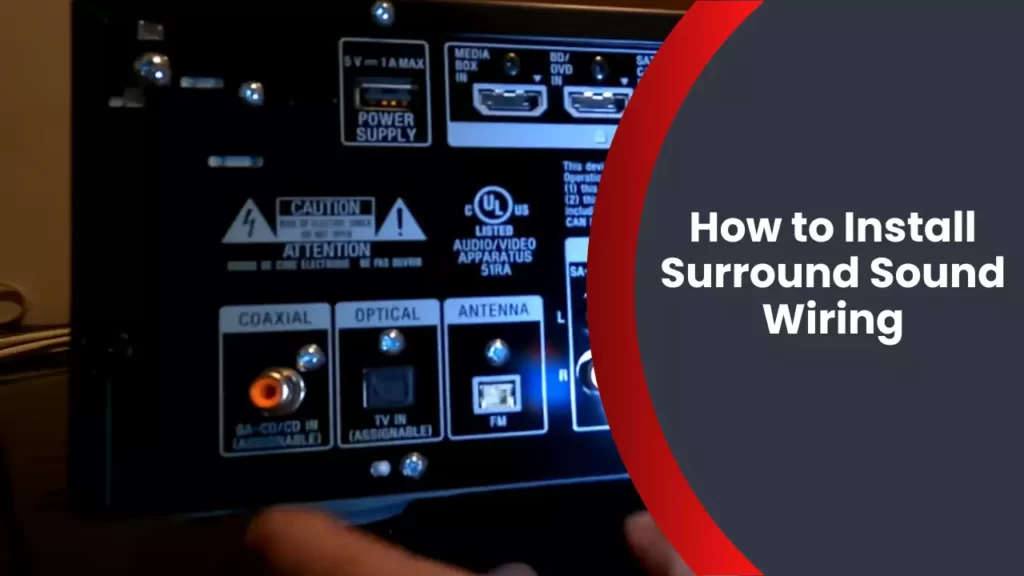
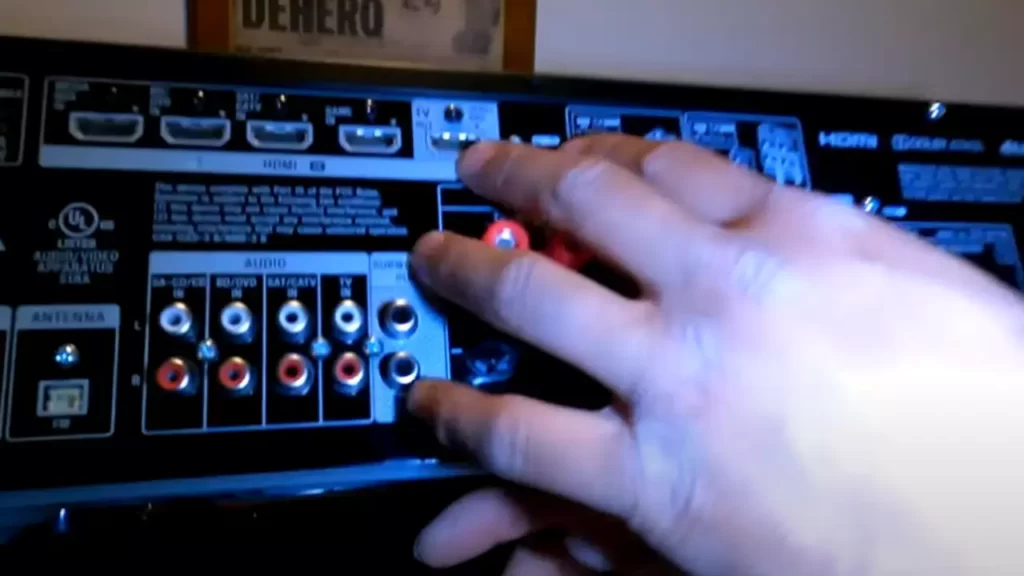
Identifying the Speaker Terminals and Wire Connections
Before connecting your surround sound speakers, it’s important to familiarize yourself with the speaker terminals and wire connections. Speaker terminals are often located at the back of your AV receiver or amplifier. They are labeled according to each speaker channel (front left, front right, center, surround left, surround right, etc.). These terminals allow you to connect your speakers using speaker wire.
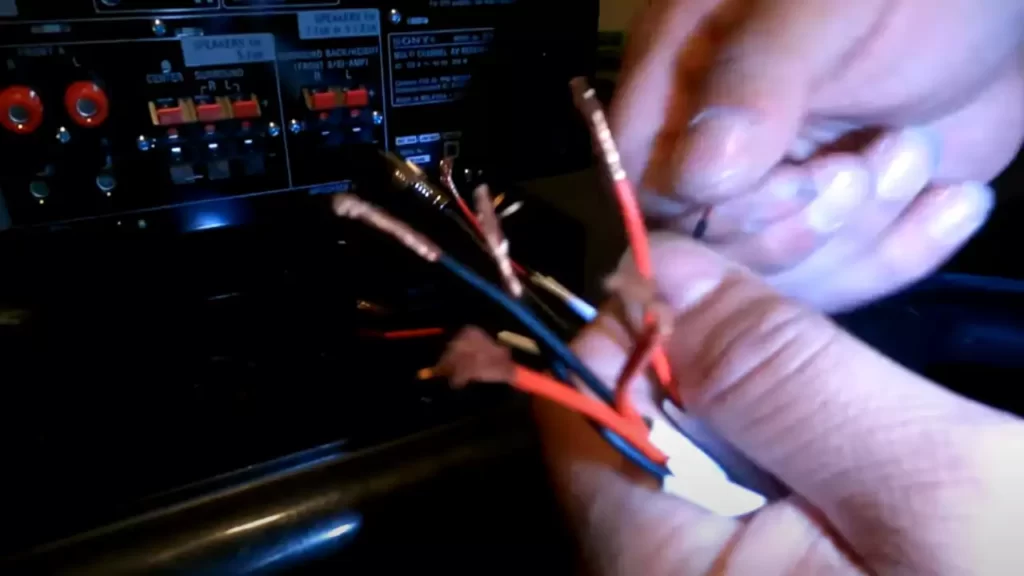
The speaker wire consists of two conductors, usually color-coded for convenience. These conductors are commonly referred to as the positive (+) and negative (-) leads. It’s crucial to connect the correct conductors to the appropriate speaker terminals to ensure phase coherence and maximize audio quality.
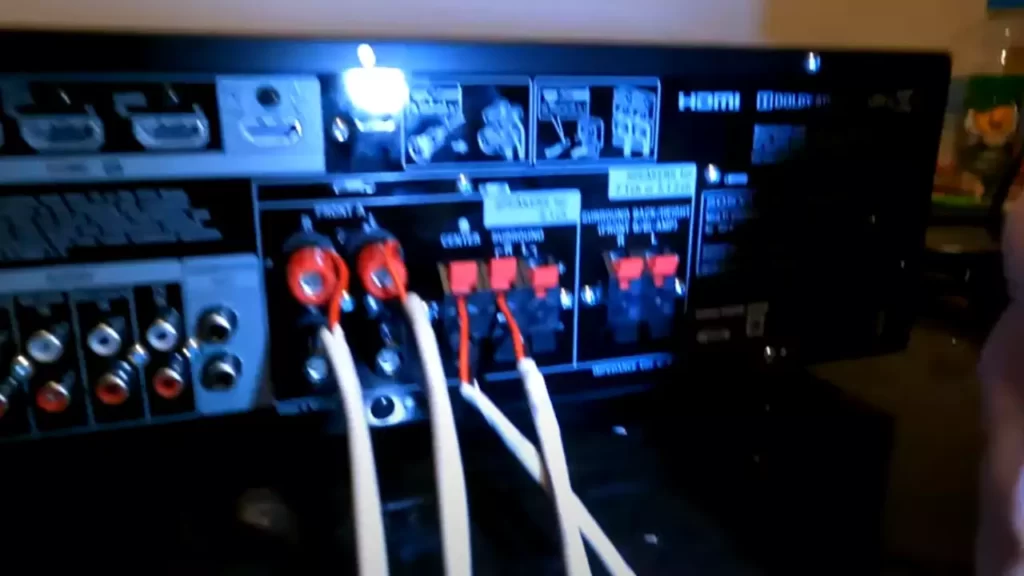
When connecting the speaker wire to the terminals, make sure to strip a small portion of insulation from the ends of the wire, revealing the bare conductors. Insert the exposed conductors into the corresponding terminals on the AV receiver or amplifier, being cautious to match the positive and negative leads correctly. Once inserted, tighten the terminals to ensure a secure connection.
Depending on the type of speaker terminal design on your AV receiver or amplifier, you may need to use various connection methods, such as binding posts, banana plugs, or spring clips. These connection methods differ in terms of ease of use and overall performance, so be sure to choose the method that suits your setup and preferences.
Connecting the Speakers to the AV Receiver/Amplifier
Now that you have identified the speaker terminals and wire connections, it’s time to connect your surround sound speakers to the AV receiver or amplifier. Follow these step-by-step instructions:
- Start by positioning your speakers in their desired locations around your listening area. Ensure that each speaker is placed according to a proper surround sound setup, such as front left and right speakers positioned towards the screen, the center speaker placed above or below the screen, and surround speakers positioned slightly behind the listening area.
- Once the speakers are in place, measure the required length of speaker wire from the AV receiver or amplifier to each speaker. It’s always better to have slightly more wire than required to allow for flexibility and future adjustments.
- Cut the required lengths of speaker wire and strip the insulation from the ends, exposing the bare conductors.
- Beginning with one speaker, connect the positive (+) lead of the speaker wire to the positive (+) terminal on the AV receiver or amplifier for the corresponding channel. Then, connect the negative (-) lead of the speaker wire to the negative (-) terminal on the AV receiver or amplifier for the same channel.
- Repeat the previous step for each speaker, ensuring that you connect each speaker to the appropriate channel on the AV receiver or amplifier.
- Once all the speakers are connected, double-check the connections to ensure that each positive (+) lead is connected to the respective positive (+) terminal and each negative (-) lead is connected to the respective negative (-) terminal.
- Finally, tidy up the speaker wire by bundling any excess wire lengths and securing them with zip ties or cable clips. This not only improves the aesthetics of your setup but also reduces the risk of tripping over loose wires.
By following these steps, you have successfully connected your surround sound speakers to the AV receiver or amplifier. This allows you to enjoy high-quality, immersive audio that complements your home theater or entertainment system.
Testing And Adjusting The Surround Sound System
Now that you have successfully installed the surround sound wiring and connected your speakers, it’s time to ensure your system is working optimally. Testing and adjusting the surround sound system is an essential step to guaranteeing an immersive audio experience in your home theater. In this section, we will cover two crucial steps: testing the speaker connections and audio channels, and adjusting the speaker settings for optimal sound quality.
Testing the Speaker Connections and Audio Channels
The first step in ensuring a fully functional surround sound system is to test the speaker connections and audio channels. Here’s how you can do it:
- Start by playing a test tone or audio sample that allows you to identify each speaker’s location. Many receivers have a built-in test mode for this purpose.
- Listen carefully as the test tone moves across the speakers, from front to back and left to right. Make sure each speaker produces sound and is correctly positioned.
- Use a sound level meter or a smartphone app to measure the sound levels of each speaker. Adjust the volume levels accordingly to ensure a balanced audio experience.
- Test the audio channels individually. Make sure the front left, center, front right, rear left, rear right, and subwoofer channels are producing clear and distinct sound.
By following these steps, you can identify any faulty connections or misconfigured audio channels, allowing you to rectify the issues promptly.
Adjusting the Speaker Settings for Optimal Sound Quality
Now that all your speakers are functioning correctly, it’s time to fine-tune the speaker settings to achieve optimal sound quality. Here are some essential adjustments to consider:
- Speaker Distance: Measure the distance between each speaker and the listening position. Enter these values in your receiver’s settings to optimize the audio delay and ensure proper synchronization.
- Tone Control: Adjust the bass and treble levels to suit your preferences and room acoustics. Experiment with different settings to achieve a well-balanced sound.
- Room Correction: If your receiver supports room correction technology, such as Audyssey or MCACC, activate it and follow the on-screen instructions for automatic calibration.
- Surround Modes: Experiment with various surround sound modes offered by your receiver to find the one that enhances your audio experience. These modes simulate different acoustic environments.
Remember to take your time and listen to different audio samples or movies to evaluate the impact of each adjustment. Tweak the settings until you achieve the desired sound quality, maximizing the immersion of your surround sound system.
By thoroughly testing the speaker connections and audio channels, as well as adjusting the speaker settings for optimal sound quality, you can ensure a truly immersive audio experience in your home theater. Take the time to fine-tune your surround sound system, and get ready to enjoy cinematic audio right from your living room.
Troubleshooting Surround Sound Wiring Issues
Installing surround sound wiring in your home can greatly enhance your audio experience, but like any wiring project, it can come with its fair share of issues. Whether you are encountering static, weak sound, or no sound at all, troubleshooting these problems is essential to ensure that your surround sound system is working correctly. In this section, we will discuss some common wiring problems and provide handy tips and solutions to help you troubleshoot and resolve them.
Identifying common wiring problems
When it comes to troubleshooting surround sound wiring issues, identifying the root cause is the first step towards finding a solution. Here are some common wiring problems you may encounter:
| Problem | Description |
| Loose connections | Loose or improper connections between the speakers, the receiver, and the wall outlets can result in poor sound quality or no sound at all. |
| Incorrect wiring configuration | Using the wrong cables or connecting the wires in the wrong order can cause issues with sound distribution and lead to incorrect channel output. |
| Wire damage | Physical damage to the wires, such as cuts or fraying, can disrupt the electrical signals and result in distortion or loss of sound. |
Troubleshooting tips and solutions
Once you have identified the common wiring problems, it’s time to put on your troubleshooting hat and find the solutions. Here are some tips to help you troubleshoot and fix the issues:
- Check connections: Ensure all connections are secure and properly plugged in. Take a close look at the speaker wires, receiver connections, and wall outlets, tightening any loose connections if necessary.
- Verify wiring configuration: Double-check the wiring configuration, making sure you have used the correct cables and connected the wires to the appropriate inputs and outputs. Refer to the user manual or the manufacturer’s instructions for guidance.
- Inspect wire damage: Examine the wires for any signs of damage, such as cuts or fraying. If you find any, consider replacing the damaged section with new wire or using electrical tape to mend the wire carefully.
- Test individual components: To isolate the issue, test each individual speaker and device by connecting it directly to the receiver. This step will help you identify if the problem lies with a specific component or the overall wiring setup.
- Reset and recalibrate: If all else fails, try resetting the surround sound system to its factory settings. Additionally, consider recalibrating the system using the built-in audio setup tools to ensure optimum sound quality.
By following these troubleshooting tips and solutions, you can diagnose and fix common surround sound wiring issues, helping you achieve the immersive audio experience you desire. Remember to consult the manufacturer’s guidelines and seek professional assistance if needed. Now that you are equipped with troubleshooting know-how, you can efficiently tackle any surround sound wiring problems that may arise.
Final Steps And Tips
As you near the completion of your surround sound installation, there are a few final steps and tips that can help ensure a seamless and professional finish. These last details will not only improve the audio quality but also enhance the overall look and safety of your setup. Take a moment to review these essential considerations below:
Concealing wires for a cleaner look
One crucial aspect to consider when setting up your surround sound system is how to conceal the wires effectively. Nobody wants unsightly cables strewn across the room, detracting from the aesthetic appeal. To achieve a cleaner and more organized look, follow these steps:
- Identify the optimal placement of your speakers and receiver to determine the length of wires required.
- Plan the route for your cables, ensuring they are out of sight and hidden as much as possible.
- Use cable management solutions such as cable raceways, wire molding, or wall-mounted channels to hide the wires along walls or baseboards.
- If you prefer a more permanent solution, consider in-wall wire concealment for a truly seamless appearance. However, professional installation might be required in such cases.
Proper cable management and organization
While concealing wires improves the visual appeal, proper cable management and organization play a significant role in maintaining functionality. Follow these tips to keep your audio system organized:
- Label each cable at both ends, identifying its purpose or connection point. This will save you time when troubleshooting or making adjustments in the future.
- Secure cables at regular intervals using cable clips or zip ties to prevent tangling or accidental disconnections.
- Keep power cords separated from audio cables to minimize interference and signal degradation.
- Group and route cables together according to their placement. For example, keep all front speaker cables bundled together, and the same applies to rear speakers, subwoofer, and audio/video sources.
Safety precautions during installation
Lastly, when installing surround sound wiring, safety should always be a top priority. Follow these safety precautions to prevent any accidents or damage:
- Ensure all power is turned off and cables are unplugged before working with the wires.
- Use appropriate safety equipment, such as gloves and safety glasses, to protect yourself from any sharp edges or potential hazards.
- Check your local building codes and regulations to ensure compliance before installing any in-wall or concealed wiring.
- Avoid running cables parallel to power lines to minimize the risk of interference or electrical hazards.
By paying attention to these final steps and tips, you can successfully complete the installation of your surround sound system, leaving you with an impressive audiovisual experience and a clean, clutter-free living space.
Frequently Asked Questions
How Do I Connect Speaker Wire To My Surround Sound?
To connect speaker wire to your surround sound system, strip the ends of the wire, revealing the bare copper. Identify the positive and negative terminals on the speakers and receiver. Twist the bare wires onto the corresponding terminals, ensuring a secure connection.
What Wires Do You Need For Surround Sound?
To connect surround sound, you’ll need speaker wires to connect the speakers to the receiver or amplifier. Additionally, an HDMI cable is usually needed to connect the receiver or amplifier to the TV or other video sources for audio and video signals.
How Do I Hook Up My Surround Sound To My Tv?
To connect your surround sound to your TV, follow these steps: 1. Check if your TV has an HDMI ARC or optical audio output. 2. Connect one end of the HDMI or optical cable to the TV’s corresponding output. 3.
Connect the other end to the audio input on your surround sound receiver. 4. Set your TV’s audio output to HDMI ARC or change the audio output to optical. 5. Turn on your surround sound system and enjoy immersive audio.
What Is The Best Way To Install Surround Sound?
To install surround sound, start by placing the speakers strategically around the room. Connect them to the receiver using speaker wire. Next, connect the receiver to the TV with an HDMI cable. Adjust the settings on the receiver for optimal sound quality.
Finally, test the sound system by playing different audio sources.
Conclusion
To wrap it up, installing surround sound wiring might seem like a daunting task, but with the right guidance and tools, it can be easily accomplished. By following the steps outlined in this blog post, you can create an immersive audio experience in your home.
Remember to plan the layout, choose the appropriate cables, and connect everything properly. Enhancing your entertainment system has never been easier! Happy wiring!