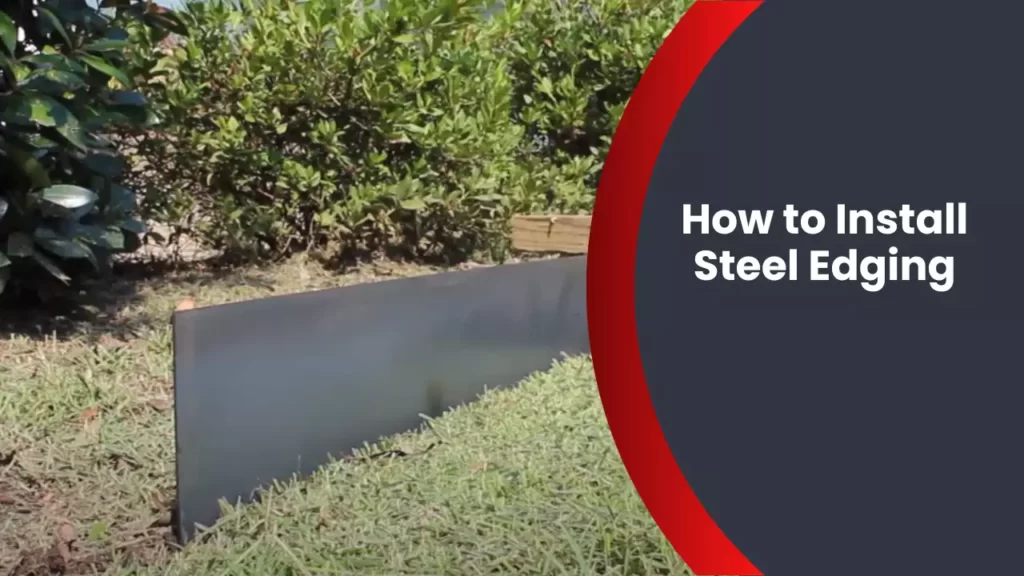
To install steel edging, prepare the space, place the edging in position, and secure it with stakes. The process of installing steel edging requires a few simple steps, but it can greatly enhance the aesthetics and functionality of your landscape.
By following this guide, you will be able to install steel edging quickly and efficiently. Steel edging is a durable and versatile option for defining the boundaries of your garden beds, pathways, and other landscaping areas. It provides a clean and polished look while also serving as a barrier to keep plants and soil contained.
Whether you are a seasoned DIY enthusiast or a beginner, installing steel edging is a project that can easily be completed with a little time and effort.
Understanding Steel Edging
Steel edging is a versatile and durable option for landscaping projects. It is a popular choice among homeowners and gardeners due to its strength and attractive appearance. In this section, we will explain what steel edging is, why you should choose it, and the advantages it offers over other materials. By understanding steel edging, you can make an informed decision about whether it is the right choice for your outdoor space.
What is Steel Edging?
Steel edging is a type of edging material used to define and separate different areas of your outdoor space, such as flower beds, pathways, or garden borders. Made from high-quality steel, it is designed to create clean lines and maintain a neat and organized appearance in your landscape.
Why Choose Steel Edging?
There are several reasons why steel edging is a popular choice among homeowners and landscapers. Here are a few key advantages:
- Durability:
Steel edging is incredibly durable and can withstand the test of time. Unlike other materials such as plastic or wood, steel is resistant to cracking, rotting, and warping. This means that once installed, steel edging will stay intact and maintain its functionality for years to come.
- Strength:
Steel edging offers unmatched strength and stability. It can withstand heavy foot traffic, lawnmower blades, and other impacts without bending or breaking. This makes it ideal for areas where durability is crucial, such as high-traffic pathways or driveways.
- Versatility:
Steel edging is available in various sizes, shapes, and finishes, allowing you to choose the perfect option to complement your landscape design. Whether you prefer a sleek and modern look or a more rustic appearance, there is a steel edging style that will enhance the overall aesthetic of your outdoor space.
- Easy Installation:
Installing steel edging is a straightforward process that can be completed by most homeowners. It typically involves anchoring the edging into the ground using stakes or screws. The ease of installation makes it a convenient choice for DIY enthusiasts who want to enhance their landscape without hiring professional help.
Advantages of Steel Edging Over Other Materials
Steel edging holds several advantages over other common landscaping materials. Take a look at the table below to understand the key benefits:
| Advantages | Steel Edging | Other Materials |
|---|---|---|
| Durability | ✓ | ✓ |
| Strength | ✓ | ✓ |
| Versatility | ✓ | ✓ |
| Easy Installation | ✓ | ✓ |
| Longevity | ✓ | ✗ |
| Aesthetics | ✓ | ✗ |
As shown in the table, steel edging outshines other materials in terms of durability, strength, versatility, and easy installation. Additionally, it offers better longevity and aesthetics compared to many alternative options. With these advantages, it’s no wonder that steel edging is a top choice for discerning homeowners.
In conclusion, steel edging is a durable, sturdy, and versatile solution for defining and separating different areas of your outdoor space. Its advantages over other materials make it an excellent choice for enhancing the functionality and aesthetics of your landscape. Now that you understand what steel edging is and why it is beneficial, you can confidently explore this option for your next landscaping project.
Preparing For Installation
Measuring and marking the area
Before you start the installation process for steel edging, the first step is to measure and mark the area where you want to install it. Accurate measurements and markings will ensure a precise and professional-looking installation. Here’s how you can do it:
1. Measure the length and width of the area: Use a tape measure to determine the dimensions of the desired edging area. Make sure to measure all sides and corners to get an accurate measurement.
2. Mark the edges: Once you have measured the area, mark the edges using small stakes or flags. Insert them into the ground at each corner and along the length of the area. This will serve as a visual guide during the installation process.
3. Connect the marks: Use a string or a long straight board to connect the marked stakes or flags. This will help you see the exact outline of the installation area and ensure straight lines.
Gathering the necessary tools and materials
Once you have measured and marked the area, the next step is to gather all the tools and materials you will need for the installation. Having everything ready in advance will ensure a smooth and efficient process. Here is a list of the essential tools and materials you will need:
1. Steel edging: Choose the appropriate type and length of steel edging based on your project requirements. Measure the total length of your installation area to determine how much edging you need.
2. Spade or garden shovel: You will need a spade or garden shovel to dig a trench for the edging. Make sure it is sturdy and sharp enough to cut through the soil easily.
3. Rubber mallet: A rubber mallet is handy for gently hammering the edging into place without causing any damage.
4. Level: To ensure the edging is straight and even, use a level to check the alignment as you install it.
5. Measuring tape: Keep a measuring tape handy to double-check the dimensions and measurements during the installation process.
6. Work gloves and safety glasses: Protect your hands and eyes by wearing sturdy work gloves and safety glasses throughout the installation process.
Clearing the installation site
Before you start installing the steel edging, it’s crucial to clear the installation site and prepare it properly. This will ensure that the edging is properly secured and will stand the test of time. Follow these steps to clear the site:
1. Remove any existing edging: If there is any old or broken edging in the area, remove it completely before installing the new steel edging. Use a shovel or a pry bar to pry it out of the ground.
2. Clear vegetation and debris: Remove any grass, weeds, rocks, or other debris from the installation site. This will allow the edging to sit firmly and evenly in the soil.
3. Level the ground: Use a rake or a shovel to level the ground where the edging will be installed. Remove any high spots and fill in any low areas to ensure a smooth and even surface.
4. Compact the soil: Before installing the edging, compact the soil in the installation area using a tamper or the back of a shovel. This will provide a solid base for the edging and prevent any shifting or movement over time.
Following these steps will ensure you are well-prepared for the installation process of steel edging. Once you have measured and marked the area, gathered the necessary tools and materials, and cleared the installation site, you are ready to move on to the next steps of installing the steel edging.
Step-By-Step Steel Edging Installation Process
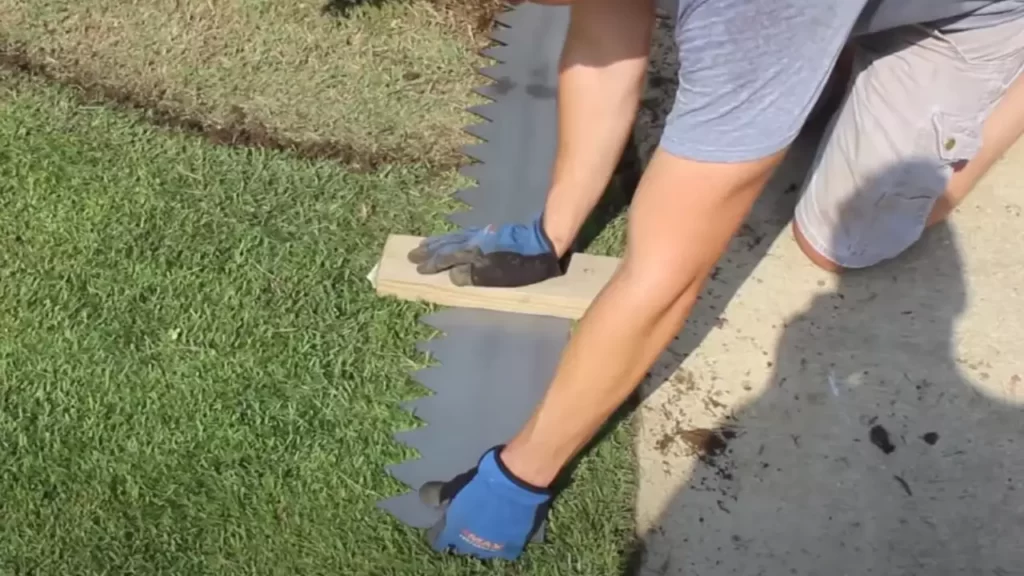
Step 1: Excavating the Trench
Before you start the installation process, the first step is to excavate a trench for the steel edging. Use a shovel or an edging spade to carefully dig a trench along the desired edge for your landscaping project. The trench should be about 4-6 inches deep and slightly wider than the width of the steel edging. Make sure to remove any roots, rocks, or debris from the trench to ensure a smooth installation. Take your time and be precise during this step, as the trench will serve as the foundation for your steel edging.
Step 2: Adding a Base Layer
Once the trench is excavated, it’s time to add a base layer for stability. A base layer helps to stabilize the steel edging and prevents it from shifting or sinking over time. Fill the trench with a layer of crushed stone or gravel, ensuring it is evenly spread and compacted. The base layer should be about 2-3 inches deep, providing a solid foundation for the edging. This will help to distribute the weight evenly and keep the steel edging in place.
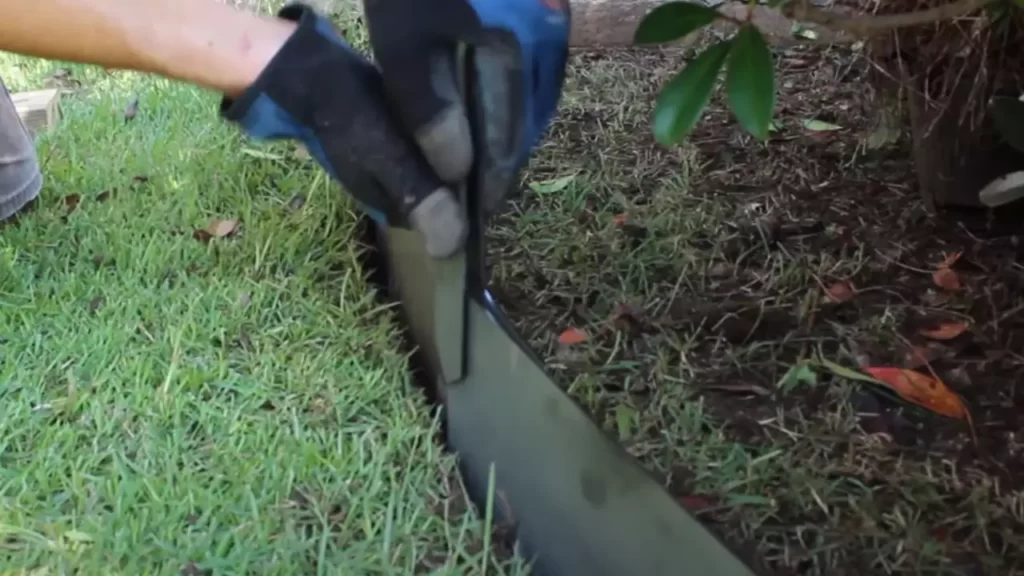
Step 3: Installing the Steel Edging
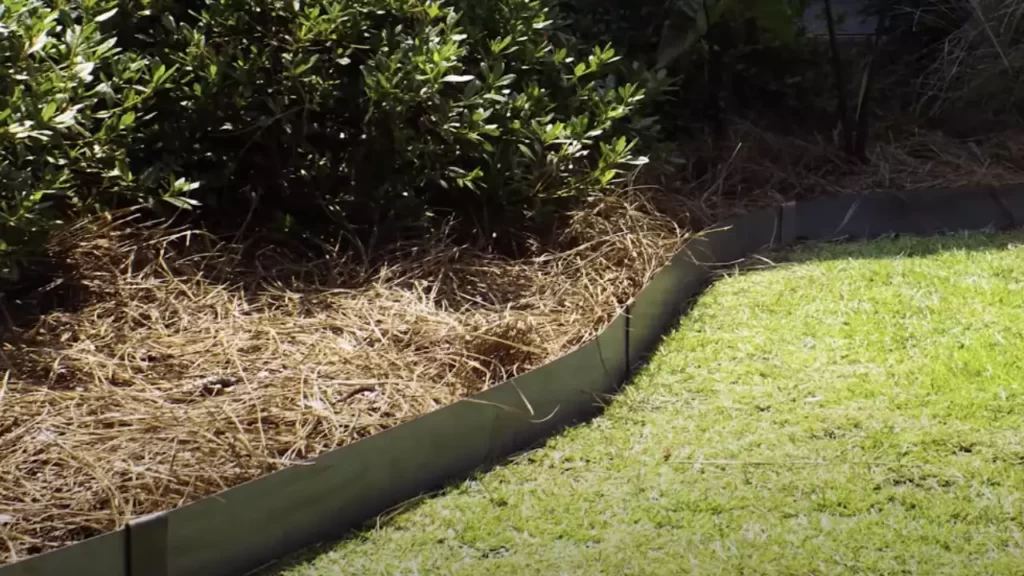
Now it’s time to install the steel edging into the trench. Carefully place the edging into the trench, ensuring it fits snugly and follows the desired contour of your landscaping project. Use a rubber mallet or a hammer to gently tap the edging into the ground, making sure it is level and secure. The steel edging should be driven into the ground to a depth of about 2-3 inches, leaving about an inch above the soil surface for a clean and polished look. Be cautious not to damage the edging during installation.
Step 4: Securing the Steel Edging in Place
After the steel edging is installed, it’s important to secure it in place to prevent any movement or shifting. Use landscaping spikes or stakes to anchor the edging at regular intervals along its length. Insert the spikes or stakes through the pre-drilled holes in the steel edging and drive them into the ground until they are firmly secured. This will provide added stability and ensure that the steel edging remains in place, even in high traffic areas or during heavy rainfall. Take care to place the spikes or stakes at an angle, with the top leaning away from the steel edging for maximum support.
Congratulations! You have now successfully installed steel edging for your landscaping project. Following these step-by-step instructions will not only provide a polished and professional look to your outdoor space but also ensure that your steel edging remains durable and long-lasting. Enjoy the enhanced aesthetics and functionality that steel edging brings to your garden or lawn!
Tips For A Successful Installation
When it comes to installing steel edging, following these tips can help ensure a successful and long-lasting installation. From ensuring proper alignment and straightness to dealing with obstacles and maintaining longevity, these guidelines will help you achieve the desired results.
Ensuring proper alignment and straightness
One of the key factors in a successful steel edging installation is ensuring proper alignment and straightness. Here are some tips to help you achieve this:
- Start by marking the desired layout of the edging using stakes or spray paint.
- Ensure that the first piece of edging is installed correctly. This will serve as the reference point for the rest of the installation.
- Use a level to check for proper alignment and adjust as necessary.
- If installing multiple sections of edging, make sure they are aligned with each other to maintain a seamless appearance.
Properly securing the edging to prevent shifting
To prevent the steel edging from shifting over time, proper securing is essential. Follow these tips to ensure a secure installation:
- Use metal stakes or anchor pins to secure the edging to the ground. Place them every few feet along the length of the edging.
- Drive the stakes or anchor pins into the ground at a slight angle towards the edging to provide additional stability.
- Ensure that the stakes or anchor pins are driven deep enough to hold the edging firmly in place.
- Check the edging periodically and tighten any loose stakes or anchor pins to prevent shifting.
Dealing with obstacles during installation
During the installation process, you may encounter obstacles such as tree roots or rocks. Here’s how to deal with them:
- Use a flat spade or garden shovel to remove any obstacles in the path of the edging.
- In some cases, you may need to dig a trench to accommodate the edging, especially if there are large obstructions.
- Ensure that the trench is wide enough to accommodate the edging and deep enough to prevent it from being exposed or dislodged.
Maintaining the longevity of steel edging
To ensure the longevity of your steel edging and prolong its lifespan, follow these maintenance tips:
- Regularly inspect the edging for any signs of damage or rust.
- If any damage is detected, repair or replace the affected sections promptly to prevent further deterioration.
- Keep the edging clean and free from debris by regularly sweeping or rinsing it.
- Apply a rust-resistant coating or paint to protect the steel from corrosion.
By following these tips, you can achieve a successful installation of steel edging that not only enhances the aesthetics of your outdoor space but also provides long-lasting durability and functionality.
Common Mistakes To Avoid
Common Mistakes to Avoid
When it comes to installing steel edging, there are several common mistakes that people often make. These mistakes can cause issues with the installation and result in a less durable and effective edging. To ensure a successful installation and a long-lasting steel edging, it is crucial to avoid these common mistakes:
Incorrect Measuring and Marking
One of the most common mistakes when installing steel edging is incorrect measuring and marking. Accurate measurements are essential to ensure that the edging is the correct length and properly aligned. Incorrect measurements can lead to gaps or overlaps, compromising the overall appearance and functionality of the edging.
To avoid this mistake, take the time to carefully measure the area where the steel edging will be installed. Use a measuring tape to get precise measurements and mark the placement of the edging using stakes or marking paint. Double-check your measurements before starting the installation process.
Improper Base Layer Preparation
The base layer preparation is another crucial step in installing steel edging. Failing to properly prepare the base layer can result in unevenness, instability, and shifting of the edging over time. It is essential to create a solid and level foundation for the edging to ensure its stability and longevity.
Before installing the steel edging, carefully prepare the base layer by clearing any debris and leveling the ground. If necessary, dig a shallow trench to create a stable foundation for the edging. Compact the soil or add a layer of crushed gravel to provide a solid base for the edging to sit on. This will help prevent any sinking or shifting of the edging once it is installed.
Insufficient and Ineffective Securing Methods
Securing the steel edging is crucial to maintain its position and prevent it from shifting or being damaged. Many people make the mistake of using insufficient or ineffective securing methods, which can result in loose or unstable edging.
When securing the steel edging, ensure that you use sturdy stakes or anchors that are suitable for the type of soil and the expected pressure on the edging. Hammer the stakes into the ground at regular intervals, making sure they are securely holding the edging in place. Additionally, consider using connectors or end pieces to join the edging sections together for added stability.
Neglecting Maintenance
Once the steel edging is installed, it is important not to neglect its maintenance. Neglecting maintenance can lead to decay, rust, or damage to the edging over time. Regular maintenance will help keep the edging in good condition and extend its lifespan.
Regularly inspect the edging for any signs of damage or shifting. Remove any debris or vegetation that may accumulate around the edging, as this can cause moisture buildup and accelerate rusting. If any damage or rust is noticed, address it promptly by repairing or replacing the affected sections.
By avoiding these common mistakes and following the proper installation and maintenance practices, you can ensure a successful and long-lasting steel edging installation. Take your time, pay attention to detail, and enjoy the benefits of a well-maintained and visually appealing landscape.
Enhancements And Design Ideas
In addition to its practical use in defining and separating different areas of your landscape, steel edging also offers a variety of enhancements and design ideas to make your outdoor space truly stand out. By incorporating these creative elements, you can take your steel edging installation to the next level, infusing it with style and personality.
Adding curves to the steel edging
One way to instantly elevate the aesthetic appeal of your steel edging is by incorporating curves into the design. Curved steel edging adds a graceful and organic touch to your landscaping, creating a softer, more fluid look. It can also help to complement the natural contours of your garden or yard, enhancing the overall visual appeal.
To achieve this curved effect, simply bend the steel edging as desired using a specialty tool or a sturdy pair of pliers. Make sure to plan and mark out the curves beforehand to ensure a smooth and seamless installation. With curved steel edging, you can create flowing pathways, gentle borders, or even unique shape designs, transforming your outdoor space into a work of art.
Using different finishes and colors
Another way to enhance the appearance of your steel edging is by exploring different finishes and colors. While the classic silver finish is always a timeless choice, you can also find steel edging available in a range of powder-coated finishes, such as black, brown, or green. These finishes not only add a touch of color but also provide added protection against rust and wear.
Additionally, some manufacturers offer custom finishes, allowing you to match the steel edging with the existing color palette of your landscape. By choosing a finish that complements your plants, flowers, or architectural features, you can create an aesthetically cohesive and harmonious outdoor space.
Incorporating lighting into the installation
For a truly mesmerizing effect, consider incorporating lighting into your steel edging installation. By adding low-voltage landscape lighting, you can not only illuminate your pathways and garden beds but also highlight the beauty and elegance of the steel edging itself. Illuminate the edges from below for a soft glow or strategically place spotlights to emphasize specific focal points.
LED lights are an excellent choice for steel edging installations, as they provide energy efficiency, long lifespan, and a range of color options. Whether creating a warm and inviting ambiance or a dramatic and contemporary aesthetic, lighting can transform your steel edging into a captivating feature, bringing your outdoor space to life even after the sun sets.
Pairing steel edging with other landscaping elements
To create a cohesive and visually appealing landscape design, consider pairing your steel edging with other landscaping elements. For example, you can combine it with decorative rocks or pebbles, creating a striking contrast against the sleek steel. Alternatively, incorporate plants, flowers, or mulch along the edging to soften its appearance and create a seamless transition between different areas of your yard.
Additionally, consider integrating steel edging with other outdoor structures, such as wooden decking, concrete pavers, or ornamental fences. This combination of materials adds depth, texture, and visual interest to your outdoor space, elevating its overall design.
By exploring these enhancements and design ideas, you can transform your steel edging installation into a unique and captivating feature, breathing new life into your landscape. Whether you choose to add curves, experiment with finishes and colors, incorporate lighting, or pair it with other elements, let your creativity flourish and enjoy the stunning results.
Frequently Asked Questions About Steel Edging
When it comes to creating a clean and defined look for your garden or landscape, steel edging is a popular choice. However, you may have some questions regarding its suitability for different soil types, its ability to be used for curved edges, its lifespan, and the maintenance it requires. In this section, we will address these frequently asked questions and provide you with all the information you need to install steel edging effectively. Let’s dive in!
Is steel edging suitable for all types of soil?
Steel edging is versatile and can be used in most soil types, making it a reliable option for various landscaping projects. Whether you have sandy soil, clay soil, or loamy soil, steel edging can provide the stability and durability needed to maintain a neat and tidy garden. Its strength and flexibility allow it to withstand the pressures of different types of soil and any movements that may occur over time. So no matter what type of soil you have, rest assured that steel edging can be an excellent choice for you.
Can steel edging be used for curved edges?
Yes, steel edging is incredibly adaptable and can be used to create beautiful curved edges in your garden or landscape. Its flexibility allows it to be shaped and formed into smooth curves, enabling you to create visually appealing borders that enhance the overall aesthetics of your outdoor space. Whether you want to edge your flower beds, pathways, or garden borders, steel edging can be easily manipulated to fit any desired curves effortlessly.
How long does steel edging typically last?
Steel edging is known for its exceptional durability and longevity. When properly installed and maintained, it can last for many years, even decades. The lifespan of steel edging can vary depending on factors such as the quality of the steel, the climate conditions, and the level of maintenance it receives. However, on average, you can expect steel edging to last anywhere from 10 to 25 years. Choosing high-quality steel edging and performing regular upkeep can extend its lifespan and ensure its long-lasting performance in your garden.
What maintenance is required for steel edging?
Maintaining steel edging is relatively easy and requires minimal effort. To keep it in optimal condition, you should periodically check for any signs of damage or rust. If you notice any issues, promptly repair or remove the affected sections. Additionally, removing any debris or vegetation that may accumulate along the edging will help prevent any potential damage. Regularly inspecting and cleaning your steel edging will not only enhance its appearance but also prolong its lifespan, ensuring it continues to provide efficient and reliable garden boundaries for years to come.
Frequently Asked Questions
How Do You Secure Steel Edging?
To secure steel edging, follow these steps: 1. Dig a trench along the desired edging line. 2. Place the steel edging into the trench, ensuring it is level and straight. 3. Use metal stakes to anchor the edging firmly in place.
4. Backfill the trench with soil, compacting it around the edging. 5. Finally, add mulch or stones to finish the landscaping project.
Is Metal Edging Easy To Install?
Yes, metal edging is easy to install. It requires minimal effort and can be done quickly. The simple installation process allows anyone to achieve professional-looking results without hassle.
How Deep Should Steel Edging Be?
Steel edging should be installed at a depth of about 4 to 6 inches. This depth ensures stability and prevents shifting or movement over time. It creates a strong boundary for landscaping and can withstand the pressure of soil and other materials.
How Far Should Metal Edging Be From The Ground?
Metal edging should be placed approximately 1-2 inches above the ground. This ensures stability and prevents the edging from being pushed up or damaged by grass or other materials. Additionally, it allows for proper water drainage and helps to define the edges of the landscape.
Conclusion
Installing steel edging provides a durable and aesthetic solution for defining and separating different areas in your yard or garden. By following the step-by-step guide provided in this blog post, you can easily achieve a professional-looking installation. Remember to measure and prepare the area, properly position the edging, and secure it for long-lasting results.
With steel edging, you can create clean lines, prevent grass and weeds from encroaching, and enhance the overall appearance of your outdoor space. Start transforming your landscape today!