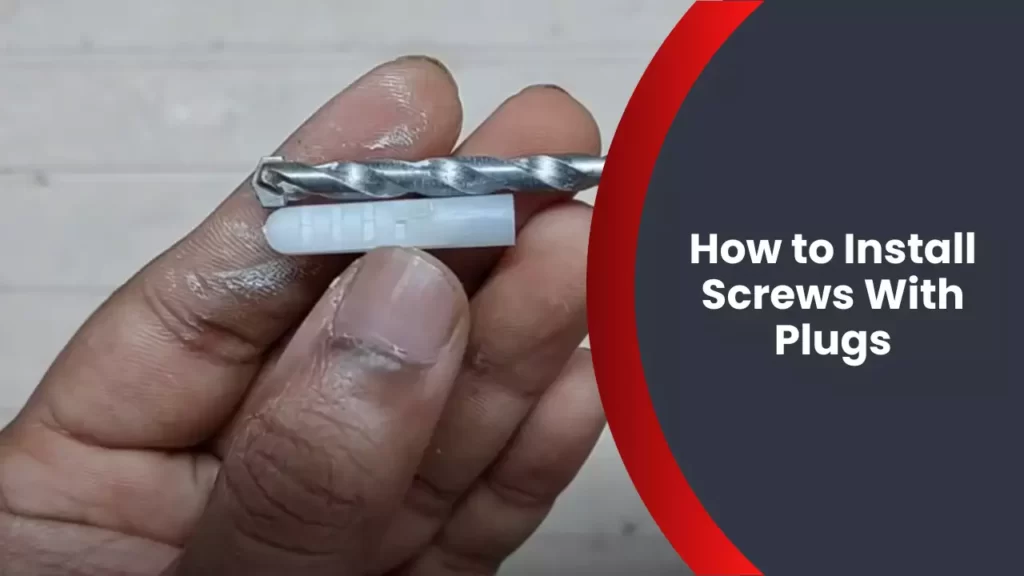
To install screws with plugs, first drill a hole with a diameter slightly smaller than the plug. Then insert the screw through the object and into the plug until it is secure.
Installing screws with plugs is a straightforward process that helps to provide a secure hold for various objects. Whether you are hanging shelves, installing wall hooks, or mounting a TV bracket, using screws with plugs ensures that your object stays in place.
This simple yet effective method involves drilling a hole with a diameter slightly smaller than the plug. Once the hole is drilled, insert the screw through the object, aligning it with the hole, and into the plug until it is secure. The plug expands inside the hole, creating a tight fit and preventing the screw from loosening over time. By following this technique, you can confidently install screws with plugs for reliable and durable attachments.
Understanding The Purpose Of Screws With Plugs
Understanding the Purpose of Screws With Plugs
When it comes to installing various items in your home or workspace, using the right tools is essential. One such tool that can make a significant difference in the overall stability and durability of your installations is screws with plugs. These versatile hardware components offer secure and reliable fastening solutions, especially when dealing with different materials. In this section, we will delve into the purpose of screws with plugs and shed light on their importance and benefits for various materials.
Importance of using screws with plugs
Using screws with plugs is crucial for ensuring the stability and longevity of your installations. These hardware components are specifically designed to provide a solid grip on different materials, preventing any potential loosening or damage over time. Whether you are mounting shelves, cabinets, or even lightweight fixtures, screws with plugs offer a reliable way to secure them firmly in place.
– Screws with plugs provide enhanced weight-bearing capabilities, distributing the load evenly and reducing the risk of sagging or failure.
– They improve the overall aesthetics of your installations by concealing any visible screw heads. This streamlined look adds a professional and finished appearance to your projects.
– The use of screws with plugs reduces the risk of wear and tear on your materials. Without the plugs, the direct contact between the screw and the material can lead to splitting, cracking, or stripping, compromising the structural integrity.
– Screws with plugs offer increased versatility as they can be used on a variety of materials, including wood, drywall, concrete, and more. This adaptability makes them suitable for a wide range of projects and applications in different environments.
Benefits of screws with plugs for different materials
Understanding the benefits of using screws with plugs for different materials can help you make informed decisions when it comes to installing items around your home or workspace. Let’s explore how these screw-plug combinations offer specific advantages depending on the material you are working with:
Wood:
– Screws with plugs provide a secure grip in wood, reducing the risk of loosening or shifting over time.
– The plugs help to create a flush and seamless finish, hiding any unsightly screw heads and enhancing the visual appeal.
Drywall:
– Using screws with plugs in drywall ensures a strong hold, preventing any potential damage caused by the weight or movements of mounted items.
– The plugs help distribute the load across a larger surface area, reducing the risk of the drywall crumbling or breaking under pressure.
Concrete:
– Screws with plugs designed for concrete offer exceptional strength and anchorage, allowing you to securely mount heavy objects or fixtures.
– These plugs are specifically engineered to create a reliable connection in concrete, ensuring stability and preventing any unwanted movement.
In conclusion, screws with plugs play a vital role in providing secure and durable fastening solutions for various materials. Their importance lies in the enhanced stability, improved aesthetics, and reduced risk of damage they offer. By understanding the benefits screws with plugs provide for different materials like wood, drywall, and concrete, you can ensure the longevity and reliability of your installations. So, the next time you embark on a DIY project or hire a professional, consider the value and advantages that screws with plugs bring to your construction endeavors.
Tools And Materials Required
Installing screws with plugs requires the use of specific tools and materials to ensure a proper and sturdy fit for a variety of applications. Whether you are hanging shelves, mounting TV brackets, or securing furniture, having the right tools can make the installation process easier and more efficient. In this section, we will discuss the essential tools and materials you will need to successfully install screws with plugs.
List of tools needed for installing screws with plugs
- Screwdriver (manual or electric)
- Drill
- Drill bits
- Tape measure
- Pencil or marker
- Hammer
- Level
- Stud Finder
- Wire cutters (if needed)
- Plugs
- Screws
- Wall anchors (if needed)
Having the right tools not only ensures a secure installation but also reduces the risk of damaging your walls or other surfaces. Let’s take a closer look at each item on the list.
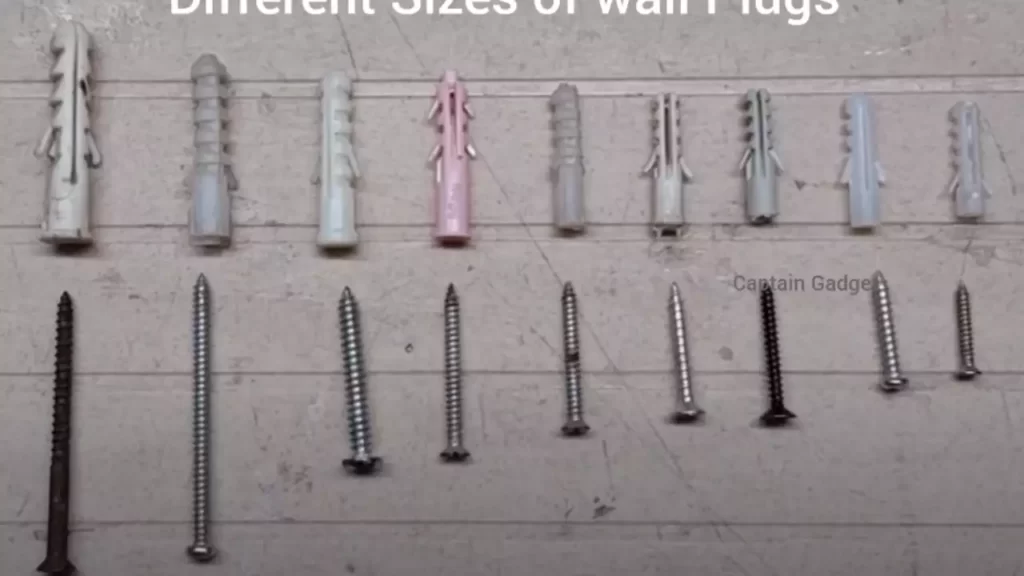
Types of plugs and screws available in the market
When it comes to installing screws with plugs, there are various types available in the market, each designed for specific purposes and materials. It is essential to choose the right type of plugs and screws to ensure a secure and long-lasting installation. Below are the most common types you will come across:
| Type | Material | Usage |
|---|---|---|
| Metal plugs | Metal | Ideal for heavy-duty applications on solid walls or concrete |
| Plastic plugs | Plastic | Suitable for lightweight applications on plasterboard or hollow walls |
| Hollow wall anchors | Various materials | Used for securing items on hollow walls, such as drywall, by providing extra support |
| Masonry screws | Metal | Designed specifically for masonry and concrete surfaces |
It is important to assess the weight and type of material you will be working with to determine the appropriate plugs and screws. Using the wrong type can result in an insecure installation or damage to the wall.
Now that you are familiar with the tools and materials required for installing screws with plugs, let’s move on to the next section where we will discuss the step-by-step process of installing screws with plugs.
Preparing The Surface For Installation
Cleaning the Surface
Before installing screws with plugs, it’s crucial to prepare the surface properly. Cleaning the surface thoroughly helps ensure a secure and long-lasting installation. Dust and debris can prevent the plug from adhering tightly to the surface, resulting in instability and potential damage over time. To clean the surface effectively, follow these steps:
- Use a soft-bristle brush or a damp cloth to remove any loose dirt, grime, or dust particles.
- If the surface is particularly dirty, consider using a mild detergent mixed with water. Gently scrub the surface with the solution to remove stubborn stains, grease, or dirt.
- Rinse the surface with clean water to remove any residue from the cleaning solution.
- Allow the surface to dry completely before continuing with the installation process.
Ensuring the Surface is Dry and Dust-Free
Before proceeding with the installation of screws and plugs, it is important to ensure that the surface is completely dry and free from dust. Moisture or dampness can affect the adhesive properties of the plug, compromising its ability to secure the screw tightly. To ensure the surface is dry and dust-free, follow these steps:
- Check for any moisture or dampness on the surface. If there are any signs of moisture, allow the surface to dry completely before continuing.
- Remove any lingering dust or debris using a clean, dry cloth or a brush specifically designed for surface cleaning.
- Inspect the surface closely to ensure it is free from any dust or foreign particles that might hinder the installation.
Taking the time to clean and prepare the surface properly before installing screws with plugs is essential for achieving a secure and stable installation. By following these steps and ensuring the surface is dry and dust-free, you can guarantee that the screws and plugs will adhere properly, providing a reliable and long-lasting solution.

Choosing The Right Size Of Screws And Plugs
When it comes to installing screws with plugs, one of the most crucial steps is choosing the right size. Using screws and plugs that are too small can lead to loose connections and potential damage to the material, while using screws and plugs that are too large can cause cracking or splitting. To ensure a secure and long-lasting installation, it is important to measure the thickness of the material and select the appropriate length and diameter of screws and plugs.
Measuring the thickness of the material
Before you can choose the right size of screws and plugs, it is essential to measure the thickness of the material you are working with. This will help determine the length of the screw needed to penetrate the material and provide a secure connection. To measure the thickness accurately, use a caliper or a ruler to get the precise measurement in millimeters or inches.
Selecting the appropriate length and diameter of screws and plugs
Once you have measured the thickness of the material, you can now select the appropriate length and diameter of screws and plugs. The length of the screw should be slightly longer than the combined thickness of the material and the plug. This ensures that the screw can securely fasten the plug to the material without penetrating through it.
When it comes to the diameter of the screws and plugs, it is important to match them to each other and the size of the drilled hole. The plug should fit snugly into the drilled hole, while the screw should fit through the center of the plug without any play. It is recommended to use a plug that is the same size as the drilled hole and a screw with a slightly smaller diameter than the plug.
Example:
For a material with a thickness of 20mm and a drilled hole of 10mm in diameter, you would need a screw that is slightly longer than 30mm and a plug that is 10mm in diameter to ensure a secure installation.
Below is a table summarizing the recommended screw and plug sizes based on material thickness:
| Material Thickness | Recommended Screw Length | Recommended Plug Diameter |
|---|---|---|
| 10mm | 20mm | 10mm |
| 15mm | 25mm | 10mm |
| 20mm | 30mm | 10mm |
By following these guidelines for selecting the right size of screws and plugs, you can ensure a secure and stable installation. Remember to measure the thickness of the material and choose the appropriate length and diameter of screws and plugs. With the proper sizing, you can enhance the durability and stability of your projects.
Marking The Installation Points
|
When it comes to installing screws with plugs, one crucial step is marking the installation points. Properly marking the points ensures that your screws are placed accurately and securely. In this section, we will explore the process of determining the correct placement of screws and plugs, as well as using a level for accuracy. |
Determining the correct placement of screws and plugs
Determining the correct placement of screws and plugs is vital for a successful installation. Careful consideration of the weight and type of material being hung is essential in this process. Whether you are hanging a heavy picture frame or installing shelves, precise placement ensures stability and longevity.
Here are the steps to determine the correct placement:
- Measure and mark: Begin by carefully measuring and marking the desired location for your screws and plugs. Use a measuring tape or ruler to ensure accuracy. Clearly mark the points with a pencil or marker, making sure they align both horizontally and vertically.
- Consider the weight: Take into account the weight of the item you will be hanging. If it is heavier, you will need additional screws and plugs for added stability. Make sure to distribute the weight evenly by spacing the marks accordingly.
- Location of studs: If possible, determine the location of the studs in the wall beforehand. Knowing the position of the studs allows you to anchor your screws and plugs securely, providing better support for heavier items.
Using a level for accuracy
An essential tool for accurate installation is a level. A level ensures that your screws and plugs are straight and properly aligned. Here are the steps to use a level:
- Place the level: Position the level horizontally or vertically across the marked points to check for any deviations from level. Adjust the position of the marks as necessary to achieve a straight line.
- Check levelness: Double check the levelness of your markings by using the level in different positions. This ensures that the screws and plugs will be properly aligned and provide a secure hold.
- Make adjustments: If the marks are not level, make any necessary adjustments by erasing or remarking the points until they align with the level.
By taking the time to determine the correct placement of screws and plugs and using a level for accuracy, you can ensure a successful installation. This attention to detail will not only provide stability but also enhance the overall aesthetic appeal of the finished project. Now that you are ready to move forward with the installation, let’s dive into the next step – drilling holes for the screws and plugs.
Drilling Pilot Holes
When it comes to installing screws with plugs, one essential step that should not be overlooked is drilling pilot holes. These small holes provide a guide for the screws and help prevent the wood from splitting. In this section, we will take a closer look at the importance of pilot holes and how to properly drill them.
Importance of Pilot Holes
Pilot holes play a crucial role in ensuring a secure and durable installation. Here’s why they are so important:
- Preventing Wood Splitting: When driving a screw directly into a wooden surface, there is a higher chance of the wood splitting. This can weaken the structure and compromise the overall stability. By creating a pilot hole, you are giving the screw a clear pathway to follow, reducing the likelihood of splitting.
- Aligning the Screws: Pilot holes also help align the screws properly, ensuring they go in straight and flush with the surface. This is particularly important when working with hardwoods or materials that are prone to cracking or splitting.
- Easy Screw Insertion: By creating a pilot hole, you are making it easier to drive the screw into the material. This is especially beneficial when dealing with dense or hard surfaces.
Choosing the Right Drill Bit Size
Choosing the correct drill bit size is crucial for drilling pilot holes. The size of the drill bit should match the diameter of the screw, specifically the shank (the solid part of the screw without the threads). If the drill bit is too small, the screw may not fit properly, and if it is too large, the screw may not have enough support.
When selecting the drill bit size, it’s important to consider both the outer diameter of the shank and the depth of the pilot hole you want to create. A good rule of thumb is to choose a drill bit that is slightly smaller than the outer diameter of the screw’s shank.
Drilling Pilot Holes at Marked Points
Once you have chosen the right drill bit size, it’s time to drill the pilot holes. Here’s how:
- Marking the Points: Use a pencil or marker to mark the exact points where you want to place the screws. This will ensure accurate drilling.
- Securing the Material: Secure the material you are working with, whether it’s wood, plastic, or any other surface, using clamps or a vise.
- Aligning the Drill Bit: Attach the appropriate drill bit to your drill. Make sure it is securely tightened.
- Start Drilling: Place the drill bit’s tip at the marked point and apply firm, steady pressure as you drill. Keep the drill perpendicular to the surface to ensure a straight hole.
- Correct Depth: Drill the pilot hole to a depth slightly shorter than the length of the screw. This will ensure a snug fit without compromising the wood’s integrity.
- Clean the Hole: After drilling, remove any debris or wood chips from the pilot hole. This will prevent interference with the screw’s insertion.
By following these steps, you can effectively drill pilot holes for the installation of screws with plugs. Remember, pilot holes not only improve the overall structural integrity but also make the installation process smoother and more efficient.
Inserting The Plugs
When it comes to installing screws with plugs, inserting the plugs into the pilot holes is a crucial step that ensures a secure and professional finish. This step involves applying glue to the plugs and then inserting them into the pilot holes in a precise and careful manner. In this article, we will discuss the process of inserting plugs and the importance of applying glue before inserting them.
Applying glue to the plugs
Before inserting the plugs, it’s important to apply a small amount of glue to each one. This helps to create a strong bond between the plug and the surrounding material, ensuring that the plug stays in place and provides a secure hold for the screw. Use a waterproof wood glue that is suitable for the type of material you are working with, whether it’s wood, drywall, or another surface.
Apply a small amount of glue to the end of each plug, making sure not to use too much as excess glue can be messy and difficult to clean up. A thin layer of glue is sufficient to create a strong bond. Using your finger or a small brush, spread the glue evenly over the end of the plug, ensuring that the entire surface is coated. This will help to create a tight seal and prevent any moisture from getting into the hole.
Inserting the plugs into the pilot holes
Once the plugs are coated with glue, it’s time to insert them into the pilot holes. Start by aligning the plug with the hole, making sure that it is positioned correctly. Press the plug firmly into the hole, using a gentle twisting motion to help it go in smoothly. The plug should fit snugly into the hole, with no gaps or spaces around the edges.
If the plug doesn’t go in easily, don’t force it. Instead, check the size of the hole and the plug to ensure they are compatible. It’s important to use plugs that are specifically designed for the size of the pilot hole. If the plug is too large, it may split the surrounding material, whereas if it’s too small, it may not provide enough support for the screw. Take your time and make sure each plug is inserted correctly.
Once all the plugs are inserted, you can trim any excess material using a flush-cut saw or chisel. This will help to create a smooth and flush surface, ready for sanding and finishing. Take care not to damage the surrounding material as you trim the plugs.
In conclusion, inserting plugs into pilot holes is an important step in installing screws. By applying glue to the plugs and inserting them correctly, you can ensure a secure and professional finish. Follow these steps carefully, and you’ll be able to confidently install screws with plugs for a variety of projects.
Installing Screws With Plugs
Installing Screws with Plugs
When it comes to securely fastening objects to walls or other surfaces, screws with plugs are a reliable solution. These small plastic or nylon plugs provide extra support by anchoring the screws in place. However, to ensure a successful installation, it is important to properly align the screws with the plugs and drive them in slowly. In this guide, we will walk you through the step-by-step process of installing screws with plugs to help you achieve a sturdy and professional result.
Aligning the screws with the plugs
Before driving the screws into the plugs, it is crucial to align them properly. Improper alignment can lead to difficulties during installation, as the screws may not fit securely into the plugs. To align the screws with the plugs correctly, follow these steps:
- Mark the position: Using a pencil or marker, mark the exact location where you want to install the screws. Ensure that the marks are level and aligned according to your desired outcome.
- Position the plugs: Take the plugs and insert them into the marks you made on the surface. Make sure they are centered and firmly pressed against the wall.
- Line up the screws: Place the screws over the plugs, ensuring they are positioned in the center of each plug. Take your time to adjust their placement if necessary.
Slowly driving the screws into the plugs
Once the screws are aligned with the plugs, the next step is to drive them in slowly. This process requires precision and patience to ensure that each screw securely fastens into its corresponding plug. Follow these steps for a successful installation:
- Select the appropriate screwdriver: Choose a screwdriver that matches the size and type of screws you are using. A mismatched screwdriver can strip the screw or damage the plug.
- Start with a gentle approach: Place the screwdriver at the center of the screw head and apply gentle pressure. Begin turning the screw in a clockwise direction, allowing it to penetrate the plug slowly.
- Monitor resistance: Pay attention to the resistance you encounter while driving the screw. If you feel excessive resistance, stop immediately and assess the situation. It could be an indication of improper alignment, an obstruction, or the need for a larger plug.
- Ensure full engagement: Drive the screw until it is fully engaged with the plug, but avoid overtightening. Over-tightening may cause the plug to deform or compromise the integrity of the installation.
- Repeat the process: Repeat the above steps for each screw and plug combination, ensuring that every screw is driven in properly.
By aligning the screws with the plugs accurately and driving them in slowly, you will create a sturdy and long-lasting installation. Take your time during the process, paying attention to details for optimal results. With these steps in mind, you’ll be able to confidently install screws with plugs for various projects around your home or workspace.
Ensuring A Secure Installation
Checking the stability of the screws and plugs
Before you can ensure a secure installation, it’s important to check the stability of both the screws and plugs. This will help you identify any potential issues that could compromise the strength and durability of your installation.
Start by examining each screw to make sure it is in good condition. Look for any signs of corrosion or damage, such as rust or bent threads. If you notice any issues, replace the screws with new ones to ensure a secure fit.
Next, inspect the plugs to ensure they are in proper working condition. Check for any cracks or breakages that might affect their stability. If you find any damaged plugs, it’s crucial to replace them with new ones to maintain the integrity of the installation.
Tightening any loose screws
After checking the stability of the screws and plugs, it’s essential to tighten any loose screws that could compromise the security of your installation. Loose screws can lead to unstable or wobbly fixtures, risking potential accidents or damage.
To tighten the screws, use a screwdriver that matches the type and size of your screws. Apply pressure in a clockwise direction to ensure a tight fit. As you tighten the screws, give them a firm twist to ensure they are secure and stable.
If you encounter any stubborn screws that are difficult to tighten, consider using a lubricant or applying gentle heat to make the task easier. However, be mindful not to apply excessive force, as it can damage the threads and affect the overall strength of the installation.
By taking the time to check the stability of the screws and plugs and tightening any loose screws, you can ensure a secure installation that will withstand daily use and provide peace of mind.
Concealing The Screws And Plugs
Covering the screws and plugs with wood putty or filler
When it comes to installing screws with plugs, one of the key steps in achieving a seamless finish is concealing those unsightly screws and plugs. A tried and tested method is to cover them with wood putty or filler. This not only hides any imperfections but also creates a smooth surface ready for painting or staining. Here’s how you can do it.
First, gather your supplies:
– Wood putty or filler
– Putty knife
– Sandpaper (medium-grit and fine-grit)
– Clean cloth
Follow these steps to cover the screws and plugs with wood putty or filler:
1. Begin by preparing the surface. Make sure it is clean and free from any dust or debris. Use a clean cloth to wipe away any dirt or residue.
2. Take a small amount of wood putty or filler on your putty knife. Press it firmly into the hole where the screw or plug is located. Make sure to completely fill the hole, ensuring there are no gaps.
3. Use the putty knife to smooth the surface of the wood putty or filler, ensuring it is flush with the surrounding surface. Take your time to achieve a seamless finish.
4. Allow the wood putty or filler to dry according to the manufacturer’s instructions. This may take anywhere from a few hours to overnight, depending on the product.
5. Once the wood putty or filler is fully dry, it’s time to sand the surface. Start with medium-grit sandpaper to level the putty or filler with the surrounding wood. Use smooth, even strokes in the direction of the wood grain.
6. After sanding with medium-grit sandpaper, switch to fine-grit sandpaper to achieve a smooth and polished surface. Again, sand in the direction of the wood grain.
7. Once you are satisfied with the smoothness of the surface, use a clean cloth to remove any dust or particles left behind from sanding.
Sanding and painting to match the surface
Now that the screws and plugs are concealed with wood putty or filler, the next step is to sand and paint to match the surface. This ensures a cohesive and professional-looking result. Here’s how to do it:
1. Start by lightly sanding the entire surface around the filled holes to create a smooth and even texture. Use fine-grit sandpaper and sand in the direction of the wood grain.
2. After sanding, wipe away any dust or debris with a clean cloth or a tack cloth specially designed for cleaning before painting.
3. Now it’s time to paint the surface to match the surrounding area. Choose a paint color that matches or complements the finish of the wood. Use a small brush or a paint sponge to carefully apply an even coat of paint over the filled holes.
4. Allow the paint to dry completely before inspecting the results. If necessary, apply a second coat of paint for better coverage and blending.
By following these steps to cover the screws and plugs with wood putty or filler and sanding and painting to match the surface, you can achieve a seamless and professional finish that will enhance the overall appearance of your project. Remember to take your time and pay attention to detail for the best results.
Maintenance And Longevity
Whether you’ve recently installed screws with plugs or have had them in place for some time, proper maintenance is key to ensuring their longevity. By regularly checking the screws and plugs for any signs of damage and implementing proper maintenance techniques, you can maximize the lifespan of your installation. In this section, we will discuss the importance of regularly checking for damage and outline the steps for proper maintenance.
Regularly checking the screws and plugs for any signs of damage
Checking your screws and plugs for any signs of damage is an essential part of maintenance. By inspecting them regularly, you can identify and address any issues before they escalate. Here are a few steps to follow:
- Visually inspect the screws and plugs, looking for any cracks, chipping, or other visible signs of damage.
- Tighten any loose screws using a screwdriver, ensuring they are securely in place.
- Check for any noticeable wear and tear, such as fraying or stretching of the plug material.
- Ensure that the plug is still fitting snugly into the hole, with no gaps or looseness.
By regularly checking the condition of your screws and plugs, you can prevent further damage and avoid potential issues down the line.
Proper maintenance to ensure longevity of the installation
In addition to regular checks for damage, implementing proper maintenance techniques is crucial to ensuring the longevity of the screws and plugs installation. Here are some essential steps to follow:
- Keep the installation clean by regularly removing any dust, debris, or buildup that may accumulate.
- Wipe down the screws and plugs with a mild detergent and a damp cloth to remove any dirt or stains.
- Avoid using harsh chemicals or abrasive materials that could damage the surface of the screws or plugs.
- Apply a protective coating or sealant to the screws and plugs, if necessary, to help prevent rust or corrosion.
Following these maintenance practices will not only extend the lifespan of your screws and plugs but also ensure their proper functionality and appearance over time. By investing a little time and effort in maintenance, you can enjoy a durable and long-lasting installation.
Tips And Tricks For A Successful Installation
When it comes to installing screws with plugs, there are a few tips and tricks that can help ensure a successful and secure installation. In this section, we will cover the importance of using a screwdriver with the appropriate torque settings and applying even pressure while driving the screws.
Using a Screwdriver with the Appropriate Torque Settings
One of the key factors in successfully installing screws with plugs is using a screwdriver with the appropriate torque settings. Torque refers to the amount of force applied to tighten or loosen a screw. Using too much torque can damage the screw or the material, while using too little can result in a loose or unstable installation.
Here are a few important points to keep in mind:
- Refer to the manufacturer’s instructions or consult a torque chart to determine the appropriate torque setting for the specific screw and plug you are using.
- If your screwdriver has adjustable torque settings, ensure it is set to the correct level before beginning the installation.
- Avoid using excessive force when driving the screw, as this can strip the screw or damage the material.
- Conversely, ensure you apply enough force to securely tighten the screw, but without over-tightening.
Applying Even Pressure While Driving the Screws
In addition to using the right torque settings, it is equally important to apply even pressure while driving the screws into the material. This helps ensure that the screw is properly seated and provides a secure and sturdy installation.
Consider the following tips to apply even pressure:
- Hold the screwdriver with a firm grip, ensuring your hand is positioned close to the end of the handle.
- Apply pressure evenly and consistently while turning the screwdriver clockwise.
- Avoid using jerky or uneven motions, as this can cause the screw to become misaligned or the plug to be unevenly inserted.
- Monitor the progress of the screw as you drive it in, making any necessary adjustments to ensure it is going in straight and evenly.
By using a screwdriver with the appropriate torque settings and applying even pressure while driving the screws, you can achieve a successful installation that is secure and long-lasting.
Troubleshooting Common Issues
When it comes to installing screws with plugs, there are a few common issues that you might encounter. Understanding how to troubleshoot these issues will help you complete your installation smoothly and successfully. In this section, we will discuss two of the most common issues: plugs breaking during installation and screws not aligning properly with the plugs.
Plugs breaking during installation
If you find that your plugs are breaking during installation, it can be frustrating and time-consuming. However, there are a few potential reasons why this might be happening and some troubleshooting steps you can take to address the issue:
- Inadequate pre-drilling: One common cause of plugs breaking is not pre-drilling the holes properly. Make sure to use a drill bit that is the same size as the plug and pre-drill the holes to the appropriate depth. This will help prevent excessive pressure on the plug during installation.
- Insertion technique: Another factor to consider is your insertion technique. When inserting the plug into the hole, use a steady, even pressure. Avoid applying too much force, as this can cause the plug to break. If necessary, lubricate the plug or the hole with a small amount of soap or water to ease the insertion process.
- Quality of the plugs: Lastly, the quality of the plugs themselves can affect their durability. Make sure you are using high-quality plugs that are designed for the specific type of material you are working with. Cheaper or lower-quality plugs may be more prone to breaking.
Screws not aligning properly with the plugs
Another common issue that you may encounter is screws not aligning properly with the plugs. This can make it difficult to securely fasten the screws and can compromise the stability of the installation. Here are a few troubleshooting steps to help address this issue:
- Realign the plugs: If you notice that the screws are not aligning properly with the plugs, try removing the screws and gently realigning the plugs. Sometimes, slight adjustments are needed to ensure a proper fit. Use a screwdriver or another appropriate tool to carefully adjust the position of the plugs as needed.
- Check screw length: It’s also essential to ensure that the length of the screws matches the thickness of the material and the length of the plugs. If the screws are too short, they may not reach the plugs properly, leading to misalignment. Measure the depth of the hole and select screws with an appropriate length.
- Inspect the plug holes: Additionally, inspect the plug holes for any obstructions or debris that may be preventing the plugs from aligning correctly. Clean out any debris or use a larger drill bit to widen the holes slightly if necessary.
By troubleshooting these common issues, you will be able to install screws with plugs more effectively. Remember to take your time, follow best practices, and use high-quality materials for successful installations.
Frequently Asked Questions
How Do You Install Screws With Plastic Plugs?
To install screws with plastic plugs, follow these steps: 1. Choose an appropriate size drill bit. 2. Drill a hole in the wall or surface where you want to install the screw. 3. Insert the plastic plug into the hole until it is flush with the surface.
4. Place the screw into the plug and use a screwdriver or drill to secure it into place. 5. Ensure the screw is tightened firmly but not over-tightened to avoid damaging the plug.
Do You Hammer Or Screw Wall Plugs?
For wall plugs, you should hammer them in for a secure fit. Screw-in wall plugs are not commonly used.
Do You Screw Wall Plugs In?
Yes, wall plugs are screwed into the wall to provide a secure anchor for screws or nails.
How Do You Install A Metal Screw Wall Plug?
To install a metal screw wall plug, follow these steps: 1. Firstly, choose the correct size of wall plug for the screw. 2. Then, use a drill to create a hole in the wall, making sure it is the correct depth.
3. Next, insert the wall plug into the hole and tap it gently with a hammer until it is flush with the wall. 4. Finally, screw in the metal screw into the wall plug until it is secure.
Conclusion
The process of installing screws with plugs is an important skill to master for anyone involved in DIY projects or home repairs. By following the step-by-step guide provided you can ensure a secure and professional-looking result. Remember to choose the appropriate size and type of screw and plug for your project, and take the time to properly prepare the surface before installation.
With these tips in mind, you’ll be able to confidently tackle any screw and plug installation task with ease.