To install rivet nuts without a tool, use a rivet nut hand tool or a drill bit and a wrench. Here’s how to do it in a few simple steps.
When you need to install rivet nuts without a specialized tool, there are a couple of alternative methods you can try. One option is to use a rivet nut hand tool, which allows for easy installation by squeezing the nut into place.
Another method is to use a drill bit and a wrench. Start by drilling a hole that matches the diameter of the rivet nut, then thread the nut onto the bolt and insert it into the hole. Finally, use a wrench to tighten the nut until it is secure. Both of these methods can be effective for installing rivet nuts without the need for a specialized tool.
What Are Rivet Nuts And Their Benefits
Rivet nuts are versatile fasteners that provide reliable and efficient solutions for various applications. These specialized inserts are designed to create a permanent and strong threaded connection in materials where it may not be feasible or cost-effective to use traditional nuts and bolts. When it comes to installing rivet nuts without a tool, it is important to understand their definition and the advantages they offer.
Definition of Rivet Nuts
Rivet nuts, also known as threaded inserts or rivnuts, are tubular insertions with internal threads. They are typically made of steel, aluminum, or stainless steel and come in various shapes and sizes to accommodate different applications. These inserts are designed to be permanently installed in materials such as metal, plastic, and composite surfaces, creating a secure and reliable threaded connection.
Advantages of Using Rivet Nuts
Rivet nuts offer several benefits that make them a popular choice in various industries and applications:
- Durable and Secure: Rivet nuts create a strong and secure threaded connection that can withstand high levels of torque and tension. This ensures the longevity and reliability of the fastened joint.
- Easy Installation: While using a tool is typically recommended for installing rivet nuts, it is possible to install them without a tool. This allows for quick and convenient installation even in situations where a tool may not be readily available or feasible to use.
- Versatile Application: Rivet nuts can be used in a wide range of materials, including metal, plastic, and composites. Their versatility makes them suitable for various industries, such as automotive, aerospace, electronics, and furniture manufacturing.
- Reduced Weight and Cost: Rivet nuts provide a lightweight alternative to traditional nuts and bolts, reducing the overall weight of the assembled product. They also eliminate the need for additional hardware, such as washers or nuts, resulting in cost savings.
- High Load Capacity: Despite their small size, rivet nuts have a high load-bearing capacity, making them capable of withstanding substantial loads and forces. This makes them suitable for both light-duty and heavy-duty applications.
In conclusion, rivet nuts are versatile fasteners that offer numerous benefits, including durability, easy installation, versatile application, reduced weight and cost, and high load capacity. These advantages make them a reliable choice for various industries and projects. And while using a tool is recommended for installation, it is possible to install rivet nuts without a tool, providing flexibility in certain situations.

Tools And Materials Required
List of necessary tools and materials
When it comes to installing rivet nuts without a tool, it’s important to gather the right tools and materials for the job. While a rivet nut tool is the most efficient and accurate way to install rivet nuts, there are alternatives that can be used. Here is a list of necessary tools and materials you will need:
Alternatives to a rivet nut tool
If you don’t have a rivet nut tool, there are alternative methods you can use to install rivet nuts. These methods may not be as precise or efficient as using a tool specifically designed for the job, but they can still get the job done. Here are a few alternatives you can consider:
1. Hand Riveter: A hand riveter can be used as an alternative to a rivet nut tool. Although it is mainly used for installing rivets, it can also be used to install rivet nuts. However, it may not provide the same level of precision and control as a dedicated rivet nut tool.
2. Pliers: Ordinary pliers can also be used to install rivet nuts. While this method can work, it requires a bit more effort and may not provide the same level of tightness as a proper tool. However, if you don’t have access to any other tools, pliers can get the job done in a pinch.
3. Socket and Nut: Another alternative method is to use a socket and nut. This involves selecting a socket that matches the size of the rivet nut, placing the nut on the socket, and using a wrench to tighten it into place. While this method can be effective, it can be time-consuming and less precise compared to using a dedicated tool.
4. Wooden Block and Hammer: If you’re in a bind and don’t have access to any tools, you can use a wooden block and hammer to install rivet nuts. Simply place the rivet nut on the desired location, position the wooden block over it, and hammer it gently until it is properly secured. This method requires caution and precision to avoid damaging the nut.
While these alternatives can work to some extent, they may not provide the same level of precision and ease as using a dedicated rivet nut tool. If possible, it’s recommended to invest in a proper tool for the best results.
Step 1: Preparing The Rivet Nut And The Work Surface
Before you start installing your rivet nuts without a tool, it is important to properly prepare both the rivet nut and the work surface. This will ensure a secure and reliable installation, preventing any unforeseen issues later on. In this step, we will cover the three main aspects of preparation: choosing the appropriate rivet nut size, inspecting the work surface for suitability, and cleaning and preparing the work surface.
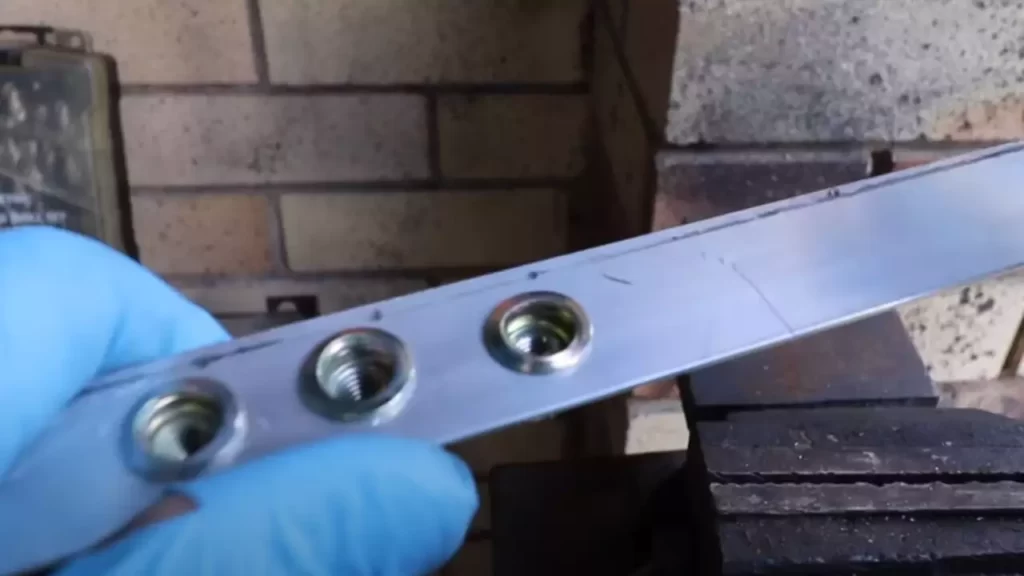
Choosing the Appropriate Rivet Nut Size
Choosing the right size for your rivet nut is crucial in achieving a successful installation. A rivet nut that is too small may not provide enough strength and stability, while one that is too large may not fit securely. To determine the appropriate size, consider the material and thickness of the workpiece. In general, the diameter of the rivet nut should match the hole size, while the length should accommodate the thickness of the material.
Inspecting the Work Surface for Suitability
Before proceeding with the installation, it is vital to inspect the work surface to ensure its suitability. Look for any defects, such as cracks, dents, or deformations, which could impair the integrity of the rivet nut. Additionally, check if the material is compatible with the chosen rivet nut. If the work surface is made of a brittle material, it may not be suitable for rivet nut installation.
Cleaning and Preparing the Work Surface
Once you have determined the appropriate rivet nut size and confirmed the suitability of the work surface, it is time to clean and prepare the area. Start by removing any debris, dirt, or rust from the surface using a wire brush or sandpaper. This will ensure a clean and smooth installation. Next, apply a degreaser to eliminate any grease or oil that could hinder the bonding process. Finally, wipe down the area with a clean cloth to remove any residue and allow it to dry completely before proceeding to the next step.
Step 2: Inserting The Rivet Nut Into The Work Surface
Once you have prepared the work surface and selected the appropriate rivet nut size, it’s time to learn how to insert the rivet nut without a tool. Below, we will explore a few methods you can use to achieve a secure and professional installation.
Method 1: Hand Tightening
Hand tightening is a simple method that requires only your strength and a few basic tools. Here’s how to do it:
- First, select a compatible drill bit that matches the outer diameter of the rivet nut. This will ensure a snug fit.
- Next, insert the drill bit into the hole you drilled in the work surface. Make sure it goes in straight and aligns with the desired position.
- Once the drill bit is in place, take the rivet nut and place it over the bit’s exposed end.
- Gently hold the rivet nut in place with your fingers while using your free hand to turn the drill bit clockwise. Continue rotating until the rivet nut tightens securely against the work surface.
This method requires a bit of patience and precision. Ensure the rivet nut is aligned properly and that it goes in straight to achieve optimal results.
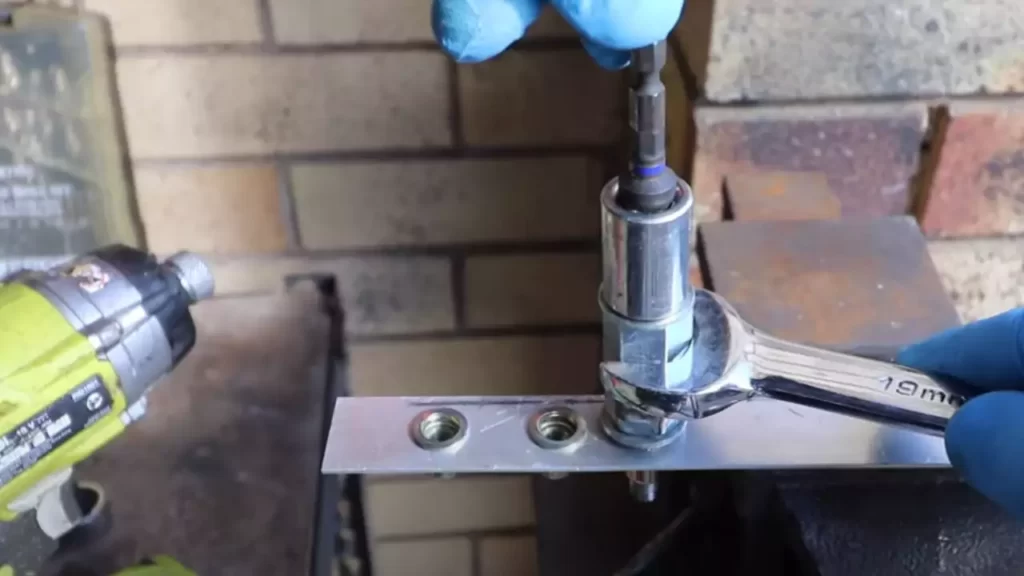
Method 2: Using a Socket and Washer
If you prefer a more mechanical approach, you can use a socket and washer to insert the rivet nut into the work surface. Follow these steps:
- Start by selecting a socket that fits snugly onto the rivet nut’s outer edge.
- Place a flat washer over the socket, ensuring it rests evenly on top.
- Take the rivet nut and position it on the work surface, aligning it with the drilled hole.
- Place the socket and washer combination over the rivet nut’s exposed end.
- Using a wrench or ratchet, apply downward pressure while turning the socket clockwise. This action will drive the rivet nut into the work surface.
- Continue tightening until the rivet nut is securely embedded.
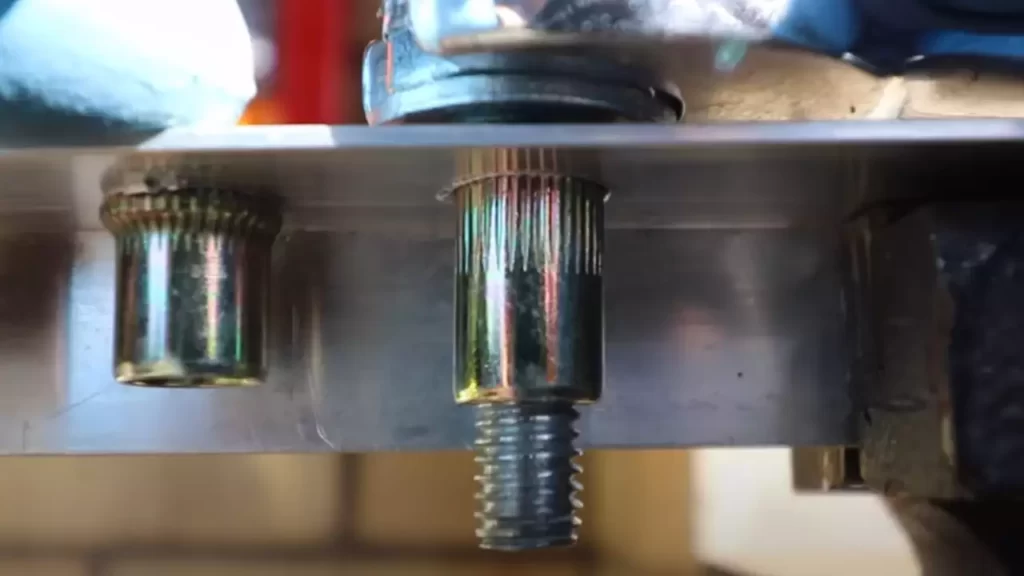
Method 3: Using a Nut and Bolt
If you find yourself without specialized tools, don’t worry! You can still install a rivet nut using a simple nut and bolt. Here’s how:
- Locate a nut of the same size as the rivet nut you want to install.
- Insert the nut into the drilled hole, ensuring it sits flush against the work surface.
- Take the rivet nut and thread it onto a bolt of the appropriate size.
- Insert the bolt through the center of the nut already in the hole, allowing the rivet nut to rest against the work surface.
- Using a wrench or socket, turn the bolt clockwise while applying downward pressure. This action will force the rivet nut to tighten and embed into the work surface.
- Once the rivet nut is flush and securely installed, remove the bolt and nut.
These methods provide viable alternatives when you don’t have access to a specialized rivet nut tool. Remember to be diligent in aligning the rivet nut properly and applying the necessary force to ensure a secure installation. With practice, you’ll be able to achieve professional results without the need for a tool.
Step 3: Setting The Rivet Nut In Place
When it comes to installing rivet nuts without the use of a tool, proper positioning and alignment are crucial for a successful installation. In this step-by-step guide, we will walk you through the techniques for setting the rivet nut in place without the need for a specialized tool.
Techniques for setting the rivet nut without a tool
To set the rivet nut without a dedicated tool, you can employ several techniques that provide satisfactory results. These methods are easy to follow and require minimal effort, making them accessible to anyone without specialized equipment. Let’s explore these techniques in detail to ensure a smooth installation process.
Proper positioning and alignment of the rivet nut
Before setting the rivet nut in place, it is crucial to position and align it correctly. This ensures a secure fit and prevents any potential damage during the installation process. Follow these steps to properly position and align the rivet nut:
- Identify the insertion hole: Locate the hole where you intend to install the rivet nut. Ensure that the hole is clean and free from any debris or obstruction that may affect the installation.
- Choose the right size rivet nut: Select a rivet nut that matches the size of the insertion hole. The rivet nut should fit snugly without any play or excessive wiggle room.
- Insert the rivet nut: Insert the rivet nut into the insertion hole, ensuring that it sits flush against the material surface. Apply gentle pressure to make sure the rivet nut is properly seated.
- Align the rivet nut: Align the flange of the rivet nut with the material surface. This step is crucial for achieving a secure and effective installation. Make sure the rivet nut is sitting straight and aligned perpendicular to the material surface.
By diligently following these steps, you can ensure that the rivet nut is positioned and aligned accurately, laying the foundation for a successful installation.
In conclusion, setting the rivet nut in place without a tool is an achievable task with the right techniques. By focusing on proper positioning and alignment, you can achieve a secure and effective installation. Remember to take the necessary precautions and follow the steps outlined in this guide to ensure the best results.
Step 4: Tightening The Rivet Nut
Once you have successfully inserted the rivet nut into the desired hole and secured it in place, the next step is to tighten it. Ensuring that the rivet nut is securely fastened is crucial for its proper functioning. In this section, we will explore some manual tightening methods that you can use to achieve a tight and reliable connection.
Manual tightening methods
There are several ways to tighten a rivet nut without the use of specialized tools. These manual methods can be handy when you don’t have access to a rivet nut tool or simply prefer a more hands-on approach. Here are a few techniques you can try:
- Finger Tightening: This method involves using your fingers to tighten the rivet nut. Start by gripping the rivet nut firmly and turning it clockwise to tighten. Apply enough pressure to ensure it is secure, but be careful not to overtighten, which could cause damage.
- Wrench Tightening: If you have a wrench or pliers available, you can use this tool to tighten the rivet nut. Place the jaws of the wrench or pliers around the flat part of the rivet nut and turn it clockwise to create a secure connection. Make sure to use a wrench or pliers that are suitable for the size of the rivet nut for optimal tightening.
- Socket and Ratchet: Another effective method is using a socket and ratchet, similar to how you would tighten a bolt or nut. Select a socket that matches the size of the rivet nut and attach it to a ratchet. Place the socket over the rivet nut and turn it clockwise using the ratchet until it is securely tightened.
It is important to remember that while manual tightening methods are a viable option, they may not provide the same level of precision and consistency as using a dedicated rivet nut tool. However, with careful attention and proper technique, you can still achieve a reliable fastening with manual methods.
By employing these manual tightening methods, you can ensure that your rivet nut is securely fastened and ready to perform its intended function. Experiment with different techniques to find the one that works best for you and the specific requirements of your project. Whether you choose to use your fingers, a wrench, or a socket and ratchet, always double-check the tightness to prevent any potential issues down the line.
Step 5: Testing The Rivet Nut
Once you have successfully installed the rivet nut, it is important to test its strength and stability before moving forward. Testing will ensure that the rivet nut can withstand the expected load and provide a secure fastening solution. Follow these steps to test the rivet nut effectively.
Checking the strength and stability of the rivet nut
To check the strength and stability of the rivet nut, perform the following steps:
- Step 1: Apply a gradual load: Begin by applying a gradual load on the rivet nut. This can be done by attaching a component or object that exerts a controlled force on the rivet nut. Make sure the load is gradually increased to simulate real-life conditions.
- Step 2: Observe for any signs of failure: While applying the load, closely monitor the rivet nut for any signs of failure, such as loosening or movement. Pay attention to the surrounding materials as well for any cracks or deformation.
- Step 3: Verify the stability: Check if the rivet nut remains securely fastened throughout the testing process. It should provide a stable and reliable connection, with no wobbling or loosening.
- Step 4: Assess the load-bearing capacity: Determine if the rivet nut can handle the expected load. If it shows signs of weakening or fails to meet the required strength, consider using a larger-sized or stronger rivet nut.
Troubleshooting common issues with rivet nuts
Sometimes, issues may arise during the testing process or even after installation. Here are some common problems with rivet nuts and how to troubleshoot them:
| Issue | Troubleshooting |
|---|---|
| Loosening of the rivet nut: | Check if the rivet nut is properly tightened. If not, use a suitable tool to tighten it further. In some cases, using adhesive or thread-locking compounds may be necessary. |
| Difficulties during installation: | If you encountered difficulties during installation, ensure that you have chosen the correct size and type of rivet nut for your application. Double-check the hole size and consider using lubrication to ease the installation process. |
| Cracking or deformation of surrounding materials: | If the surrounding materials are experiencing cracking or deformation, it may indicate that the rivet nut is too large or the hole is improperly drilled. Consult an expert or use a smaller-sized rivet nut if necessary. |
By following these testing and troubleshooting guidelines, you can ensure that the installed rivet nut meets your expectations in terms of strength, stability, and overall performance. Remember, regular inspection and maintenance are vital to keep the fastening solution in optimal condition and prevent any potential issues in the future.
Frequently Asked Questions
How Do You Install Rivet Nuts Without Special Tools?
To install rivet nuts without special tools, follow these steps: 1. Place the rivet nut in the desired hole. 2. Use a wrench to screw the rivet nut into the hole, applying pressure until it is secure. 3. Check if the nut is properly installed by testing its stability.
4. If needed, use pliers to lock the nut in place. 5. Ensure a firm connection before using the rivet nut.
Can You Install Rivets Without A Rivet Tool?
No, a rivet tool is necessary to install rivets. A rivet tool helps create the necessary pressure for the rivet to securely fasten two materials together. Without a rivet tool, you won’t be able to properly install rivets.
What Can I Use Instead Of A Rivet Nut Tool?
To replace a rivet nut tool, you can use alternative methods such as a manual rivet gun, pliers, or a hammer and anvil. These tools are effective in installing rivet nuts without the need for a specialized tool.
Do You Need A Special Tool For Rivnuts?
No, you don’t need a special tool for rivnuts. They can be installed using standard hand tools.
Conclusion
Installing rivet nuts without a tool can be a simple and cost-effective solution for various projects. By following the steps outlined in this blog post, you can successfully insert rivet nuts using basic household items, saving you time and money.
Remember to choose the right size and type of rivet nut for your application. With a little patience and practice, you’ll be able to complete your projects efficiently and effectively. So, go ahead and give it a try!