To install an RG6 connector, insert the stripped cable end into the connector until it reaches the end, then tighten the collar to secure it in place. Installing an RG6 connector is a straightforward process that allows you to connect coaxial cables for various purposes.
Whether you need to install connectors for satellite TV, cable, or networking applications, the RG6 connector is a commonly used option. This guide will walk you through the steps to install an RG6 connector, helping you achieve a reliable connection in just a few simple steps.
Understanding The Rg6 Connector
Understanding the Rg6 Connector
The Rg6 connector is a crucial component in cable installations, ensuring a secure and reliable connection for coaxial cables. Whether you’re setting up a cable TV network or connecting your satellite dish, understanding the Rg6 connector is essential for a successful installation. In this section, we will delve into the role of the Rg6 connector in cable installations, the types of Rg6 connectors available in the market, and the common tools required for the installation process.
The Role of the Rg6 Connector in Cable Installations
The Rg6 connector plays a vital role in maintaining the integrity of the signal transmission in cable installations. It provides a seamless connection between two coaxial cables, ensuring that the signal flows uninterrupted and with minimal loss. By securely joining the cables, the Rg6 connector protects against interference, signal distortion, and signal leakage, resulting in enhanced audio and video quality.
Types of Rg6 Connectors Available in the Market
When it comes to Rg6 connectors, there are a variety of types available in the market to cater to different installation needs and preferences. Below are three common types of Rg6 connectors:
| Type | Description |
|---|---|
| BNC Connector | The Bayonet Neill–Concelman (BNC) connector is a twist-lock type connector commonly used in CCTV applications. It provides a secure and reliable connection. |
| F-type Connector | The F-type connector is widely used in cable and satellite TV installations. It offers a simple compression design, ensuring a tight connection and excellent signal transfer. |
| RCA Connector | The RCA connector, also known as a phono connector, is popularly used for audio and video connections. It features a plug with a central metal pin and an outer ring for reliable connectivity. |
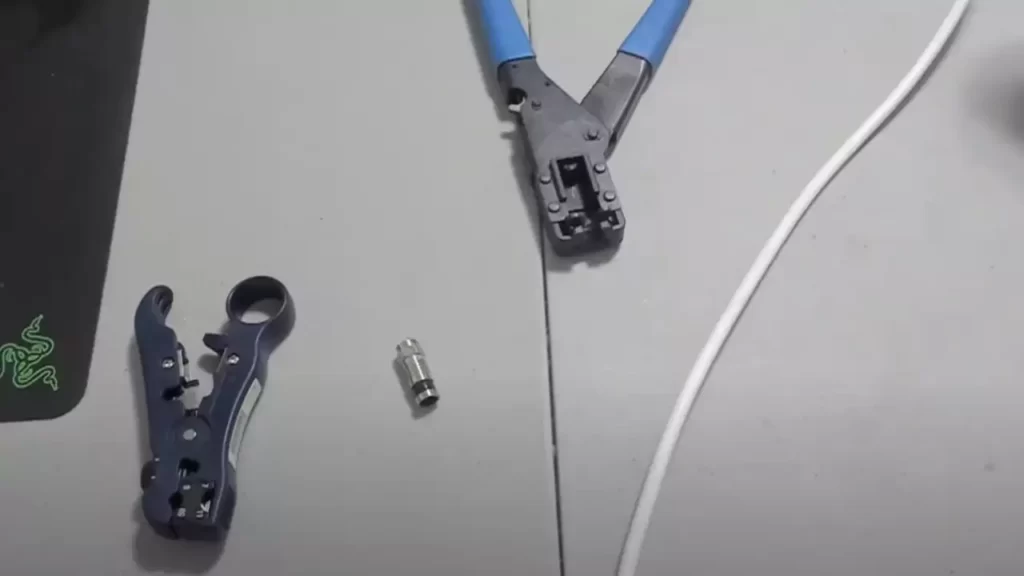
Common Tools Required for the Installation Process
Before installing the Rg6 connector, it’s essential to gather the necessary tools to ensure a smooth installation process. Here are some common tools required:
- Coaxial cable cutter
- Coaxial cable stripper
- Compression tool
- Rg6 connectors
- Electrical tape
- Connector compression gauge
These tools enable you to accurately trim the cable, strip off the appropriate amount of insulation, and securely attach the Rg6 connector to the cable end. With the right tools, you can achieve optimal signal strength and minimize signal loss.
Now that we’ve covered the role of the Rg6 connector, the types available in the market, and the tools required for installation, you’re ready to proceed with installing the Rg6 connector for your cable installation needs.
Preparing For The Installation
Before you dive into installing an RG6 connector, it is important to prepare for the task at hand. This involves assessing the cable length and connector requirements, gathering the necessary tools and materials, and ensuring a safe and clean working environment. By taking these steps, you can streamline the installation process and ensure a successful outcome.
Assessing the cable length and the connector requirements
One of the first steps in preparing for the installation of an RG6 connector is to assess the cable length and determine the specific connector requirements. This information is crucial as it will guide you in selecting the appropriate connector type and ensure a proper fit.
Start by measuring the length of your RG6 cable accurately. You can use a measuring tape or ruler to get an exact measurement. Take note of the length, as this will help you determine the amount of cable slack needed to properly install the connector.
Next, identify the connector type required for your specific installation needs. The two common connector types for RG6 cables are the F-type connector and the BNC connector. The F-type connector is widely used for residential installations, while the BNC connector is commonly used in commercial setups.
Gathering the necessary tools and materials for the installation
To ensure a smooth installation process, it is essential to gather all the necessary tools and materials beforehand. Having everything within reach will save you time and frustration during the installation. Here is a list of tools and materials you will typically need:
| Tools | Materials |
|---|---|
|
|
By having these tools and materials ready, you can work efficiently and effectively.
Ensuring a safe and clean working environment
Before you start the installation, it is crucial to create a safe and clean working environment. This ensures your safety and prevents any potential damage to the equipment or cable. Here are some important steps to follow:
- Clear the workspace of any clutter or obstacles that may impede your movement.
- Make sure the area is well-lit, allowing you to see the connectors and cables clearly.
- Check that there are no exposed wires or damaged cables that could pose a safety hazard.
- Wear appropriate protective gear, such as gloves and safety glasses, to protect yourself during the installation.
- Keep a clean cloth or paper towels handy to wipe off any dust or debris from the cables and connectors.
By adhering to these safety measures and maintaining a clean working environment, you can minimize the risk of accidents and ensure a smooth installation process.
Preparing for the installation of an RG6 connector is a crucial step in ensuring a successful and hassle-free installation. By assessing the cable length and connector requirements, gathering the necessary tools and materials, and creating a safe and clean working environment, you set yourself up for a seamless installation process. So, let’s dive in and get your RG6 connector installed!
Stripping And Preparing The Cable
When it comes to installing an RG6 connector, one of the important steps is properly stripping and preparing the cable. This ensures a clean and secure connection for your cable installation. In this section, we will discuss how to measure and mark the cable for stripping, as well as using the appropriate tools to strip the outer jacket of the cable. Lastly, we will cover removing the foil and braiding to expose the inner conductor. Let’s get started!
Measuring and Marking the Cable for Stripping
Before you begin stripping the cable, it is important to measure and mark the appropriate length where the stripping will take place. This helps to ensure that you don’t strip too much or too little of the cable jacket, which can affect the quality of the connection. Here’s how you can measure and mark the cable:
- Start by measuring the desired length for stripping. This can be typically around 1 inch, but it may vary depending on your specific installation.
- Mark the measured length on the cable using a marker or a piece of tape. This will act as a guide for stripping the cable and help you achieve consistent results.
Using the Appropriate Tools to Strip the Outer Jacket of the Cable
Once you have measured and marked the cable, it’s time to strip the outer jacket using the right tools. Here are the steps to follow:
- Choose a cable stripping tool that is suitable for RG6 cables. These tools are designed specifically to strip the outer jacket without damaging the inner conductor.
- Position the stripping tool over the marked area, making sure it aligns with the length you measured.
- Gently rotate the stripping tool around the cable, applying light pressure. This will help the cutting blades of the tool remove the outer jacket without cutting into the braiding or inner conductor.
- Continue rotating the stripping tool until the outer jacket is completely removed. Be careful not to strip beyond the marked length to avoid exposing the braiding or damaging the inner conductor.
Removing the Foil and Braiding to Expose the Inner Conductor
After stripping the outer jacket, you will need to remove the foil and braiding to expose the inner conductor. Here’s how:
- Use your fingers or a small pair of wire cutters to carefully remove the foil wrapping around the cable. This can usually be done by gently peeling it away.
- Once the foil is removed, you will see the braiding underneath. Use your fingers or wire cutters to fold back the braiding and expose the inner conductor.
- Take care not to damage the inner conductor while removing the foil and braiding.
By following these steps, you have successfully stripped and prepared the RG6 cable for the installation of a connector. Now you are ready to proceed with the next steps of your cable installation process.
Attaching The Rg6 Connector
Now that you have identified the correct type of Rg6 connector for your cable, it’s time to move on to the next step of the installation process – attaching the connector. This crucial step ensures a secure and reliable connection, allowing for optimal signal transmission. Follow the steps below to attach your Rg6 connector with ease and precision.
Identifying the correct type of Rg6 connector for your cable
Before attaching the Rg6 connector, it’s important to ensure you have the correct type for your cable. Rg6 connectors come in different versions, such as twist-on, crimp-on, and compression connectors. Each type requires a specific installation method and tool.
To identify the correct type, refer to the specifications of your cable and the instructions provided by the connector manufacturer. It’s crucial to match the connector type to the cable type to ensure compatibility and a secure connection.
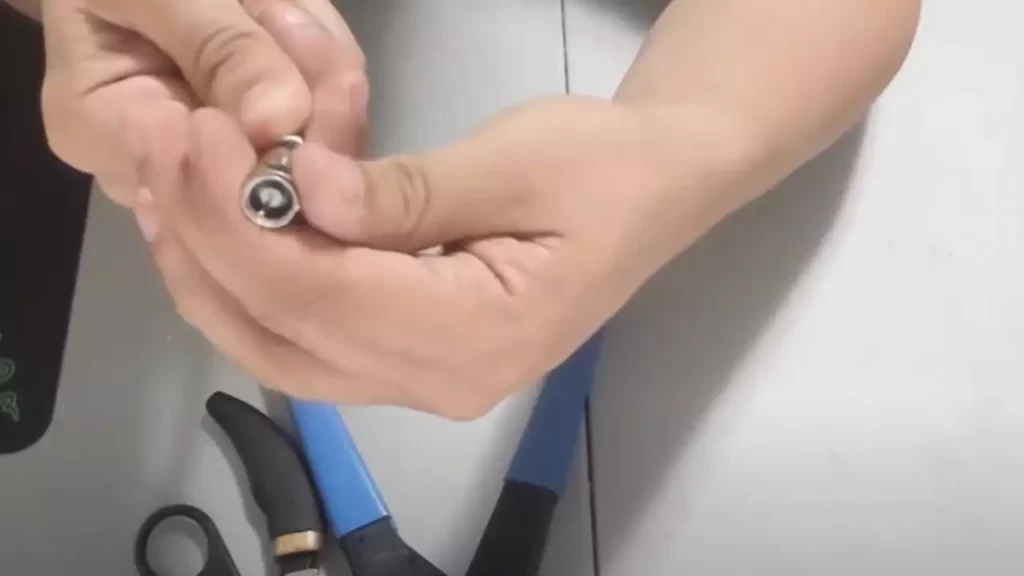
Inserting the cable into the connector and aligning the conductor
Once you have the appropriate connector, the next step is to insert the cable into the connector. Begin by stripping the outer insulation from the end of the cable, exposing the inner conductor and the shielding. Make sure to use a cable stripper or a sharp blade to carefully remove the insulation while avoiding any damage to the conductor.
Next, insert the exposed end of the cable into the connector, ensuring the conductor goes all the way into the connector and makes proper contact. The conductor should align with the pin or center contact of the connector. This alignment is crucial for maintaining a clean and strong signal transmission.
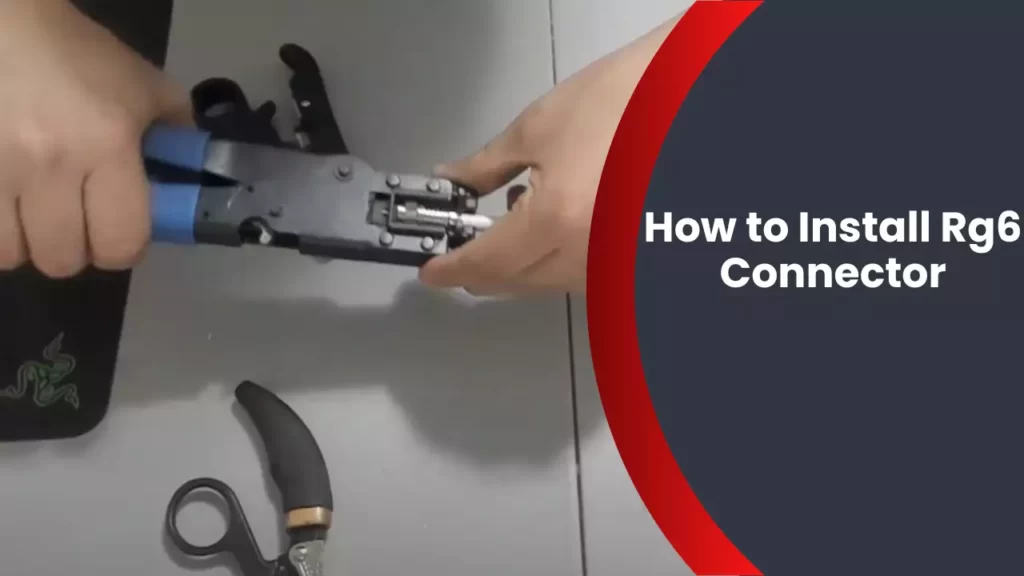
Applying the appropriate pressure to secure the connector
With the cable inserted into the connector and the conductor properly aligned, it’s time to secure the connector in place. The method used to secure the connector depends on the type of connector you are using, so make sure to follow the manufacturer’s instructions.
For twist-on connectors, simply twist the connector clockwise until it is fully tightened, ensuring a snug fit. Crimp-on and compression connectors require specialized tools. Use a crimping tool or compression tool, respectively, to apply the appropriate pressure and secure the connector in place.
It’s important to avoid applying too much pressure as it can damage the connector or the cable. Aim for a secure and firm connection without over-tightening.
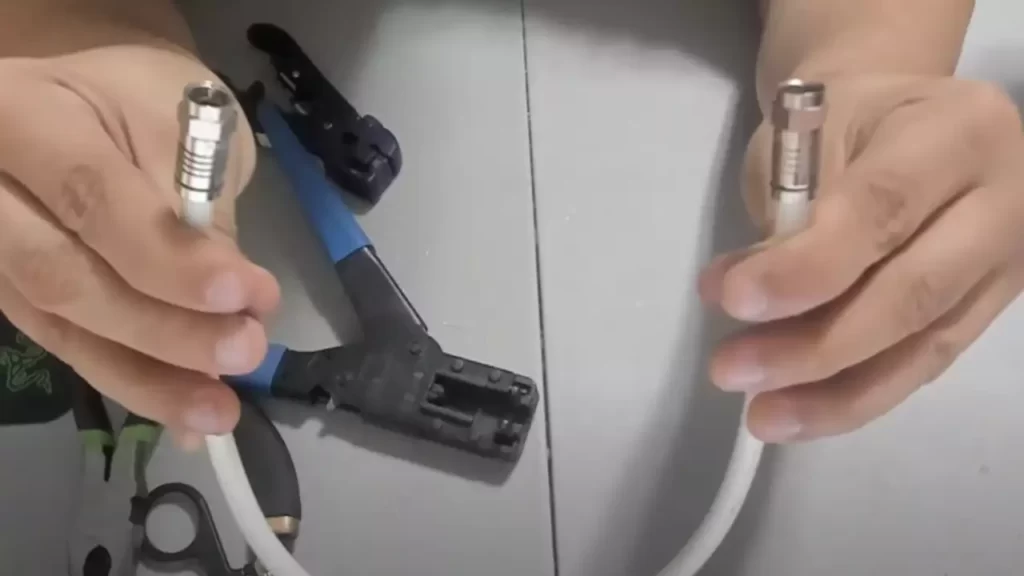
Once the connector is secured, give it a gentle tug to ensure it is firmly attached and does not come loose. A properly attached Rg6 connector will provide reliable signal transmission and minimize signal loss.
Remember, the process of attaching the Rg6 connector requires precision and attention to detail. Take your time, follow the instructions, and ensure a secure connection for optimal performance.
Testing And Troubleshooting
After installing an RG6 connector, it’s important to test and troubleshoot the connection to ensure it’s working properly. This step is crucial for ensuring a strong and reliable signal for your cable or satellite TV.
Checking for Proper Signal Strength and Clarity
One of the first things you should do after installing an RG6 connector is to check for proper signal strength and clarity. This will help you determine if the installation was successful and if there are any issues that need to be addressed.
To check the signal strength, you can use a signal meter or the signal strength indicator on your TV or cable box. Tune your TV to a channel and look for the signal strength indicator, usually displayed as bars or a percentage. If the signal strength is low or fluctuating, it could indicate a problem with the connector or the cable.
Next, check for signal clarity by tuning to different channels. Look for any pixelation, freezing, or distortion in the picture. If you notice any issues, it could be a sign of a weak or improperly installed connector.
Identifying and Fixing Common Installation Issues
If you’re experiencing signal issues after installing an RG6 connector, it’s important to identify and fix common installation issues to ensure a reliable signal. Here are some common issues and their solutions:
| Common Installation Issues | Solutions |
|---|---|
| Loose Connector | Tighten the connector by twisting it clockwise until it’s snug. Make sure not to overtighten, as it can damage the connector. |
| Improper Cable Stripping | Ensure that the cable is properly stripped before attaching the connector. Use a cable stripping tool to remove the outer insulation and expose the inner conductor. |
| Bent or Damaged Cable | If the cable is bent or damaged, replace it with a new one. A damaged cable can result in a weak or intermittent signal. |
By identifying and addressing these common installation issues, you can improve the signal quality and ensure a successful connection.
Using a Cable Tester to Ensure a Successful Connection
A cable tester is a valuable tool for ensuring a successful connection after installing an RG6 connector. It allows you to check the continuity and integrity of the cable, identifying any faults or issues that may affect the signal quality.
To use a cable tester, simply connect one end of the tester to the RG6 connector and the other end to a compatible device, such as a TV or cable box. The tester will then analyze the signal and provide you with information about its quality and integrity.
If the cable tester indicates any issues or faults, you may need to re-terminate the connector or replace the cable. By using a cable tester, you can ensure that your RG6 connector is properly installed and that you have a strong and reliable signal.
Testing and troubleshooting your RG6 connector installation is crucial for ensuring optimal signal strength and clarity. By following these steps, you can identify and address any installation issues and ensure a successful connection for uninterrupted entertainment.
Securing And Protecting The Connection
When it comes to installing an RG6 connector, it’s not only important to properly assemble the connector, but also to ensure the connection is secured and protected for optimal performance. By following a few simple steps, you can prevent damage to the cable, organize and secure it with cable clips and ties, and protect the connection from environmental factors such as moisture or dust.
Applying proper strain relief to prevent damage to the cable
One of the first steps in securing the connection is applying proper strain relief to prevent damage to the cable. Strain relief helps to relieve stress on the cable and prevents it from getting pulled or twisted, which can lead to signal loss or damage to the cable.
To apply strain relief, follow these steps:
- Leave a sufficient amount of slack in the cable near the connector. This extra length will allow the cable to move without putting stress on the connection.
- Use a cable tie or zip tie to secure the cable to a stable structure, such as a wall or an equipment rack. This will prevent any tension or strain from being transferred to the connector.
- Lastly, consider using a cable sleeve or spiral wrap to further protect the cable and prevent it from being bent or kinked. This additional layer of protection will ensure the longevity of the connection.
Using cable clips and ties to organize and secure the cable
Once the strain relief is in place, the next step is to organize and secure the cable using cable clips and ties. This not only helps to keep the cable tidy and neat, but also prevents it from being accidentally pulled or tripped over.
To organize and secure the cable, follow these steps:
- Start by identifying the best route for the cable. Consider using cable clips or adhesive mounts to secure the cable along the desired path.
- Ensure the cable is not stretched or tightly bent between clips. It should have a gentle curve and be allowed some flexibility.
- Use cable ties to bundle any excess cable length, keeping it neat and out of the way. Be careful not to overtighten the ties, as this can damage the cable.
Protecting the connection from environmental factors such as moisture or dust
In addition to securing the cable, it’s important to protect the connection from environmental factors that can cause signal degradation or damage. Moisture, dust, and other contaminants can interfere with the connection and lead to poor performance.
To protect the connection from these factors, consider the following:
- Apply a layer of electrical tape around the connection to provide insulation and protect it from moisture.
- Use weatherproof cable connectors or enclosures for outdoor installations to protect against rain and other weather conditions.
- Avoid placing the connection in areas where it can be exposed to excessive dust or dirt. If necessary, use cable management solutions such as cable raceways or conduit for added protection.
- Regularly inspect the connection and clean it if necessary. Use a soft, lint-free cloth to remove any dust or debris that may have accumulated.
By following these steps and ensuring proper strain relief, cable organization, and protection from environmental factors, you can secure and protect your RG6 connector connection for optimal performance and longevity.
Conclusion And Final Checks
When it comes to installing an RG6 connector, proper installation and thorough checks are crucial to ensure a high-quality signal transmission. In this final section, we will discuss the important steps to take to conclude the installation and verify its effectiveness. By following these final checks, you can ensure that your RG6 connector is firmly installed, minimizing any potential issues or signal degradation.
Verifying the installation for any loose connections or issues
Now that you have completed the installation process, it’s time to inspect your work. Carefully examine each connection point to ensure they are snug and secure. Look for any signs of loose connections or faulty components. Wiggle each connection gently to see if there is any movement or give. If you detect any loose parts, tighten them using the appropriate tools. Keep in mind that even the smallest loose connection can cause signal loss or disruptions, so be meticulous in your inspection process.
Testing the signal quality after the installation
After verifying the connections, it’s essential to test the signal quality to ensure a successful installation. Connect your television or other applicable device to the RG6 connector and check for any issues with the signal. Run a signal test or perform a channel scan on your TV to evaluate the strength and clarity of the channels received. Pay close attention to any pixelation, distorted audio, or freeze frames, as these can indicate a problem with the signal quality. If you notice any issues, double-check the connection points and repeat the verification process to rectify any problems.
Understanding the importance of a well-installed RG6 connector
A well-installed RG6 connector plays a vital role in maintaining a high-level signal transmission. It ensures minimal signal loss and interference, providing you with a clear and uninterrupted viewing experience. Without a properly installed connector, you may encounter pixelation, signal drops, or even complete signal loss. By adhering to the correct installation methods and conducting thorough checks, you can avoid these issues and enjoy the full capabilities of your RG6 cable. Remember, investing time and effort into a proper installation will save you from frustration and disappointment down the line.
Frequently Asked Questions
How To Install A Rg6 Compression Connector?
To install an RG6 compression connector: strip the cable’s outer insulation, fold back the braid, trim the foam dielectric, push the connector onto the cable, compress it with a compression tool, and check for a secure connection.
How Do You Crimp Ideal Rg6 Connectors?
To crimp ideal RG6 connectors, follow these steps: 1. Strip the RG6 cable 2. Slide the connector onto the cable. 3. Use a crimp tool to secure the connector onto the cable. 4. Ensure the crimp is tight and secure. 5. Test the connection for proper signal transmission.
Remember to use the appropriate tools and follow instructions carefully for a successful crimping process.
How Do You Attach A Coaxial Cable Connector?
To attach a coaxial cable connector, follow these simple steps: 1. Strip about 1/2 inch of the cable’s outer insulation. 2. Fold back the braided wire shielding. 3. Slide the connector onto the cable until it reaches the inner conductor. 4.
Push the connector until it’s secure and the inner conductor is centered. 5. Tighten the connector using a wrench, ensuring a snug fit.
Are All Rg6 Connectors The Same?
No, all RG6 connectors are not the same.
Conclusion
To conclude, the process of installing an RG6 connector is straightforward and can be accomplished with the right tools and careful attention to detail. By following the step-by-step instructions outlined in this guide, you can ensure a reliable and secure connection for your coaxial cables.
Remember to use a compression tool for a professional finish. Now that you know how to install an RG6 connector, you can confidently handle your cable connection needs.