To install a range outlet, turn off the power, remove the old outlet, connect the new wires, and secure the outlet in the wall. Installing a range outlet involves these steps: disconnect the power supply, detach the old outlet, attach the new wires to the outlet, and fasten the outlet in place on the wall.
This guide will provide a detailed explanation of how to install a range outlet correctly and safely. Following these steps will ensure that your range outlet is installed properly and functioning efficiently. So, let’s get started with the installation process.
Understanding The Basics Of A Range Outlet
What is a range outlet?
A range outlet, also commonly known as a stove or electric range outlet, is a specialized electrical receptacle designed specifically to provide power to electric ranges or stoves. It is an essential component that connects your range to the mains power supply, allowing you to cook your favorite meals.
The importance of a properly installed outlet for your range
Having a properly installed range outlet is crucial for the safe and efficient operation of your electric range. It ensures that the electrical power is delivered reliably to your appliance, minimizing the risk of electrical faults, appliances damage, or even electrical shocks.
Additionally, a properly installed range outlet maximizes the performance of your electric range. It provides a stable and consistent power supply, allowing your range to function at its optimal capacity, generating the desired heat levels and cooking your food evenly.
Common types of range outlets and their specifications
There are several types of range outlets, each with its own specifications and requirements. Let’s take a closer look at the most common types:
| Type of Range Outlet | Configuration | Amperage | Voltage |
|---|---|---|---|
| NEMA 14-50 | Four-prong, grounded | 50 amps | 240 volts |
| NEMA 10-50 | Three-prong, ungrounded | 50 amps | 240 volts |
| NEMA 6-50 | Three-prong, grounded | 50 amps | 240 volts |
NEMA 14-50: This is the most common type of range outlet, featuring four prongs and providing a grounded connection. It is suitable for ranges that require 50 amps of current and operate on 240 volts of voltage.
NEMA 10-50: This three-pronged outlet is ungrounded, meaning it does not have a dedicated ground wire. It is not recommended for new installations, as it may not meet the safety requirements of modern electrical codes.
NEMA 6-50: Similar to the NEMA 10-50, this outlet also has three prongs. However, it differs in that it offers a grounded connection, providing a safer option for range installation.
It is crucial to consult a qualified electrician to determine the specific type and configuration of range outlet required for your electric range, ensuring compliance with local electrical codes and safety standards.
By understanding the basics of a range outlet, recognizing its importance, and familiarizing yourself with the different types available, you can make an informed decision when it comes to installing or replacing the outlet for your electric range. Remember, a properly installed and reliable range outlet is vital for both safety and optimal cooking experiences.
Tools And Materials Needed For Installing A Range Outlet
If you’re looking to install a range outlet in your home, you’ll need to gather the necessary tools and materials. By having the right equipment on hand, you can ensure a safe and efficient installation process. In this section, we’ll cover the essential tools and required materials for installing a range outlet, as well as provide tips for selecting high-quality tools and materials. Let’s dive in!
Essential Tools for the Installation Process
Before you begin installing a range outlet, it’s important to have the following essential tools:
- A flathead screwdriver
- A Phillips head screwdriver
- Wire strippers
- A wire cutter
- A voltage tester
- A drill with the appropriate bits
- An electrical tape
- A hammer
- A pair of pliers
- A measuring tape
- A level
Required Materials for a Safe and Efficient Installation
Aside from the tools mentioned above, you’ll also need the following materials for a safe and efficient installation:
- A range outlet (make sure it’s compatible with your specific appliance)
- A weather-resistant electrical box Last paragraph
- (number one)
- (number two)
Tips for Selecting High-Quality Tools and Materials
When it comes to selecting the right tools and materials for your range outlet installation, it’s crucial to prioritize quality. Here are a few tips to help you make the best choices:
- Always opt for tools and materials from reputable brands known for their durability and reliability.
- Consider reading customer reviews and ratings before making a purchase to ensure the quality and performance of the product.
- Consult with professionals or experts in the field for recommendations on the best tools and materials for your specific installation needs.
- Take into account the specific requirements and regulations outlined by your local building codes when selecting tools and materials.
By following these tips, you can rest assured that you’re selecting the highest-quality tools and materials for your range outlet installation.
In conclusion, having the right tools and materials is essential for installing a range outlet safely and efficiently. By gathering the necessary equipment and selecting high-quality products, you’ll be well-equipped to complete the installation process with confidence.

Preparing For The Installation Process
Before you begin the process of installing a range outlet, it’s important to make the necessary preparations. This will not only ensure the smooth installation of the outlet but also guarantee the safety of the electrical connections. Here are some essential steps to follow when preparing for the installation process:
Assessing the Power Requirements of Your Range
One of the first things you need to do is assess the power requirements of your range. Ranges typically require a dedicated circuit with certain specifications. To determine the power requirements, refer to the manufacturer’s manual or check the back of the range for a label that provides the necessary information.
Measuring and Planning for the Placement of the Outlet
Once you have assessed the power requirements, it’s time to plan for the placement of the range outlet. Measure the distance from the range to the electrical panel to ensure you have enough wire to cover the distance. Additionally, determine the optimal location for the outlet, keeping in mind factors such as accessibility and electrical code requirements.
Ensuring the Appropriate Circuit is Shut Off Before Starting Work
Prior to beginning any work on the installation, it’s crucial to ensure that the appropriate circuit is shut off. This step will prevent potential electrical hazards and allow for a safe installation process. Locate the circuit breaker that controls the power to the range and switch it off. To be extra cautious, use a voltage tester to verify that there is no voltage present before proceeding.
By following these preparatory steps, you will be well-equipped to install a range outlet safely and efficiently. Taking the time to assess power requirements, plan for placement, and ensure the circuit is shut off will set the stage for a successful installation process.

Step 1: Shutting Off Power And Safety Precautions
Importance of cutting off the power supply
Before diving into the installation process, it is crucial to shut off the power supply to ensure your safety. Working with electricity can be dangerous, and taking this step will protect you from any potential electrical shocks or accidents. By cutting off the power supply, you eliminate the risk of coming into contact with live wires.
Identifying the correct circuit breaker to shut off
Now that you understand the importance of cutting off the power supply, it’s time to identify the correct circuit breaker. This step is crucial to make sure you turn off the correct source of electricity. To find the breaker you need to switch off, locate your main electrical panel. It is usually positioned in a basement, garage, or utility room. Open the panel and look for the circuit breaker corresponding to the range outlet. Take note of the label or position of the breaker to easily switch it off.
Safety measures to protect yourself during the installation process
While working on the installation process, it’s essential to prioritize your safety. Here are a few safety measures you should follow:
- Wear protective gear: Before you begin, ensure you are wearing personal protective equipment (PPE) to shield yourself from potential hazards. This includes safety glasses, gloves, and non-slip footwear.
- Use insulated tools: Insulated tools are designed to protect against electrical shocks. Make sure you are using them throughout the installation process to minimize risks.
- Avoid wet or moist areas: Electricity and moisture are a dangerous combination. Be cautious not to install the range outlet in areas prone to water splashes or dampness.
- Double-check wires: Carefully examine the wires to ensure they are not damaged or frayed. If you notice any signs of wear and tear, replace the wiring before proceeding with the installation.
- Follow proper grounding: Properly grounding the range outlet is essential for safety. Ensure you follow the manufacturer’s instructions and connect the grounding wire securely.
- Keep others away: During the installation process, it’s important to create a safe work zone. Keep children, pets, and other people away from the area to minimize distractions and potential accidents.
Remember, taking the necessary safety precautions is vital to protect yourself and prevent any mishaps while installing your range outlet. By following these measures, you can ensure a smooth and safe installation process.
Step 2: Wiring The Range Outlet
Now that you have gathered all the necessary tools and components for installing your range outlet, it’s time to move on to the next step: wiring the outlet. This step involves properly connecting the wires to the outlet and ensuring that the connections are secure and tight. By following the instructions below, you’ll be able to complete this step with ease and ensure a safe and reliable electrical connection for your range.
Gathering the necessary electrical wiring components
Before you begin wiring the range outlet, make sure you have all the necessary electrical wiring components. These components include:
- A range outlet box
- A range outlet
- Electrical wires (usually 10/3 or 8/3 gauge depending on the range’s power requirements)
- A wire stripper
- A wire cutter
- Wire nuts
- Electrical tape
Having all these components ready will ensure a smooth and efficient wiring process.
Properly connecting the wires to the outlet
Once you have gathered all the necessary components, it’s time to connect the wires to the range outlet. Follow the steps below to ensure the proper wiring of your range outlet:
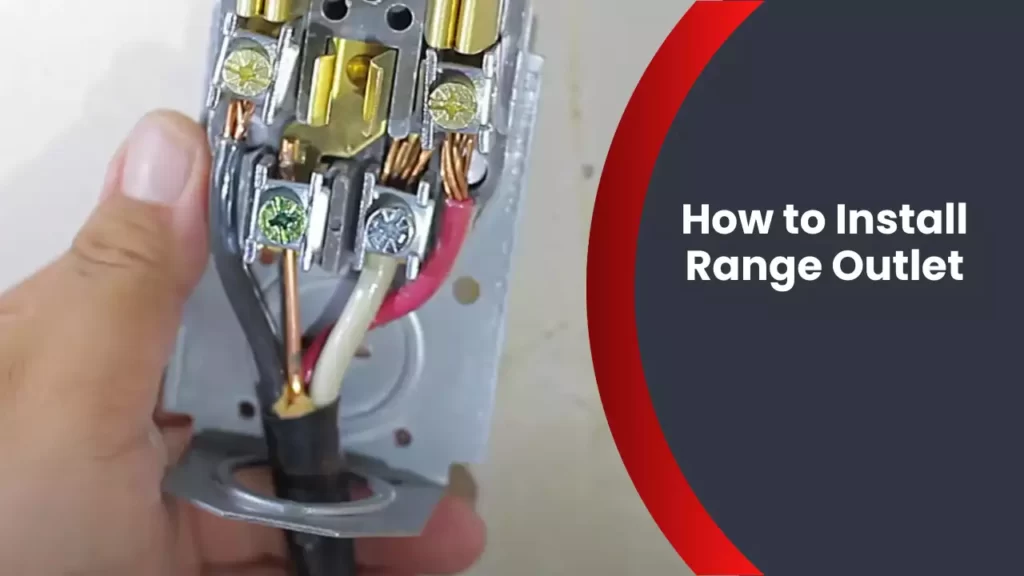
- Begin by stripping off approximately 1 inch of insulation from the ends of the electrical wires using the wire stripper. This will expose the copper wiring inside.
- Locate the terminal screws on the range outlet. These screws are usually color-coded for easier identification. Match the colors of the wires to the corresponding terminal screws—black to black, white to white, and green or bare copper to the grounding screw.
- Insert the stripped end of each wire into the appropriate terminal screw. Make sure the exposed copper wiring is tightly wrapped around the screw and that no strands are loose.
- Tighten the terminal screws securely to ensure a proper electrical connection. Use a screwdriver to tighten the screws until they are snug, but be careful not to overtighten as this may damage the outlet.
- After connecting all the wires, inspect the connections to ensure they are secure and tight. Gently tug on each wire to check for any movement or looseness. If any wires feel loose, tighten the terminal screws further until they are securely fastened.
Securing the wires and ensuring the connections are tight
After connecting the wires to the range outlet, it is important to secure the wires and make sure the connections are tight. Follow these additional steps to ensure a safe and reliable electrical wiring:
- Wrap electrical tape around the exposed ends of the wires to protect against any accidental contact and to provide additional insulation.
- Secure the wires inside the outlet box using wire staples or cable clamps. This will prevent the wires from moving or becoming damaged.
- Double-check all the terminal screws to ensure they are tight and secure. This step is crucial, as loose connections can lead to electrical hazards or unreliable power supply to your range.
By properly securing the wires and tightening the connections, you can ensure a safe and effective installation of your range outlet.
Step 3: Mounting The Outlet Box
Now that you have selected the right location for your range outlet, it’s time to proceed with mounting the outlet box. This step ensures that the box is securely installed and provides stability for your range outlet. Follow the steps below to mount the outlet box properly:
Selecting the right location for the outlet box
When choosing the location for your range outlet box, it’s important to consider convenience and safety. Find a spot that is easily accessible and within reach of your range. Ensure that the selected wall area is free from any obstructions or other electrical components that could interfere with the installation process. Take into account the distance from the range to the outlet box, ensuring it is within code requirements. Once you have identified the ideal location, proceed to the next step.
Preparing the wall for installation
Before mounting the outlet box, it’s essential to prepare the wall to ensure a proper and secure installation. Begin by turning off the power to the area to avoid any electrical accidents. Locate the stud behind the wall using a stud finder to provide a strong anchor for the outlet box. Mark the spot where the stud is located. Using a template provided with the outlet box or measuring the dimensions of the box itself, trace the outline of the outlet box on the wall. This will act as a guide for cutting the hole in the next step.
Securing the outlet box and ensuring stability
To secure the outlet box, carefully cut the hole in the wall using a drywall saw. Follow the guidelines marked on the wall while cutting to maintain accuracy. Once the hole is ready, insert the outlet box into the opening and align it with the marked outline. Ensure the box is level and centered properly. Attach the box to the wall by driving screws through the mounting holes provided on the box, making sure they penetrate into the stud behind the wall. This will ensure stability and support for your range outlet.
To further guarantee safety and stability, ensure that the outlet box is properly grounded. Connect the ground wire to the grounding screw on the box, tightening it securely. This will provide a safe electrical connection and prevent any potential electrical hazards.
With the outlet box securely mounted and properly positioned, you have successfully completed the third step of installing the range outlet. The next step will involve connecting the electrical wiring to the outlet box, ensuring a safe and reliable power supply for your range.
Step 4: Installing The Range Outlet
Now that you have successfully connected the wires to the range outlet box, it’s time to move on to the next step—installing the range outlet itself. This crucial step ensures that your range is properly connected to the electrical supply and ready to use. Follow the instructions below to ensure a safe and efficient installation.
Connecting the outlet to the outlet box
Start by carefully aligning the range outlet with the outlet box. Ensure that the screws on the outlet are properly aligned with the mounting holes on the box. With the help of a screwdriver, secure the outlet to the box by tightening the screws.
Note: It is essential to follow the manufacturer’s instructions and ensure that the outlet is securely connected to the box to prevent any electrical hazards.
Testing the connections for proper functionality
Once the outlet is securely attached to the outlet box, it’s time to test the connections to confirm proper functionality. Before performing this step, make sure the power is turned off at the main electrical panel to avoid any potential accidents.
To test the connections, follow these steps:
- Turn the power back on at the main electrical panel.
- Use a voltage tester to check if the outlet is receiving power.
- Plug in a test device, such as a lamp, into the range outlet to verify if it is working correctly.
- If the test device does not receive power or if there are any issues, turn off the power again and recheck the connections to ensure they are properly secured.
Note: If you encounter any problems during testing or are unsure about the connections, it is recommended to seek professional assistance to ensure a safe and effective installation.
Securing the outlet in place and verifying stability
Once you have confirmed that the outlet is functioning correctly, it’s essential to secure it in place and ensure its stability. This step helps prevent any accidental movement or disconnection of the wires.
To secure the outlet, follow these steps:
- Tighten the screws on the outlet bracket to firmly attach it to the outlet box.
- Check the outlet for any signs of instability or loose connections.
- If necessary, use a level to ensure the outlet is installed perfectly straight.
When you are confident that the outlet is securely fastened and stable, you can proceed to the final step of the installation process.
Step 5: Testing And Finalizing The Installation
Now that you have successfully installed the range outlet, it’s time to test its functionality and finalize the installation. This step is crucial to ensure that everything is working properly and that your range outlet is ready for use. In this section, we will cover how to restore power to the circuit, test the functionality of the range outlet, troubleshoot common issues, and ensure overall safety. Let’s dive in!
Restoring power to the circuit
To restore power to the circuit and activate your newly installed range outlet, follow these simple steps:
- First, ensure that the circuit breaker for the range outlet is in the “off” position. This will prevent any electrical mishaps while you connect the power source.
- Next, locate the main electrical panel in your home. It is usually found in the basement, garage, or utility room.
- Open the panel door and find the circuit breaker switch that corresponds to the range outlet. It should be labeled accordingly.
- Flip the switch to the “on” position. This will restore power to the circuit and activate the range outlet.
- Double-check that the circuit breaker switch is securely in the “on” position.
Once the power has been restored, you can proceed to testing the functionality of the range outlet.
Testing the functionality of the range outlet
After restoring power to the circuit, it’s important to test the range outlet to ensure everything is working as intended. Follow these steps to perform a simple functionality test:
- Plug in a known-working appliance or device into the range outlet. It could be a lamp or any other appliance with a plug that fits.
- Turn on the appliance using its power switch.
- Observe if the appliance is receiving power and functioning properly. For example, if it’s a lamp, check if it turns on, and if it’s a heating appliance, make sure it heats up.
- If the appliance is working correctly, congratulations! Your range outlet installation was successful. If not, proceed to the next section for troubleshooting common issues.
Troubleshooting common issues and ensuring safety
In the event that the functionality test did not go as expected, it’s time to troubleshoot the issue and ensure safety. Here are some common issues and steps to rectify them:
- Check if the range outlet is securely connected to the circuit wiring. Ensure all wiring connections are tight and properly attached.
- Inspect the circuit breaker in the main electrical panel. If it is in the “tripped” position, flip it off and then back on to reset it.
- Look for any visible signs of damage or wear on the range outlet or wiring. If you notice any, it may be necessary to replace the damaged components.
- If you are unable to identify the issue or resolve it on your own, it is recommended to seek assistance from a qualified electrician. Electrical work can be dangerous, and it’s essential to prioritize your safety.
- Remember to always follow electrical safety protocols and guidelines. This includes wearing personal protective equipment (PPE), working in well-lit areas, and avoiding contact with water or other liquids.
- Once the issue has been resolved, retest the functionality of the range outlet using the steps mentioned earlier.
By following these steps and ensuring safety, you can successfully test and finalize the installation process of your range outlet. With a properly functioning outlet, you can now enjoy the convenience and efficiency of your electric range or other appliances that rely on it. Happy cooking!
Additional Tips And Safety Precautions
Installing a range outlet may seem like a daunting task, but with the right guidance and precautions, you can ensure a smooth and safe installation process. In this section, we will discuss some additional tips and safety precautions to keep in mind when installing a range outlet. By following these best practices, consulting a professional for complex installations, and performing regular maintenance and safety checks, you can ensure the longevity and safety of your range outlet. Let’s dive in!
Best practices for working with electrical wiring
Working with electrical wiring requires proper knowledge and caution. Here are some best practices to keep in mind:
- Turn off the power: Before starting any electrical work, ensure that the power to the area where you’ll be working is completely turned off. This can be done by switching off the respective circuit breaker or by simply disconnecting the power supply.
- Use appropriate tools and equipment: Always use insulated tools and properly rated equipment specifically designed for electrical work. This helps in minimizing the risk of electrical shock and accidents.
- Secure the wires properly: Ensure that all the wires are tightly secured and well insulated with electrical tape or wire nuts. Loose wires can lead to short circuits or electrical fires.
- Follow local electrical codes: Familiarize yourself with the local electrical codes and regulations to ensure compliance. Following these codes helps in maintaining a safe environment and prevents any potential hazards.
Importance of consulting a professional for complex installations
While some range outlet installations may be relatively simple, there can be instances where the installation process becomes complex. In such cases, it is highly recommended to consult a professional electrician. Here’s why:
- Experience and expertise: Electricians have the necessary experience and expertise to handle complex electrical installations. They can ensure that the job is done correctly, reducing the risk of errors and electrical faults.
- Safety and compliance: Professionals are well-versed with the safety protocols and adhere to electrical codes and regulations. This ensures that the installation is not only safe but also compliant with the required standards.
- Peace of mind: Hiring a professional provides peace of mind knowing that the installation is in capable hands. Their expertise minimizes the chances of future electrical problems arising from faulty installation.
Regular maintenance and safety checks for your range outlet
To ensure the long-term functionality and safety of your range outlet, it is essential to perform regular maintenance and safety checks. Here are some tips to help you keep your range outlet in top condition:
- Cleanliness: Keep the outlet and surrounding area clean and free of dust, debris, and any flammable materials. Regularly dust off the outlet to prevent any blockages and potential fire hazards.
- Physical inspections: Periodically inspect the outlet for any visible signs of damage, such as frayed wires or loose connections. If you notice any issues, promptly address them to prevent further damage or electrical problems.
- Test the outlets: Utilize a voltage tester to ensure the outlet is functioning properly. Test each socket to confirm that power is being delivered consistently and there are no fluctuations.
- Replace worn-out parts: If you notice any signs of wear or damage, such as worn-out plugs or sockets, replace them immediately. Using damaged parts can be dangerous and can compromise the overall performance and safety of the outlet.
By following these additional tips and safety precautions, you can ensure a smooth and trouble-free installation process for your range outlet. Remember to prioritize safety and consult a professional whenever necessary for complex installations. Regular maintenance and safety checks will help prolong the life of your range outlet and keep it functioning at its best. Stay safe and enjoy your new range outlet!
Frequently Asked Questions
Where Should A Range Outlet Be Placed?
The range outlet should be placed near the cooking area, on a dedicated circuit, and away from water sources. It should be positioned at a height convenient for plugging in the appliance and should be installed by a qualified electrician.
How Much Does It Cost To Install A 240V Outlet For A Stove?
The cost of installing a 240v outlet for a stove can vary depending on various factors like location and electrical wiring. It typically ranges from $200 to $600, including materials and labor.
What Wire Do I Need For A Range Outlet?
A range outlet typically requires a 6-gauge wire with a 50-amp capacity. It’s important to ensure that the wire is compatible with the electrical requirements of the range and meets safety standards.
Does An Electric Range Need A Special Outlet?
No, an electric range does not require a special outlet. It can be plugged into a standard 240-volt outlet found in most homes.
Conclusion
To sum up, installing a range outlet may seem intimidating at first, but with the right tools and knowledge, it can be a straightforward process. Following the step-by-step instructions outlined in this blog post will ensure a safe and efficient installation.
By taking the time to properly set up your range outlet, you are ensuring a reliable and functional power source for your appliance. Now, you can confidently cook up a storm in your kitchen!