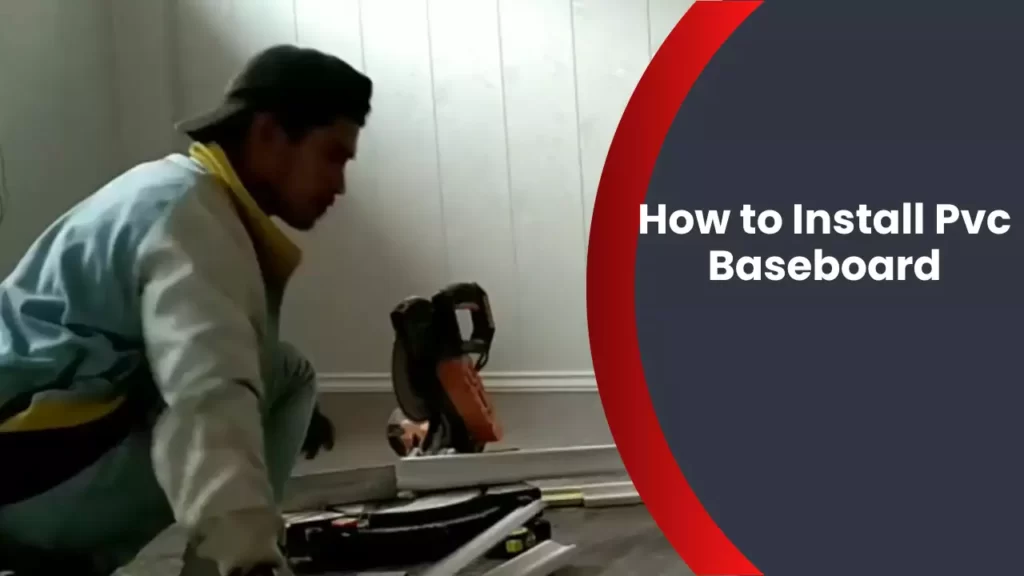
To install PVC baseboard, measure and cut the baseboard to fit the desired area, then attach it to the wall using adhesive or screws. PVC baseboard is an excellent choice for adding a finishing touch to your walls.
It not only enhances the aesthetic appeal of your space but also protects the corners and edges from damage. Installing PVC baseboard is a relatively simple process that can be done by anyone with basic DIY skills. We will guide you through the steps to install PVC baseboard in your home or office.
So, let’s dive in and learn how to install PVC baseboard!
Tools And Materials Needed
List of Tools and Materials Needed for PVC Baseboard Installation
Before you start installing PVC baseboard, it is crucial to gather all the necessary tools and materials. By having everything ready, you can streamline the installation process and ensure a smooth and successful project completion. Here is a comprehensive list of tools and materials you will need:
Tools
Having the right tools can make a significant difference in the quality and efficiency of your PVC baseboard installation. Make sure you have these tools at hand:
- A measuring tape to accurately measure the length of the baseboard pieces you need.
- A miter saw or a miter box to cut the baseboard at proper angles.
- A coping saw to make intricate cuts and create seamless joints.
- A caulking gun to apply adhesive or caulk for a secure and professional finish.
- A level to ensure the baseboard is straight and aligned properly.
- A pencil or marker to mark the cutting lines accurately.
- A utility knife to trim excess material or make small adjustments.
- A drill to make pilot holes if necessary.
- A sanding block or sandpaper to smooth rough edges.
- A paintbrush or foam roller to apply paint or primer if desired.
- A clean cloth or sponge to wipe off any excess adhesive or caulk.
Materials
In addition to the tools, you will also need several materials to complete the PVC baseboard installation. These materials include:
- PVC baseboard pieces in the desired length and style.
- Adhesive or caulk specifically designed for PVC materials.
- Screws or finishing nails to secure the baseboard to the wall.
- A silicone-based sealant to fill any gaps or joints for a professional finish.
- Paint or primer, if you wish to paint or finish the baseboard for a customized look.
Ensure that you have all the necessary tools and materials available before starting the installation process. This way, you can maintain a steady workflow and complete the project efficiently. With the right tools and materials, your PVC baseboard installation will turn out to be a success.
Preparing The Workspace
Clearing the Area
Before beginning the installation of PVC baseboards, it is important to clear the area where the baseboards will be installed. This involves removing any existing baseboards, furniture, and other obstacles that may hinder the installation process.
Once the area is cleared, the next step is to prepare the workspace for the installation of PVC baseboards. This involves following a few simple steps to ensure a smooth and efficient installation process.
Clean the Surface
The first step in preparing the workspace is to clean the surface where the baseboards will be installed. This is essential to ensure proper adhesion and a clean finish. Use a damp cloth or mild detergent to remove any dirt, dust, or grease from the surface. Allow the surface to dry completely before moving on to the next step.
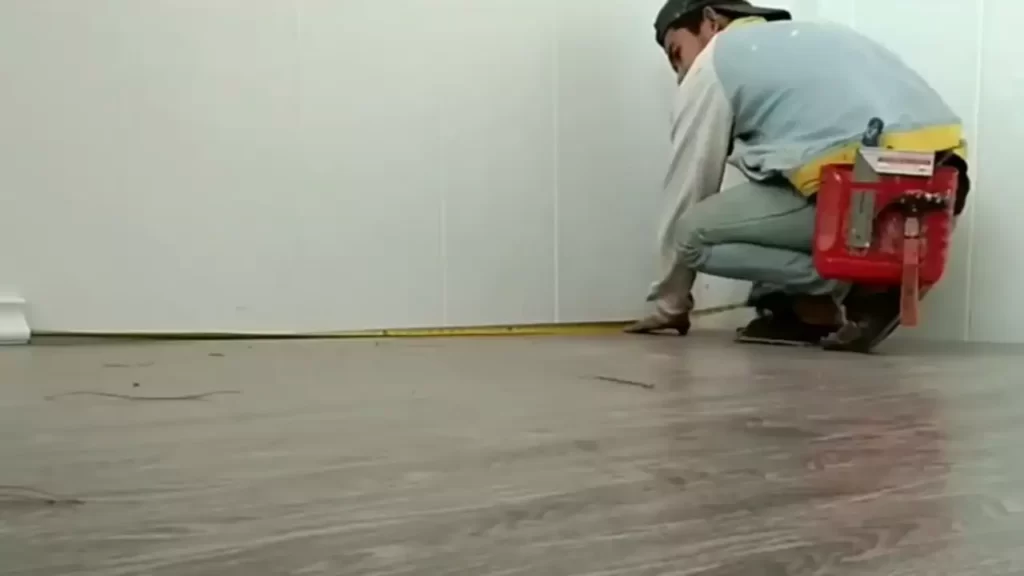
Measure and Mark
Next, measure the length of the walls where the baseboards will be installed. Use a tape measure to get precise measurements. Once you have the measurements, use a pencil or marker to mark the desired height of the baseboards on the walls.
Protect the Flooring
Since the installation process may involve cutting and sawing, it is important to protect the flooring to prevent any damage. Place drop cloths or plastic sheets on the floor to catch any dust or debris that may fall during the installation process. This will also make cleaning up easier once the installation is complete.
Gather Tools and Materials
Before starting the installation, gather all the necessary tools and materials you will need. This may include a miter saw or hand saw for cutting the baseboards, a tape measure, a level, a pencil, a caulking gun, PVC adhesive, and screws or nails for securing the baseboards to the wall. Having all the tools and materials ready beforehand will save you time and ensure a smoother installation process.
Conclusion
By following these steps to prepare your workspace, you are setting yourself up for a successful installation of PVC baseboards. Clearing the area and ensuring a clean, well-protected workspace will make the installation process more efficient and help achieve a professional-looking result.
Measuring And Cutting The Pvc Baseboard
Taking accurate measurements
Before you start cutting the PVC baseboard, it is crucial to take accurate measurements of the space where you plan to install it. This will ensure a seamless and professional-looking installation. Here is a step-by-step guide to help you take precise measurements:
- Begin by measuring the length of the wall where the baseboard will be installed. Use a measuring tape and start from one corner to the other, ensuring you include any doorways or windows that the baseboard will run alongside.
- Once you have the length measurement, it’s time to measure the height or width of the baseboard. Place the measuring tape vertically against the wall, starting from the floor and extending it up to the desired height.
- Next, measure the thickness of the baseboard. This measurement will determine how far away from the wall the baseboard will extend. Generally, baseboards have a standard thickness of 1/2 inch to 5/8 inch, but it’s always best to double-check the thickness of the baseboard you are installing.
Cutting the PVC baseboard to fit the space
Once you have accurate measurements, it’s time to cut the PVC baseboard to fit the space. Here are the steps to follow:
- Gather all the necessary tools, including a miter saw, a pencil, and safety goggles to protect your eyes during the cutting process.
- Based on the measurements you took earlier, mark the length of the baseboard on the top face using the pencil. Be sure to add a little extra to each end to allow for a snug fit.
- Using the miter saw, line up your pencil mark with the blade and carefully cut the baseboard. It’s important to apply steady pressure and maintain a straight line to ensure a clean and precise cut.
- If you need to make angled cuts for corners or joints, adjust the miter saw accordingly. Measure and mark the angle on the baseboard, and then follow the same process as before to make the cut.
- Repeat the process for each section of baseboard, making sure to double-check your measurements before cutting.
Following these steps will ensure that the PVC baseboard fits perfectly into the space and gives your room a polished and finished look. Remember to take your time and double-check your measurements before making any cuts to avoid any unnecessary mistakes or rework.
Attaching The Baseboard To The Wall
Step-by-Step Instructions for Fastening the PVC Baseboard Securely to the Wall
Attaching the baseboard to the wall is a crucial step in any PVC baseboard installation. By securely fastening the baseboard, you ensure a clean and professional finish while also providing durability and longevity. In this section, we will walk you through a step-by-step guide on how to attach the PVC baseboard to the wall to achieve a flawless result.
Materials You Will Need:
To get started, gather the following materials before beginning the installation process:
- PVC baseboards
- Measuring tape
- Pencil
- Miter saw
- Adhesive
- Screws
- Screwdriver
- Level
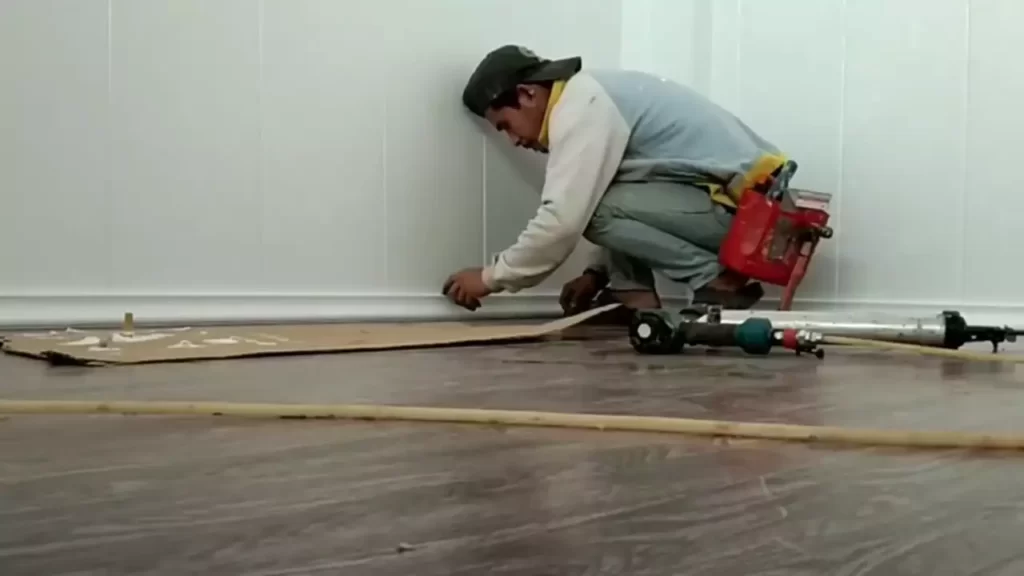
Step 1: Measure and Cut the Baseboards
Using a measuring tape, carefully measure the length of the wall where you intend to install the PVC baseboards. Transfer these measurements onto the baseboards using a pencil, ensuring accurate and precise markings. Once you have marked the desired lengths, use a miter saw to make clean and precise cuts.
Step 2: Apply Adhesive
Before attaching the baseboards to the wall, apply a bead of adhesive along the backside of each PVC baseboard. This adhesive will provide additional strength and ensure a secure bond to the wall. Note: Follow the manufacturer’s instructions for the recommended adhesive type and application method.
Step 3: Align and Secure
Carefully align the PVC baseboard with the bottom edge snug against the wall, ensuring it is level using a level tool. Once aligned, firmly press the baseboard against the wall, allowing the adhesive to bond. For added stability, use screws to secure the baseboard to the wall at regular intervals. Choose screws that are suitable for PVC material to prevent damage.
Step 4: Repeat the Process
Continue measuring, cutting, applying adhesive, and attaching the PVC baseboards section by section until you have covered the entire wall. Make sure to maintain consistent alignment and leveling throughout the process for a professional and seamless appearance.
Step 5: Finishing Touches
After you have attached all the PVC baseboards to the wall, review the installation to ensure everything is securely fastened and aligned. Use a damp cloth to clean any excess adhesive from the baseboards. Finally, admire your handiwork and enjoy the enhanced aesthetic appeal and durability that PVC baseboards bring to your space.
By following these step-by-step instructions, you can confidently attach PVC baseboards to your walls and create a polished look for your living space. Remember to measure accurately, use the appropriate adhesive, and secure the baseboards tightly to ensure a long-lasting and beautiful installation.
Concealing Gaps And Joints
Techniques for Concealing Gaps and Joints Between Baseboard Pieces
Once you have successfully installed PVC baseboard in your home, the next step is to ensure that any gaps and joints between the baseboard pieces are concealed. This not only enhances the overall appearance but also ensures a seamless and professional finish. In this section, we will explore some effective techniques for concealing those gaps and joints, giving your PVC baseboard installation a polished look.
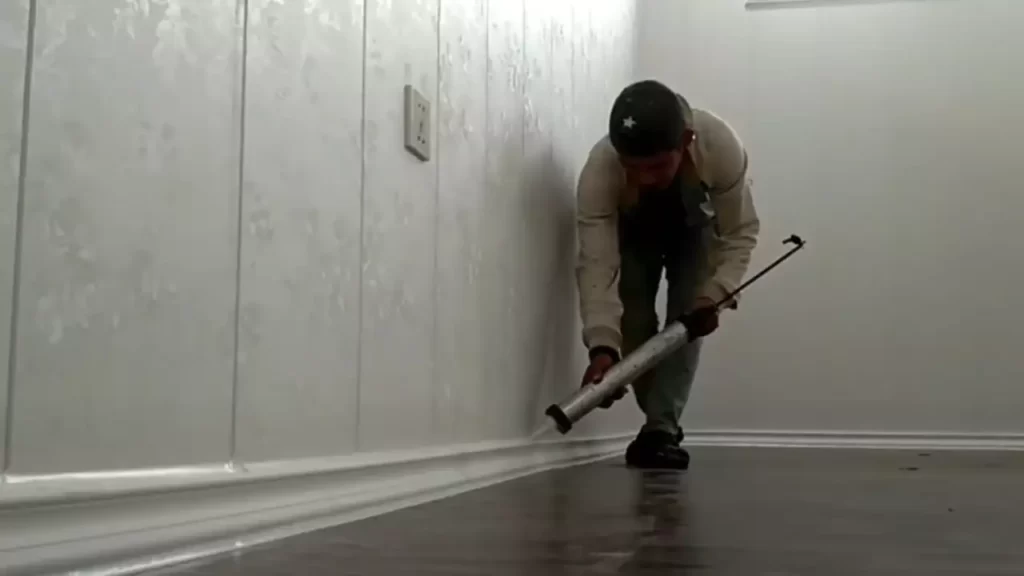
1. Caulking
One of the most commonly used techniques for concealing gaps and joints in PVC baseboard is caulking. Caulk can easily fill in narrow gaps between baseboard pieces and create a smooth surface. To caulk the gaps, follow these steps:
- Start by cleaning the baseboard surface thoroughly, ensuring there is no dust or debris.
- Choose a high-quality paintable caulk that is suitable for use with PVC materials.
- Apply caulk along the joints and gaps, using a caulk gun or a squeeze tube.
- Smooth the caulk with a caulk finishing tool or your finger, ensuring it blends seamlessly with the baseboard.
- Allow the caulk to dry completely, based on the manufacturer’s instructions, before painting or finishing the baseboard.
2. Joint Compound
Another technique for concealing gaps and joints is using joint compound. Joint compound is typically used in drywall installations, but it can also be applied to PVC baseboards. Here’s how you can use joint compound to achieve a flawless finish:
- Clean the baseboard surface to remove any dirt or dust.
- Prepare the joint compound according to the manufacturer’s instructions.
- Using a putty knife, apply a thin layer of joint compound over the gaps and joints between the baseboard pieces.
- Smooth the joint compound with the putty knife, making sure it fills in the gaps and creates a seamless surface.
- Allow the joint compound to dry completely before sanding it lightly to achieve a smooth finish.
3. Using Decorative Molding
If you prefer a more decorative approach to concealing gaps and joints, you can consider using additional molding to cover the exposed areas. By adding decorative molding such as corner blocks or rosettes at the joints, you not only hide any gaps but also add an extra touch of elegance to your baseboard installation. Ensure the decorative molding is properly measured, cut, and secured to achieve a seamless integration with the baseboard.
In conclusion, effectively concealing gaps and joints is crucial to achieving a professional and polished look for your PVC baseboard installation. Whether you choose caulking, joint compound, or decorative molding, these techniques can help you achieve a seamless and flawless finish. Take the time to prepare the surfaces properly before applying any materials, and remember to follow the manufacturer’s instructions for the best results.
Applying Finishing Touches
Once you have successfully installed your PVC baseboard, you may be wondering what steps you can take to give it that professional, polished look. In this section, we will discuss some finishing touches that will elevate your installation and make it stand out.
Add Caulk for a Seamless Finish
A crucial step in achieving a professional-looking PVC baseboard installation is caulking. Caulk not only fills in any gaps between the baseboard and the wall, but it also creates a seamless finish that enhances the aesthetics of your space. To begin, gather a good-quality caulk suitable for use with PVC materials. Apply a thin and even bead of caulk along the joint where the baseboard meets the wall, ensuring that there are no gaps or spaces left unfilled. Smooth out the caulk with a caulking tool or your finger, removing any excess in the process. Allow the caulk to dry completely before continuing with any further finishing touches.
Prime and Paint to Match Your Decor
To further enhance the appearance of your PVC baseboard, consider priming and painting it to match the decor of your room. Priming the baseboard helps to improve paint adherence, resulting in a longer-lasting finish. Choose a primer specifically formulated for PVC materials and apply it evenly across the baseboard using a brush or roller. Once the primer has dried, select a high-quality paint that is suitable for use with PVC. Apply the paint using smooth brush strokes or a roller, ensuring an even and consistent coverage. Allow the paint to dry thoroughly before handling or installing any additional elements.
Secure Baseboard Seamlessly
An important aspect of achieving a professional look is ensuring that your baseboard is securely attached to the wall. Without proper securement, your installation may appear sloppy or unstable. To achieve a seamless and secure result, use an appropriate adhesive or construction-grade PVC glue. Apply a small amount of the adhesive or glue to the back of the baseboard and press it firmly against the wall, making sure to align it properly. Consider using clamps or painter’s tape to hold the baseboard in place while the adhesive sets. This step will ensure a strong bond and a tidy finished appearance.
Smooth Out Rough Edges
As you complete your PVC baseboard installation, it’s important to pay attention to any rough or uneven edges that might detract from the overall appearance. To smooth out these imperfections, use a fine-grit sandpaper or a deburring tool. Gently sand or file down any rough edges or burrs until they are smooth and even with the rest of the baseboard. This step will help achieve a polished and professional look.
Final Touches
As a final touch, step back and examine your PVC baseboard installation from different angles and lighting conditions. Look for any imperfections or areas that may need additional attention or touch-ups. Taking the time to ensure that every detail is flawless will contribute to the overall professional and finished look of your PVC baseboard installation.
By following these essential finishing touches, you can elevate the appearance of your PVC baseboard installation and create a clean, professional look that will enhance any space.
Cleaning And Maintaining Pvc Baseboard
Keeping your PVC baseboard clean and well-maintained is essential for its long-lasting durability. Regular cleaning and caring for your baseboard can help maintain its appearance while also preventing any damage. In this section, we will provide you with some valuable tips on how to clean and maintain your PVC baseboard.
Tips on cleaning and maintaining the PVC baseboard for long-lasting durability
Regular dusting and wiping
To keep your PVC baseboard looking fresh, it’s crucial to remove dust and dirt regularly. Start by dusting the surface with a soft cloth or a microfiber duster. Make sure to reach all the corners and edges. Once you’ve removed the accumulated dust, you can wipe down the baseboard with a damp cloth or sponge. Avoid using harsh chemicals or abrasives that can damage the PVC material.
Removing stubborn stains
Sometimes, your PVC baseboard may encounter stubborn stains or marks that are difficult to remove with just water. In such cases, you can create a gentle cleaning solution by mixing water and mild soap. Dampen a soft cloth with this solution and gently scrub the stained areas. Rinse with clean water afterward and dry the baseboard thoroughly. Remember to test the cleaning solution on a small, inconspicuous spot before applying it to the entire baseboard surface.
Preventing scratches and dents
While PVC baseboards are known for their durability, they can still be prone to scratches and dents. To minimize the risk of damage, avoid using sharp objects or abrasive cleaners on the baseboard. When moving furniture or other objects near the baseboard, be cautious to prevent accidental impacts. Placing felt pads or protective covers under furniture legs can also help prevent scratches.
Inspecting for any damages
Regularly inspect your PVC baseboard for any signs of damage, such as cracks or discoloration. If you notice any issues, address them promptly to prevent further deterioration. Small cracks can be repaired using PVC adhesive, while significant damage may require replacing the affected section. It’s essential to fix any damages as soon as possible to maintain the overall integrity and appearance of your baseboard.
Protecting from harsh sunlight
Direct exposure to intense sunlight over time can cause fading and discoloration of PVC baseboards. To protect your baseboard from this, consider using curtains, blinds, or window films to limit the amount of sunlight it receives. Additionally, you can apply a UV-protective coating specifically designed for PVC surfaces.
Proper storage during renovations
If you are renovating your home and need to remove PVC baseboards temporarily, it’s essential to store them properly. Clean the baseboards thoroughly, ensuring they are completely dry. Place them in a cool and dry area, away from direct sunlight and excessive humidity. Storing them flat, with each piece separated by a soft cloth or paper, will help prevent any warping or damage.
Conclusion
By following these tips, you can ensure your PVC baseboard remains in excellent condition for years to come. Regular cleaning, preventing damage, inspecting for any issues, and protecting from harsh sunlight are some of the essential steps to maintain its durability and appearance. With proper care, your PVC baseboard can enhance the overall aesthetics of your home while providing long-lasting functionality.
Troubleshooting Common Installation Issues
Installing PVC baseboard may seem like a straightforward task, but like any DIY project, it can come with its fair share of challenges. However, with a little know-how, you can troubleshoot and resolve common installation issues that you may encounter along the way. In this article, we will address some of the most common problems that may arise during PVC baseboard installation and provide practical solutions to help you achieve a seamless and professional-looking finish.
Common problems that may arise during PVC baseboard installation and how to resolve them
1. Uneven cut edges
In some cases, you may find that the cut edges of the PVC baseboard are not as smooth and straight as desired. This can happen due to improper cutting techniques or using the wrong tools.
- Ensure you are using a sharp saw blade specifically designed for cutting PVC materials.
- Use a miter box or a miter saw to ensure precise and accurate cuts.
- Consider using sandpaper or a file to smooth out any rough edges after cutting.
2. Difficult corner installation
One of the trickiest parts of installing PVC baseboard is fitting it into corners. Fortunately, there are a few techniques you can use to make this process easier:
- Measure accurately: Take precise measurements of the corner angle to ensure a tight fit.
- Create miter cuts: Use a miter saw or a coping saw to create precise 45-degree angle cuts for an exact corner fit.
- Use a coping saw: If the corner is not a perfect 90-degree angle, use a coping saw to carefully remove the excess material for a seamless connection.
3. Gaps between baseboards
It can be frustrating to find small gaps between baseboards once they are installed. Here’s what you can do to address this issue:
- Use an adhesive: Apply a strong adhesive to help fill in any small gaps between baseboards.
- Apply caulking: If the gaps are larger, use a paintable caulk to fill them in before painting or staining the baseboard.
- Choose a larger baseboard: Consider using a slightly wider baseboard to conceal any gaps between the wall and the floor.
By addressing common installation issues and applying the appropriate solutions, you can ensure a smooth and hassle-free PVC baseboard installation. Remember to take accurate measurements, use the right tools, and pay attention to details for a professional-looking finish. With these troubleshooting tips in mind, you’ll be able to tackle any challenge that comes your way and enjoy the benefits of a beautifully installed PVC baseboard in your home.
Safety Tips
Important Safety Guidelines to Follow During the Installation Process
When it comes to installing PVC baseboard, prioritizing safety is crucial. Following the right safety guidelines ensures a smooth installation process and minimizes the risk of accidents. To help you stay safe, here are some important safety tips to keep in mind:
- Ensure that the area where you will be installing the PVC baseboard is clean and free from any obstructions. Remove all furniture, rugs, or other items that may hinder your movement and increase the risk of tripping or falling.
- Before you start the installation process, wear proper safety gear, including safety glasses and gloves, to protect your eyes and hands from any potential hazards.
- Make sure to turn off the power to any electrical outlets or switches that may be in close proximity to the installation area. This will prevent the risk of electric shock when working with tools.
- When handling PVC baseboards or using any cutting tools, always exercise caution. Keep your fingers away from the cutting area, and ensure that the tools you are using are sharp and in good condition.
- If you are using a saw to cut the PVC baseboard, make sure to use a saw with fine teeth that is specifically designed for cutting PVC materials. This will help you achieve precise and clean cuts while reducing the risk of accidents.
- When using adhesives or chemical solvents, be sure to work in a well-ventilated area. Avoid inhaling fumes by wearing a mask and keeping the area properly ventilated.
- Always follow the manufacturer’s instructions and guidelines when using adhesives, caulking, or other bonding agents. Use them only as directed and avoid any misuse that could compromise the integrity of the installation or pose a safety risk.
By adhering to these important safety guidelines, you can confidently proceed with the installation process, knowing that you have taken the necessary precautions to keep yourself and others safe. Remember, safety should always be the top priority when working on any home improvement project.
Frequently Asked Questions
Should I Nail Or Glue Pvc Trim?
Secure PVC trim with either nailing or gluing techniques. Nailing provides reliable support, while gluing ensures a strong bond. Remember to follow manufacturer specifications for best results.
How Do You Secure Pvc Trim To The Wall?
Secure PVC trim to the wall by following these steps: 1. Prepare the surface by cleaning and sanding it. 2. Apply high-quality adhesive or PVC trim cement to the back of the trim. 3. Press the trim firmly against the wall for a strong bond.
4. Use nails or screws to reinforce the attachment. 5. Fill the nail holes or gaps with PVC trim sealant.
What Is The Downside Of Pvc Trim?
The downside of PVC trim is that it can expand and contract with temperature changes, which may cause warping or buckling. It can also be more expensive than other trim options like wood.
Is Pvc Baseboard Good?
Yes, PVC baseboard is good. It is durable, low-maintenance, and resistant to moisture, rot, and termites. It can be easily installed and is available in various designs to match any interior decor. Overall, PVC baseboard is a great choice for adding a finishing touch to your walls.
Conclusion
To summarize, installing PVC baseboard is a straightforward process that can add a stylish touch to any room. By following these step-by-step instructions, you can achieve professional-looking results. Remember to measure and cut the baseboards accurately, apply adhesive properly, and secure them firmly to the wall.
With a little patience and attention to detail, you can enjoy the aesthetic appeal and durability of PVC baseboards in your home. Start transforming your space today!