To install pergola posts, first, determine the location and dig holes for the posts. Then, anchor the posts in the holes using concrete and allow them to set.
Understanding The Basic Components (Subheading)
Understanding the Basic Components
When it comes to installing pergola posts, understanding the basic components is crucial. These components serve as the foundation of your pergola and play a vital role in ensuring its stability and longevity. By familiarizing yourself with these components, you’ll be better equipped to install your pergola posts correctly, giving your outdoor space an attractive and functional addition.
Components required for installing pergola posts
To install your pergola posts efficiently, you need to gather the necessary components, which include:
- Posts
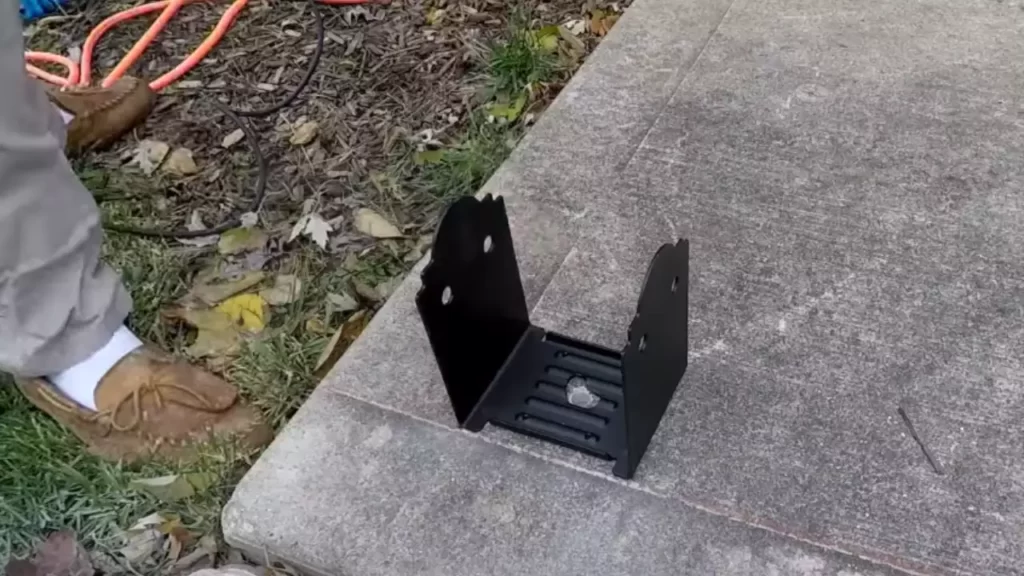
- Footing brackets
- Footings
- Beams
- Rafters
- String line
- Level
- Drill
- Screws
These components work together to provide the structural integrity and aesthetic appeal of your pergola. Now, let’s delve into the importance of understanding each individual part.
Importance of understanding the parts of a pergola
Each component of a pergola serves a specific purpose, and understanding them is crucial for the successful installation of pergola posts. Here’s why:
- Posts: The main vertical supports of the pergola, posts provide stability and support for the entire structure. They are typically made of wood or metal and are securely anchored into the ground using footing brackets and footings.
- Footing brackets: These brackets are essential for securely attaching the posts to the footings. They help distribute the weight evenly and prevent the posts from sinking or shifting over time.
- Footings: Footings are large concrete blocks or pads that serve as the base for the pergola posts. They provide a solid foundation and prevent the posts from sinking into the ground. The size and depth of the footings depend on the size and weight of your pergola.
- Beams: Beams are horizontal components that connect the posts and provide a sturdy framework for the rafters. They play a significant role in supporting the weight of the roof and ensuring the stability of the entire pergola structure.
- Rafters: Rafters are the slanted or horizontal beams that span across the pergola, providing shade and support for vines or other decorative elements. They are placed on top of the beams and secured in place to create an aesthetically pleasing and functional roof for your pergola.
- String line: A string line is used as a guide to ensure the posts are aligned correctly. It helps you achieve a level and symmetrical pergola structure, which is essential for both appearance and stability.
- Level: A level is a tool used to ensure that your pergola posts, beams, and rafters are straight and level. It helps you avoid any structural issues and ensures a professional and visually appealing result.
- Drill: A drill is necessary for creating pilot holes and screwing the different components together securely. It allows for easy installation and adjustments during the building process.
- Screws: Screws are used to fasten the various components of the pergola together. They provide a strong and durable connection, ensuring the stability and longevity of your pergola.
Understanding the individual parts of a pergola and their respective roles allows you to tackle the installation process with confidence and precision. By utilizing the right components and following proper installation techniques, you can enjoy a beautiful and functional pergola in your outdoor space for years to come.

Choosing The Right Location (Subheading)
Installing pergola posts requires careful consideration and planning, especially when it comes to choosing the right location for your structure. The location will not only affect the overall aesthetics of your pergola but also its longevity and functionality. In this section, we will explore the importance of site selection for pergola installation and discuss the key factors to consider when selecting the location for your pergola posts.
Importance of site selection for pergola installation
Choosing the perfect spot for your pergola is crucial to ensure its stability and longevity. A well-planned placement will not only enhance the visual appeal of your outdoor space but also create a functional and enjoyable area for you to relax and entertain. Additionally, considering the site’s natural elements and assessing potential challenges beforehand can save you time, effort, and money in the long run.
Factors to consider when selecting the location for pergola posts
When deciding on the ideal location for your pergola posts, several factors should be taken into account. Considering these factors will help you determine the best position that suits your needs and ensures a successful installation.
1. Property Layout and Accessibility
Examine your property’s layout to identify the most convenient and accessible location for your pergola. Consider factors such as the proximity to your house, outdoor living spaces, and pathways. A well-placed pergola will not only create a seamless extension of your home but also provide ease of access and flow throughout your outdoor area.
2. Sun Exposure and Shade
Observe the sun’s path throughout the day to determine the ideal placement of your pergola with regards to sun exposure. Depending on your preferences, you may want to consider partial shade or full sun for your outdoor space. The strategic positioning of the pergola can provide ample shade during the hottest parts of the day or create an optimal space for sunbathing.
3. Wind and Weather Conditions
Take into account the prevailing wind direction and intensity in your area. Placing your pergola in a wind-protected spot will increase its stability and prevent unnecessary wear and tear. Additionally, consider how your location is affected by extreme weather conditions, such as heavy rain or snowfall, to ensure your pergola can withstand these elements.
4. Underground Utilities and Obstacles
Prior to installing your pergola posts, it is essential to identify any underground utilities, such as water pipes, electrical lines, or gas lines, that may be present in your desired location. Ensure you obtain the necessary permits and consult with professionals if needed to avoid any potential hazards or complications. Additionally, be mindful of any trees, large rocks, or other obstacles that may obstruct the installation process.
5. Future Landscaping Plans
Consider your future landscaping plans when selecting the location for your pergola. Anticipate any potential changes or additions you might make to your outdoor space, such as installing a swimming pool or expanding your garden. Planning for these future developments will help you choose a location that allows flexibility and harmonizes with your long-term vision.
6. Local Regulations and Guidelines
Check with your local authorities to ensure compliance with any building regulations or guidelines in your area. These regulations may dictate setbacks from property lines, maximum height restrictions, or other requirements that may influence your choice of location for the pergola posts. Adhering to these regulations will save you from potential fines and headaches in the future.
By carefully evaluating these factors and using them as a guide, you can confidently choose the right location for your pergola posts. Remember, thoughtful site selection ensures not only the structural integrity of your pergola but also a beautiful and functional outdoor space that you can enjoy for years to come.
Preparing The Ground
Before you can install pergola posts, it’s essential to properly prepare the ground. This step ensures a stable foundation that will support the structure and withstand various weather conditions. In this section, we will cover two crucial steps for preparing the ground: clearing the area and leveling the ground.
Clearing the area for installing pergola posts
Clearing the area is the first step towards installing pergola posts. Start by removing any plants, debris, or obstacles that might be in the way. This is important to ensure a clean and even base for your pergola posts. Use a shovel or a rake to clear away any rocks, roots, or vegetation that could interfere with the installation process. It’s also a good idea to mark the area where you plan to install the posts to keep track of the dimensions.
Leveling the ground for a stable foundation
Once you have cleared the area, the next step is to level the ground. Leveling ensures that your pergola posts will have a solid and stable foundation. Start by using a shovel or a rake to remove any high spots or mounds of soil. This will help create a more even surface. Next, use a level and a long, straight board to check for any slopes or unevenness. Place the board on different parts of the ground and adjust the soil as necessary until you achieve a level surface.
Keep in mind that the ground should be leveled horizontally, but also vertically. Use a tape measure to ensure that the depth of the holes for the posts is consistent. This will contribute to the overall stability of your pergola. It’s crucial to invest time in properly leveling the ground to avoid any future problems and to guarantee a long-lasting structure.
Now that you have cleared the area and leveled the ground, you are one step closer to installing your pergola posts. In the next section, we’ll cover the process of setting the posts in concrete, ensuring a solid and secure foundation for your pergola.
Digging Holes For The Posts
Introduction
When it comes to installing a pergola, one essential step is digging holes for the posts. Properly dug holes provide a solid foundation, ensuring the stability and longevity of your pergola structure. In this guide, we will discuss the important factors to consider when determining the depth and width of the holes. We will also cover the digging techniques that can help you achieve efficient and accurate results. By following these steps, you will be on your way to installing your pergola with confidence and precision.
Determining the depth and width of the holes
Determining the depth and width of the holes is crucial to ensure the stability of your pergola. The size of the posts and the local climate are two factors that influence the measurements.
Post Size: The depth and width of the holes should correspond to the size of the posts. Typically, posts for pergolas are 4×4 or 6×6 inches. For 4×4 posts, a hole depth of 2 feet is recommended, whereas for 6×6 posts, a depth of 3 feet is ideal. As for the width, it should be around 3 times the width of the posts to allow for a sufficient amount of concrete for securing the posts.
Local Climate: The local climate also plays a role in determining the hole depth. Areas with colder climates may require deeper holes to prevent frost heave, which can cause the posts to shift. Consult local building codes or speak with a professional if you are unsure about the specific requirements for your region.
To summarize, when determining the depth and width of the holes for your pergola posts, consider the size of the posts and the local climate. This will help ensure the stability and durability of your pergola structure.
Digging techniques for efficient and accurate results
Efficient and accurate digging techniques are essential to save time and energy while achieving precise results. Here are a few tips to help you dig the holes for your pergola posts effectively:
- Use the right tools: Start by equipping yourself with the right tools for the job. A post hole digger or an auger can make the digging process much easier and more efficient. These tools allow you to dig deeper and wider holes with minimal effort.
- Start with a pilot hole: If you are using an auger, it is recommended to start with a pilot hole before using the full-size auger bit. This will help you establish the desired hole location and ensure accuracy.
- Remove debris efficiently: As you dig, it is important to remove the loose soil or debris from the hole regularly. This will prevent the hole from becoming overcrowded, making it easier to reach the desired depth.
- Check for levelness: Periodically check the levelness of the holes as you dig. This will help ensure that all the posts are installed at a consistent height, resulting in a level and aesthetically pleasing pergola structure.
- Smooth the sides: After you have reached the desired depth, take the time to smooth the sides of the hole. This will create a clean surface for the concrete, ensuring a secure and stable foundation for your pergola.
By following these digging techniques, you can efficiently and accurately dig the holes for your pergola posts. Remember to use the right tools, start with a pilot hole, remove debris regularly, check for levelness, and smooth the sides of the hole. These steps will help you achieve a sturdy and long-lasting pergola structure.
In conclusion, digging holes for the posts is a crucial step in the installation of a pergola. By determining the depth and width of the holes according to the post size and local climate, and implementing efficient digging techniques, you will ensure a solid foundation for your pergola. Now that you have mastered the art of digging holes for pergola posts, you are ready to move on to the next exciting steps of your pergola installation journey. Happy building!
Setting The Posts In Concrete
When it comes to installing a pergola, setting the posts in concrete is a crucial step that ensures stability and longevity. By securely anchoring your posts in concrete, you can prevent the structure from shifting or toppling over due to external factors such as wind or uneven ground. In this post, we will discuss the importance of using concrete for stability and provide step-by-step instructions on how to set the posts in concrete for your pergola installation.
Importance of using concrete for stability
Using concrete to set the posts of your pergola is essential for achieving optimal stability. Concrete acts as a strong and durable foundation that holds the structure firmly in place. Here are a few reasons why using concrete is imperative:
- Prevents movement: Concrete provides a solid base that prevents the posts from shifting or rotating.
- Enhances structural integrity: By embedding the posts in concrete, you create a secure connection between the pergola and the ground, ensuring its overall stability and strength.
- Resists environmental factors: Concrete is highly resistant to weather conditions and can withstand harsh elements such as wind, rain, and temperature changes. This resilience helps to maintain the stability of the pergola over time.
- Minimizes maintenance: Once the posts are set in concrete, you can enjoy a low-maintenance pergola that requires minimal adjustments or repairs.
Steps for setting the posts in concrete
Follow these steps to securely set the posts of your pergola in concrete:
- Prepare the site: Choose the location for your pergola and mark the spots where the posts will be placed. Ensure that the ground is level and free from any obstructions.
- Dig the holes: Use a shovel or a post hole digger to dig holes that are at least one-third the height of the posts and wider at the base. Make sure the holes are deep enough to provide a stable foundation and accommodate the concrete.
- Measure and cut the posts: Measure the desired height for your pergola posts, including the amount that will be buried in the concrete. Cut the posts to the appropriate length using a saw.
- Place the posts: Insert the posts into the holes and check for alignment and levelness. Use temporary braces or clamps to hold the posts in position if necessary.
- Mix and pour the concrete: Follow the manufacturer’s instructions to prepare the concrete mix. Pour the concrete into each hole, ensuring that it surrounds the base of the posts. Fill the holes up to the ground level, leaving a slightly rounded top to allow for water runoff.
- Allow curing time: Wait for the concrete to cure according to the recommended time provided by the manufacturer. Avoid putting any weight or pressure on the posts during this period.
- Secure the posts: Once the concrete has fully cured, remove the temporary braces or clamps and inspect the posts for stability. Make any necessary adjustments or tighten any loose connections to ensure a firm installation.
By following these steps, you can effectively set the posts of your pergola in concrete, creating a solid foundation that withstands the test of time.
Checking For Level And Alignment
Checking for Level and Alignment
One significant step in installing pergola posts is checking for level and alignment. Properly aligning the posts ensures the structural integrity and visual appeal of your pergola. Not only does it ensure a secure and stable structure, but it also enhances the overall aesthetics. Here, we will discuss the tools needed for checking level and alignment as well as some effective methods to ensure your posts are straight and level.
Tools needed for checking level and alignment
To ensure accurate level and alignment, you will require the following tools:
| Tool | Function |
|---|---|
| Tape Measure | To measure the height and distance between posts accurately. |
| Spirit Level | To check if the posts are plumb vertically and level horizontally. |
| String Line | To create a straight reference line for proper alignment between posts. |
| Stakes | To secure the string line and mark the exact position of the posts. |
Methods to ensure the posts are straight and level
Once you have the necessary tools, you can follow these methods to ensure your pergola posts are straight and level:
- Start by marking the desired location for each post with stakes. Use a tape measure to ensure equal spacing between the posts.
- Stretch a string line tightly between the first and last stakes to create a reference line. This line will guide the alignment of all the posts.
- Using a spirit level, place it against each post vertically to check if it is plumb. Adjust the position of the post as necessary to achieve a perfectly vertical alignment.
- Next, check the levelness of the posts horizontally. Place the spirit level on top of each post to verify if it is level. If needed, adjust the post by adding or removing soil until it is perfectly level.
- Repeat this process for all the posts, making sure to check both vertical plumbness and horizontal levelness.
- Ensure that all posts are aligned with the string line. Check each post against the line to verify that they are in line with the initial reference.
- Once all the posts are straight, level, and properly aligned, secure them in place by backfilling with soil or using concrete for added stability.
By following these methods and using the recommended tools, you can ensure that your pergola posts are correctly installed, visually pleasing, and structurally sound. Taking the time to check for level and alignment will create a sturdy and aesthetically pleasing base for your pergola, ensuring its longevity.
Installing Beams And Joists
Installing Beams and Joists (subheading)
Now that your pergola posts are securely in place, it’s time to move on to the next step: installing beams and joists. These components provide the structural support for your pergola and will ultimately determine its strength and stability. In this section, we’ll guide you on how to secure beams to the posts and attach the joists for maximum structural support.
Securing Beams to the Posts
To secure the beams to the posts, follow these simple steps:
- Measure and mark the desired height for your beams on each post. This will depend on the overall design and height of your pergola.
- Cut your beams to the appropriate length using a saw. Ensure that the ends are clean and straight.
- Position the beams on top of the posts, aligning them with the marked heights. Ensure that they are level and equal in height on each post.
- Use sturdy galvanized screws or bolts to secure the beams to the posts. Place the screws or bolts through the sides of the beams and into the sides of the posts.
Remember to use a level to ensure that the beams are perfectly horizontal. This will prevent any imbalance and ensure the overall stability of your pergola.
Attaching Joists for Structural Support
Once the beams are securely in place, you’re ready to attach the joists. These horizontal members will provide additional support and stability to your pergola structure. Here’s how you can attach the joists:
- Measure and mark the desired spacing between each joist on the beams. This will depend on the size of your pergola and the spacing requirements of your chosen decking material.
- Cut your joists to the appropriate length using a saw. Ensure that they have clean and straight edges.
- Position the joists on top of the beams, aligning them with the marked spacing. Ensure that they are flush at both ends.
- Use galvanized joist hangers to attach the joists to the beams. Place the hangers on the sides of the beams and screw them into place. Make sure to use the appropriate number of hangers for each joist.
By attaching the joists with joist hangers, you ensure a secure and sturdy connection. This method also allows for easy adjustment or replacement of joists if needed in the future.
Remember to use a level to ensure that the joists are perfectly horizontal. This will ensure that your pergola remains level and structurally sound.
In conclusion, securing beams to the posts and attaching joists are crucial steps in the installation of a pergola. By following these guidelines, you’ll ensure the structural integrity and durability of your pergola for years to come. So grab your tools and get ready to enjoy the shade and beauty of your newly installed pergola!
Adding Additional Support
Incorporating braces for added stability
Pergolas are a great addition to any outdoor space, providing shade and a pleasing aesthetic. However, to ensure your pergola remains sturdy and secure, it’s important to consider adding additional support. One effective way to achieve this is by incorporating braces for added stability. These braces act as reinforcement for your pergola posts, preventing them from flexing or warping under the weight of the structure and elements. By properly installing braces, you can significantly increase the longevity and durability of your pergola.
Benefits of using support brackets
Using support brackets when installing pergola posts offers a range of benefits that contribute to the overall stability and strength of your structure. Here are a few key advantages to consider:
- Enhanced structural integrity: Support brackets provide an additional layer of reinforcement, ensuring that your pergola remains stable even in windy conditions.
- Reduced risk of post movement: Without support brackets, there is a higher chance of the pergola posts shifting over time, compromising the structural integrity. Support brackets help anchor the posts firmly in place, minimizing any potential movement and instability.
- Improved weight distribution: By distributing the weight of the pergola evenly across the posts, support brackets help alleviate stress on individual posts and prevent them from buckling or sagging under heavy loads. This also ensures a longer lifespan for your pergola.
- Flexibility in design: Support brackets come in various designs and sizes, allowing you to choose the ones that complement your pergola’s style and ensure a seamless integration with the overall aesthetic.
- Easier installation: Support brackets are designed to streamline the installation process, making it easier for DIY enthusiasts and professionals alike to securely attach the posts.
Installing support brackets alongside your pergola posts not only enhances the stability and durability of your structure but also provides peace of mind, knowing that your pergola will withstand the test of time and weather conditions.
Attaching The Pergola Rafters
Once you have successfully positioned and secured the pergola posts, it’s time to move on to attaching the rafters. This step is crucial in not only providing structural stability to your pergola but also determining its overall aesthetic appeal. Here are some techniques to ensure a proper and visually pleasing installation of the pergola rafters.
Positioning and Securing the Rafters
Before you begin attaching the rafters, it’s important to ensure that they are positioned correctly to achieve the desired design and function of your pergola. Consider the following steps:
- Determine the desired rafter placement: Depending on the design and size of your pergola, you may choose to position the rafters parallel or at an angle. Make sure to refer to your pergola plans or design guidelines for accurate placement.
- Snap chalk lines: Use a chalk line to mark the exact placement of each rafter on the top of the posts. This will serve as a guide during the installation process and help you maintain consistent spacing between the rafters.
- Pre-drill holes: To prevent splitting, it’s advisable to pre-drill holes into the ends of your rafters. Use a drill bit that matches the size of the screws or bolts you will be using for attachment.
- Attach the rafters: Secure the rafters to the posts using appropriate fasteners, such as screws or bolts. Make sure to align the pre-drilled holes with the corresponding holes in the posts for a secure and sturdy connection.
Techniques for Ensuring Proper Spacing Between Rafters
Proper spacing between the rafters is crucial for both structural integrity and aesthetic appeal. Consider the following techniques to ensure accurate spacing:
- Using spacers: Utilize small, uniformly-sized spacers to ensure consistent spacing between the rafters. These spacers can be placed on top of the posts before attaching the rafters, ensuring an even distribution.
- Measuring tape and pencil method: Measure the desired spacing between the rafters using a measuring tape and mark the measurements with a pencil. This will act as a guide during the installation process, enabling precise placement.
- Dividing equal distances: If you know the total length of your pergola and the number of rafters you want to install, divide the overall distance by the number of rafters to determine the equal spacing between them. This technique ensures consistent and visually pleasing placement.
- Checking with a level: After installing each rafter, use a level to ensure that it is perfectly horizontal or at the desired angle. This will help maintain consistent spacing between the adjacent rafters.
By following these techniques for positioning the rafters and ensuring proper spacing, you can achieve a visually appealing and structurally sound pergola installation. Take your time during this step to ensure accuracy and precision, as it will greatly contribute to the overall success and functionality of your pergola.
Applying Finishing Touches
Once the pergola posts are securely set in the ground and the structure is stable, it’s time to add those final touches that will make your pergola truly stand out. Applying finishing touches not only enhances the visual appeal but also provides protection to ensure the longevity of your pergola. In this section, we will explore different ways to add decorative elements and finish options for protecting the wood.
Adding decorative elements to the pergola
A pergola is not just a functional structure; it’s also a beautiful addition to any outdoor space. By incorporating decorative elements, you can personalize your pergola and make it reflect your unique style. Here are a few ideas to consider:
- Hang string lights: Create a magical ambiance by hanging string lights across the top of your pergola. Whether you opt for soft, warm white lights or colorful fairy lights, this simple addition can transform your pergola into a cozy retreat during warm summer nights.
- Add climbing plants: Introduce nature into your pergola by planting climbing plants, such as ivy, wisteria, or climbing roses. As these plants grow, they will intertwine with the pergola’s structure, creating a natural and vibrant canopy of leaves and flowers.
- Install a canopy or shade cloth: If you prefer more shade or protection from the elements, consider adding a canopy or shade cloth to your pergola. This not only provides functional benefits but also adds a touch of elegance to your outdoor space.
- Hang curtains or drapes: For a touch of luxury and privacy, hang curtains or drapes on the sides of your pergola. Choose fabric that complements your outdoor furniture and enjoy the feeling of an outdoor oasis.
Finishing options for protecting the wood
Protecting the wood of your pergola is essential to ensure its durability and resistance against the elements. Choosing the right finishing option not only shields the wood from moisture, UV rays, and insects but also enhances its natural beauty. Here are some popular finishing options for your consideration:
| Finishing Option | Description |
|---|---|
| Exterior wood stain | A wood stain not only enhances the color of the wood but also adds a protective layer against moisture and UV radiation. It allows the natural grain of the wood to shine through while providing an elegant finish. |
| Sealer or varnish | Applying a sealer or varnish creates a protective barrier on the wood, preventing moisture from penetrating the surface. It gives a clear, glossy finish, highlighting the natural texture of the wood. |
| Paint | If you prefer a more vibrant and solid color for your pergola, consider painting it. Choose an exterior-grade paint that is designed to withstand various weather conditions, ensuring the longevity of both the wood and the paint. |
| Waterproof oil | Waterproof oil provides excellent protection against water damage. It penetrates the wood, sealing it from within and preventing warping, splitting, and rotting. |
When selecting a finishing option for your pergola, consider the climate and the type of wood used. Also, make sure to follow the manufacturer’s instructions for proper application to guarantee the best results.
By adding decorative elements and applying the right finishing touches, you can transform your pergola into a stunning outdoor feature that enhances both the aesthetics and functionality of your space. Take the time to explore different options and unleash your creativity to make your pergola truly unique.
Conclusion
Importance of following proper installation techniques
Installing pergola posts may seem like a simple task, but it is crucial to follow proper installation techniques to ensure a sturdy and long-lasting structure. Neglecting these techniques can result in a pergola that is not only unstable but also prone to damage and deterioration over time. In this section, we will highlight the importance of adhering to the correct installation methods, so you can enjoy the full benefits of your well-built pergola.
1. Ensuring structural integrity
One of the primary reasons for following proper installation techniques is to ensure the structural integrity of your pergola. By carefully adhering to the recommended guidelines, you can create a sturdy and stable framework that will withstand the test of time. This includes properly anchoring the posts to the ground and adequately securing the crossbeams, providing a solid foundation for your pergola.
2. Enhancing safety
Another essential aspect of installing pergola posts correctly is to enhance safety. A well-installed pergola reduces the risk of accidents or injuries caused by the structure collapsing or dislodging. By properly positioning the posts, reinforcing them with suitable braces, and utilizing appropriate fasteners, you can minimize the chances of any mishaps and enjoy your pergola worry-free.
3. Increasing durability
Following proper installation techniques also increases the durability of your pergola. By meticulously securing the posts and applying the correct methods, you protect the structure from excessive movement, rot, and decay. This ensures that your pergola can withstand various weather conditions, including heavy winds, rain, and snow, without succumbing to damage or deterioration.
4. Improving aesthetic appeal
Properly installed pergola posts contribute to the overall aesthetic appeal of your outdoor living space. When the posts are level, straight, and secured at the proper height, it creates a clean, balanced, and visually pleasing structure. This enhances the beauty of your pergola and adds value to your home, making it an attractive feature for both you and potential buyers in the future.
Conclusion
Installing pergola posts may require a bit of extra care and attention, but the rewards are well worth it. By following proper installation techniques, you ensure the structural integrity, enhance safety, increase durability, and improve the aesthetic appeal of your pergola. So, take the time to install your pergola correctly, and you’ll enjoy a beautiful, long-lasting outdoor space for many years to come.
Frequently Asked Questions
Should Pergola Posts Be Set In Concrete?
Pergola posts should be set in concrete for stability and durability. The concrete base provides strength to support the weight and withstand weather conditions. It prevents post rotting and shifting, ensuring a long-lasting and secure structure.
How Deep Should Pergola Posts Be In The Ground?
The pergola posts should be buried in the ground at a depth of at least 24 inches for stability and to provide adequate support.
What Is The Best Way To Anchor A Pergola Post?
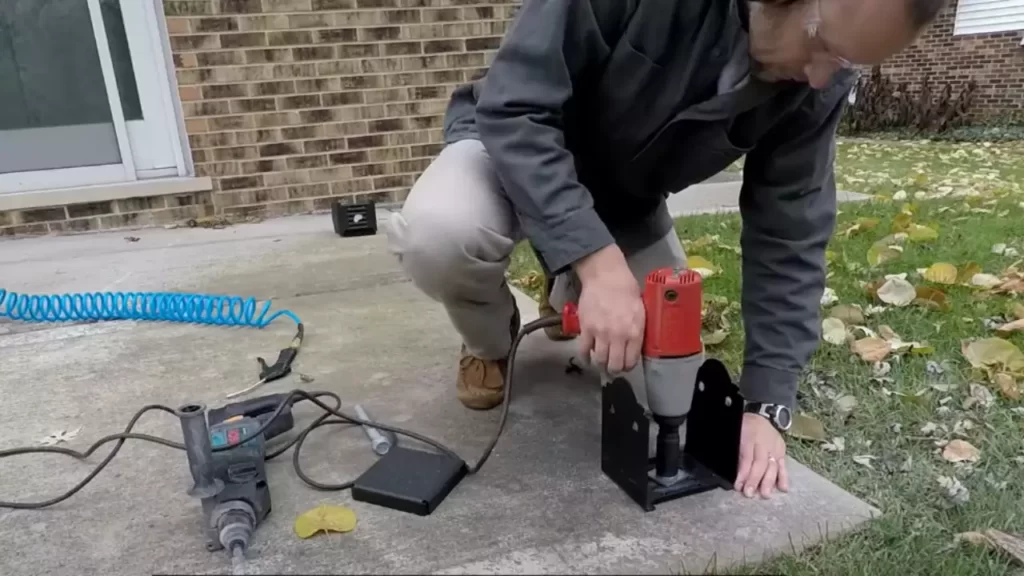
Anchor pergola posts securely by digging deep holes, at least 3 feet deep, and placing concrete footings in each hole. Attach the post to the footing using metal post brackets and bolts. This method ensures stability and prevents the pergola from shifting or collapsing.
How Do You Anchor A Pergola Post To Concrete?
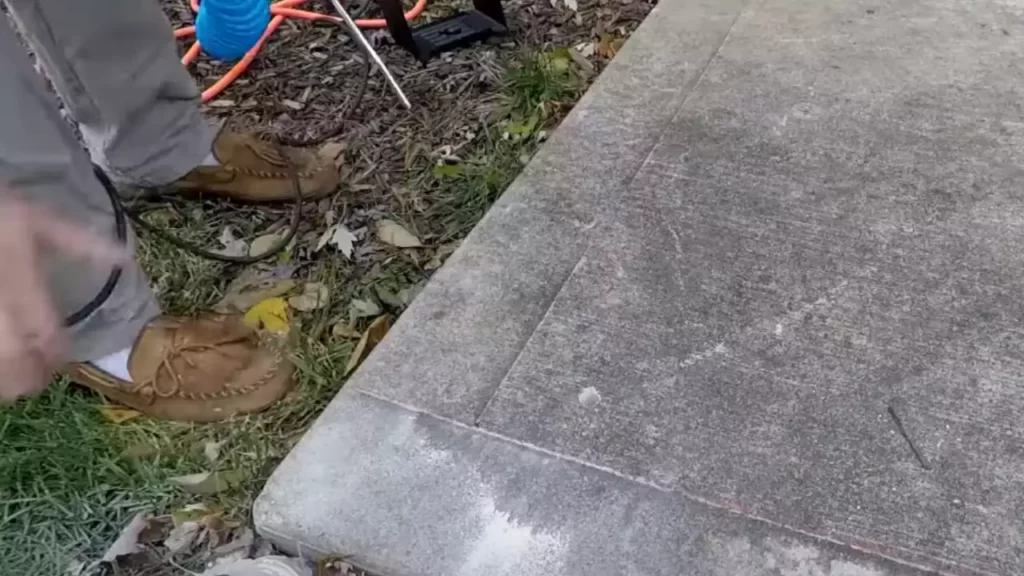
To anchor a pergola post to concrete, follow these steps: 1. Mark the location of the post on the concrete surface. 2. Drill holes into the concrete using a masonry bit. 3. Insert concrete anchors into the holes. 4. Place the post over the anchors and secure them using screws or bolts.
5. Ensure the post is level and secure before continuing with the construction.
Conclusion
Installing pergola posts can be a challenging but rewarding DIY project. By following the steps outlined in this blog post, you can successfully set up your pergola posts and create a beautiful outdoor space. Remember to choose the right materials, accurately measure and mark the post locations, and securely anchor the posts in concrete.
With proper installation, your pergola will provide a durable and stylish addition to your home. Happy building!