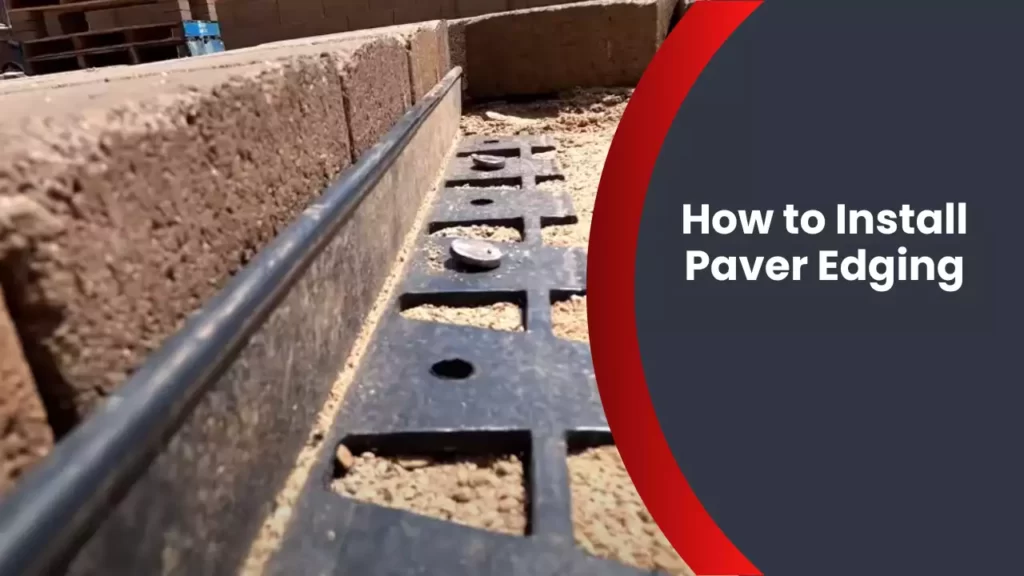
To install paver edging, start by excavating a trench for the edging material. Then, lay the paver edging in the trench and secure it in place using stakes or spikes.
Installing paver edging is an essential step in creating a well-defined and structured landscape design. Whether you are working on a patio, walkway, or driveway project, paver edging helps to keep the pavers in place and prevents them from shifting or spreading over time.
By following a few simple steps, you can easily install paver edging on your own. We will guide you through the process of installing paver edging to achieve a professional and polished finish. So, let’s get started and create a beautiful and long-lasting outdoor space you can enjoy for years to come.
Understanding The Benefits Of Paver Edging
Installing paver edging is a crucial step in creating a beautiful, long-lasting paved area. Not only does it provide a finished look to your project, but it also offers a range of practical benefits. From enhancing stability to preventing the spread of weeds and grass, paver edging plays a vital role in ensuring the durability and attractiveness of your installation.
Enhancing the Stability of Your Paver Installation
By adding paver edging to your project, you significantly enhance the stability and strength of your installation. Paver edging acts as a support system, holding the pavers in place and preventing shifting or movement over time. This is particularly important in areas with heavy foot traffic or where vehicles may pass over the paved surface.
Creating a Defined Separation Between Different Areas
Paver edging creates a clear separation between different areas in your outdoor space, allowing for a well-defined and organized layout. Whether you are creating separate sections for a patio, walkway, or driveway, paver edging helps maintain the distinct boundaries between these areas. Not only does this contribute to the overall aesthetic appeal, but it also prevents the pavers from spreading outwards into unwanted areas.
Preventing the Spread of Weeds and Grass
One of the most notable benefits of paver edging is its ability to prevent the spread of weeds and grass. The edging acts as a barrier, preventing unwanted vegetation from infiltrating the gaps between pavers. This not only reduces the maintenance required to keep your paved area neat and weed-free, but it also helps extend the lifespan of the pavers by minimizing the risk of damage caused by plant roots.
By understanding the benefits of paver edging, you can make an informed decision when it comes to installing and maintaining your paved areas. The stability, defined separation, and weed prevention it offers will not only enhance the longevity of your installation but also contribute to the overall beauty and functionality of your outdoor space.
Tools And Materials Needed
In order to install paver edging efficiently and effectively, you will need to gather a few essential tools and materials. These items will not only simplify the installation process, but also ensure a sturdy and visually appealing result. Let’s take a closer look at the basic tools and materials you will need:
Basic Tools:
Shovel: A shovel is an indispensable tool for any paver edging installation. It will be used to excavate the area where the edging will be placed and remove any unwanted debris or soil.
Rubber Mallet: A rubber mallet is necessary for gently tapping and leveling the paver edging stones into place. Its soft surface helps prevent damage to the stones while providing enough force to create a secure fit.
Tape Measure: Accurate measurements are key to ensuring proper alignment and spacing of the paver edging. A tape measure allows you to measure the dimensions of the area and cut the edging stones to the appropriate lengths.
Level: To guarantee a level and even installation, a level is essential. It will help you determine if the paver edging stones are correctly aligned and adjust them accordingly.
Materials:
Paver Edging Stones: The main component of the installation, paver edging stones create a clean separation between different areas of your outdoor space. These durable stones are available in various styles and sizes, allowing you to choose the best option for your specific design.
Landscape Fabric: Landscape fabric acts as a barrier, preventing weeds and grass from growing through the gaps in your paver edging. Placing the fabric underneath the edging stones helps maintain the neat appearance of your outdoor space.
Spike Anchors: Spike anchors securely fasten the paver edging stones to the ground, ensuring they stay in place and resist shifting over time. These anchors penetrate the soil and provide stability to the edging.
Sand: Sand is used to fill the gaps between the paver edging stones, providing stability and preventing the growth of unwanted vegetation. It also enhances the overall appearance of the installation.
Preparing The Area
Before installing paver edging, it’s essential to prepare the area properly to ensure a successful and long-lasting installation. This process involves measuring and marking the edge of the paver installation, excavating the area, and clearing the ground. Following these steps will ensure a smooth and even foundation for your paver edging.
Measuring and Marking the Edge of the Paver Installation
The first step in preparing the area is measuring and marking the edge of the paver installation. This is crucial to ensure that your paver edging is installed in a straight line and remains consistent throughout the process.
To measure and mark the edge, follow these simple steps:
- Start by placing wooden stakes at each end of the paver edging area.
- Using string or a long piece of twine, tie it tightly between the two stakes, making sure it is level and straight.
- Measure and mark the desired width and shape of the paver edging using spray paint or chalk along the string.
Excavating the Area
Once you have measured and marked the edge of the paver installation, it’s time to excavate the area. Excavating involves removing grass, rocks, and any other debris from the designated area to create a clean and level surface for the paver edging.
Follow these steps to excavate the area:
- Using a shovel or a garden spade, start digging along the marked edge, removing the top layer of turf or sod.
- Continue excavating until you reach a depth of approximately 4-6 inches, depending on the desired height of the paver edging.
- Ensure that the excavation is consistent in depth and level across the entire area.
Clearing the Ground
After excavating the area, the next step is to clear the ground thoroughly. This involves removing any remaining debris, roots, or vegetation that could potentially hinder the installation of the paver edging.
Here’s how you can clear the ground effectively:
- Use a rake or a garden hoe to remove any rocks, roots, or other obstructions from the excavated area.
- Inspect the ground for any low spots or uneven areas and fill them with topsoil to ensure a level surface.
- Tamp down the ground using a hand tamper or a vibrating plate compactor to further compact the soil and create a stable foundation.
Once you have completed these steps, your area will be properly prepared for installing paver edging. This diligent preparation will ensure a successful installation and provide an attractive and durable edge to your paver project.
Installing The Landscape Fabric
Installing landscape fabric is an important step when it comes to installing paver edging. The fabric helps to prevent weed growth, stabilize the soil, and improve overall drainage. In this section, we will walk you through two crucial steps: cutting and laying the landscape fabric, and securing it with stakes.
Cutting and Laying the Landscape Fabric
Before you begin cutting and laying the landscape fabric, make sure to measure the area where you’ll be installing the paver edging. Use a measuring tape to get accurate dimensions.
To cut the landscape fabric, lay it out on a flat surface and mark the measurements you took earlier. Use a pair of sharp scissors or a utility knife to cut along the marked lines, ensuring clean and straight edges.
Once you have the fabric cut to size, it’s time to lay it down. Start by clearing the area of any debris, rocks, or plants that may obstruct the fabric’s smooth placement. Ensure that the soil is level and free from any bumps or unevenness.
Place the landscape fabric over the prepared area, making sure it covers the entire space. Gently pull the fabric taut to remove any wrinkles or creases that may interfere with its effectiveness. If needed, you can use stakes to hold down the fabric temporarily while you secure it.
Securing the Fabric with Stakes
Securing the landscape fabric with stakes is crucial to ensuring it stays in place and performs its intended functions effectively. Start by placing stakes along the edges of the fabric, ensuring they are evenly spaced. You can use metal or plastic stakes, depending on your preference.
Using a hammer or a mallet, carefully drive the stakes into the ground through the fabric. Make sure they are firmly anchored, providing enough tension to hold the fabric in place. Continue this process, placing stakes at regular intervals along the edges and throughout the center of the fabric.
For added stability, consider placing additional stakes at the corners and any key points that require extra support. This will help prevent the fabric from shifting or becoming loose over time.
Remember, the purpose of securing the landscape fabric with stakes is to keep it in place, so ensure each stake is driven deep enough to maintain tension. However, be cautious not to damage the fabric in the process.
Once you have secured the landscape fabric with stakes, it’s time to move on to the next step in the paver edging installation process. By properly installing the landscape fabric, you’ve taken an important step towards achieving a professional and long-lasting result.
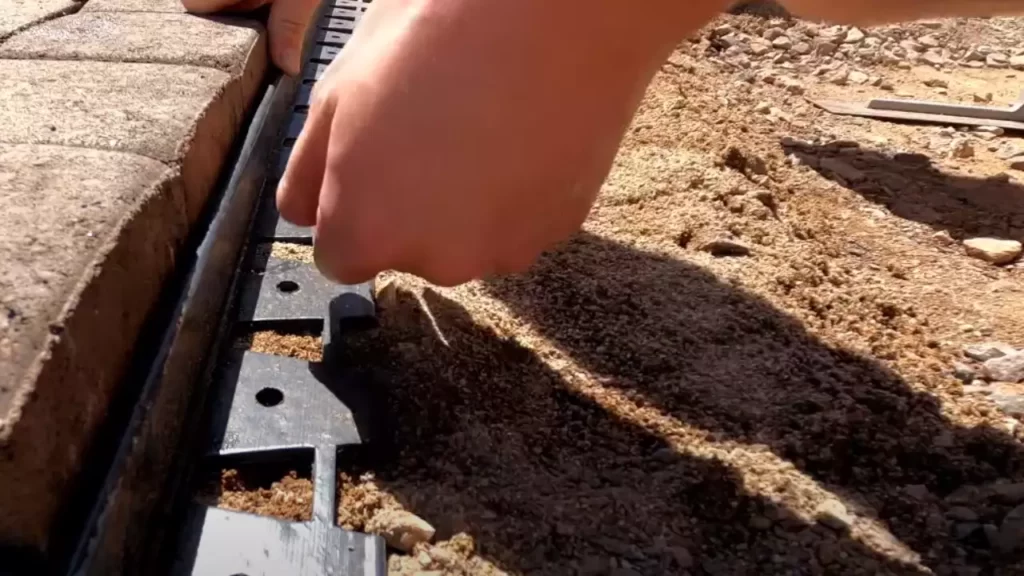
Placing The Paver Edging Stones
Lining Up the Paver Edging Stones
Before you start placing the paver edging stones, it is crucial to line them up properly. This will ensure a clean and neat appearance while also providing stability to your edging. Begin by measuring the length of your edging area and marking it with a string or chalk line, allowing for any curves or corners. This will serve as your guide when placing the stones. It is recommended to use a mallet or rubber mallet to gently tap the stones into place, ensuring they fit snugly against each other.
Ensuring Proper Alignment and Leveling
Proper alignment and leveling are essential for a successful paver edging installation. To ensure the stones are aligned correctly, use a level to check the edges of each stone. If you notice any unevenness, adjust the stones accordingly. This will help maintain a straight and uniform appearance for your edging. Additionally, it is essential to ensure that the stones are level. Use a level to check both across the top surface of the stones and along the front edge. Adjust as necessary until all the stones are level.
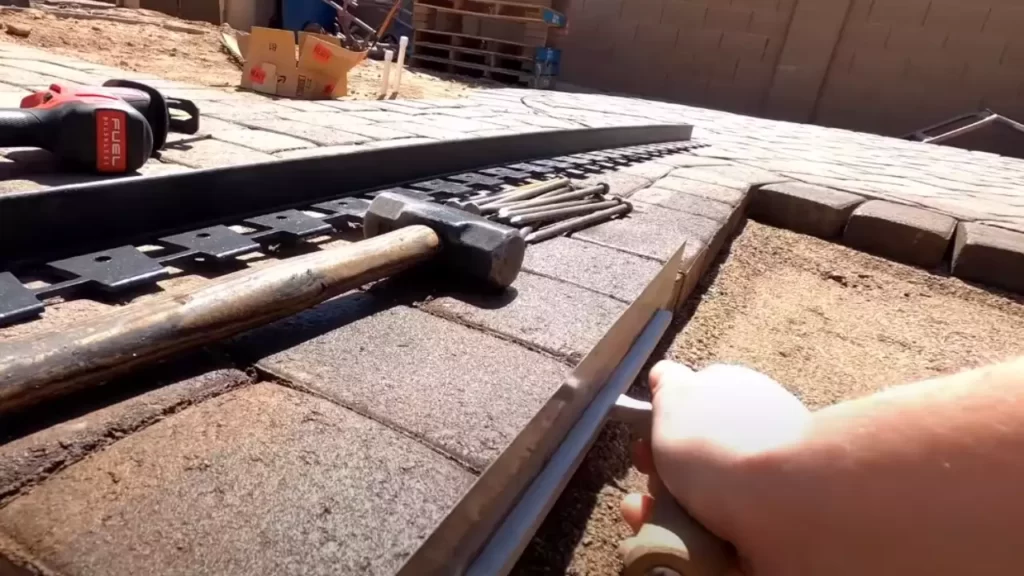
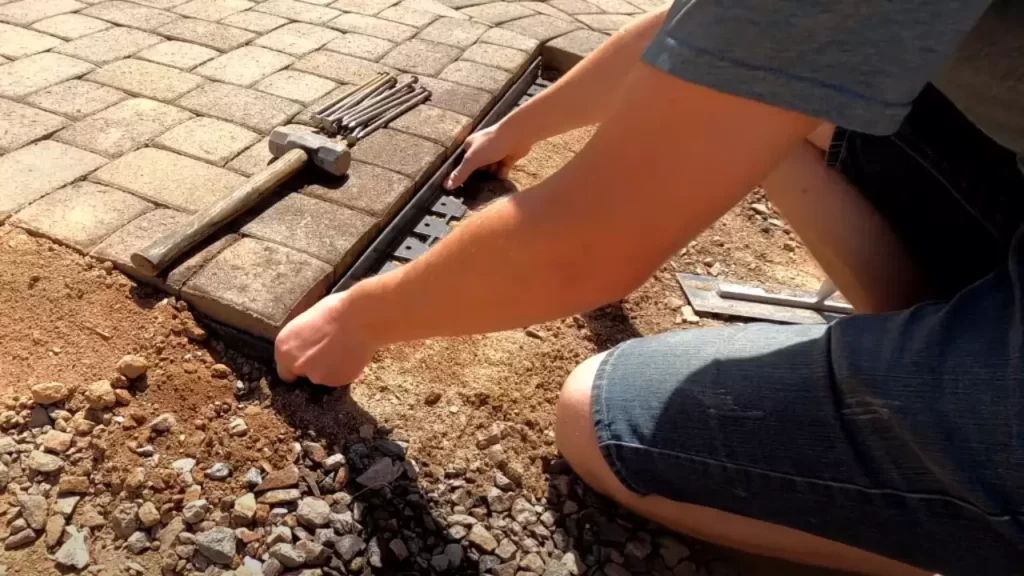
Securing the Edging Stones with Spike Anchors
To keep the paver edging stones securely in place, spike anchors are the way to go. These anchors are typically made of metal and are specifically designed to secure paver edging. To install, simply position the spike anchor against the front edge of the stone and drive it into the ground using a mallet or hammer. Make sure to place the anchors at regular intervals along the length of the edging to provide adequate support. This will help prevent the stones from shifting or moving over time, ensuring a durable and long-lasting edging.
Filling And Finishing
Now that you have successfully installed the paver edging, it’s time to move on to the next phase – filling and finishing. This step will not only enhance the stability and aesthetic appeal of your paver edging but will also prevent any potential shifting or movement of the stones over time. Let’s dive in and explore the crucial steps involved in this phase.
Adding Sand Between the Paver Edging Stones
One of the key elements in the filling and finishing process is adding sand between the paver edging stones. This sand acts as a stabilizer, providing a cushioning effect and securing the stones firmly in place. To begin, you’ll first need to gather fine-grained sand specifically designed for this purpose. Spread the sand evenly over the top surface of the paver edging, ensuring it reaches all the gaps between the stones.
Tamping Down the Sand
Once you have spread the sand, the next step is to thoroughly tamp it down. Tamping is essential as it compacts the sand and ensures it settles tightly within the gaps, creating a solid foundation. To accomplish this, use a hand tamper or a plate compactor by applying firm pressure over the entire surface area of the paver edging. Repeat this process until the sand settles and becomes level with the top surface of the stones.
Cleaning Up and Inspecting the Completed Installation
With the sand firmly in place, it’s time to clean up and inspect the completed installation. Start by brushing off any excess sand from the paver edging using a broom or a brush to create a clean and polished look. Next, inspect the entire installation carefully, paying close attention to any loose stones or gaps that may require additional sand. Taking the time to inspect and address any potential issues now will save you from future headaches.
Once you have completed these crucial steps, congratulate yourself! You have successfully filled and finished your paver edging installation, ensuring its longevity and durability. Now you can sit back and enjoy the beauty and functionality of your newly upgraded outdoor space.
Regular Inspection And Cleaning
Removing Debris and Weeds
One of the most important aspects of maintaining a well-kept paver edging is to regularly inspect and clean it. By removing debris and weeds, you not only enhance the appearance but also increase the longevity of the installation. Debris like dirt, leaves, and twigs can accumulate over time and compromise the stability of the pavers. Weeds, on the other hand, can grow between the joints and cause the stones to shift or crack.
Here’s a step-by-step guide on how to effectively remove debris and weeds from your paver edging:
- Start by using a broom or leaf blower to remove loose debris such as dirt, leaves, and small stones. This will make it easier to spot any underlying issues or weed growth.
- Next, inspect the joints between the pavers for any signs of weed growth. If you notice any, carefully remove them using a hand weeder or a putty knife. Be sure to remove the entire weed, including the roots, to prevent regrowth.
- For stubborn weeds or grass that may have taken root, you can consider using a herbicide specifically designed for paver edging. Follow the instructions on the product label and apply with caution, taking care not to damage the surrounding plants or grass.
Remember, regular maintenance is key to preventing weed growth and maintaining the appearance of your paver edging. Consider implementing preventative measures such as applying a weed barrier or using polymeric sand to fill in the joint gaps, inhibiting weed growth.
Inspecting for Any Damaged or Shifted Stones
In addition to removing debris and weeds, it’s crucial to inspect your paver edging for any damaged or shifted stones. Over time, environmental factors and foot traffic can cause the pavers to shift, leading to an uneven surface or potential tripping hazards. Here’s what you should do to ensure the integrity of your paver edging:
- Walk along the edge of the installation, visually inspecting each stone for any signs of damage such as cracks or chips. If you come across any damaged stones, remove and replace them as soon as possible to maintain a seamless appearance.
- Pay attention to any gaps between the pavers. If you notice significant gaps, it could indicate that the substrate beneath the edging has shifted. In this case, you may need to lift and readjust the pavers, ensuring they are level and properly aligned.
- For loose or wobbly stones, gently tap them back into place using a rubber mallet. If the stone does not settle securely, consider adding a layer of sand or gravel underneath to stabilize it.
By regularly inspecting your paver edging and addressing any issues promptly, you can maintain its structural integrity and ensure a safe and visually appealing outdoor space.
Repairing And Replacing Paver Edging
Properly installed paver edging not only enhances the aesthetic appeal of your outdoor space but also provides structural support, keeping the pavers in place. However, over time, due to wear and tear or natural elements, the edging stones may crack, break, shift, or become dislodged. Addressing these issues promptly is essential to maintain the integrity and functionality of your paver project. In this section, we will discuss the steps to repair and replace paver edging, focusing on two common scenarios: addressing cracked or broken edging stones and reinstalling or replacing shifted or dislodged stones.
Addressing Cracked or Broken Edging Stones
Cracked or broken edging stones can compromise the stability of the paver installation and detract from its overall appearance. If you notice any damaged edging stones, it is crucial to take immediate action. Here are the steps to address cracked or broken edging stones:
- Start by carefully removing the damaged stone using a chisel and hammer. Make sure to wear protective eyewear and gloves for safety.
- Inspect the area for any underlying issues that may have contributed to the damage, such as insufficient compacted base or poor drainage. Address these issues before proceeding with the repair.
- Replace the damaged stone with a new one of the same size and material. Ensure that the replacement stone fits snugly into the edging profile.
- Secure the replacement stone in place by tapping it gently with a rubber mallet until it is level with the surrounding stones.
- Check the alignment of the adjacent edging stones to ensure a seamless transition.
- Finish the repair by sweeping jointing sand into the gaps between the edging stones to stabilize them further.
Reinstalling or Replacing Shifted or Dislodged Stones
Shifted or dislodged edging stones can disrupt the overall stability of the paver installation and create an uneven surface. To resolve this issue, follow these steps for reinstalling or replacing shifted or dislodged stones:
- Carefully remove the shifted or dislodged stone from its current position. Use a pry bar or a similar tool to lift it without causing further damage.
- Inspect the base and surrounding area for any issues that may have contributed to the displacement. Address these issues to prevent future problems.
- Ensure that the base has adequate compaction and the necessary amount of base material is in place.
- Reinstall the stone by positioning it back into the edging profile, making sure it sits firmly and level with the adjacent stones.
- If the stone is damaged beyond repair, replace it with a new one of the same size and material.
- Verify the alignment of the surrounding edging stones, adjusting them if necessary for a seamless fit.
- Complete the reinstallation by sweeping jointing sand into the gaps between the stones to stabilize them.
By promptly addressing cracked, broken, shifted, or dislodged edging stones, you can maintain the integrity and longevity of your paver edging. Remember to regularly inspect your outdoor space and address any issues as soon as they arise to prevent unnecessary damage or costly repairs down the road.
Enhancing The Appearance Of Your Paver Edging
Once you have successfully installed your paver edging, it’s time to add the finishing touches that will enhance its overall appearance. The right combination of materials and landscaping can take your paver edging to the next level, turning it into a beautiful focal point in your outdoor space.
Adding Finishing Touches, such as Mulch or Gravel
One way to enhance the appearance of your paver edging is by adding a layer of mulch or gravel. These materials not only provide a clean and polished look, but they also offer practical benefits.
With mulch:
- Add a layer of mulch around your paver edging to create a contrast between the pavers and the surrounding vegetation.
- Choose a mulch color that complements the paver edging and the overall design of your outdoor space.
- Spread the mulch evenly and maintain it by replenishing it regularly.
If you prefer gravel:
- Consider using pea gravel or crushed stone to create a visually appealing texture around your paver edging.
- Select a gravel color that complements the paver edging and the surrounding elements.
- Spread the gravel evenly and compact it to ensure a stable and level surface.
Incorporating Plants or Flowers along the Edging
Another way to enhance the appearance of your paver edging is by incorporating plants or flowers along the edging. This not only adds color and texture but also brings a natural touch to your outdoor space. Here are some ideas to consider:
- Plant low-growing flowers or groundcovers along the paver edging to soften its look and create a seamless transition between the pavers and the surrounding landscape.
- Choose plants that can tolerate the conditions in your outdoor space, such as sunlight exposure and soil type.
- Consider adding ornamental grasses or taller plants at strategic points to create visual interest and height variation.
By incorporating plants or flowers along the edging, you can create a beautiful and cohesive outdoor space that will surely impress your guests.
Remember, the key to enhancing the appearance of your paver edging is to choose materials and landscaping elements that complement its design and blend harmoniously with the overall aesthetic of your outdoor space. Whether it’s adding mulch or gravel or incorporating plants or flowers, these finishing touches will transform your paver edging into a stunning feature that you can enjoy for years to come.
Frequently Asked Questions
How Do You Put An Edge On Pavers?
To put an edge on pavers, use an angle grinder with a diamond cutting wheel. Carefully guide the grinder along the edge of the paver, wearing safety goggles and gloves. Repeat if needed for a clean, straight edge.
What Is The Best Base For Paver Edging?
The best base for paver edging is a compacted and leveled layer of crushed stone or gravel. This type of base provides stability, drains water effectively, and helps prevent movement and shifting of the pavers over time.
How Do You Fill The Gap Between Pavers And Walls?
You can fill the gap between pavers and walls by using polymeric sand or a jointing compound. Pour the sand or compound into the gaps, then sweep and wet it to fill the joints. This will provide stability, prevent weed growth, and enhance the overall appearance of the paver installation.
How Do You Edge Pavers Over Concrete?
To edge pavers over concrete, follow these steps: 1. Prepare the surface by cleaning and leveling the concrete. 2. Lay out the pavers along the edge with a small gap between them. 3. Insert plastic or metal edging that is designed for pavers.
4. Secure the edging by driving spikes into the ground. 5. Backfill the gap with soil, compact it, and you’re done!
Conclusion
Installing paver edging may seem daunting, but with the right techniques, it can be a straightforward process. By following the steps outlined you can achieve the desired results and enhance the look of your outdoor area. Remember to measure accurately, prepare the site properly, and secure the edging tightly.
With a little patience and careful attention to detail, you can create a beautiful and long-lasting paver edging that will add value to your home. So, go ahead and get started on your paver edging project today!