To install patio tiles, start by preparing the surface and removing any existing flooring. Then, apply adhesive or mortar to the surface and firmly press the tiles into place, ensuring they are level and aligned.
Choosing The Right Patio Tiles For Your Space
Choosing the Right Patio Tiles for Your Space
When it comes to enhancing the functionality and aesthetics of your outdoor space, patio tiles are the perfect choice. Whether you’re looking to revamp an existing patio or create a brand-new outdoor oasis, selecting the right tiles is crucial. With countless options available, it can be overwhelming to make a decision. This article will guide you through the process, helping you choose the perfect patio tiles that suit your space.
Factors to consider when selecting patio tiles
Choosing the right patio tiles involves considering a few crucial factors. By considering these factors, you can ensure that the tiles you choose are not only visually appealing but also durable and practical.
- Climate: Take into account the climate in your area. If you experience extreme temperatures or frequent freeze-thaw cycles, opt for tiles that can withstand these conditions.
- Maintenance: Consider the amount of maintenance you are willing to put into your patio. Some tiles may require regular sealing or cleaning, while others are more low-maintenance.
- Slip resistance: Safety is paramount, especially in outdoor areas. Look for tiles that offer good slip resistance to reduce the risk of accidents, especially if you have children or elderly people using the patio.
- Budget: Your budget plays a crucial role in choosing the right tiles. Determine how much you are willing to spend and explore options within that price range.
Popular options for patio tile materials
When it comes to patio tile materials, there is a wide range of options available, each with its own unique qualities and characteristics. Let’s take a look at some popular options:
| Material | Pros | Cons |
|---|---|---|
| 1. Concrete tiles | – Durable and long-lasting – Versatile in terms of design and color options – Affordable |
– May require sealing to prevent staining – Can be prone to cracking in areas with freeze-thaw cycles |
| 2. Natural stone tiles | – Luxurious and elegant appearance – Each tile is unique, adding character to your patio – Highly durable and resistant to extreme weather conditions |
– Higher cost compared to other options – Requires regular sealing and maintenance |
| 3. Porcelain tiles | – Wide range of design options, including those that mimic natural stone or wood – Highly resistant to stains, scratches, and fading – Low maintenance and easy to clean |
– Can be more expensive than other materials – May be slippery when wet if not properly textured |
By considering these materials, you can choose the one that best suits your needs, preferences, and budget.
Matching the style of your outdoor space
It’s important to create a cohesive look between your patio tiles and the overall style of your outdoor space. Whether you have a modern, traditional, or eclectic theme, selecting tiles that complement the existing design elements is essential.
For a modern and sleek style, consider concrete or porcelain tiles in neutral tones. To achieve a more rustic or natural look, natural stone tiles with warm hues would be a perfect choice.
Remember to pay attention to the size and pattern of the tiles as well. Large tiles can create a sense of openness and spaciousness, while smaller mosaic tiles add intricate detail and visual interest.
By keeping these factors in mind and selecting patio tiles that suit your unique needs and style, you can transform your outdoor space into a stunning retreat that you’ll enjoy for years to come.

Preparing Your Patio For Tile Installation
Before you start installing patio tiles, it’s crucial to prepare your patio surface properly. This step not only ensures a smooth and long-lasting tile installation, but it also helps prevent any future damage or issues. In this section, we will discuss the various steps to prepare your patio for tile installation.
Clearing and Cleaning the Patio Surface
The first step in preparing your patio for tile installation is to clear and clean the surface thoroughly. Remove any furniture, plants, or debris from the patio area to create a clean and clutter-free space. This will allow you to assess the condition of the existing surface more effectively.
Next, give the patio surface a good cleaning to remove any dirt, stains, or residue. You can use a pressure washer or simply scrub the surface with a mild detergent and a brush. Ensure that you rinse the patio thoroughly to remove all traces of cleaning solution.
Examining for Any Damage or Necessary Repairs
Once the patio surface is clean, it’s time to inspect it for any damage or necessary repairs. Carefully examine the surface for cracks, chips, or uneven areas. Pay close attention to edges, corners, and areas where water may accumulate.
If you find any cracks or chips, it’s essential to repair them before installing the tiles. Fill the cracks with a suitable filler or patching compound, following the manufacturer’s instructions. Smooth out the repaired areas to ensure a level surface.
Leveling the Ground If Needed
Leveling the ground is a crucial step to ensure a stable and even patio tile installation. Uneven surfaces can lead to poor tile adhesion and potential future issues. Therefore, it’s important to address any slopes or unevenness in the patio area.
If you notice any uneven spots, you can level the ground by adding a layer of sand or gravel. Spread an even layer of the chosen material over the entire patio area, focusing on the low spots. Use a rake to distribute the sand or gravel evenly and level it out as much as possible.
Once you have added the leveling material, compact it firmly using a tamper or a hand compactor. This will create a stable and solid base for your patio tiles.
In conclusion, preparing your patio for tile installation is a crucial step that ensures a successful and long-lasting project. By clearing and cleaning the patio surface, examining for any damage or necessary repairs, and leveling the ground if needed, you can create a sturdy foundation for your patio tiles. Take the time to properly prepare your patio, and you’ll be rewarded with a beautiful and durable tile installation.
Installing The Patio Tiles
When it comes to transforming your outdoor space, installing patio tiles is a great way to add style and functionality. Whether you’re looking to create a cozy seating area or an elegant dining space, patio tiles can instantly elevate your backyard. In this section, we’ll walk you through the step-by-step process of installing patio tiles, from measuring and marking the layout to cutting tiles to fit around edges or obstacles. Let’s get started!
Measuring and marking the layout of the tiles
Before you start installing the patio tiles, it’s important to measure the area accurately and mark the layout to ensure a clean and symmetrical finish. Here’s how to do it:
- Measure the dimensions of the patio area and calculate the number of tiles you’ll need. Remember to account for any cutting or wastage.
- Using a tape measure and chalk or marker, mark the perimeter of the patio on the ground. Start at one corner and work your way around, making sure the lines are straight and aligned.
- If you have a pattern in mind, use additional markings to indicate the design or placement of different tile sizes.
Mixing and applying the tile adhesive
Once you’ve marked the layout of the tiles, it’s time to mix and apply the tile adhesive. Follow these steps:
- Prepare the tile adhesive according to the manufacturer’s instructions. This usually involves mixing the adhesive powder with water until it reaches a smooth consistency.
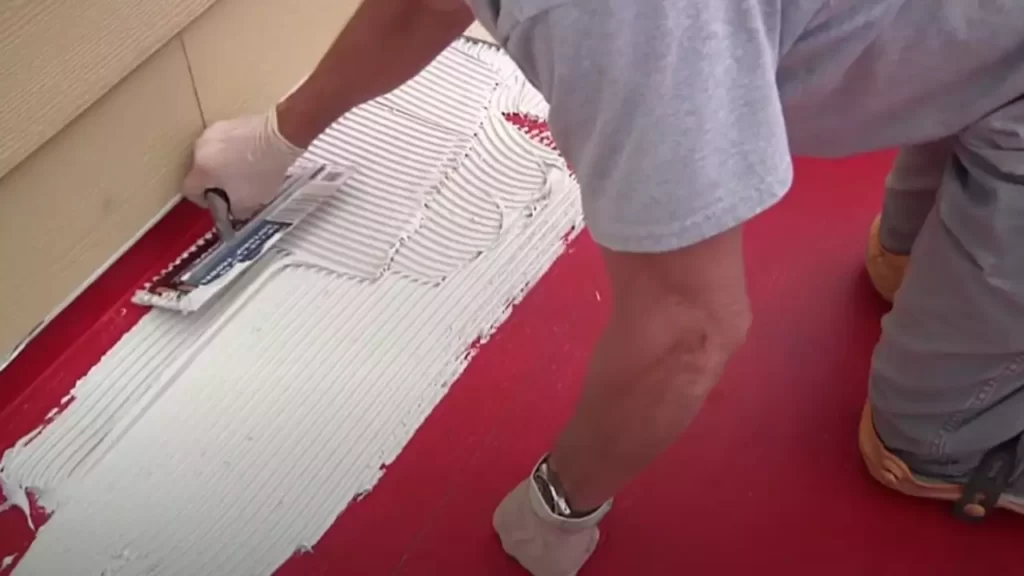
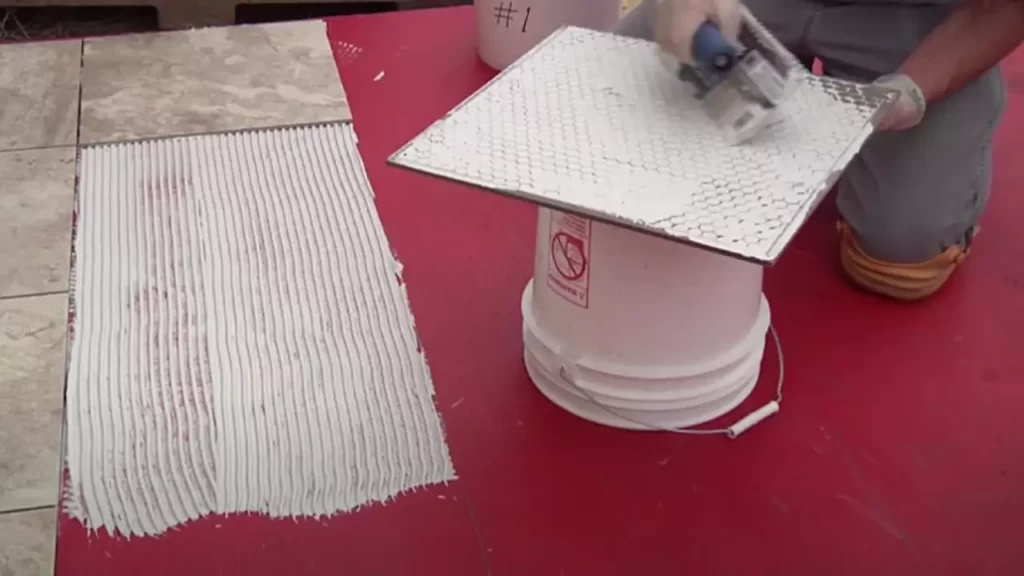
- Using a trowel, spread a thin layer of adhesive onto the marked area. Start from one corner and work your way across, ensuring even coverage.
- When spreading the adhesive, use the notched edge of the trowel to create grooves. These grooves will help the tiles adhere properly.
Placing and aligning the tiles
Now that the adhesive is ready, it’s time to start placing the tiles on the patio. Follow these steps for a seamless installation:
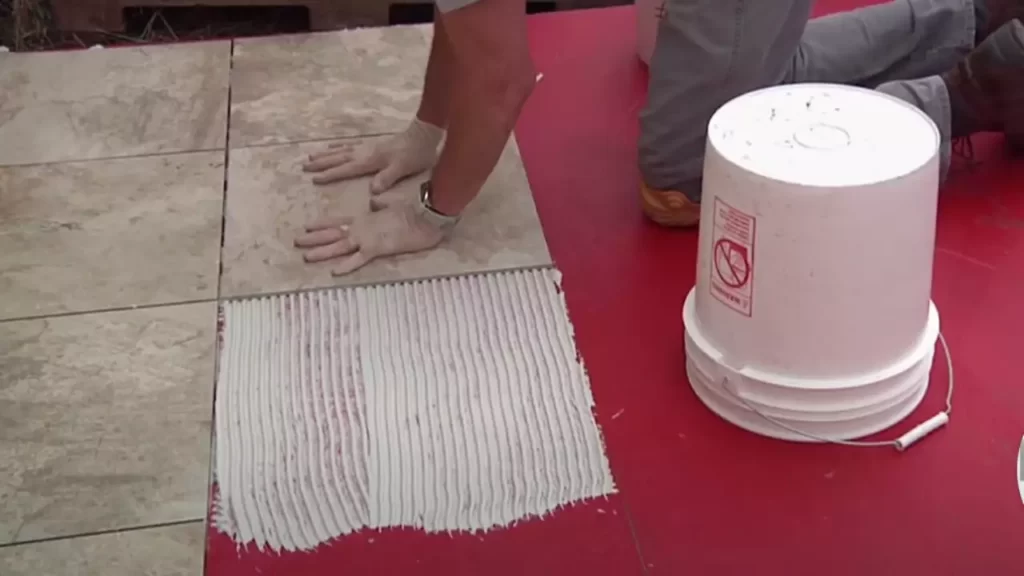
- Start at one corner and place the first tile, pressing it firmly into the adhesive. Twist the tile slightly to ensure it is fully embedded.
- Continue placing the remaining tiles, working your way across the patio. Make sure to leave space between each tile for grouting.
- As you go, use a level or straight edge to check that the tiles are level and aligned. Adjust as necessary.
Cutting tiles to fit around edges or obstacles
Inevitably, you’ll encounter edges or obstacles that require tiles to be cut to fit. Here’s how to tackle this part of the installation:
- Measure the dimensions of the space that needs a cut tile and mark those measurements on the tile surface.
- Using a tile cutter or a wet saw, carefully cut along the marked lines. Remember to wear safety goggles and gloves for protection.
- Place the cut tile into the space, ensuring a snug fit. Use tile spacers if needed to maintain consistent spacing with the neighboring tiles.
And there you have it! By following these steps for measuring, marking, mixing, applying, placing, aligning, and cutting, you’ll be able to install patio tiles like a pro. Enjoy your newly transformed outdoor space!
Grouting And Finishing The Patio Tiles
Mixing and applying the grout
Once you have laid all the patio tiles, the next step in the installation process is grouting and finishing. Grouting is an essential part of ensuring that your patio tiles are locked in place securely and that no gaps or spaces are left between them. To begin, you will need to mix the grout according to the manufacturer’s instructions. (Tip: It’s always best to wear gloves and a mask when working with grout to protect your hands and respiratory system.)
To mix the grout, follow these simple steps:
- In a clean bucket, pour the desired amount of grout powder.
- Add water gradually while stirring the mixture with a grout float until you achieve a smooth, paste-like consistency.
- Let the mixture sit for a few minutes, then give it a final stir to ensure all the dry powder is fully incorporated.
Now that your grout is mixed and ready to go, it’s time to apply it to the patio tiles. Use the grout float to spread the grout over the tiles at a 45-degree angle, pressing it into the gaps between the tiles. Make sure to work in small sections to prevent the grout from drying out too quickly. Once the grout is applied, use the float to scrape off any excess grout from the surface of the tiles.
Removing excess grout and cleaning the tiles
After you have applied the grout, it’s important to remove any excess grout before it dries completely. This will ensure a smooth and polished finish for your patio tiles. Here’s how to do it:
- Fill a bucket with clean water.
- Dampen a clean sponge or cloth in the water and wring out any excess.
- Using gentle circular motions, wipe away the excess grout from the surface of the tiles.
- Rinse the sponge or cloth frequently to prevent the grout from smearing.
Continue this process until all the excess grout is removed and the tiles are clean. Take extra care not to remove the grout from the gaps between the tiles. Once you are satisfied with the cleanliness of the tiles, allow the grout to dry and cure.
Allowing the grout to dry and cure
To allow the grout to fully dry and cure, it is essential to follow the manufacturer’s recommended drying time. This can vary depending on factors such as humidity and temperature. As a general rule, allow the grout to dry for at least 24 hours before walking on the patio. During this time, make sure to keep the area free from any foot traffic or excessive moisture that could compromise the drying process.
Applying a sealant for added protection
Once the grout has dried and cured, it’s time to apply a sealant to protect your patio tiles from dirt, stains, and moisture. The sealant creates a protective barrier that helps maintain the beauty and longevity of your patio tiles. Follow these steps to apply the sealant:
- Choose a high-quality sealant suitable for your type of patio tiles.
- Pour the sealant into a tray or container.
- Using a paintbrush or roller, apply an even coat of sealant to the surface of the tiles.
- Allow the sealant to dry for the recommended time specified by the manufacturer.
- Apply a second coat if necessary for added protection.
Once the sealant has fully dried, your patio tiles are now ready to enjoy. The sealant will help preserve the beauty of your patio tiles and make them easier to clean and maintain in the long run. Remember to periodically reapply the sealant as per the manufacturer’s instructions to ensure maximum protection. With proper grouting and finishing, your patio tiles will not only enhance the aesthetic appeal of your outdoor space but also provide a durable and functional surface for your patio furniture and activities.
Maintaining And Extending The Life Of Your Patio Tiles
Maintaining and Extending the Life of Your Patio Tiles
Once you’ve installed your beautiful patio tiles, it’s important to implement proper maintenance techniques to ensure their longevity. By following a few simple steps, you can keep your patio tiles looking pristine and extend their life span. In this section, we will discuss regular cleaning and sweeping to prevent debris buildup, handling stains and spills on the tiles, resealing the tiles as needed, and making repairs to damaged tiles.
Regular cleaning and sweeping to prevent debris buildup
Regularly cleaning and sweeping your patio tiles is essential in preventing the buildup of dirt, leaves, and other debris. Accumulated debris can not only detract from the appearance of your patio but can also lead to discolouration and damage. A simple yet effective way to maintain your tiles is by sweeping them regularly with a broom or using a leaf blower to remove loose debris.
Handling stains and spills on the tiles
No matter how cautious you are, spills and stains are bound to happen on your patio. To maintain the appearance of your tiles, it is essential to address stains and spills promptly. For general stains, consider using a mild detergent mixed with water and a soft scrub brush to gently remove the stain. In the case of more stubborn stains, such as oil or grease, sprinkle some baking soda over the affected area, let it sit for a few minutes, then scrub with a brush. Rinse thoroughly with clean water to ensure all residue is removed.
Resealing the tiles as needed
Sealing your patio tiles is an important step in protecting them from weather conditions, stains, and daily wear and tear. Over time, the initial sealant may wear off, leaving your tiles vulnerable. Keep an eye out for any signs that your tiles require resealing, such as water absorption, fading color, or increased susceptibility to stains. When resealing, prep the tiles by cleaning them thoroughly, then apply a fresh coat of sealant according to the manufacturer’s instructions.
Making repairs to damaged tiles
Despite your best efforts, accidents happen, and your patio tiles may become damaged. Whether it’s a chip, crack, or loose tile, addressing these issues promptly is crucial in preventing further damage. Start by assessing the severity of the damage and determining if a repair or replacement is necessary. For minor repairs, consider using an epoxy adhesive or tile filler to fix chips and cracks. Replace any loose or damaged tiles to avoid larger problems down the line and ensure proper stability.
By implementing regular cleaning practices, promptly handling spills and stains, resealing as needed, and making necessary repairs, you can keep your patio tiles in excellent condition for years to come. Taking the time and effort to maintain your tiles will not only preserve their beauty but also contribute to the overall durability and lifespan of your patio.
Enhancing Your Patio With Additional Features
Adding patterns or designs using different tile sizes or colors
Enhancing your patio with additional features can completely transform your outdoor space into a stylish and inviting oasis. One of the most effective ways to elevate the aesthetic appeal of your patio is by incorporating patterns or designs using different tile sizes or colors. By experimenting with tile arrangements and combinations, you can create visually stunning patterns that suit your personal style.
Consider using larger tiles as the base and smaller tiles as accents to add depth and complexity to your patio design. For instance, you can lay down large square tiles in a neutral shade and then intersperse smaller, brightly colored tiles in a geometric pattern. This play with sizes and colors will create a dynamic look that catches the eye.
If you prefer a more subtle approach, you can opt for a monochromatic design using the same size tile in different shades. By selecting tiles in varying tones of the same color, you can create a visually interesting gradient effect that adds a touch of elegance to your patio.
Remember, the key to achieving an appealing pattern or design with different tile sizes or colors is to strike the right balance. Aim for cohesion and harmony while being creative and bold.
Incorporating decorative borders or insets
In addition to playing with tile sizes and colors, incorporating decorative borders or insets can further enhance the charm of your patio. These subtle yet impactful additions can create a defined border, frame specific areas, or add intricate detailing that elevates the overall aesthetic.
To add a decorative border, consider using tiles in a contrasting color or pattern along the edges of your patio. This simple addition can provide a bold and distinguished look, effectively outlining the space.
For a more intricate touch, you can incorporate tile insets into your patio design. These insets can be used to create ornate patterns, showcase a focal point, or even feature personalized designs. Whether you opt for a mosaic pattern or a custom-made medallion, tile insets offer endless possibilities for adding character to your patio.
When incorporating decorative borders or insets, be mindful of the overall design and ensure that they complement the existing elements. A well-planned and executed border or inset can truly elevate the sophistication of your patio.
Installing patio furniture and accessories
No patio is complete without the right furniture and accessories. The addition of patio furniture allows you to transform your outdoor space into a comfortable and functional area where you can relax, entertain, and enjoy the beauty of your surroundings.
When selecting patio furniture, consider the size and layout of your outdoor space. Opt for furniture pieces that complement the overall design and provide ample seating or lounging options. From cozy sectionals to stylish bistro sets, there are numerous options available to suit your taste and needs.
Aside from furniture, incorporating accessories can add the finishing touches to your patio. Think about adding elements such as decorative cushions, outdoor rugs, potted plants, and lighting fixtures to create a cozy and inviting ambiance.
Ensure that the patio furniture and accessories you choose are weather-resistant and durable, capable of withstanding outdoor conditions. This will ensure longevity and allow you to enjoy your enhanced patio for years to come.
Frequently Asked Questions
What Do You Put Under Outdoor Tiles?
Outdoor tiles are typically installed on a bed of mortar or concrete, which acts as a stable and level base. This ensures durability and prevents the tiles from shifting or cracking. Additionally, a waterproofing membrane may be applied underneath the tiles to protect against moisture damage.
How Do You Lay Tile On An Outdoor Patio?
To lay tile on an outdoor patio, follow these guidelines: 1) Prepare the surface by cleaning and leveling it. 2) Apply a waterproofing membrane to protect against moisture. 3) Lay the tile using thin-set mortar and ensure proper spacing. 4) Use a rubber mallet and level to ensure tiles are set evenly.
5) Finally, apply grout and sealant to complete the installation.
Do Outdoor Tiles Need To Be Laid On Concrete?
Outdoor tiles do not necessarily need to be laid on concrete. They can also be laid on a variety of surfaces such as compacted gravel or sand. It is important to prepare the surface properly and ensure it is stable and level before laying the tiles.
How Do You Install Ceramic Tile On A Patio?
To install ceramic tile on a patio, follow these steps: 1. Prepare the surface by cleaning and leveling it. 2. Apply a layer of thin-set mortar with a trowel. 3. Place the tiles, pressing them firmly into the mortar. 4.
Make sure they are evenly spaced and level. 5. Allow the mortar to cure before grouting the tiles.
Conclusion
Installing patio tiles can be a straightforward and rewarding project that enhances the aesthetics and functionality of your outdoor space. By following the step-by-step instructions provided in this guide, you can successfully transform your patio into a beautiful and inviting area.
Remember to choose high-quality tiles, prepare the surface properly, and take your time during the installation process. With the right tools and knowledge, you can create a stunning patio that will withstand the test of time and provide you with endless enjoyment for years to come.
Start your patio transformation today!