To install an outdoor outlet box for new construction, follow these steps: 1. Determine the desired location for the outlet box.
2. Cut a hole in the wall where the box will be installed. 3. Run electrical wiring from an existing power source to the new outlet location. 4. Connect the wiring to the outlet box and secure it in place.
5. Install a weatherproof cover on the outlet box. Remember to follow all local electrical codes and regulations for outdoor installations. Introducing an outdoor outlet box to your new construction project can greatly enhance the functionality and convenience of your outdoor space.
Whether you need to power outdoor lighting, tools, or appliances, having a weatherproof outlet box can provide a safe and accessible power source. Installing an outdoor outlet box is a straightforward process that requires some basic electrical knowledge and tools.
In this guide, we will walk you through the step-by-step process of installing an outdoor outlet box for new construction. By following these instructions and adhering to local electrical codes, you can ensure a safe and reliable outdoor power source for all your needs.

Planning And Preparation
Before installing an outdoor outlet box for new construction, it’s essential to plan and prepare properly to ensure a smooth and safe installation process. This involves determining the location, checking local building codes and regulations, gathering the necessary tools and materials, and turning off the power supply.
Determine the location for the outdoor outlet box
Determining the location for the outdoor outlet box is the first step in this process. Consider both convenience and safety when choosing the placement. It’s important to select a location that is easily accessible and convenient for your outdoor electrical needs. Whether you plan to use it for powering outdoor lights, tools, or appliances, placing the outlet in a suitable location is crucial.
Take into account the proximity to the main electrical panel and existing wiring to ensure a seamless connection. Additionally, consider the environmental factors such as rain, wind, and sunlight, which may affect the durability of the outlet box and the connected devices. It’s recommended to choose a location that provides adequate shelter and protection for the box.
Check local building codes and regulations
Knowing and adhering to local building codes and regulations is vital to ensure the safety and legality of your outdoor outlet installation. Different areas may have specific requirements regarding the installation of electrical outlets, such as the depth of burial and the use of GFCI (Ground Fault Circuit Interrupter) protection.
Before proceeding, research the local building codes or contact your local authorities to understand the specific guidelines you need to follow. This will help prevent any potential safety hazards and ensure your installation meets the necessary standards.
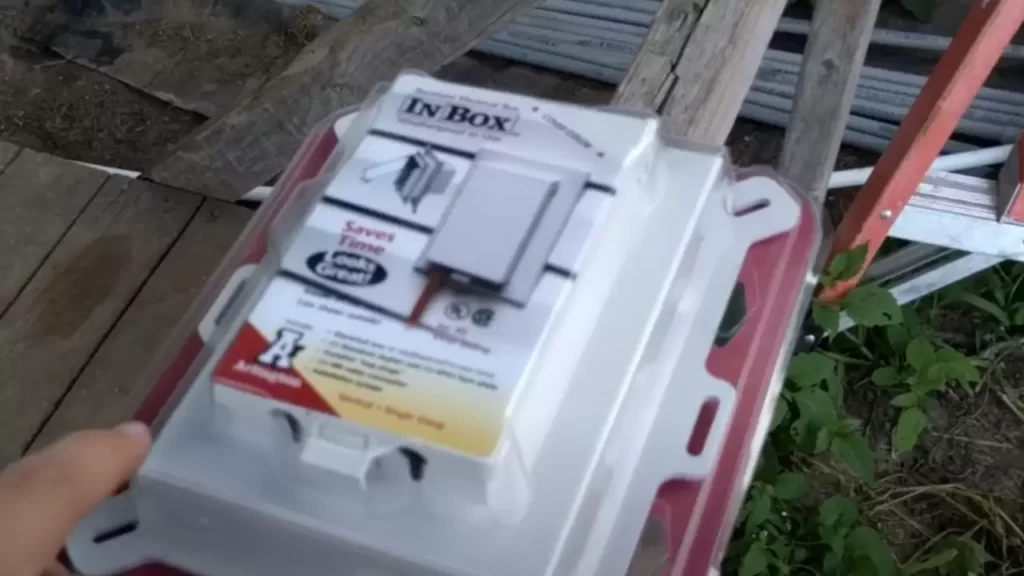
Gather necessary tools and materials
Before starting the installation process, gather all the necessary tools and materials to ensure a smooth and efficient workflow. Here’s a handy checklist to help you prepare:
| 1. | Outdoor outlet box |
| 2. | GFCI outlet |
| 3. | Romex cable (appropriate gauge) |
| 4. | Wire connectors |
| 5. | Wire strippers |
| 6. | Screwdriver |
| 7. | Hammer |
| 8. | Drill |
| 9. | Electrical tape |
| 10. | Outdoor-rated faceplate |
Make sure you have all the tools and materials readily available before starting the installation to avoid any unnecessary delays or interruptions.
Turn off the power supply
Always prioritize safety when working with electrical installations. Before beginning, it is crucial to turn off the power supply to the area where you will be installing the outdoor outlet box. Locate the appropriate circuit breaker in your main electrical panel and switch it off to cut the power.
Use a voltage tester to ensure the power is completely off before proceeding with any work. This step is essential for safeguarding yourself and preventing electrical accidents.
By properly planning and preparing for the installation of your outdoor outlet box, you can ensure a successful and safe project. Take the time to determine the location, check local regulations, gather the necessary tools and materials, and turn off the power supply. With these preparations in place, you’ll be ready to move on to the next steps of the installation process.
Installing The Electrical Box
When it comes to installing an outdoor outlet box in new construction, one of the most important steps is properly installing the electrical box. This ensures that the outlet is safe and secure, and that it meets all electrical code requirements. In this section, we will cover all the necessary steps to successfully install the electrical box for your outdoor outlet.
Mark the location for the box
The first step in installing the electrical box is to mark the location where it will be installed. This is typically done on the exterior wall of the building, near the desired location for the outlet. Use a tape measure and a pencil to mark the exact spot where the box will be placed.
Cut a hole for the box in the wall
With the location marked, it’s time to cut a hole in the wall to accommodate the electrical box. Use a reciprocating saw or a drywall saw to carefully cut out the marked area. Take care to cut along the lines accurately and smoothly.
Run electrical conduit from the main panel to the box
Now that the hole is cut, you will need to run electrical conduit from the main panel to the box. This conduit will house the electrical wiring and protect it from the elements. Use conduit straps to secure the conduit to the wall at regular intervals.
Attach the conduit to the box securely
Once the conduit is in place, it needs to be securely attached to the electrical box. Use a conduit connector or a fitting specifically designed for this purpose to attach the conduit to the box. Make sure the connection is tight and secure to prevent any movement or damage.
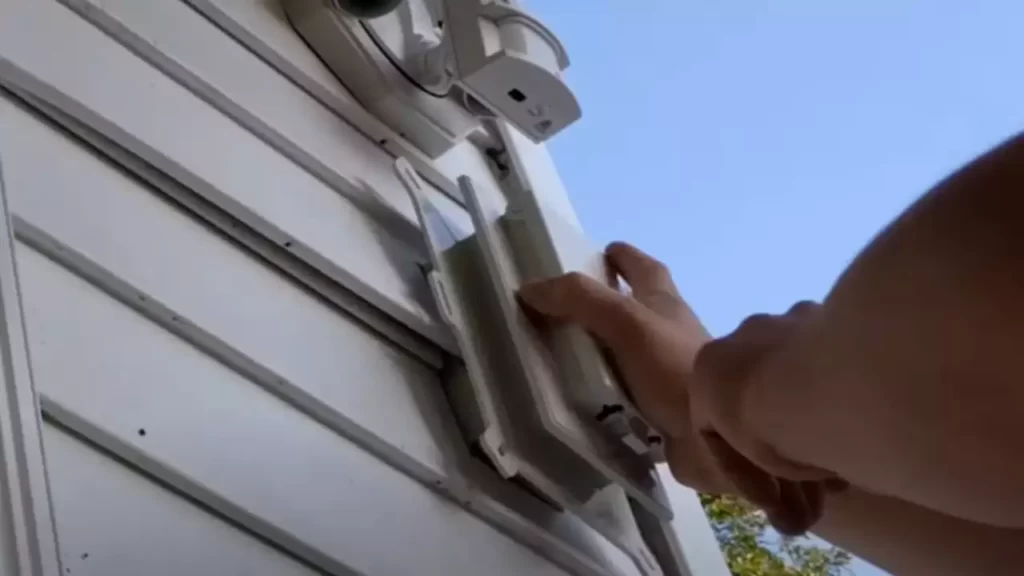
Insert the box into the wall opening
With the conduit attached, carefully insert the electrical box into the wall opening. Ensure that it fits snugly and is level with the surrounding wall surface. This will ensure a clean and professional installation.
Secure the box in place using screws or mounting brackets
Finally, secure the electrical box in place using screws or mounting brackets. Follow the manufacturer’s instructions for the specific box you are using. Make sure the box is firmly attached to the wall and does not wobble or move.
Wiring And Connections
Connect the electrical wires to the outlet box
Once you have properly positioned and secured your outdoor outlet box, it’s time to connect the electrical wires. This step requires careful attention to ensure a safe and effective connection. Begin by stripping the insulation off the ends of the wires, exposing about half an inch of bare copper. This will allow for a solid connection with the outlet box.
Next, identify the black wire, also known as the hot wire, and the white wire, which is the neutral wire. Connect the black wire to the brass screw terminal on the outlet, and connect the white wire to the silver screw terminal. Make sure to tighten the screws securely with a screwdriver to ensure a proper connection. If you have a green or bare copper wire, this is the ground wire. Connect it to the green screw terminal on the outlet.
Install proper wire connectors
Now that you have made the electrical connections, it’s important to install proper wire connectors to protect and secure the wires. Wire connectors are small devices that join two or more electrical wires together, ensuring a safe and reliable connection. Choose connectors that are suitable for your wire size and type.
Strip the insulation off the ends of the wires as before, and then insert the stripped ends into the wire connectors. Twist the connector clockwise until it is tight and secure. This will provide both electrical insulation and mechanical strength to the connection. Inspect each connector to ensure that it is properly installed and that there are no exposed wires or loose connections.
Make sure all connections are secure and tight
Once you have installed the wire connectors, it is crucial to double-check that all connections are secure and tight. This will help prevent any potential electrical hazards or malfunctions in the future. Use a screwdriver or pliers to tighten any loose screws on the outlet, ensuring that all connections are firmly in place.
Install GFCI protection if required
GFCI (Ground Fault Circuit Interrupter) protection is essential for outdoor outlets to provide an extra level of safety. GFCI outlets continuously monitor the current flowing through the circuit and quickly interrupt the power if any imbalance is detected. This helps protect against electric shock.
If your local electrical code requires GFCI protection for outdoor outlets, make sure to install a GFCI outlet or a GFCI breaker if the outlet is part of a circuit. Consult a licensed electrician for guidance on the specific requirements and proper installation of GFCI protection.
Test the outlet for proper functionality
Before securing the outlet cover in place, it is crucial to test the outlet for proper functionality. Use a voltage tester to verify that there is power flowing to the outlet. Insert the tester into the outlet slots and check for a reading indicating the presence of voltage.
In addition to checking for power, test the outlet by plugging in a device or a lamp to ensure it is working correctly. If the device turns on and functions as expected, you can proceed with securing the outlet cover. If there are any issues, double-check the wiring connections and troubleshoot as necessary.
Secure the outlet cover in place
Finally, once you have confirmed that everything is in order, secure the outlet cover in place. Use the provided screws to attach the cover to the outlet box, ensuring a snug fit. This will protect the outlet from weather elements and prevent accidental contact with the electrical components. Double-check that the cover is securely fastened before considering the installation complete.
Note: Remember to follow all safety precautions and consult with a licensed electrician if needed.
Frequently Asked Questions
How Do I Install An Outdoor Outlet Box In New Construction?
To install an outdoor outlet box in new construction, first, determine the desired location. Then, turn off the power supply to the area. Trace the shape of the box on the wall, drill a hole in each corner, and cut the opening using a reciprocating saw.
Attach the box securely, connect the wiring inside, and cover with a weatherproof outlet cover plate. Finally, restore power and test the outlet.
What Materials Do I Need To Install An Outdoor Outlet Box In New Construction?
To install an outdoor outlet box in new construction, you will need the following materials:
1. Outdoor electrical outlet box
2. Weatherproof outlet cover plate
3. Romex cable
4. Wire connectors
5. Screws or anchors for mounting the outlet box
6. Electrical tools (screwdriver, wire stripper, electrical tape)
7. Reciprocating saw or similar tool for cutting the wall opening
8. Safety gloves and goggles
Can I Install An Outdoor Outlet Box Without Professional Help?
Yes, it is possible to install an outdoor outlet box in new construction without professional help. However, it is important to have a basic understanding of electrical work and follow proper safety precautions. If you are unsure about any aspect of the installation process, it is recommended to consult with a licensed electrician to ensure the job is done correctly and safely.
How Much Does It Cost To Install An Outdoor Outlet Box In New Construction?
The cost of installing an outdoor outlet box in new construction can vary depending on factors such as the location, materials used, and any additional electrical work required. On average, the cost can range from $100 to $300 for a basic installation.
It is recommended to obtain quotes from licensed electricians in your area to get a more accurate estimate based on your specific requirements.
Conclusion
Installing an outdoor outlet box in new construction is a simple yet essential task for enhancing your home’s functionality. By following the steps outlined in this guide, you can ensure a safe and efficient installation process. Remember to consult local building codes and seek professional assistance if needed.
With a properly installed outdoor outlet box, you can conveniently power your outdoor appliances and enjoy your outdoor space to the fullest. Take the first step towards creating an outdoor oasis today!