To install an off-grid solar system, follow these steps accurately for a successful setup. Here’s a well-rounded introduction to the process.
Generating electricity from renewable sources like solar power is becoming increasingly popular and practical, especially for those who live in remote areas without access to the traditional power grid. Installing an off-grid solar system allows you to generate and store your own electricity, reducing reliance on fossil fuels and saving money in the long term.
We will explain the exact steps needed to install an off-grid solar system, providing a clear and concise guide to this environmentally friendly energy solution.
Understanding Off Grid Solar System Basics
Are you ready to embrace sustainable living and harness the power of the sun? Installing an off grid solar system allows you to live independently from the traditional power grid. Whether you live in a remote area without access to electricity or simply want to reduce your environmental footprint, understanding the basics of off grid solar systems is crucial. In this section, we will explore the benefits, components, and working principle of off grid solar systems.
Benefits of off grid solar system
An off grid solar system offers a multitude of benefits for those seeking energy independence. Here are some key advantages:
- Energy Independence: With an off grid solar system, you are not dependent on the utility grid for your energy needs. This allows you to have power even in remote locations, providing freedom and flexibility.
- Cost Savings: By generating your own electricity, you can significantly reduce or eliminate your energy bills. Once the initial investment is recovered, the energy you produce is essentially free, saving you money in the long run.
- Environmental Sustainability: By relying on renewable energy from the sun, you reduce your carbon footprint and contribute to a cleaner environment. Solar energy is a clean and sustainable power source, unlike fossil fuels which contribute to greenhouse gas emissions.
- Increased Resilience: In the event of a power outage or natural disaster, having an off grid solar system ensures that you have a reliable source of power. This resilience can provide peace of mind and even save lives in critical situations.
Components of off grid solar system
A typical off grid solar system comprises several essential components that work together to generate and store electricity. These components include:
| Component | Description |
|---|---|
| Solar Panels | Convert sunlight into direct current (DC) electricity. |
| Charge Controller | Regulates the flow of electricity from the solar panels to the batteries, preventing overcharging and damage. |
| Batteries | Store the excess electricity generated by the solar panels for use during periods of low sunlight or at night. |
| Inverter | Converts the direct current (DC) electricity stored in the batteries into alternating current (AC) electricity, which is compatible with household appliances and devices. |
| Backup Generator | Provides additional power during prolonged periods of low sunlight or when electricity demands exceed the solar system’s capacity. |
Working principle of off grid solar system
The working principle of an off grid solar system is based on capturing sunlight and converting it into usable electrical energy. Here’s a simplified explanation of how it works:
- Solar panels absorb sunlight and convert it into direct current (DC) electricity.
- The charge controller regulates the electricity flow to prevent damage or overcharging of the batteries.
- The batteries store the excess electricity produced by the solar panels for later use.
- The inverter converts the stored direct current (DC) electricity into alternating current (AC) electricity, which can power household appliances and devices.
- In case of insufficient solar energy, the backup generator can provide additional power to meet the electricity demands.
By understanding the benefits, components, and working principle of off grid solar systems, you are on your way to embracing sustainable energy and achieving independence from the traditional power grid.
Assessing Energy Needs For Your Off Grid Solar System
Assessing Energy Needs for your Off Grid Solar System is a crucial step towards achieving energy independence. By accurately calculating your energy consumption, estimating your solar energy production requirements, and determining the battery storage capacity, you can ensure that your off-grid solar system meets your energy needs efficiently. Let’s delve into these three aspects in detail:
Calculating your energy consumption
Before installing an off-grid solar system, it is essential to have a clear understanding of your energy consumption. By assessing how much electricity you consume on a daily basis, you can determine the size of the solar system and battery capacity required to meet your needs. To calculate your energy consumption:
- Maintain a record of your energy usage over a specific period, such as a month.
- Identify the electrical appliances and devices you use and their power ratings.
- Multiply the power rating of each appliance by the number of hours you use it per day.
- Add up the daily energy consumption of all your appliances to arrive at a total value.
By following this process, you can obtain an accurate estimate of your daily energy consumption.
Estimating your solar energy production requirements
Now that you know your energy consumption, it’s time to estimate the solar energy production required to meet that demand. This estimation helps determine the size and number of solar panels needed for your off-grid solar system. To estimate your solar energy production requirements:
- Consider the average amount of sunlight your location receives throughout the year.
- Calculate the daily solar energy production by multiplying the solar panel’s wattage by the number of sunlight hours available.
- Take into account other factors that can affect solar panel efficiency, such as shading or tilting angles.
By performing these calculations, you can determine the minimum solar panel capacity necessary to fulfill your energy needs reliably.
Determining the battery storage capacity
In an off-grid solar system, battery storage plays a crucial role in storing excess solar energy for use during periods of low sunlight or high energy consumption. To determine the battery storage capacity needed:
- Calculate your daily energy consumption from step one.
- Consider the desired autonomy, which is the number of days you want your system to run without sunlight.
- Multiply your daily energy consumption by the desired autonomy to obtain the total battery capacity required.
Ensuring that your off-grid solar system has adequate battery storage capacity ensures uninterrupted power supply during cloudy days or increased energy demands.
By carefully assessing your energy needs and following these calculations, you can determine the appropriate solar panel capacity and battery storage required for your off-grid solar system. This will lead to a more efficient and reliable energy solution for your off-grid lifestyle.
Designing Your Off Grid Solar System
Designing an off-grid solar system is a crucial step towards harnessing renewable energy for your home. By carefully planning and selecting the right components, you can ensure efficient energy generation and storage. In this article, we will guide you through the key considerations involved in designing your off-grid solar system.
Prior to installing an off-grid solar system, it is essential to conduct a thorough site survey. This survey helps you identify the specific requirements and constraints of your location, enabling you to make informed decisions when designing your system.
During the site survey, consider the following:
- Orientation and Shading: Assess the availability of unobstructed sunshine throughout the day to determine the optimal location for solar panel placement.
- Roof Strength and Angle: Evaluate the structural integrity of your roof and determine if it can support the weight of solar panels. Additionally, identify the ideal tilt angle for maximum solar exposure.
- Obstacles: Identify and address any potential shading obstacles such as trees, buildings, or other structures that may hinder the efficiency of your solar system.
- Climatic Conditions: Consider weather patterns, including rainfall, snowfall, and temperature fluctuations, as they can impact system performance and longevity.
Choosing the right location for your solar panels is vital for maximizing energy generation. Ideally, the panels should be placed in an area that receives ample sunlight throughout the day.
Consider the following factors when selecting the optimal location:
- Maximum Sun Exposure: Place the panels where they are exposed to the most sunlight, typically facing south or west, in order to capture as much solar energy as possible.
- Minimal Shading: Ensure that there are no significant shading obstructions, such as tall buildings or trees, that can significantly reduce the efficiency of your solar panels.
- Proximity to Battery Bank: Keep the solar panels as close as possible to the battery bank to minimize energy loss through long wire runs.
Choosing the appropriate size and type of solar panels is crucial for effectively meeting your energy needs. It is important to consider both the power requirements of your household and the available space for installation.
Here are the key factors to consider when sizing and selecting solar panels:
- Power Consumption: Calculate your daily power consumption to determine the wattage required from your solar panels. Consider peak loads and future expansion needs.
- Panel Efficiency: Look for solar panels with high conversion efficiency, as they can generate more power in limited space.
- Budget and Space Constraints: Balance cost and available space to choose solar panels that best fit your requirements.
Selecting the right battery type and capacity is crucial for ensuring a reliable and efficient off-grid solar system. The battery bank stores excess energy generated by your solar panels, which can be used when sunlight is insufficient or during nighttime.
Consider the following factors when choosing your battery:
- Battery Type: Decide between lead-acid batteries and lithium-ion batteries, considering factors like cost, lifespan, maintenance requirements, and performance in different climate conditions.
- Battery Capacity: Calculate the total energy consumption in kilowatt-hours (kWh) per day to determine the required battery capacity for storing enough energy to sustain your household.
- Depth of Discharge (DoD): Take into account the recommended DoD for your chosen battery type to ensure its longevity.
By conducting a site survey, selecting the optimal location for solar panels, sizing and selecting the right solar panels, and choosing the appropriate battery type and capacity, you can design an efficient off-grid solar system that meets your energy needs. This comprehensive approach ensures a sustainable and cost-effective solution for renewable energy generation and storage.
Obtaining Required Permits And Licenses
Researching local regulations and codes
Before starting the installation process for your off-grid solar system, it’s crucial to research and familiarize yourself with the local regulations and codes that govern solar installations in your area. This step is essential to ensure compliance with the law and avoid any potential legal issues down the line.
Start by contacting your local government offices or building authorities to inquire about the specific permits and licenses required for off-grid solar installations. They will provide you with valuable information on the rules and regulations that you need to adhere to for your project.
Additionally, it’s important to research any zoning restrictions or HOA guidelines that may apply to your property. Some areas may have specific requirements regarding the placement and appearance of solar panels, so be sure to take these into consideration during the planning phase.
Applying for permits and licenses
Once you have gathered all the necessary information regarding local regulations and codes, the next step is to apply for the required permits and licenses. This step ensures that you have legal authorization to proceed with your installation and that you meet all the safety standards set forth by the government.
Contact your local permitting office or building department to inquire about the specific documents and applications you need to submit. They may require detailed project plans, equipment specifications, and proof of insurance. It is important to provide all the requested information accurately and completely to avoid any delays in the permitting process.
After submitting your application, the permitting office will review your plans to ensure compliance with the established codes and safety standards. This review process may take some time, so be patient. Once your application is approved, you will receive the necessary permits and licenses to proceed with your installation.
Following safety guidelines and standards
Installing an off-grid solar system requires strict adherence to safety guidelines and standards to protect yourself, your property, and others. Ignoring these guidelines can lead to accidents, property damage, or even legal consequences. So, it’s crucial to prioritize safety throughout the entire installation process.
Ensure that you have the required personal protective equipment (PPE) such as safety goggles, gloves, and sturdy shoes before you start the installation. Familiarize yourself with the manufacturer’s instructions for each component of your solar system, and follow them meticulously.
It’s also important to consult with a licensed electrician or a professional solar installer to ensure the correct wiring and grounding of your solar panels. This step helps prevent electrical malfunctions and reduces the risk of fire hazards.
Regular maintenance and monitoring of your off-grid solar system are equally important for safety and optimum performance. Periodically inspect the panels, wiring, and battery connections for any signs of wear or damage. Taking prompt action to address any issues will ensure your solar system continues to operate efficiently and safely for years to come.

Installing Solar Panels And Mounting System
When it comes to installing an off-grid solar system, one of the most crucial steps is the installation of solar panels and the mounting system. This step sets the foundation for harnessing solar energy to power your home or business. In this article, we will guide you through the process of preparing the installation area, mounting solar panels on the roof or ground, and connecting solar panels in series or parallel.
Preparing the Installation Area
Before you begin installing your solar panels, it is essential to prepare the installation area properly. Here are the steps you need to follow:
- Start by identifying a suitable location with ample sunlight exposure throughout the day. Ideally, this space should have no shading from tall buildings, trees, or other obstructions that may hinder solar energy absorption.
- Measure the available space to ensure it can accommodate your desired number of solar panels.
- Clear the area from any debris, vegetation, or other objects that may obstruct the installation process or impact the performance of your solar system.
- Ensure the surface is clean, level, and sturdy enough to withstand the weight of the solar panels and mounting system.
- Take necessary safety precautions, such as wearing appropriate protective gear, prior to starting the installation.
Mounting Solar Panels on the Roof or Ground
Mounting your solar panels securely is crucial to ensure their optimal performance and longevity. Depending on your preference and available space, you can choose to mount them on the roof or ground. Here’s what you need to do:
Roof Mounting:
If you decide to install your solar panels on the roof, follow these steps:
- Inspect your roof’s condition and ascertain it is structurally sound to support the weight of the panels. If necessary, consult a professional to assess the roof’s capacity.
- Choose the appropriate mounting system based on your roof type, such as a flush mount, ballasted mount, or penetrating mount. Ensure the mounting system is compatible with your solar panels.
- Install the mounting system on the roof by securely attaching it to the rafters or directly into the roof structure. Use appropriate waterproofing techniques to prevent leakage.
- For each solar panel, follow the manufacturer’s instructions to attach them securely to the mounting system. Use the provided bolts, brackets, or clamps to ensure a tight fit.
- Double-check the alignment and orientation of the panels, ensuring they are facing the optimal direction to capture maximum sunlight.
Ground Mounting:
If you opt for ground mounting, these steps will guide you through the process:
- Select a suitable location on the ground, ensuring it meets the criteria mentioned earlier.
- Prepare the ground by removing any obstacles and ensuring it is level enough for the mounting system.
- Install the ground mounting system according to the manufacturer’s instructions. This may involve anchoring the system into the ground or using concrete foundations.
- Attach the solar panels to the mounting system, following the manufacturer’s guidelines.
- Make necessary adjustments to the angle and orientation of the panels to optimize sunlight absorption.
Connecting Solar Panels in Series or Parallel
Now that your solar panels are securely mounted, the next step is to connect them appropriately to harness and convert solar energy effectively. Depending on your system’s requirements, you can connect the panels in series or parallel.
Series Connection:
In a series connection, the positive terminal of one panel is connected to the negative terminal of another panel. This connection increases the overall voltage of the system while maintaining the same current. It is suitable when you need a higher voltage output.
Parallel Connection:
In a parallel connection, the positive terminals of all panels are connected together, as well as the negative terminals. This connection maintains the same voltage while increasing the overall current. It is advisable when you require a higher current output.
To ensure a successful connection, follow these steps:
- Carefully read the manufacturer’s instructions for specific guidance on wiring and connections.
- Use appropriate wiring and connectors according to the system specifications.
- Adhere to proper electrical safety measures, such as wearing insulated gloves and turning off the power source during the connection process.
- Regularly inspect and maintain the connections to avoid any loose or damaged wiring.
By following these steps, you can confidently install solar panels and a mounting system to begin harnessing clean and renewable solar energy.
Connecting Inverter And Battery Bank
Selecting the Right Inverter for Your System
When it comes to selecting an inverter for your off-grid solar system, there are a few key factors to consider. First and foremost, you’ll want to ensure that the inverter is compatible with your battery bank and solar array. It’s important to choose an inverter with the right voltage and power capacity to meet the demands of your system. Additionally, consider the type of inverter that best suits your needs. There are three main types: modified sine wave, pure sine wave, and grid-tied inverters. Each has its own advantages and limitations, so carefully evaluate which one is the best fit for your off-grid setup.
Connecting the Inverter to the Solar Array and Battery Bank
Once you have chosen the right inverter for your off-grid solar system, it’s time to connect it to the solar array and battery bank. This process requires attention to detail to ensure a safe and efficient connection. Here are the steps you need to follow:
1. Start by identifying the positive and negative terminals on both the inverter and the solar array/battery bank. Using appropriately sized cables, connect the positive terminal of the solar array to the positive terminal of the inverter and the negative terminal of the solar array to the negative terminal of the inverter. Repeat this process for the battery bank, connecting the positive and negative terminals accordingly.
2. To secure the connections, use appropriate connectors such as MC4 connectors for the solar array and battery terminals. These connectors provide a secure and weatherproof connection, preventing any accidental disconnections.
3. Make sure to double-check all the connections before proceeding. Loose or improperly connected cables can lead to poor system performance or even potential hazards. Take your time to ensure every connection is tight and secure.
Testing the Inverter Functionality
After connecting the inverter to the solar array and battery bank, it’s crucial to test its functionality to ensure proper operation. Here’s how you can test the inverter:
1. Turn on the inverter and monitor its display or indicators. It should indicate that it’s receiving power from the solar array and battery bank.
2. Connect a load, such as a small appliance or light bulb, to the inverter’s AC outlets. The load should receive power and operate smoothly.
3. Verify that the inverter is producing the expected voltage and frequency output. You can use a multimeter or other suitable measuring devices to ensure the correct values.
4. Monitor the inverter’s performance over time to ensure it consistently delivers reliable power to your off-grid system.
By following these steps and adhering to the proper installation guidelines, you can confidently connect your inverter to the solar array and battery bank in your off-grid solar system. This connection is vital for converting the DC power from your solar array and battery into AC power for everyday use.
Wiring And Electrical Connections
Designing the electrical circuit for your off grid solar system
When it comes to installing an off-grid solar system, one of the most critical aspects is designing the electrical circuit. This includes determining the right number and size of solar panels, batteries, and inverters needed to meet your energy requirements. Planning the electrical circuit beforehand ensures a smooth installation process and an efficient system overall.
First, calculate your daily energy needs. Consider the appliances and devices you’ll be using and determine their power consumption. This information will help you determine the size of your solar system. Keep in mind that it’s better to slightly overestimate your needs to account for unforeseen circumstances or future expansions.
Once you have your energy requirements, you can determine the number of solar panels you need. Each panel produces a certain amount of electricity, measured in watts. You can find this information on the panel itself or in the manufacturer’s specifications. Calculate the total wattage needed by dividing your daily energy needs by the peak sun-hours in your location. Peak sun-hours refer to the amount of sunlight your location typically receives in a day.
After determining the number of panels, you need to decide on their arrangement. Solar panels can be connected in series or parallel, or a combination of both. Connecting them in series increases the voltage output but keeps the current the same, while connecting them in parallel keeps the voltage the same but increases the current. Choose the configuration that suits your system’s voltage requirements and installation space.
Next, select the appropriate batteries. The batteries store the electricity generated by the solar panels for use during low-sunlight periods or during the night. Consider the battery capacity, voltage, and type (such as lead-acid or lithium-ion) that best fits your needs. Determine the number of batteries required by dividing your daily energy needs by the battery’s capacity and taking into account the battery’s depth of discharge (DOD).
Finally, you need to choose the right inverter. The inverter converts the direct current (DC) generated by the solar panels and stored in the batteries into alternating current (AC) that can be used by your electrical load. Consider the inverter’s capacity, efficiency, and any additional features you may require, such as surge capability or integrated battery chargers.
Properly designing the electrical circuit for your off-grid solar system ensures that each component works harmoniously and maximizes the energy generated by your solar panels. It also allows for future scalability and easy maintenance. Always consult a professional or an experienced installer for guidance to ensure a safe and efficient system installation.
Properly grounding the system
Grounding is a crucial aspect of any electrical system, including off-grid solar systems. Proper grounding protects you, your property, and your equipment from electrical faults and lightning strikes. It also ensures the safety of anyone working on or around the system, reducing the risk of electric shock.
To properly ground your off-grid solar system, follow these steps:
1. Install a grounding rod: Drive a copper grounding rod into the ground near your system’s main components, such as inverters and charge controllers. The rod should be buried deep enough to make good contact with the earth.
2. Connect the grounding rod to the components: Use copper grounding wire to connect the grounding rod to each component in your system. Ensure a secure connection and avoid any loose or damaged wiring.
3. Bond metal equipment: Bond all metal equipment, including solar panels, batteries, inverters, and mounting structures, together using grounding wire. This helps prevent potential differences between the equipment, reducing the risk of electric shock.
4. Verify the grounding: Use a multimeter to check the continuity and resistance of the grounding connections. Ensure that the resistance is within acceptable limits and that there is a good connection between all grounding points.
Remember, proper grounding is essential not only for safety but also for the optimal performance of your off-grid solar system. If you are unsure or uncomfortable with the grounding process, it is recommended to seek professional assistance to ensure compliance with electrical codes and regulations.
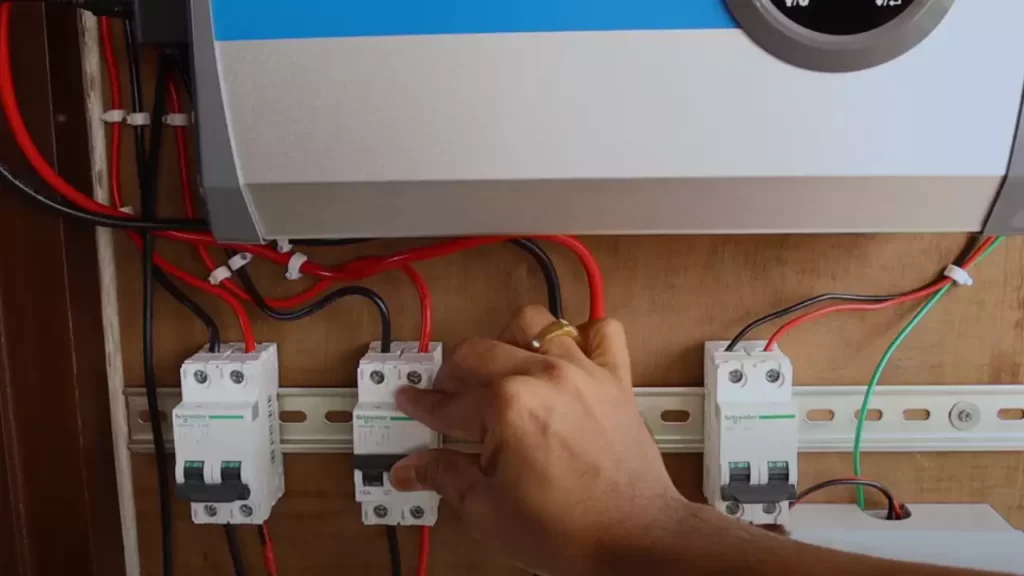
Connecting the solar system to your electrical load
Once you have designed and grounded your off-grid solar system, it’s time to connect it to your electrical load. This step involves interconnecting the solar panels, batteries, inverters, and other components to ensure a seamless flow of electricity.
To connect your solar system to your electrical load, follow these steps:
1. Connect the solar panels to the charge controller: Use appropriate wiring to connect the solar panels’ positive and negative terminals to the charge controller. The charge controller regulates the charging and discharging of the batteries, protecting them from overcharging and optimizing their lifespan.
2. Connect the charge controller to the batteries: Use battery cables to connect the charge controller’s positive and negative terminals to the corresponding terminals on the batteries. Ensure a snug and secure connection to prevent any loose connections.
3. Connect the batteries to the inverter: Use battery cables to connect the positive and negative terminals of the batteries to the corresponding terminals on the inverter. Make sure to follow the polarity markings to avoid any reverse connections.
4. Connect the inverter to your electrical load: Use appropriate wiring to connect the inverter’s AC output to your electrical load. This may involve connecting to a breaker panel or directly wiring to specific appliances or devices. Consult a professional electrician if you are unfamiliar with electrical wiring or need assistance in connecting to your specific electrical load.
Once all connections are in place, double-check for any loose or improperly secured wiring. Verify that the polarity is correct, and all connections are properly tightened. Turn on your electrical load and monitor your off-grid solar system to ensure everything is functioning as expected.
By following these steps and adhering to proper electrical connections, you can install an efficient off-grid solar system that meets your energy needs while ensuring the safety of your property, yourself, and others.
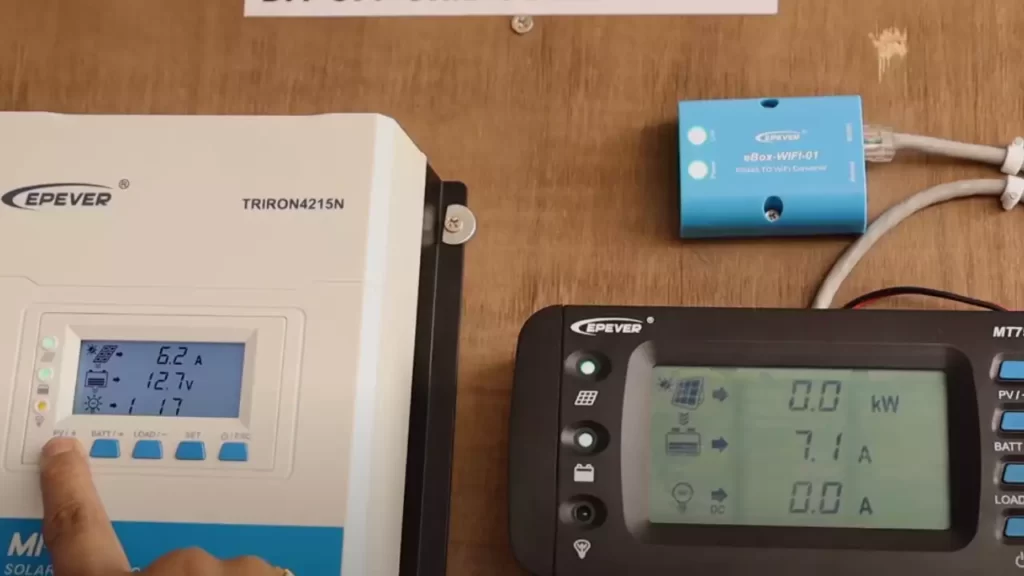
Testing And Commissioning The Off Grid Solar System
Conducting Initial System Checks and Troubleshooting
Before fully utilizing your off-grid solar system, it is important to conduct a series of initial system checks and troubleshooting to ensure everything is functioning optimally. These checks will help identify any potential issues and build confidence in the performance of your solar system.
To begin, visually inspect the entire system, including the solar panels, charge controller, batteries, and inverter. Look for any signs of physical damage, loose connections, or corrosion. Tighten any loose connections and clean any dirt or debris that may have accumulated on the panels or other components.
Next, test the voltage of the batteries using a multimeter. Ensure that the voltage level is within the manufacturer’s recommended range. If the voltage is low, it may indicate a problem with the battery bank or the charging system.
Checking the charge controller is also crucial. Make sure it is properly connected and functioning. The charge controller plays a vital role in regulating the charging and discharging of the batteries, protecting them from overcharging or over-discharging.
If any issues are detected during these initial checks, troubleshoot them immediately. This may involve consulting the user manual, contacting the manufacturer, or seeking assistance from a professional solar technician. Promptly addressing and resolving any issues will help optimize the performance and longevity of your off-grid solar system.
Verifying the Functionality of the Entire System
After conducting the necessary checks and troubleshooting, it is time to verify the functionality of your entire off-grid solar system. This step ensures that every component is working harmoniously and delivering the expected results.
Start by testing the solar panel output. Measure the voltage and current generated by the panels under direct sunlight. Compare these readings with the specifications provided by the manufacturer. If there is a significant discrepancy, it may point to issues with the panels or the wiring.
Next, check the charge controller’s functionality. Ensure that it is correctly managing the flow of electricity between the solar panels and the battery bank. Monitor the charging process and verify that the battery voltage is increasing as expected.
Once the batteries are fully charged, test the inverter. Connect electrical loads, such as lights or appliances, and observe if power is being supplied effectively. Measure the voltage and ensure it is within the acceptable range. Additionally, assess the inverter’s ability to handle peak loads and its response to sudden changes in energy demand.
During this verification process, be attentive to any abnormal sounds, smells, or excessive heating from the equipment. These signs can indicate potential issues that need to be addressed promptly.
Implementing Regular Maintenance and Monitoring Practices
To ensure the long-term efficiency and reliability of your off-grid solar system, it is imperative to implement regular maintenance and monitoring practices. By consistently checking the system and addressing any concerns, you can prolong the lifespan of the components and maximize energy production.
Regularly clean the solar panels to remove dirt, dust, or debris that may hinder their efficiency. Inspect the wires and connections for signs of wear or damage and replace them if necessary. Regularly tighten any loose connections to avoid potential voltage drops and system inefficiencies.
Monitoring the performance of your off-grid solar system is crucial. Use monitoring software or devices that provide real-time data on energy production, battery status, and overall system performance. Regularly analyze this data to identify any anomalies or deviations from expected outputs. In case of any issues, take immediate action to resolve them and prevent further damage.
In conclusion, by conducting initial system checks and troubleshooting, verifying the functionality of the entire system, and implementing regular maintenance and monitoring practices, you can ensure the optimal performance and longevity of your off-grid solar system.
Maximizing Efficiency And Extending Battery Life
When it comes to off-grid solar systems, maximizing efficiency and extending battery life are key factors in ensuring optimal performance. By implementing energy-saving practices, optimizing system performance through regular maintenance, and following tips to extend the lifespan of your battery bank, you can make the most out of your off-grid solar system and reduce your reliance on the grid.
Implementing energy-saving practices
Implementing energy-saving practices is crucial in making your off-grid solar system more efficient. By reducing unnecessary energy consumption, you can minimize the load on your batteries and maximize their lifespan. Here are a few energy-saving practices to consider:
- Use energy-efficient appliances and electronics, such as LED bulbs and energy-saving devices.
- Turn off lights, electronics, and appliances when not in use to avoid unnecessary power drain.
- Utilize natural lighting and ventilation to minimize the need for artificial lighting and air conditioning.
- Invest in efficient insulation and weatherproofing to reduce the energy required for heating and cooling.
Optimizing system performance through regular maintenance
Regular maintenance is essential to ensure the optimum performance of your off-grid solar system. By following a maintenance routine, you can identify and address any potential issues before they become major problems. Here are some maintenance tasks to include in your routine:
- Inspect solar panels for any signs of damage, dirt, or shading that could decrease their efficiency.
- Clean the solar panels regularly to remove dirt, dust, and debris that can obstruct sunlight absorption.
- Check the battery bank regularly for proper voltage, electrolyte levels, and signs of corrosion.
- Inspect and tighten all electrical connections to ensure they are secure and free from any corrosion or damage.
- Regularly monitor and analyze system performance through the use of solar monitoring tools or software.
Tips for extending the lifespan of your battery bank
Your battery bank is a critical component of your off-grid solar system. Taking proper care of your batteries can significantly extend their lifespan and improve overall system performance. Here are some tips for maximizing the lifespan of your battery bank:
- Ensure proper battery charging by following the manufacturer’s recommendations and using a charge controller.
- Avoid deep discharging your batteries by setting the battery cutoff voltage appropriately.
- Regularly check and maintain the electrolyte levels in your flooded lead-acid batteries.
- Store your batteries in a cool and dry environment to prevent excessive heat or moisture damage.
- Use your batteries regularly but avoid overcharging them, as this can shorten their lifespan.
By implementing energy-saving practices, optimizing system performance through regular maintenance, and following these tips to extend the lifespan of your battery bank, you can maximize the efficiency of your off-grid solar system and enjoy the benefits of sustainable and independent energy.
Frequently Asked Questions
Can I Install My Own Off-Grid Solar?
Yes, you can install your own off-grid solar system. However, it is important to follow proper guidelines and instructions. Ensure you have the necessary knowledge, skills, and tools to complete the installation safely and effectively. Consulting with a professional or taking a training course is recommended.
How Do You Set Up An Off-Grid Solar System?
To set up an off-grid solar system, follow these steps: 1. Assess your energy needs and calculate the required solar panel and battery capacity. 2. Install solar panels in a location with maximum sunlight exposure. 3. Connect the panels to a charge controller and batteries using appropriate wiring.
4. Set up an inverter to convert DC power from the batteries to AC power for your appliances. 5. Test and monitor the system regularly to ensure its efficient functioning.
How Much Does It Cost To Set Up An Off-Grid Solar System?
The cost of setting up an off-grid solar system can vary depending on various factors. It typically ranges from $10,000 to $50,000. Factors such as the size of the system, quality of equipment, location, and installation expenses can influence the overall cost.
What Size Solar System Do I Need To Run Off-Grid?
To determine the size of the solar system needed for off-grid use, consider your energy consumption. Calculate your typical daily usage in kilowatt-hours (kWh). Divide this by the peak sun hours in your area. This will give you the approximate system size in kilowatts (kW) needed to run off-grid.
Conclusion
Installing an off-grid solar system is a smart and sustainable choice for those seeking energy independence. By following the step-by-step guide in this blog post, you can successfully install your own solar system and start harnessing the power of the sun.
Not only will you reduce your carbon footprint, but you will also save on electricity bills in the long run. Embrace the benefits of renewable energy and take control of your energy future today.