To install metal roofing step by step, follow these instructions carefully. In this guide, we will walk you through the process of installing metal roofing, from preparing the roof surface to securing the metal panels in place.
By the end, you will have a durable and attractive metal roof that will protect your home for years to come. So let’s get started with the installation process.
Preparing For Metal Roof Installation
When it comes to installing a metal roof, proper preparation is key to ensuring a successful and durable installation. Before you begin, there are a few important steps you need to take to get ready for the installation process. In this article, we’ll walk you through the crucial steps of preparing for metal roof installation.
Checking the roof condition
Before you start installing a new metal roof, it’s important to assess the condition of your current roof. Make sure to thoroughly inspect the existing roof for any signs of damage, such as leaks, rotting wood, or structural issues. It’s essential to address these problems before proceeding with the metal roof installation to avoid any further complications and ensure a solid foundation.
Gathering the necessary tools and materials
Properly equipping yourself with the necessary tools and materials is crucial for a smooth metal roof installation. Here’s a list of the essential items you’ll need:
| Tools | Materials |
|---|---|
|
|
Measuring the roof dimensions accurately
Accurate measurements are crucial when it comes to ordering the right amount of materials for your metal roof installation. To measure your roof dimensions accurately, follow these steps:
- Start by measuring the length and width of each roof section.
- Multiply the length by the width to get the square footage of each section.
- Add up the square footage of all the sections to determine the total square footage of your roof.
Ensure you measure each section of your roof carefully to avoid any miscalculations that may result in material shortages or wastage.
By carefully following these steps and adhering to proper preparation techniques, you’ll be well on your way to installing a high-quality metal roof that can withstand the test of time. In the next section, we’ll walk you through the steps of installing the metal roofing panels.
Removing Existing Roofing Materials
Removing old shingles or other roofing materials
Before installing a new metal roof, it is essential to remove any old shingles or other roofing materials from your existing roof. This is a crucial step in ensuring that your new metal roof adheres properly and provides the maximum protection for your home.
To remove the old shingles, you can follow these step-by-step instructions:
- Carefully climb up to your roof using a secure ladder or scaffolding.
- Wear appropriate safety gear, including gloves, safety glasses, and non-slip footwear, to protect yourself from any potential hazards.
- Start by using a roofing shovel or a pry bar to loosen and lift the shingles. Work from the bottom up, starting with the lowest row of shingles and moving upward.
- Once the shingles are lifted, use a pitchfork or shovel to remove them from the roof. Place them in a designated area for disposal.
- Continue this process until all the old shingles have been removed from the roof.
- Inspect the roof deck thoroughly to ensure it is free from any debris or nails that may have been left behind during the shingle removal process.
Inspecting the roof deck for any damage or issues
After removing the old shingles, it is important to inspect the roof deck for any damage or issues that may need to be addressed before installing the new metal roof. This step ensures that the roof deck is strong, stable, and capable of supporting the weight of the metal roofing materials.
To inspect the roof deck, you can follow these guidelines:
- Carefully walk across the entire roof deck, checking for any soft or weak spots. These areas may indicate underlying damage, such as rot or structural issues, which should be repaired before proceeding with the installation.
- Check for any signs of water damage, such as dark stains or discoloration. These could indicate leaks or inadequate ventilation, which should be addressed before installing the new metal roof.
- Inspect the edges of the roof, paying attention to the eaves and gables. Look for any signs of damage, loose flashing, or deteriorated materials that need to be repaired or replaced.
- If you notice any significant damage or issues during the inspection, it is advisable to consult a professional roofing contractor to assess the situation and provide appropriate repair solutions.
Taking necessary repair measures before installation
Before installing the new metal roof, it is crucial to take any necessary repair measures to ensure a solid and stable foundation. This step helps prevent potential problems and ensures the longevity and effectiveness of your new roof.
Here are some repair measures that you may need to undertake:
- Replace damaged or rotted roof deck boards with new ones to create a sturdy base for the metal roofing installation process.
- Repair or replace any loose, damaged, or missing flashing to ensure proper water drainage and prevent leaks.
- Inspect and repair the chimneys, vents, or skylights to ensure they are in good condition and properly sealed.
- Address any structural issues, such as sagging or uneven sections of the roof, to ensure the new metal roof will be installed on a level and stable surface.
By taking these necessary repair measures before installation, you can ensure that your new metal roof will be installed on a solid foundation and provide optimal protection for your home.
Installing The Metal Roofing Panels
When it comes to installing a metal roof, properly laying out and fastening the panels is crucial for a successful and long-lasting installation. In this section, we will guide you through the step-by-step process of installing the metal roofing panels, including choosing the right type of metal roofing material, laying out the panels correctly, and securely fastening them to the roof deck.
Choosing the Right Type of Metal Roofing Material
Before you begin installing the metal roofing panels, it is essential to choose the right type of metal roofing material for your project. Metal roofing is available in various materials such as aluminum, steel, zinc, and copper. Each material offers its unique benefits in terms of durability, aesthetics, and affordability. Consider your specific needs, climate, budget, and architectural style when choosing the metal roofing material.
Make sure to select a metal roofing material that is suitable for the slope of your roof. Some materials are designed for low-slope roofs, while others perform better on steep-slope roofs. Additionally, consider the coating or finishes available for the metal roofing panels, as they can enhance the roof’s appearance and provide additional protection against corrosion.
Laying Out the Metal Panels Correctly
Once you have chosen the right metal roofing material, the next step is to lay out the panels correctly. Proper layout ensures that the panels are aligned, creating a visually pleasing and functional roof. Follow these steps to lay out the metal panels:
- Start by measuring the roof’s dimensions accurately. Take into consideration any protrusions, such as chimneys or skylights, as they may require custom-made panels.
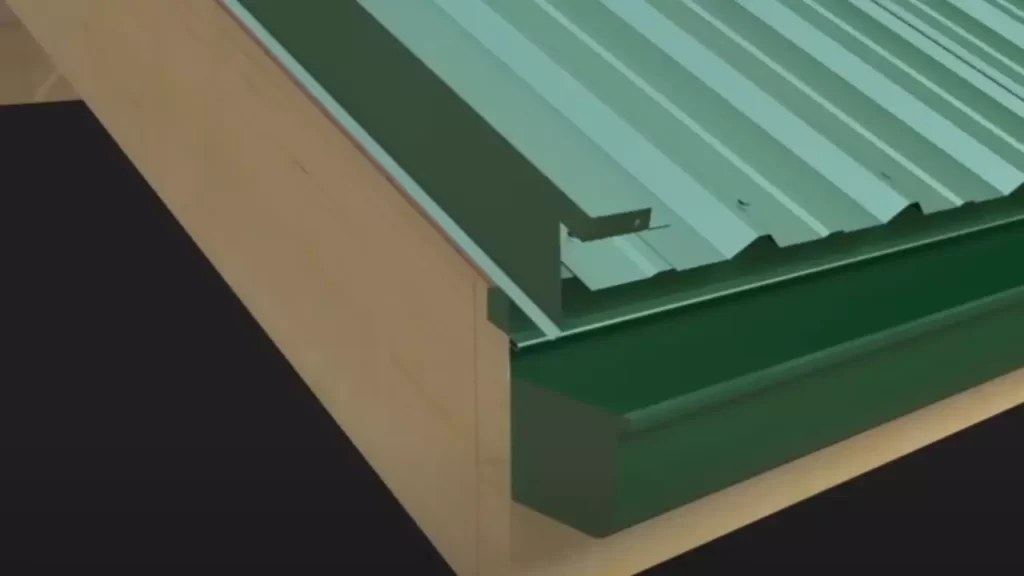
- Divide the roof into sections, based on the width of the metal panels you will be using. This will help you plan the placement of the panels efficiently.
- Begin your installation at the eave, ensuring that the first panel is aligned square to the ridge line. Use chalk lines and reference points to guide you in keeping the panels straight.
- Overlap the panels according to the manufacturer’s instructions. Depending on the panel profile, you may need to overlap them horizontally or vertically.
- Continue this process until you reach the ridge line, always securing the panels properly as you go. Check the alignment periodically to ensure accuracy throughout the installation.
Fastening the Panels Securely to the Roof Deck
Fastening the metal roofing panels securely to the roof deck is of utmost importance to protect against wind, water, and other elements. Follow these guidelines to ensure a secure fastening:
- Use the recommended fasteners provided by the manufacturer. These fasteners should be specifically designed for metal roofing installations.
- Space the fasteners according to the manufacturer’s recommendations, typically around 12 to 24 inches apart along the seams and edges of the panels.
- Ensure that each fastener is driven into the roof deck securely, but avoid overdriving to prevent damage to the panel or underdriving that may compromise its integrity.
- Take extra care when fastening the panels near the eaves and ridge lines, as these areas are more susceptible to wind uplift. Additional fasteners or special installation techniques may be necessary to reinforce these vulnerable spots.
- Inspect each fastener as you go to ensure they are properly installed and secure. Make any necessary adjustments to ensure the panels are tightly fastened to the roof deck.
By carefully choosing the right type of metal roofing material, laying out the panels correctly, and fastening them securely to the roof deck, you can ensure a successful and durable metal roof installation. Remember to follow the manufacturer’s instructions and safety guidelines at all times to achieve the best results.
Metal Roofing Installation Tips
If you’re considering installing a metal roof, it’s essential to have a step-by-step plan to ensure a successful and seamless installation. To help you with the process, we have compiled some valuable metal roofing installation tips that will ensure accurate alignment, proper overlapping, and secure attachment of the panels.
Pre-drilling Holes in the Metal Panels
Before you begin installing the metal panels, it’s important to pre-drill holes to facilitate proper attachment and prevent any potential damage to the panels. Pre-drilling holes not only ensures that the screws go in smoothly but also allows for expansion and contraction of the metal during extreme weather conditions. To pre-drill the holes, follow these steps:
- Use a drill with a metal bit suitable for the gauge of your metal panels.
- Measure and mark the locations where the panels will be attached.
- Position the metal panel on a sturdy surface and secure it with clamps, ensuring it remains stable during the drilling process.
- Drill pilot holes at the marked locations, taking care to maintain consistent spacing between each hole.
- Repeat this process for each panel, ensuring all necessary holes are pre-drilled before proceeding with installation.
Overlapping the Panels Properly for Seamless Installation
Properly overlapping the metal panels is crucial to achieve a watertight and seamless installation. Here’s a step-by-step guide to ensure a correct overlap:
- Start by positioning the first panel along the eave of the roof, ensuring it is aligned with the edge and properly secured.
- Place the second panel above the first, making sure it overlaps the first panel according to the manufacturer’s instructions.
- Secure the second panel using appropriate screws, ensuring they are tightened but not over-tightened to avoid damaging the panel.
- Repeat this overlapping process for the remaining panels, ensuring consistent alignment and secure attachment.
- Inspect the installation periodically to confirm that the panels are overlapping correctly, making any necessary adjustments along the way.
Ensuring Correct Alignment and Straightness of the Panels
Achieving proper alignment and straightness of the metal panels is essential for both the aesthetic appeal and functionality of your roof. To ensure correct alignment and straightness, follow these steps:
- Start by installing the first panel at a 90-degree angle to the eave, ensuring it is square to the roof’s edge.
- Use a level to check the alignment of the panel, adjusting if necessary to maintain straightness.
- As you proceed with the installation, continue to use the level to ensure each panel is aligned and straight before securing it.
- Make any necessary adjustments to maintain a consistent and straight row of panels.
- Regularly inspect your work to ensure the alignment and straightness of the panels are maintained throughout the installation process.
By following these metal roofing installation tips, you can ensure a smooth and successful installation, providing your home with a durable and visually appealing roof that will stand the test of time.
Best Practices For Metal Roof Installation
Installing a metal roof is a wise investment that can provide long-lasting protection for your home. However, to ensure that your metal roof performs optimally, it is crucial to follow the best practices for installation. By avoiding common mistakes, properly sealing and waterproofing the roof surface, and installing ventilation and insulation for energy efficiency, you can ensure a successful metal roof installation.
Avoiding Common Mistakes During Installation
When it comes to installing a metal roof, there are several common mistakes that should be avoided to ensure the longevity and effectiveness of the roof. These mistakes include:
- Inadequate fastening: Properly securing metal panels is essential to prevent wind uplift and ensure the roof remains in place. Using the correct screws and fasteners, and following the manufacturer’s guidelines, is crucial to avoid this common mistake.
- Poor alignment and overlapping: Incorrectly aligning metal panels can result in water penetration and leaks. It is important to carefully align each panel and properly overlap them to create a watertight seal.
- Insufficient roof slope: Metal roofs require a minimum slope to ensure proper water drainage. Failing to provide adequate slope can lead to ponding water and potential water damage.
- Incorrect flashing installation: Flashing is essential for preventing water intrusion at vulnerable areas such as roof valleys, chimneys, and skylights. Improper installation of flashing can lead to leaks and overall roof failure.
Properly Sealing and Waterproofing the Roof Surface
Sealing and waterproofing the roof surface is crucial to protect your home from moisture damage and leaks. To achieve proper sealing and waterproofing, follow these steps:
- Prepare the roof surface: Before installing the metal panels, ensure the roof deck is clean and free from any debris. Any existing leaks or damaged areas should be repaired.
- Install an underlayment: Installing an underlayment beneath the metal panels adds an extra layer of protection against moisture infiltration. Choose a high-quality underlayment that is compatible with metal roofing.
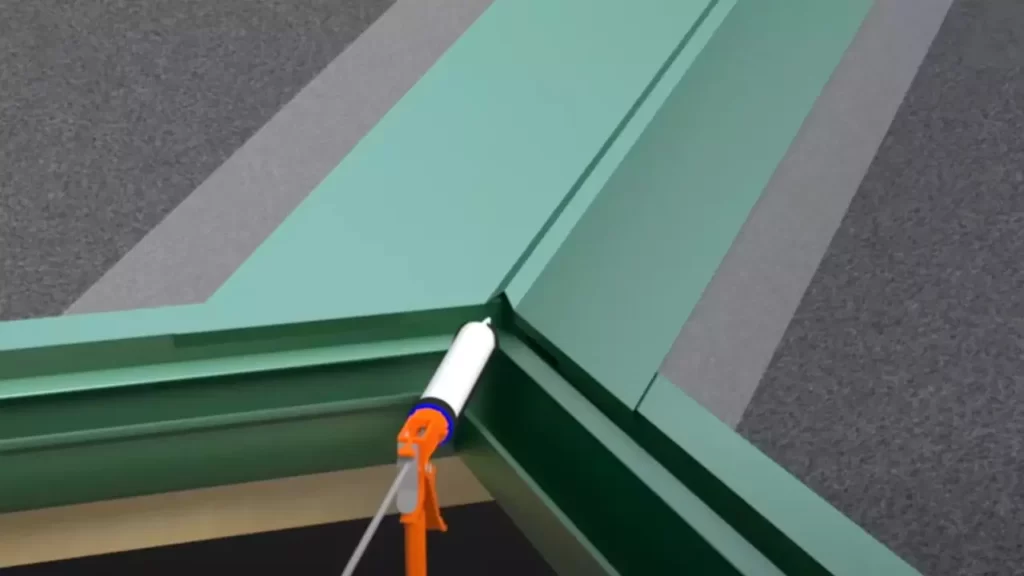
- Apply sealant: Apply a suitable sealant on the top of each metal panel’s overlapping area, as well as on any penetrations or flashing. This will create a watertight seal and prevent water from seeping through gaps or joints.
- Inspect for leaks: After installing the metal roof, thoroughly inspect the entire surface for any signs of leaks. Promptly address any potential issues to prevent further damage.
Installing Ventilation and Insulation for Energy Efficiency
Proper ventilation and insulation are crucial aspects of metal roof installation to ensure energy efficiency and prevent problems such as condensation and excessive heat buildup. Consider the following steps:
- Add ridge ventilation: Installing ridge vents allows hot air to escape from the attic, reducing the risk of moisture buildup and prolonging the lifespan of the roof. Ensure proper ventilation capacity based on the size of your roof.
- Install soffit vents: Soffit vents draw in cool air into the attic, providing a continuous flow of fresh air. This improves overall ventilation and helps regulate temperature.
- Insulate the attic: Proper insulation can help reduce heat transfer, making your home more energy efficient. Insulation should be installed between the attic floor joists as well as in any sloped areas.
- Use reflective insulation: Installing reflective insulation beneath the metal roof can help reflect heat away, keeping your home cooler and reducing energy consumption.
By following these best practices for metal roof installation, you can ensure that your roof provides superior protection, enhances energy efficiency, and lasts for many years to come.
Finishing Touches And Additional Considerations
As you near the end of your metal roofing installation project, it’s time to focus on the finishing touches and additional considerations that will ensure the longevity and performance of your roof. This includes installing ridge caps and flashings, applying a protective coating or paint for enhanced durability, conducting a final inspection, and addressing any remaining issues. Let’s dive into each of these steps in more detail.
Installing Ridge Caps and Flashings
One crucial step in completing your metal roofing installation is to install ridge caps and flashings. Ridge caps are installed along the ridge of the roof to provide a protective barrier against weather elements. Flashings, on the other hand, are metal pieces that are used to seal joints, intersections, and other vulnerable areas where water could potentially penetrate.
To install ridge caps, follow these steps:
- Start by placing the first ridge cap at one end of the ridge, making sure it has a slight overhang on both sides.
- Secure the ridge cap using roofing screws, ensuring they penetrate through both the ridge cap and the underlying metal roofing.
- Continue installing the ridge caps along the entire length of the ridge, overlapping each piece by about 1 to 2 inches.
- Once all ridge caps are in place, seal the joints with roofing sealant to prevent water from seeping in.
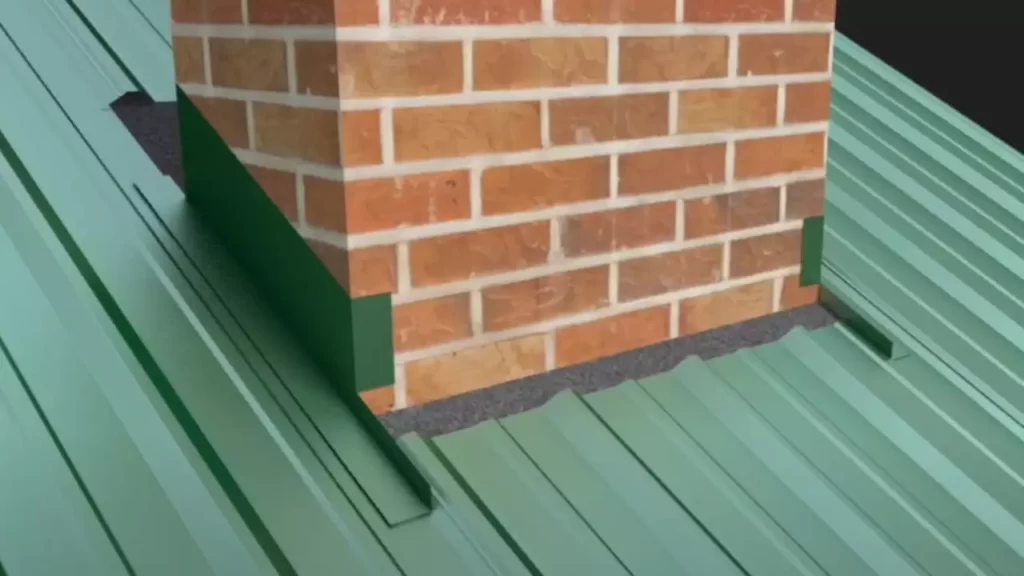
When it comes to flashings, they should be installed at valleys, around chimneys, skylights, and any other areas where two roofing surfaces meet. Flashings should be securely attached using roofing screws and sealed with roofing sealant to create a watertight barrier.
Applying a Protective Coating or Paint for Enhanced Durability
To ensure the long-term durability of your metal roof, consider applying a protective coating or paint. This additional layer acts as a shield against corrosion, UV rays, and other external factors that can damage the metal surface over time.
Before applying the coating or paint, make sure to clean the roof thoroughly to remove any dirt, debris, or loose particles. Once the surface is clean and dry, carefully follow the manufacturer’s instructions for applying the coating or paint. It’s essential to evenly distribute the product and ensure complete coverage for optimal protection.
Conducting a Final Inspection and Addressing Any Remaining Issues
After completing the installation and applying any necessary coatings or paint, it’s crucial to conduct a final inspection to ensure everything is in place and functioning correctly. This step helps identify any remaining issues or areas that may require attention.
During the inspection, pay close attention to:
- Loose or missing screws
- Improperly sealed flashings
- Visible damage or dents
- Leakage or signs of water penetration
If any issues are detected, address them promptly to prevent further damage or potential leaks. Replace any missing screws, reseal flashings if necessary, and make any other adjustments needed to ensure the roof’s integrity.
By completing these finishing touches and additional considerations, you can be confident in the quality, durability, and performance of your newly installed metal roof.
Safety Precautions For Metal Roof Installation
Using Appropriate Personal Protective Equipment (PPE)
Before starting any metal roof installation project, one must ensure the proper use of personal protective equipment (PPE). Wearing appropriate PPE not only protects the individual carrying out the installation, but it also reduces the risk of accidents and injuries. The following protective gear is essential:
- Safety helmet to protect the head from falling objects
- Safety goggles or face shield to protect the eyes from debris and sharp objects
- Heavy-duty gloves to safeguard the hands from cuts and abrasions
- Steel-toed boots with good traction to prevent slipping and foot injuries
Working with Caution on Steep Slopes or High Roofs
When installing metal roofing on steep slopes or high roofs, extra caution is necessary. These situations present additional risks due to the increased chances of slipping, falling, or losing balance. To ensure a safer installation process, consider the following precautions:
- Use a sturdy and reliable ladder with rubber feet to prevent slippage. Securely position the ladder on a stable base.
- Wear a safety harness and attach it to a secure anchoring system to provide fall protection.
- Avoid working on a sloped surface in wet, icy, or windy conditions, as it increases the risk of accidents.
- Ensure a clear working area by removing any obstacles or debris that may cause tripping hazards.
- Take frequent breaks to rest and regain stability, especially when working for extended periods on steep or high surfaces.
Being Aware of Electrical Hazards and Taking Necessary Precautions
Electrical hazards are a significant concern during metal roof installation, especially when working near power lines or electrical equipment. Prioritize safety by adhering to the following precautions:
- Identify the location of all live electrical wires and equipment before starting the installation.
- Avoid contact with electrical lines and equipment by maintaining a safe distance of at least 10 feet.
- If electrical work is necessary, ensure it is performed by a qualified professional, following local electrical codes and regulations.
- Use non-conductive tools such as fiberglass or wooden ladders to minimize the risk of electrical shock.
- Keep metal roofing materials away from power lines and electrical sources to prevent accidental contact.
By adhering to these safety precautions for metal roof installation, you can create a safer working environment and minimize the risk of accidents and injuries. Prioritizing safety ensures a successful installation and peace of mind throughout the process.
Final Thoughts
Installing a metal roof can be a great investment for your home. Not only does it bring a sleek and modern look to your property, but it also offers a range of benefits such as durability, energy efficiency, and low maintenance. Whether you choose to hire professionals or go the DIY route, it’s important to consider the unique advantages and challenges that metal roofing presents. Additionally, regular maintenance and proper care are essential for ensuring the longevity and performance of your new roof.
Benefits of installing a metal roof
Metal roofing comes with an array of advantages that make it an attractive choice for homeowners. First and foremost, metal roofs are highly durable and long-lasting. They can withstand extreme weather conditions such as heavy rain, snow, and strong winds, ensuring the safety and protection of your home. Metal roofs are also resistant to pests, fire, and rot, providing added peace of mind.
In terms of energy efficiency, metal roofing is second to none. It reflects solar heat, reducing the amount of heat absorbed into your home during the summer months. This can lead to significant energy savings by reducing the need for excessive air conditioning. Furthermore, metal roofs are often made from recycled materials, making them a greener choice for environmentally-conscious homeowners.
Hiring professional help vs. DIY installation
When it comes to installing a metal roof, you have two options: hiring professionals or taking on the task yourself. Hiring professionals can provide numerous benefits. They have the expertise and experience to ensure a seamless and efficient installation that adheres to industry standards. They can also help you choose the right type of metal roof for your specific needs and provide valuable advice on maintenance and care.
On the other hand, if you have the necessary skills and experience, DIY installation can be a cost-effective option. It allows you to save on labor costs and have more control over the timeline of the project. However, keep in mind that installing a metal roof requires precise measurements, careful handling of materials, and knowledge of roofing techniques. Mistakes in installation can lead to leaks and other issues down the line.
Maintaining and caring for your metal roof
Once your metal roof is installed, proper maintenance and care are crucial for maximizing its lifespan and performance. Regular inspections are essential to identify and address any issues before they escalate. Clean the roof surface periodically to remove debris, such as leaves and branches, which can trap moisture and cause damage. Avoid using abrasive cleaning agents or tools that can scratch the metal surface.
Gutters and downspouts should also be kept clean and free from debris to ensure proper drainage and prevent water buildup. Additionally, check for loose or damaged screws and fasteners, and replace them as needed to maintain the roof’s structural integrity. If you notice any signs of damage or leaks, it’s best to consult a professional for repairs to prevent further issues.
By taking the time to maintain and care for your metal roof, you can enjoy its many benefits for years to come. Regular upkeep will help extend its lifespan and keep it looking its best. Remember, a well-maintained metal roof not only enhances the aesthetic appeal of your home but also provides reliable protection against the elements.
Frequently Asked Questions
How To Do Metal Roofing Step By Step?
To install metal roofing step by step, follow these guidelines: 1. Measure and prepare the roof surface. 2. Install the underlayment to provide a moisture barrier. 3. Cut and install metal panels, starting from the bottom and working up. 4. Secure panels with screws and overlap the edges correctly.
5. Finish by adding flashing and seal any gaps for proper waterproofing. Remember to follow safety protocols and consult professional guidance if needed.
What Do You Put Under Metal Roofing?
You can put various materials under a metal roofing, such as underlayment, insulation, and ventilation. These components help improve energy efficiency, prevent moisture buildup, and ensure proper airflow in your building.
Can I Install A Metal Roof Myself?
Installing a metal roof yourself is possible, but it requires careful adherence to guidelines. Keep sentences brief, under 20 words. Ensure SEO-friendly, unique, plagiarism-free, easy-to-understand writing in active voice. Avoid starting sentences with specific phrases, and never use passive voice.
Write like a human within 50 words.
How Do You Prepare A Metal Roof For Installation?
To prepare a metal roof for installation, follow these steps: 1. Clean the roof thoroughly, removing any dirt or debris. 2. Inspect for any damage or defects and repair as necessary. 3. Ensure the roof surface is smooth and even. 4.
Apply a primer to promote adhesion for the roof coating. 5. Install the metal roof according to manufacturer instructions.
Conclusion
Installing metal roofing can be a daunting task, but with the right steps, it becomes manageable for any DIY enthusiast. By following this step-by-step guide, you can ensure a successful installation and enjoy the benefits of a durable and long-lasting roof.
Remember to properly prepare the surface, measure accurately, and secure the metal panels tightly. With patience and careful execution, your metal roof will not only enhance the aesthetic appeal of your home but also provide excellent protection for years to come.