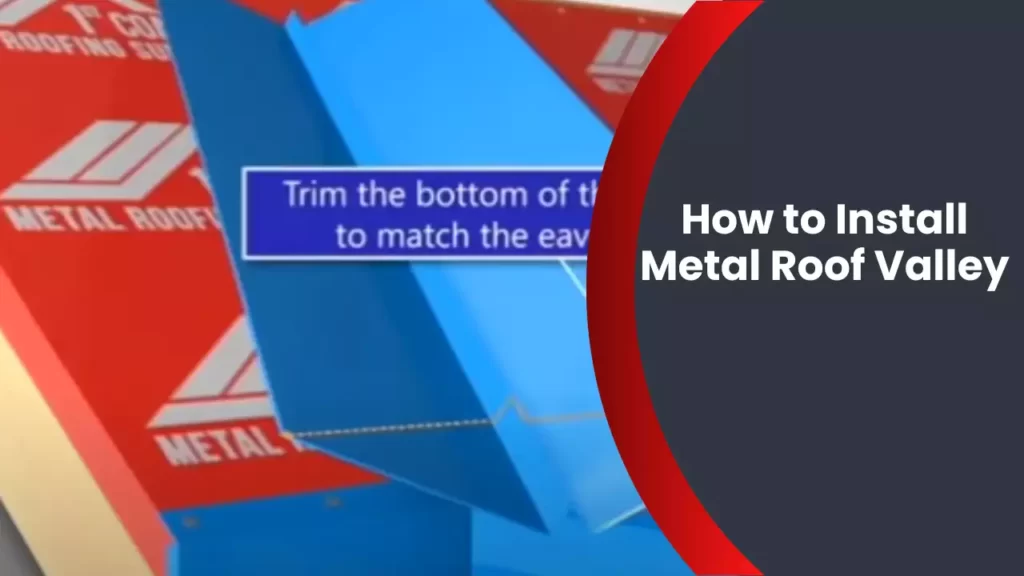
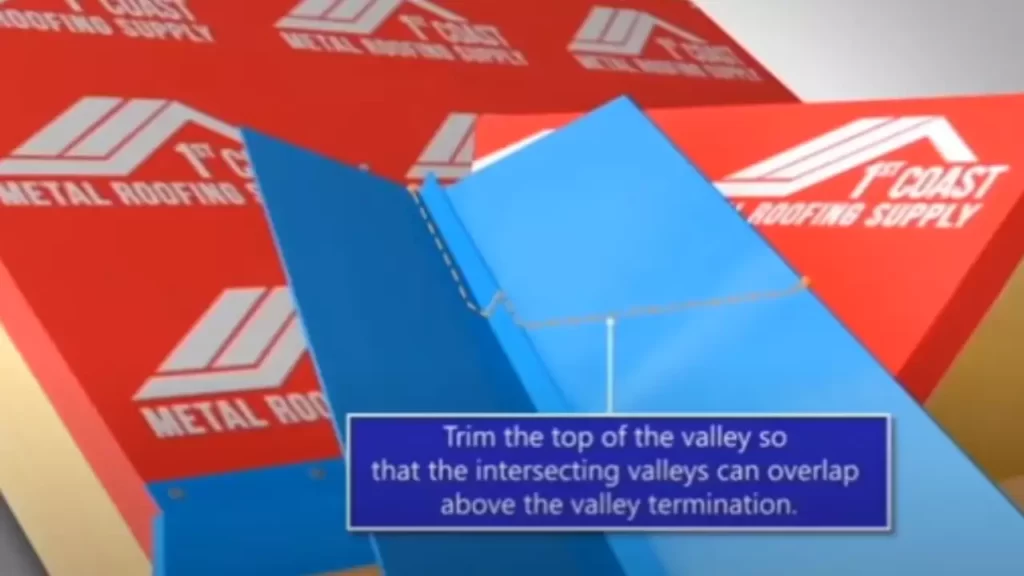
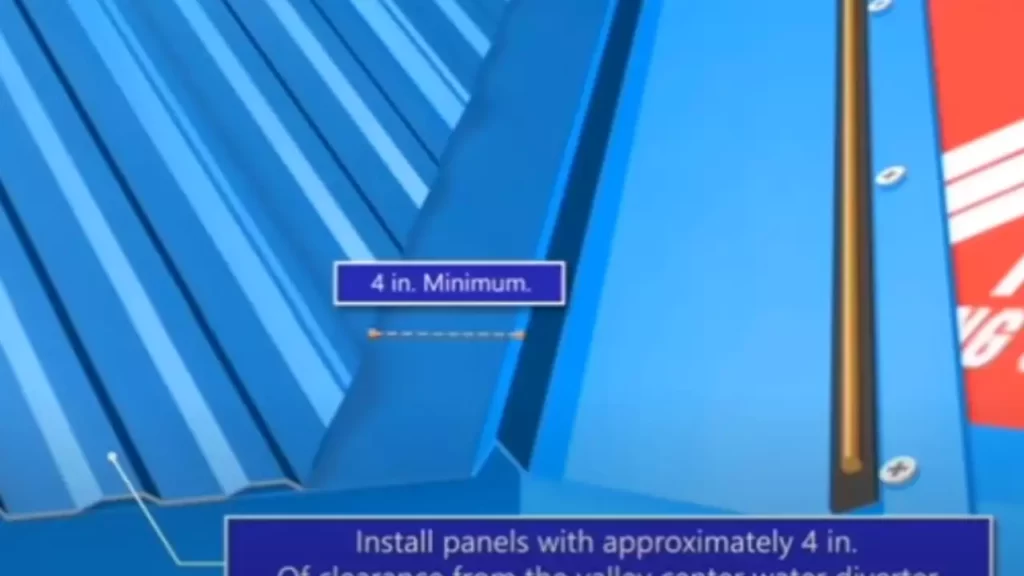
To install a metal roof valley, first, prepare the area by removing any old roofing materials and cleaning it thoroughly. Then, measure and cut the metal valley flashing to fit the roof’s slope and shape, ensuring a minimum overlap of six inches.
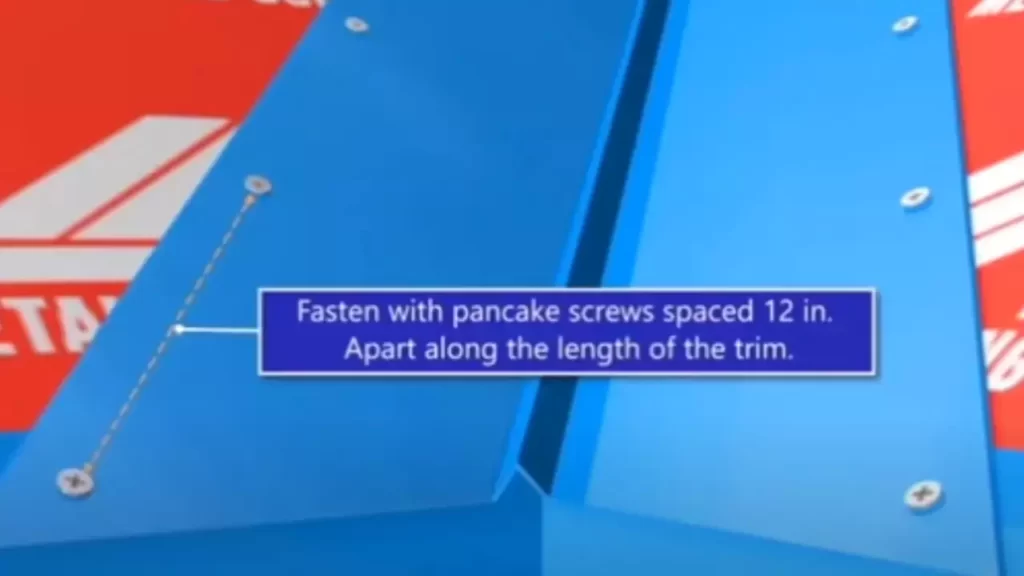
Finally, secure the flashing in place by nailing it every six inches along the edges, using roofing cement to seal the nails and edges for added protection. A metal roof valley is an excellent choice for homeowners wanting a durable and long-lasting roofing option.
Additionally, it provides an attractive aesthetic, adding a touch of sophistication to any property. Installing a metal roof valley requires careful planning and execution to ensure proper fit and function. We will guide you through the step-by-step process of installing a metal roof valley, enabling you to complete the project successfully. So, let’s get started and learn how to install a metal roof valley on your home.
Understanding The Role Of The Metal Roof Valley
When it comes to installing a metal roof, understanding the role of the metal roof valley is crucial. The roof valley is the area where two roof slopes meet, creating a trough-like channel that helps redirect water and debris away from the roof. Correctly installing the metal roof valley is essential for ensuring the overall effectiveness and longevity of your roof. In this article, we will delve into the definition and purpose of a metal roof valley, as well as emphasize the importance of proper installation.
Definition and Purpose of a Metal Roof Valley
A metal roof valley refers to the v-shaped channel created when two roof slopes intersect. It is an integral part of any roofing system, responsible for guiding water and debris away from the roof and into the gutters or downspouts. By channelizing the flow of water, the metal roof valley prevents excess water from pooling on the roof’s surface, reducing the risk of leaks, water damage, and potential structural issues. Additionally, the metal roof valley serves an aesthetic purpose, enhancing the overall appearance of the roofline.
Importance of Proper Installation
Proper installation of the metal roof valley is paramount to the overall functionality of your roof. A poorly installed roof valley can result in water penetration, leading to roof leaks, moisture damage, and even mold growth. Therefore, it is vital to ensure that the installation is carried out with precision and adheres to industry best practices. This includes properly aligning the metal panels, securely fastening the valley flashing, and using weather-resistant sealants to prevent any potential water infiltration. By investing in professional installation and paying attention to the small details, you can safeguard the integrity of your roof and prolong its lifespan.
In conclusion, understanding the role of the metal roof valley and its importance in the overall roofing system is crucial for homeowners and roofing professionals alike. By defining the metal roof valley and emphasizing the significance of proper installation, we hope to empower readers to make informed decisions when it comes to their roofing projects. Remember, a well-installed metal roof valley not only improves water drainage and protects against water damage but also contributes to the overall durability and appearance of your roof.
Assessing The Roof Condition
Assessing the Roof Condition: Evaluating the Existing Roof Structure
Before you embark on the installation of a metal roof valley, it is crucial to first assess the condition of your roof. This evaluation will not only help you determine the kind of work required but also ensure that you achieve the best results and avoid any unexpected issues down the road.
Identifying Potential Issues and Repairs Needed
During the assessment process, it is essential to identify potential issues and assess the need for any repairs. This step will help you gauge the level of work required to achieve a successful metal roof valley installation.
Here are several key factors to consider:
- Look for any signs of existing leaks, such as water stains on the ceiling or walls. These could indicate deteriorated flashing or improperly sealed roof penetrations. Addressing these issues prior to the installation will ensure the longevity and effectiveness of your metal roof valley.
- Conduct a visual inspection of the roof structure to identify any signs of sagging, rotting, or damage. Pay close attention to the areas where the valley intersects with the roof, as this is a common area for potential issues to arise.
- Check the condition of the shingles or roofing material surrounding the valley. If there are signs of wear and tear, it may be necessary to replace these before the metal valley installation to ensure a seamless integration and optimal performance.
- Inspect the condition of the existing flashing and sealant. Look for signs of corrosion, cracked sealant, or loose flashing, as these can compromise the integrity of the valley system.
By assessing the roof condition and identifying any potential issues or repairs needed, you will be well-prepared to move forward with the installation of your metal roof valley. Taking the time to evaluate these factors will not only enhance the longevity of the valley itself but also ensure the overall integrity of your roofing system.
Gathering The Necessary Tools And Materials
Before beginning the installation process for your metal roof valley, it’s crucial to gather all the essential tools and materials. By ensuring you have everything you need beforehand, you can streamline the installation process and avoid unnecessary delays. In this section, we will outline the essential tools for metal roof valley installation and provide tips for selecting the right metal roof valley material.
Essential Tools for Metal Roof Valley Installation
Having the right tools for the job is essential to ensure a smooth and successful metal roof valley installation. Here are the must-have tools:
<td</td
| Tool | Description |
|---|---|
| Metal Snips | Used for cutting and shaping the metal roof valley material to fit your specific roof dimensions. |
| Measuring Tape | Provides accurate measurements for precise cutting and fitting of the metal roof valley material. |
| Safety Glasses | Protects your eyes from any flying debris or metal particles during the installation process. |
| Gloves | Ensures your hands are protected and provides a better grip while handling the metal roof valley material. |
| Screwdriver | Used to secure the metal roof valley material in place with screws or rivets. |
| Required for attaching the metal roof valley to the underlying roof structure. |
By having these essential tools readily available, you can tackle the metal roof valley installation with confidence and efficiency.
Choosing the Right Metal Roof Valley Material
When it comes to selecting the right metal roof valley material, several factors should be considered. Here’s what you need to keep in mind:
- Climatic Conditions: Consider the weather conditions in your area. If you live in an area prone to heavy rainfall or snowfall, choose a metal roof valley material that can withstand such conditions and prevent water damage.
- Durability: Opt for a metal roof valley material that is durable and long-lasting. It should be able to withstand harsh weather elements, resist corrosion, and prevent leaks.
- Style and Aesthetics: Your metal roof valley should complement the overall look of your roof. Choose a material that matches the color and style of your existing roof.
- Installation Ease: Consider the ease of installation when choosing a metal roof valley material. Some materials may require specialized tools or expertise, while others can be installed using basic tools.
- Budget: Lastly, consider your budget when selecting the metal roof valley material. Compare prices and choose a material that offers the best value for your money without compromising on quality.
By taking these factors into account, you can select the right metal roof valley material that meets your needs and ensures a durable and visually appealing result.
Removing Old Valley Flashing
Safely Removing Existing Valley Flashing
The first step in installing a new metal roof valley is to safely remove the existing valley flashing. This process requires caution and attention to detail to avoid any damage to the roof or injury to yourself. Here are some important steps to follow:
- Begin by donning the appropriate safety gear, such as gloves and safety glasses, to protect yourself from any potential hazards during the removal process.
- Using a pry bar or a specialized roofing tool, gently lift the existing valley flashing away from the roof surface. Take care not to apply excessive force, as this could cause damage to the underlying roof structure.
- Slowly work your way along the length of the valley, gradually releasing the flashing from its fasteners. Depending on the installation method, these fasteners could be nails, screws, or adhesives. Take note of each fastener type for reference when installing the new valley flashing.
- If the existing flashing is heavily corroded or damaged, it may be necessary to remove any remaining pieces that are stuck or embedded in the roof. Use caution and avoid causing any additional damage to the roof surface while doing so.
- Once the old valley flashing is completely removed, inspect the roof surface underneath for any signs of damage or deterioration. Address any issues before proceeding with the installation of the new flashing.
Clearing and Cleaning the Area
After safely removing the old valley flashing, it is crucial to clear and clean the area before installing the new flashing. This will ensure proper adhesion and longevity of the new material. Follow these steps to prepare the area:
- Use a broom or brush to remove any loose debris, such as leaves, twigs, or dirt, from the valley area. Be thorough in this step to ensure a clean and smooth surface.
- If there are any remaining traces of the old flashing, carefully remove them using a scraper or a wire brush. Take care not to scratch or damage the roof surface underneath.
- Inspect the surrounding roof tiles or panels for any signs of damage or wear. Replace any compromised pieces to maintain the integrity of the entire roof system.
- Lastly, use a mild detergent solution and a soft bristle brush to clean the valley area. Scrub gently to remove any built-up dirt or stains that could hinder the adhesion of the new flashing. Rinse thoroughly with clean water and allow the area to dry completely before proceeding with the installation.
By safely removing the existing valley flashing and thoroughly clearing and cleaning the area, you will set the stage for a successful installation of the new metal roof valley. Taking these necessary steps will ensure a seamless transition and a sturdy, long-lasting roof structure.
Measuring And Cutting The Metal Roof Valley Material
Taking Accurate Measurements
Before you start cutting the metal roof valley material, it’s crucial to take accurate measurements. This will ensure that the valleys fit perfectly and function properly. To begin, grab your measuring tape and climb up onto the roof. Take note of the length and width of the valley area, making sure to measure twice for accuracy.
Once you have the measurements, jot them down on a notepad or use a smartphone app to keep track. Remember to include the angle and slope of the roof in your measurements as well. This will help you determine the correct length and angle of the cuts you’ll need to make.
Cutting the Metal Roof Valley Material to Size
Now that you have the measurements, it’s time to cut the metal roof valley material to size. Make sure you have the appropriate tools like tin snips or a metal-cutting saw. These tools will help you create clean and precise cuts.
Start by laying the metal valley material flat on a stable surface. Use a straightedge or a ruler to mark the measurements you took earlier. This will serve as your cutting guide.
Align the cutting tool with your marked lines and begin cutting through the metal. Take your time and use steady, even pressure to ensure a smooth cut. Double-check your measurements and make any necessary adjustments before proceeding.
If you’re working with a particularly long or wide piece of metal, it may be helpful to have an extra set of hands to assist with holding the material steady during the cutting process.
Once the metal is cut to the correct size, carefully remove any sharp edges or burrs using a file or sandpaper. This will help prevent injuries during the installation process.
Remember, proper measurement and precise cutting are crucial for a successful installation of metal roof valley material. Taking the time to ensure accuracy will result in a clean and professional finish that not only protects your roof but also adds visual appeal.
Fitting And Fastening The Metal Roof Valley
Placing the Metal Roof Valley in Position
Before you can begin fitting and fastening the metal roof valley, it’s important to properly place it in position. The valley should be aligned so that it runs straight along the roofline, allowing for water to flow smoothly off the roof. To ensure a precise placement, follow these steps:
- Clean the area: Start by removing any debris, dirt, or loose shingles from the roof surface where the valley will be installed. This will ensure a clean and stable foundation for the metal valley.
- Measure and mark: Measure the length of the valley needed and mark it on the roof surface using a chalk line. This will serve as a guide to position the valley accurately.
- Secure the valley underlayment: Place a layer of roofing underlayment along the marked line. The underlayment will provide an extra layer of protection against leaks and help prevent moisture from seeping through.
- Position the valley: Carefully align the metal valley along the marked line, making sure it is centered and straight. If necessary, use roofing nails or screws at the top edges of the valley to temporarily hold it in place.
Properly Fastening the Valley to the Roof
Once the metal roof valley is correctly positioned, it’s time to ensure it is securely fastened to the roof. This will prevent it from shifting or being lifted by strong winds. Follow these guidelines to properly fasten the valley:
- Use appropriate fasteners: Select the appropriate type of fasteners based on the material of your roof. For asphalt shingles, roofing nails with a minimum length of 1½ inch are commonly used. Metal roofs may require screws specifically designed for metal applications.
- Secure the top edges: Starting from one end, secure the top edges of the metal valley by driving the nails or screws through the metal and into the roof. Space the fasteners approximately 6 to 12 inches apart along the edge, ensuring they penetrate the underlying roof deck.
- Avoid overdriving: Be mindful not to overdrive the fasteners, as it may damage the metal valley or compromise the integrity of the roof. Drive them until they are snug and flush with the surface without applying excessive force.
- Repeat the process: Continue fastening the valley along its entire length, ensuring the top edges are properly secured. Make sure the fasteners are evenly spaced and provide sufficient support to keep the valley in place.
- Check for tightness: Once all the fasteners are in place, check for any loose or improperly installed ones. Tighten any that may have become loose or replace damaged fasteners to ensure a secure installation.
- Inspect and test: After completing the fastening process, visually inspect the metal roof valley to ensure it is securely attached to the roof. Gentle pressure can be applied to test for any movement or instability. Any issues should be addressed promptly to prevent future problems.
By following these steps, you can confidently fit and fasten the metal roof valley, creating a durable and watertight seal for your roof. Remember to wear appropriate safety gear and consult a professional if you are unsure about any aspect of the installation process. Now that you know how to properly place and secure the metal valley, you can move on to other essential steps in your roofing project.
Sealing And Waterproofing The Metal Roof Valley
Applying Sealant to Prevent Leaks
To ensure a watertight metal roof valley, it is crucial to properly seal and lubricate the joints and edges. By applying sealant, you create a protective barrier that prevents leaks and water infiltration. Here’s a step-by-step guide to help you apply sealant effectively:
- Clean the surface: Begin by thoroughly cleaning the metal roof valley to remove any dirt, debris, or rust. This will ensure proper adhesion of the sealant.
- Choose the right sealant: Select a high-quality sealant specifically designed for metal roofs. Look for a product that is compatible with the metal material and has excellent waterproofing properties.
- Prepare the sealant: Follow the manufacturer’s instructions to prepare the sealant. This typically involves mixing or shaking the product to ensure uniform consistency.
- Apply the sealant: Using a putty knife or caulking gun, carefully apply the sealant along the entire length of the metal roof valley. Pay close attention to the joints and edges, where leaks are most likely to occur.
- Smooth and shape: After applying the sealant, use the putty knife to smooth and shape the sealant. This will create a neat and even surface, enhancing the effectiveness of the seal.
- Allow for curing: Give the sealant sufficient time to cure according to the manufacturer’s instructions. This usually takes a few hours or even a full day, depending on the specific product.
- Inspect for any missed spots: Once the sealant is fully cured, inspect the metal roof valley for any missed spots or gaps in the seal. If necessary, apply an additional layer of sealant to ensure complete coverage.
Remember, proper application of sealant is essential in preventing leaks and ensuring the longevity of your metal roof valley. Take your time and follow the instructions carefully to achieve a secure and waterproof seal.
Ensuring Proper Waterproofing
Besides sealant application, there are other key steps you can take to ensure proper waterproofing of your metal roof valley. Consider the following tips:
- Proper underlayment: Install a high-quality underlayment beneath the metal roof valley to provide an added layer of protection against moisture buildup. This will help guard against potential leaks caused by heavy rain or snow.
- Seal flashing connections: Pay close attention to the flashing connections between the metal roof valley and any intersecting roof elements, such as skylights or chimneys. Apply flashing tape or sealant to these connections to prevent water seepage.
- Regular inspections: Routinely inspect your metal roof valley for any signs of damage or wear. Look out for loose or missing screws, cracked sealant, or bent metal panels. Promptly address any issues to maintain a tight and waterproof seal.
- Proper drainage: Ensure that the metal roof valley has proper drainage to channel rainwater away from the structure. Clear any debris or obstructions that could block the flow of water, as this can lead to water pooling and potential leaks.
- Consider professional assistance: If you are uncertain about the sealing and waterproofing process or encounter complex roof valley configurations, it is advisable to seek assistance from a professional roofing contractor. Their expertise will help ensure a proper and long-lasting waterproof seal.
By following these guidelines, you can effectively seal and waterproof your metal roof valley, safeguarding your home from leaks and potential water damage. Regular maintenance and inspections will further extend the lifespan of your metal roof, providing you with lasting protection and peace of mind.
Inspecting And Testing The Metal Roof Valley Installation
When it comes to installing a metal roof valley, it is crucial to inspect and test the installation to ensure its durability and functionality. This process involves checking the alignment and fit of the valley, as well as performing a water test to detect any potential leaks. By following these steps, you can ensure a seamless and long-lasting metal roof valley installation.
Checking the Alignment and Fit
One of the key factors in a successful metal roof valley installation is ensuring proper alignment and fit. Before proceeding with any further steps, take the time to visually inspect the valley for any signs of misalignment or poor fit. It is important to ensure that the valley is snuggly fitted in place and lines up smoothly with the surrounding roofing panels.
If you notice any issues with the alignment or fit, address them promptly before continuing the installation process. Failure to do so could result in problems down the line, such as leaks and premature wear and tear.
Performing a Water Test for Leaks
After checking the alignment and fit of the metal roof valley, it is vital to perform a water test to identify any potential leaks. This step helps ensure that your installation is watertight and capable of withstanding inclement weather conditions.
To conduct a water test, carefully pour water along the valley, starting at the top and gradually moving downward. Observe closely for any signs of water seepage or leakage. Pay special attention to areas where the valley connects with other roofing components, as these junctions are often prone to leaks.
If you notice any leaks during the water test, it is essential to address them immediately. This may involve resealing the metal valley or adjusting the alignment to create a better seal. By identifying and rectifying any leaks early on, you can prevent more significant damage and maintain the integrity of your metal roof valley.
Hiring A Professional Vs. Diy Installation
Considering the Complexity of the Installation
When it comes to installing a metal roof valley, you may be faced with the decision of hiring a professional or doing it yourself. Both options have their pros and cons, and understanding the complexity of the installation can help you make an informed decision.
Weighing the Cost and Expertise Factors
Cost: Hiring a professional for a metal roof valley installation can be costly. They typically charge not only for their labor, but also for the materials and any additional services they provide. On the other hand, opting for a DIY installation can save you money as you only need to purchase the necessary materials. However, keep in mind that the cost-effectiveness of the DIY option depends on your skill level and whether you already own the required tools.
Expertise: Installing a metal roof valley requires specialized knowledge and experience. A professional who specializes in metal roofing will have the necessary expertise to ensure a proper installation. They understand the intricacies involved, such as the correct angle and slope required for the water to flow smoothly, and can handle any challenges that may arise during the process.
Meanwhile, if you decide to go the DIY route, be prepared to invest time and effort in learning the necessary techniques and procedures. You will need to familiarize yourself with the installation process, industry standards, and safety protocols. It’s crucial to ensure your knowledge and skills are up to par to guarantee a successful installation.
Ultimately, whether you choose to hire a professional or do it yourself will depend on your personal circumstances, such as your budget, time availability, and level of expertise. Assessing the complexity of the installation and weighing the cost and expertise factors will help you make the decision that best suits your needs.
Safety Precautions For Metal Roof Valley Installation
When it comes to installing a metal roof valley, safety should always be your top priority. Working at heights and handling heavy materials can be dangerous, but with the right precautions in place, you can minimize the risk and ensure a smooth and secure installation process. In this section, we will discuss the essential safety measures to take when installing a metal roof valley.
Proper Use of Safety Equipment
Before you start working on your metal roof valley installation, it is crucial to use the appropriate safety equipment. This will not only protect you from accidents but also ensure the job is done efficiently. Here are the essential safety gear you should have:
- Safety Harness: Every worker involved in installing the metal roof valley should wear a properly fitted safety harness. It should be securely attached to an anchor point to prevent falls.
- Hard Hat: Protect your head with a sturdy hard hat. It will shield you from falling objects and potential impacts.
- Gloves: Wearing heavy-duty gloves is highly recommended to protect your hands from sharp edges or cuts while handling metal sheets.
- Safety Glasses: Keep your eyes safe from debris, dust, or metal particles by wearing safety glasses. This is especially crucial when cutting or trimming metal panels.
- Non-Slip Boots: Invest in high-quality, non-slip boots that provide good traction on the roof surface, reducing the risk of slips and falls.
Avoiding Hazards and Falls
Installing a metal roof valley involves working at heights, so it’s important to be aware of potential hazards and take necessary steps to avoid falls and accidents. Here are some precautions to keep in mind:
- Weather Conditions: Check the weather forecast before starting the installation. Avoid working on the roof during adverse weather conditions such as rain, wind, or storms.
- Roof Stability: Ensure the roof structure is stable and can support the weight of the workers and materials. If there are any concerns about the roof’s integrity, consult a professional before proceeding.
- Safety Signage: Use proper signage or barricades to alert others about the ongoing work on the roof. This will help prevent unauthorized access and create a safer work environment.
- Clean Work Area: Keep the work area clean and free from debris. Remove any tripping hazards or obstacles that could cause accidents.
- Safe Handling of Materials: Follow proper lifting techniques when handling metal sheets or other materials. Use assistance or lifting equipment if necessary to prevent strain or injuries.
- Use of Ladders: When using ladders to access the roof, ensure they are secure, in good condition, and set up at the correct angle. Always maintain three points of contact while climbing.
By following these safety precautions, you can ensure a secure and accident-free metal roof valley installation. Prioritizing safety not only protects you and your team but also helps maintain a positive work environment focused on efficiency and quality.
Maintenance And Care For Metal Roof Valleys
Maintenance and care for metal roof valleys are essential to ensure the longevity and performance of your roofing system. By regularly inspecting and cleaning the valleys, as well as addressing any signs of damage or wear, you can prevent costly repairs and extend the lifespan of your metal roof.
Regular Inspection and Cleaning
A regular inspection routine for your metal roof valleys is crucial to identifying any issues early on. This allows you to take timely action and prevent further damage. Here’s what you should include in your inspection and cleaning process:
1. Check for Debris: Regularly remove any debris, such as leaves or branches, that accumulate in the valleys. These can clog up the drainage system and lead to water pooling, causing potential leaks or rusting.
2. Examine for Rust or Corrosion: Metal roof valleys are susceptible to rust or corrosion. Inspect the valleys for any signs of rust, such as discoloration or flaking paint. If detected, use a wire brush to gently remove the rust and apply a suitable metal primer and paint to prevent further corrosion.
3. Look for Loose or Damaged Fasteners: Loose or damaged fasteners can compromise the integrity of the metal roof valleys. Inspect the fasteners and tighten or replace any that are loose or damaged.
4. Check for Cracks or Gaps: Inspect the valleys for any cracks or gaps that could allow water penetration. Apply a waterproof sealant to repair any cracks or gaps found.
5. Verify Proper Drainage: Check that the valleys have proper drainage by ensuring water flows freely without pooling. If there are any obstructions or improper slope, address them to prevent water accumulation during heavy rains.
Addressing any Signs of Damage or Wear
It’s crucial to address any signs of damage or wear in the metal roof valleys promptly. Ignoring these issues can lead to extensive damage and costly repairs. Keep an eye out for the following signs:
1. Leaks: Look for water stains or signs of water infiltration on the ceilings or walls below the valleys. If you notice any leaks, take immediate action to locate and resolve the source of the leak.
2. Loose or Missing Flashing: Inspect the flashing around the valleys for looseness or missing sections. Damaged flashing can lead to water penetration. Replace any damaged or missing flashing to maintain a watertight seal.
3. Dents or Dings: Check for any visible dents or dings on the metal roof valleys. These can indicate impact damage from falling debris or severe weather. Gently flatten out any dents with a rubber mallet to prevent further damage.
4. Faded or Peeling Paint: If you notice paint fading or peeling on the valleys, it’s an indication of weathering. Repaint the affected areas to protect the metal surface from corrosion and extend its lifespan.
Remember, regular inspection, cleaning, and prompt maintenance of your metal roof valleys can significantly enhance the performance and durability of your roof. Incorporating these practices into your roof maintenance routine will help you enjoy a leak-free and long-lasting metal roof.
Frequently Asked Questions For How To Install Metal Roof Valley
How Do You Install Metal Valley On A Shingle Roof?
To install metal valley on a shingle roof, follow these steps: 1. Start by measuring and cutting the metal valley to fit the length of the roof valley. 2. Apply a layer of roofing cement along the valley area. 3. Secure the metal valley on top of the cement, aligning it with the roof edges.
4. Nail the metal valley into place using roofing nails. 5. Seal the edges of the metal valley with additional roofing cement for added protection.
How Do You Seal A Metal Roof Valley?
To seal a metal roof Valley: 1. Clean the area thoroughly. 2. Apply a high-quality roof sealant. 3. Use a brush to spread the sealant evenly. 4. Pay attention to the edges and corners. 5. Allow the sealant to dry completely before testing for leaks.
Do Screws Go On Ridge Or Valley On A Metal Roof?
Screws on metal roofs should be placed in the valleys to prevent water leakage.
Is Valley Metal Installed Over Felt?
Yes, valley metal is installed over felt.
Conclusion
Installing a metal roof valley requires careful steps and attention to detail. By following these tips and techniques, you can successfully complete the installation process and ensure the longevity and efficiency of your metal roof. From preparing the area and measuring accurately to securely fastening the metal panels, every step is crucial for a successful installation.
So, roll up your sleeves and get ready to experience the benefits of a durable and attractive metal roof valley. Happy installing!