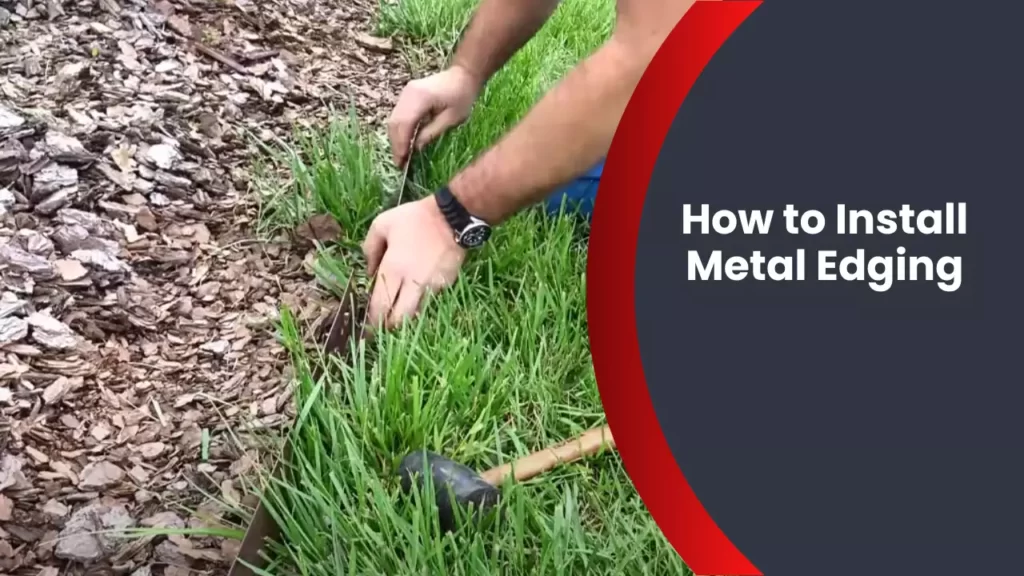
To install metal edging, start by measuring and marking the desired location. Then, dig a trench along the marked line, ensuring it is deep enough to hold the edging.
Place the metal edging into the trench and secure it in place using stakes or screws. Finally, backfill the trench with soil and compact it to create a secure installation. Metal edging is a versatile and durable option for defining borders in landscapes, gardens, and pathways.
It provides a clean and professional finish while also offering protection against erosion and separation. This article will guide you through the process of installing metal edging, ensuring a successful and long-lasting project. We will cover the necessary tools, step-by-step instructions, and important tips to help you achieve a neat and visually appealing installation. With some basic skills and patience, you can easily enhance the appearance of your outdoor space using metal edging.
Understanding The Basics Of Metal Edging
When it comes to creating a well-defined, clean, and attractive landscape, metal edging is a popular choice among homeowners and gardening enthusiasts. Metal edging serves as a practical and aesthetically pleasing solution to bordering various elements in your garden or yard. Before diving into the installation process, it’s important to understand the basics of metal edging. In this section, we will explore what metal edging is, the different types of metal edging materials available, and the advantages of choosing metal edging over other options.
What is Metal Edging and its Benefits?
Metal edging, as the name suggests, refers to thin strips or sheets of metal that are used to create borders or edges around different areas in your outdoor space. These borders help keep the landscape elements neatly separated while adding a touch of sophistication to the overall design.
One of the key benefits of metal edging is its durability. Unlike other materials commonly used for edging, such as plastic or wood, metal edging is highly resistant to damage from weather conditions, pests, and regular wear and tear. This means that once installed, metal edging can withstand the test of time, making it a long-lasting investment for your garden or yard.
Metal edging is also versatile and can be customized to fit various shapes and contours. Whether you have straight or curved edges, metal edging can be easily manipulated to match the desired design. This flexibility allows you to get creative with your landscaping projects, giving you the freedom to experiment and enhance the visual appeal of your outdoor space.
Different Types of Metal Edging Materials
When it comes to metal edging, it’s important to choose the right material for your specific needs. Here are some of the most commonly used types of metal edging materials:
| Material | Features |
|---|---|
| Steel | Durable, resistant to rust, available in various thicknesses |
| Aluminum | Lightweight, easy to work with, resistant to rust |
| Brass | Naturally corrosion-resistant, adds an aesthetic touch |
Each type of metal edging material has its own unique properties and advantages. Consider the specific requirements of your project and consult with a professional to determine which material will be most suitable for your needs.
Advantages of Metal Edging over Other Options
While there are various options available for edging your garden or yard, metal edging offers several advantages over alternative materials. Here are some key advantages of metal edging:
- Longevity: Metal edging is designed to withstand the test of time, ensuring that your landscape remains beautifully bordered for years to come.
- Strength: Metal edging is much more durable and resistant to damage compared to plastic or wood alternatives.
- Versatility: Metal edging can be easily cut, bent, and adjusted to match the specific shape and design of your landscape, allowing for unlimited possibilities.
- Low Maintenance: Unlike wooden edging that requires regular staining or plastic edging that can fade or warp over time, metal edging is low maintenance and retains its original appearance for longer.
By understanding the basics of metal edging, including its definition, benefits, different materials available, and advantages over other options, you’re now ready to proceed with the installation process. In the following sections, we will guide you through the step-by-step instructions to help you achieve a professional and flawless finish to your outdoor space.
Preparing For Installation
When it comes to installing metal edging, proper preparation is key. By assessing the landscape and planning the layout, gathering the necessary tools and materials, and measuring and marking the edging placement, you can ensure a successful installation that will provide a clean and polished look to your landscape. In this section, we will discuss each of these steps in detail.
Assessing the Landscape and Planning the Layout
Before beginning the installation process, it is important to assess your landscape and plan the layout of the metal edging. Take a close look at the area where the edging will be installed and identify any potential obstacles, such as tree roots or rocks, that may affect the placement of the edging. By identifying these obstacles beforehand, you can adjust the layout accordingly and avoid any difficulties during the installation process.
Tools and Materials for Installing Metal Edging
To install metal edging, you will need a few essential tools and materials. Here is a list of what you will need:
- Measuring tape
- Garden stakes
- Mallet or hammer
- Level
- String or twine
- Metal edging pieces
- Connectors or stakes
- Drill or screwdriver
- Screws or nails
- Optional: landscape adhesive
Measuring and Marking the Edging Placement
Before you start installing the metal edging, it is important to accurately measure and mark the placement of the edging pieces. Begin by laying out the metal edging in the desired location, using garden stakes to hold it in place. Use a mallet or hammer to secure the stakes firmly into the ground.
Next, use a measuring tape to determine the proper length for each section of the edging. Mark these measurements on the edging pieces using a permanent marker or chalk, ensuring that all pieces are cut to the correct length.
Once the edging pieces have been cut and marked, you can start installing them. Begin by digging a shallow trench along the marked line, making sure the trench is wide enough to accommodate the metal edging. Place the edging into the trench, ensuring that it sits flush with the ground and is level.
Once the edging is in place, secure it using connectors or stakes. If using connectors, place them at regular intervals along the length of the edging, using a drill or screwdriver to attach them securely. If using stakes, drive them into the ground on either side of the edging, ensuring they are driven in at a slight angle towards the edging.
Finally, check the alignment and levelness of the edging using a level. Adjust as necessary by adding or removing soil from underneath the edging until it is evenly aligned and level.
Installing Metal Edging In Your Landscape
Adding metal edging to your landscape is a fantastic way to create clean lines and define different areas in your yard. Not only does it improve the overall appearance, but it also helps to keep everything organized and tidy. Installing metal edging may seem like a daunting task, but with the right steps and a little bit of effort, you can achieve professional-looking results. In this article, we will guide you through the process of installing metal edging in your landscape, from clearing and preparing the edging area to placing and securing the edging sections.
Clearing and Preparing the Edging Area
Before you can start installing metal edging, it’s important to clear and prepare the area where you want to place it. Follow these steps to ensure a smooth installation:
- Begin by removing any existing edging, such as old plastic or wooden borders, and clear away any debris or vegetation that may be in the way.
- Mark the desired path of the edging with stakes and string, ensuring that it aligns with your intended design.
- Using a shovel or an edger, cut a clean and straight trench along the marked path. Make sure the trench is deep enough to accommodate the height of your metal edging.
- Smooth the edges and bottom of the trench to provide a level surface for the edging to sit on.
- Remove any rocks or roots that might obstruct the placement of the edging.
Digging Trenches and Creating a Base for Edging
Once you have cleared and prepared the edging area, it’s time to dig trenches and create a sturdy base for your metal edging. Follow these steps:
- Start by digging a trench along the marked path, making sure it is wide enough to comfortably accommodate the width of the edging.
- If the soil is soft or susceptible to erosion, consider adding a landscape fabric or geotextile beneath the trench to prevent weeds from growing through and to provide extra stability.
- Fill the trench with a layer of sand or gravel, about 2-3 inches thick. This will act as a stable base for the metal edging.
- Compact the sand or gravel layer using a hand tamper or a rented compactor. This will ensure that the base is firm and stable.
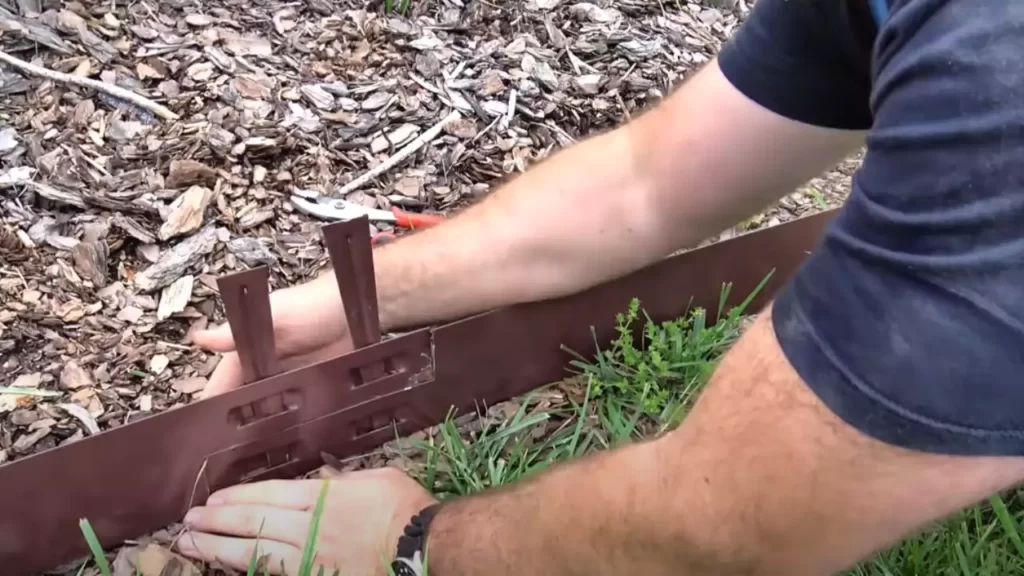
Placing and Securing Metal Edging Sections
With the trenches dug and the base prepared, it’s time to start placing and securing the metal edging sections. Follow these steps:
- Unroll the metal edging and carefully place it inside the prepared trench, ensuring that it follows the marked path.
- Position the edging vertically against the side of the trench, making sure it sits securely on the sand or gravel base.
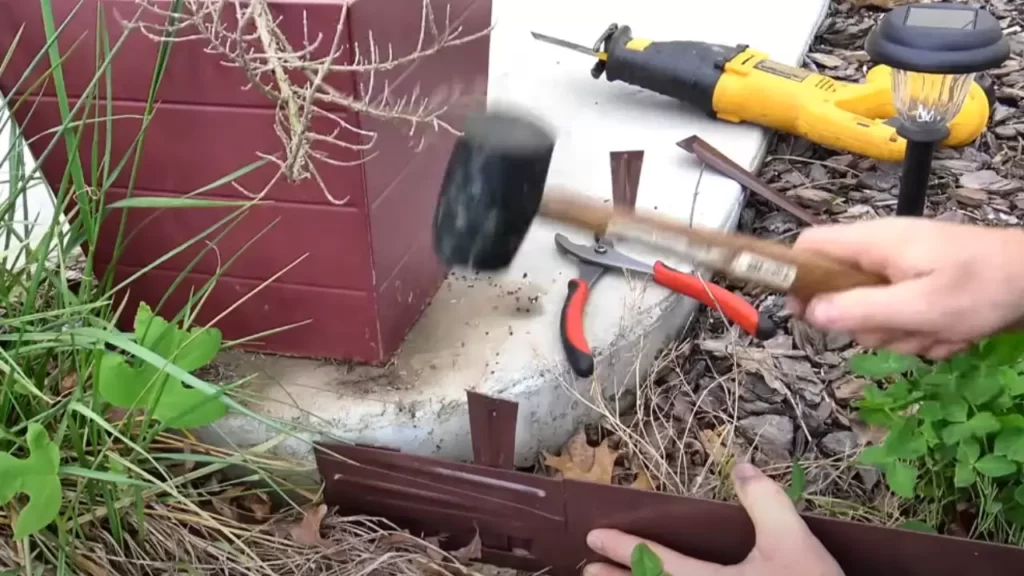
- If your metal edging comes in sections, overlap the ends by a few inches and secure them together using the provided connectors or screws.
- Use a rubber mallet to gently tap the top of the edging to ensure it is firmly in place and level with the ground.
- Fill the trench back up with soil, packing it firmly against the edging to provide additional stability.
- Finally, water the area thoroughly to help settle the soil and ensure that the edging stays in position.
By following these steps, you can successfully install metal edging in your landscape. Remember to take your time, pay attention to detail, and enjoy the process of transforming your yard into a beautifully defined and organized outdoor space.
Customizing Metal Edging
When it comes to installing metal edging, one of the great advantages is the ability to customize it to suit your specific needs. Whether you want to create a unique shape, join multiple pieces together seamlessly, or add decorative accents or patterns, metal edging provides you with the flexibility to personalize your landscape design. In this article, we will discuss three key aspects of customizing metal edging: bending and shaping, joining pieces, and adding decorative accents or patterns.
Bending and Shaping Metal Edging
One of the most common ways to customize metal edging is by bending and shaping it to fit your landscape design. With the right tools and techniques, you can create smooth curves or sharp angles that effortlessly blend with your outdoor space. Here’s how you can do it:
- Measure and mark the desired shape on the metal edging.
- Using a pair of pliers or a metal bender, gradually apply pressure and bend the metal along the marked line.
- Repeat the bending process as needed until you achieve the desired shape.
- Ensure the bends are smooth and even to maintain a professional look.
Remember to take safety precautions, such as wearing gloves and protective eyewear, while working with metal edging. Bending metal requires patience and precision, so take your time and make adjustments as necessary to achieve the perfect shape for your landscape.
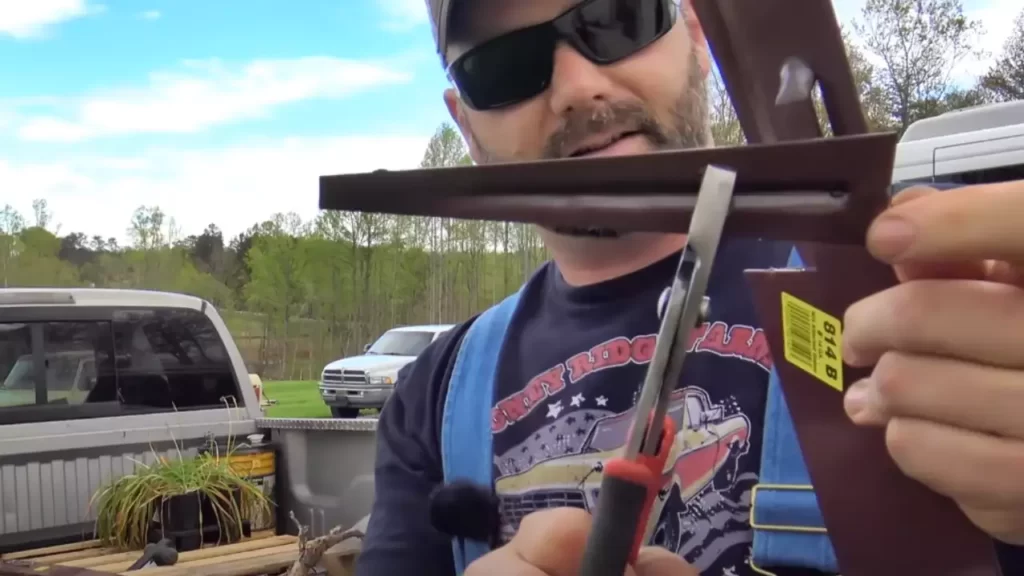
Joining Metal Edging Pieces
When it comes to installing metal edging, you may need to join multiple pieces together to create a continuous border. To ensure a seamless appearance, follow these steps to join metal edging pieces:
- Overlap the ends of two metal edging pieces that you want to join.
- Using metal shears or a hacksaw, carefully trim the overlapped sections to create clean and even edges.
- Apply an epoxy adhesive or use metal fasteners to securely attach the two pieces together.
- Smooth out any visible seams or rough edges, making sure the joined section blends with the rest of the edging.
By properly joining metal edging pieces, you can create a cohesive and seamless border that enhances the overall visual appeal of your landscape design.
Adding Decorative Accents or Patterns to Metal Edging
To make your metal edging truly stand out, consider adding decorative accents or patterns. Whether you prefer a simple and elegant design or a more intricate and eye-catching pattern, there are various ways to customize your metal edging. Here are some ideas to get you started:
- Use a metal punch tool to create decorative perforations along the edging.
- Apply adhesive-backed decorative trim or tape to add color and texture to the metal surface.
- Paint the metal edging in a pattern or design that complements your overall landscape theme.
- Attach metal embellishments, such as scrolls or rosettes, to enhance the visual appeal.
No matter the approach you choose, adding decorative accents or patterns to your metal edging can transform a functional border into a personalized work of art.
In conclusion, customizing metal edging allows you to add your personal touch to your landscape design. Whether it’s bending and shaping the metal, joining pieces to create a seamless border, or adding decorative accents or patterns, the possibilities are endless. By following the techniques and tips outlined in this article, you can create a unique and visually appealing metal edging that will enhance the overall look of your outdoor space.
Proper Maintenance And Care For Metal Edging
Metal edging adds a sleek and modern touch to any landscape design. However, to keep it looking its best and ensure its longevity, proper maintenance and care are essential. In this section, we will discuss some important tasks, such as cleaning and preventing rust, inspecting for damage and repairs, and when and how to replace or upgrade metal edging.
Cleaning and Preventing Rust on Metal Edging
Regular cleaning is crucial to remove dirt, debris, and built-up grime from metal edging. To clean your metal edging effectively, follow these simple steps:
- Start by removing any loose debris such as leaves, twigs, or grass clippings using a broom or a leaf blower.
- Mix warm water and mild dish soap in a bucket.
- Dip a soft-bristle brush or a sponge into the soapy water and scrub the metal edging gently. Pay attention to any stubborn stains or spots.
- Rinse thoroughly with a garden hose, making sure to remove all soapy residue.
- Dry the metal edging with a clean cloth or allow it to air dry.
To prevent rust from forming on your metal edging, consider applying a coat of paint or protective sealant. This will help create a barrier against moisture and oxidation. Make sure to choose a product specifically designed for outdoor metal surfaces and follow the manufacturer’s instructions for application.
Inspecting Edging for Damage and Repairs
Regularly inspecting your metal edging for damage is crucial to address any issues before they escalate. Here are a few steps you can take:
- Check for any signs of cracks, dents, or bends in the metal edging. These can compromise its structural integrity.
- Ensure that the edging is securely fastened in the ground and hasn’t shifted or become loose.
- If you notice any damage or instability, consider contacting a professional for repairs or assessing the need for replacement.
Replacing or Upgrading Metal Edging if Needed
Over time, metal edging may become worn out, damaged, or no longer align with your desired design aesthetic. If you need to replace or upgrade your metal edging, follow these steps:
- Start by removing the existing edging carefully. Use a shovel or a pry bar to loosen it from the ground.
- Dispose of the old edging responsibly, following any local waste disposal guidelines.
- Measure the area where the metal edging will be installed and choose a suitable replacement that fits your needs and preferences.
- Install the new metal edging according to the manufacturer’s instructions or consider hiring a professional for a seamless installation.
Remember, maintaining metal edging should be a regular part of your landscape maintenance routine. By following these tips, you can ensure that your metal edging remains in top-notch condition for years to come.
Tips For Successful Metal Edging Installation
When it comes to installing metal edging in your landscaping, following the right tips and techniques is crucial for a successful installation. These tips will not only ensure the longevity and stability of your metal edging but also help you integrate it seamlessly with existing landscape features. In this article, we will discuss these essential tips for a successful metal edging installation.
Ensuring Proper Drainage with Metal Edging
Proper drainage is a crucial aspect of any landscaping project, and metal edging can help you achieve this effectively. To ensure proper drainage with metal edging, follow these key steps:
- Start by preparing the area where the metal edging will be installed. Remove any grass, vegetation, or debris to create a clean and level surface.
- Before laying down the metal edging, make sure to install a trench along the desired path. This trench should be slightly deeper and wider than the metal edging, allowing for proper water flow.
- Place the metal edging into the trench, ensuring that it is level and secure. Use metal stakes to anchor the edging in place every few feet.
- Backfill the trench with soil, compacting it gently around the metal edging. This will help to secure the edging and provide stability.
- Once the metal edging is installed, make sure to create a slight slope away from any structures, such as your home or garden beds, to channel water away effectively.
Securing Edging for Longevity and Stability
To ensure the longevity and stability of your metal edging, it’s essential to take extra precautions when securing it. Follow these tips:
- Make sure to choose metal edging that is specifically designed for durability and longevity in outdoor environments. Look for materials like galvanized steel or aluminum, which are resistant to rust and corrosion.
- Before installation, inspect the metal edging for any defects or damages. Replace any damaged sections to ensure a solid and secure installation.
- Properly secure the metal edging by using a mallet or rubber mallet to gently tap it into the ground. This will help to ensure a tight fit and prevent movement over time.
- If the metal edging is installed on a sloping area or uneven ground, consider using additional stakes or fasteners to secure it firmly in place.
Integrating Metal Edging with Existing Landscape Features
Integrating metal edging with existing landscape features can enhance the overall aesthetics and functionality of your outdoor space. Follow these tips to achieve a seamless integration:
- Take the existing landscape features into account when planning the placement of your metal edging. Consider how the edging will enhance the shape and design of your garden beds, walkways, or flower borders.
- If you have existing plants or trees near where the metal edging will be installed, ensure that there is enough space for growth and expansion.
- Use a border spade or garden edger to create clean and defined edges along the existing landscape features before installing the metal edging.
- Consider using landscaping fabric or weed barrier under the metal edging to further prevent weed growth and maintain the integrity of your design.
- After installation, take the time to blend the metal edging seamlessly with the surrounding landscape. Add mulch or decorative stones around the edging to create a polished and cohesive look.
By following these tips for installing metal edging, you can achieve a successful and visually appealing outcome. Ensuring proper drainage, securing the edging for longevity and stability, and integrating it with existing landscape features will help you create a beautiful and functional outdoor space that will withstand the test of time.
Final Thoughts And Styling Ideas
Completing the installation of metal edging is just the beginning of transforming your landscape. Now that you have the basic knowledge on how to install metal edging and have achieved a clean and defined edge for your garden beds or pathways, it’s time to think about the final touches. Enhancing the visual appeal of metal edging, utilizing it in various landscape designs, and drawing inspiration from successful metal edging installations can truly elevate the look and feel of your outdoor space. Let’s explore some styling ideas and examples to help you get started.
Enhancing the Visual Appeal of Metal Edging
By paying attention to the finer details, you can enhance the visual impact of your metal edging and turn it into a standout feature in your landscape design. Consider the following ideas:
- Mix and match materials: Combine metal edging with other materials like stone or wood to create a dynamic and visually interesting border.
- Color coordination: Paint the metal edging in a color that complements your overall design scheme, making it blend seamlessly or stand out as a statement piece.
- Accent lighting: Install small LED lights along the metal edging to create a soft, ambient glow in the evenings, highlighting the contours of your garden beds or pathways.
- Curved edges: Experiment with curved metal edging to add a sense of flow and movement to your landscape, creating a visually pleasing and organic look.
Utilizing Metal Edging in Various Landscape Designs
Metal edging is a versatile solution that can be used in a wide range of landscape designs. Here are a few ideas to spark your creativity:
- Modern and minimalist: Pair sleek metal edging with clean lines and geometric shapes for a contemporary and minimalist appeal.
- Cottage garden charm: Combine metal edging with rustic elements and vibrant flowers for a charming cottage garden look.
- Formal elegance: Use metal edging to create precise borders around formal garden areas, such as rose beds or topiary displays.
- Fluid design: Incorporate metal edging to define meandering pathways or create interesting patterns that guide the eye through your landscape.
Inspiring Examples of Successful Metal Edging Installations
To help you visualize the possibilities, let’s take a look at some successful metal edging installations:
 |
 |
| Example 1: A contemporary garden design featuring metal edging combined with concrete and gravel for a sleek and cohesive look. | Example 2: A cottage-style garden with metal edging bordering lush flower beds, creating a charming and whimsical atmosphere. |
These examples show just a glimpse of what you can achieve with metal edging. Let them inspire you to think outside the box and create a stunning landscape design that showcases your personal style and enhances the beauty of your outdoor space.
In conclusion, by implementing these final touches and exploring different styling ideas, you can truly elevate the look and feel of your metal edging installations. Don’t be afraid to get creative and experiment with various combinations to find the perfect design for your landscape. Now that you have the tools and inspiration, it’s time to transform your outdoor space into a well-defined and visually appealing haven.
Frequently Asked Questions
Is Metal Edging Easy To Install?
Yes, metal edging is easy to install. It requires no special skills or tools, and the process can be completed quickly. The edges simply need to be aligned and secured in place using screws or stakes. It’s a straightforward DIY project that anyone can do.
How Do You Secure Steel Edging?
To secure steel edging, follow these steps: 1. Dig a trench along the desired line. 2. Place the edging in the trench and make sure it is level. 3. Use steel stakes to anchor the edging securely into the ground. 4.
Backfill the trench with soil, compacting it around the edging. 5. Finally, use a rubber mallet or hammer to ensure the edging is firmly in place.
How Do You Install Lowe’S Metal Landscape Edging?
To install Lowe’s metal landscape edging, follow these steps: 1. Prepare the area by removing any existing edging or debris. 2. Lay the edging strip along the desired border, ensuring it’s level and straight. 3. Secure the edging with spikes or stakes every few feet.
4. Connect multiple sections of edging by overlapping them and using connectors. 5. Backfill the area behind the edging with soil or mulch.
How Far Should Metal Edging Be From The Ground?
Metal edging should be installed with a clearance of about 1 to 2 inches from the ground. This allows for sufficient water drainage and reduces the risk of rusting.
Conclusion
Installing metal edging is a straightforward process that can enhance the look and functionality of your garden. By following the steps outlined in this blog post, you can easily create clean and defined edges that will add structure to your outdoor space.
Remember to choose the right type of metal edging, prepare the ground properly, and secure the edging firmly in place. With the right tools and a little bit of patience, you’ll be able to achieve professional-looking results. So go ahead and give it a try, and enjoy the beautiful transformation of your garden!