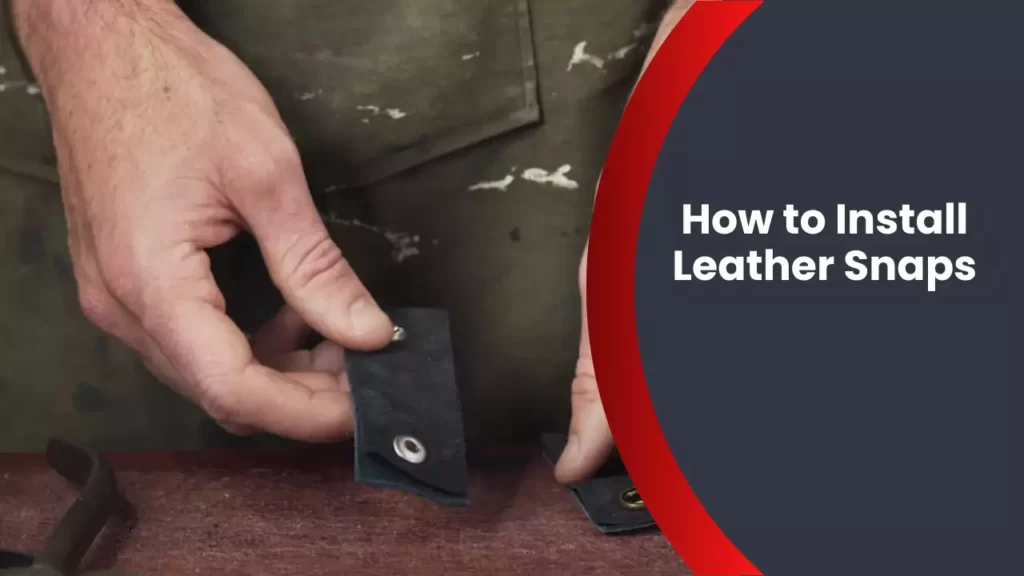
To install leather snaps, simply position the snap components on the leather and use a hammer to secure them together. Now, let’s delve into the process of installing leather snaps in more detail.
When it comes to adding snaps to leather, it is essential to have the right tools and materials on hand. Snaps typically consist of two components: the stud and the socket. The stud is the part with the protruding metal post, while the socket has the corresponding opening to attach to the stud.
By properly positioning these snap components on the leather, you can ensure a secure closure. Using a hammer or a mallet, apply force to snap them together, making sure they are firmly set in place. With these simple steps, you can easily install leather snaps for various DIY projects.
Preparing The Leather And Snaps
Before you start installing snaps on your leather project, it’s crucial to properly prepare both the leather and the snaps. This will ensure that your snaps are securely attached and will withstand daily use. In this section, we’ll guide you through the process of choosing the right leather for snaps, as well as measuring and marking the snap placement.
Choosing the Right Leather for Snaps
When it comes to snaps, selecting the right leather is essential for a successful installation. You’ll want to choose a leather that is neither too thin nor too thick. The ideal thickness for snap installation is around 3 to 5 ounces, as it provides the perfect balance of durability and flexibility.
Additionally, consider the type of leather you’re using. Top-grain or full-grain leather is recommended for snap installations due to their strength and resistance to stretching. However, if you’re working with softer leathers like suede or lambskin, you may need to reinforce the snap area with interfacing or a backing material to prevent tearing.
Measuring and Marking Snap Placement
Accurate measurements and proper snap placement are crucial for ensuring a clean and professional-looking finish. Before marking, make sure your leather piece is flat and free from any creases or wrinkles. A durable work surface and a sharp pen or marker will be your best tools for this task.
Start by determining the center point of your snap placement. Measure the width of your leather piece and divide it by two, then mark this point on the leather using a ruler. This will serve as a guide for aligning your snaps symmetrically.
Next, position your snaps precisely where you want them to be. Typically, snaps are placed near the edges of the leather piece, but make sure to leave enough space for any seam allowances or edge finishes. Once you’ve determined the exact location, mark the snap placement with a dot or a small “x.”
If you’re installing multiple sets of snaps, it’s important to maintain consistency throughout. Use a ruler or a template to ensure consistent snap spacing and alignment for a polished result. Taking these extra steps will save you time and frustration in the long run.
By properly preparing your leather and snaps, you set a solid foundation for a successful installation process. Choosing the right leather and accurately measuring and marking snap placement will greatly contribute to the overall longevity and aesthetic of your project. Now that you’re ready, let’s move on to the next step: installing the snaps.
Tools And Materials Needed
The installation of leather snaps requires specific tools and materials to ensure a professional and secure result. By using the right equipment, you can effortlessly attach snaps to your leather projects, allowing for easy fastening and durability.
Tools and Materials Needed
Before you begin, gather the following tools and materials:
- Leather Punch
- Snap Setter
- Setting Anvil
- Rubber Mallet
Now, let’s take a closer look at these essential items:
Leather Punch
The leather punch is a crucial tool for creating precise holes in your leather. It allows you to cut clean and accurate holes, ensuring a proper fit for the snaps. Choose a leather punch with interchangeable hole sizes to accommodate various snap diameters and designs.
Snap Setter
A snap setter is an indispensable tool used to secure snaps onto your leather. It consists of two parts: the male and female dies. The male die holds the snap cap in place, while the female die supports the socket or stud. The snap setter applies pressure evenly to attach the snap components together, resulting in a sturdy connection.
Setting Anvil
The setting anvil acts as a supportive base for the snap setter. It provides a solid surface for you to apply pressure without damaging your work surface. The anvil should have a concave shape in the center to accommodate the snap and keep it in place during the installation process. An anvil made from a durable material such as steel or brass is recommended to ensure longevity.
Rubber Mallet
A rubber mallet is a soft-hitting tool used in combination with the snap setter to apply pressure and secure the snaps. The rubber head minimizes the risk of damaging the snap components or the leather while ensuring a forceful strike. The mallet should have a comfortable grip to provide optimal control during installation.
By having these tools and materials at your disposal, you’re well-equipped to install leather snaps efficiently and effectively. Now that you understand the importance of each item, let’s move on to the step-by-step process of installing leather snaps in our next section.
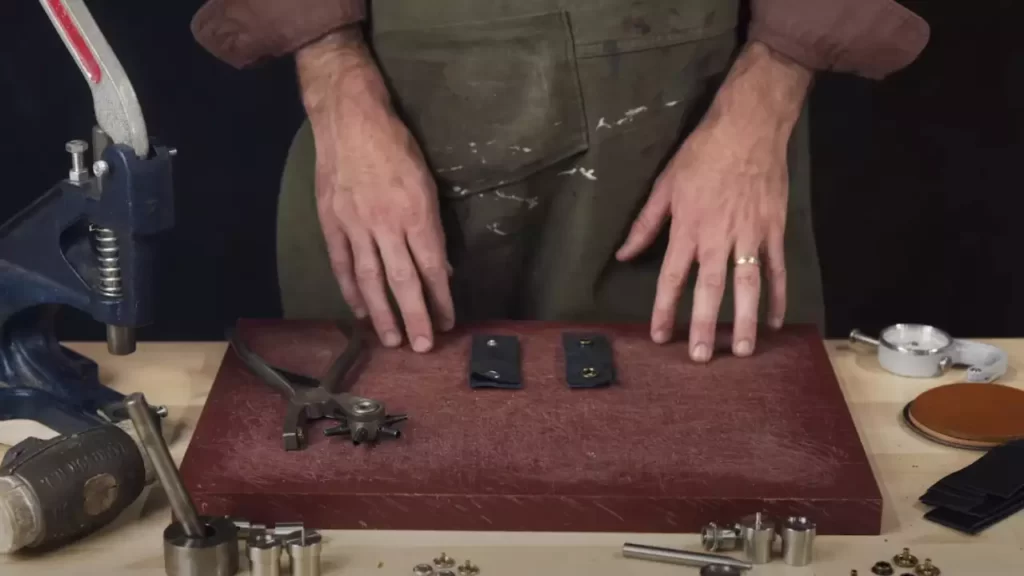
Step 1: Punching Holes In The Leather
When it comes to installing leather snaps, the first step is punching holes in the leather. This is an essential part of the process, as it allows the snap to be securely attached to the fabric. Here’s a step-by-step guide on how to punch holes in the leather for your leather snaps.
Selecting the Proper Size Hole Punch
Choosing the right size hole punch is crucial for a successful installation. The size of the punch depends on the diameter of the snap post. It’s important to select a punch that matches the size of the snap post to ensure a snug fit.
| Step | Description |
|---|---|
| 1 | Measure the diameter of the snap post using a caliper or ruler. |
| 2 | Choose a hole punch with a diameter slightly larger than the snap post. |
By selecting the proper size hole punch, you can ensure that the hole will be neither too tight nor too loose, providing a secure attachment for your snap.
Marking the Spot for the Hole
Once you have selected the appropriate hole punch, it’s time to mark the spot on the leather where the hole will be punched. Follow these simple steps:
- Carefully position the leather piece on a flat surface, ensuring it is secure and wrinkle-free.
- Using a fabric marker or a pencil, mark the desired location for the hole.
- Ensure that the marked spot is in a convenient position for attaching the snap, taking into consideration the design or pattern of your leather piece.
By marking the spot accurately, you can ensure that the hole will be placed exactly where you need it for your leather snaps.
Aligning the Hole Punch and Pressing Down Firmly
Now that you have marked the spot for the hole, it’s time to punch it out. Here’s how to align the hole punch and press down firmly:
- Place the selected hole punch directly over the marked spot on the leather.
- Ensure that the hole punch is aligned vertically and horizontally with the spot.
- Apply firm and even pressure on the hole punch, using a mallet or a rubber mallet.
- Repeat the process for any additional holes required for your leather snaps.
By aligning the hole punch correctly and applying firm pressure, you can create clean and precise holes in your leather, ready to accommodate your snaps.
Step 2: Preparing The Snaps
Once you have gathered all the necessary tools and materials and have determined the placement of your leather snaps, it’s time to move on to the preparation stage. This step involves understanding the different components of a snap and attaching the stud to the socket.
Understanding the Different Components of a Snap
Before you begin attaching the snaps, it’s important to familiarize yourself with the different components that make up a snap:
- Stud: The stud is the male part of the snap, which consists of a top, post, and bottom cap. This is the part that will be attached to your leather.
- Socket: The socket is the female part of the snap, which consists of a hollow ring and a bottom cap. This is the part that will be attached to the opposite end of your leather.
- Post: The post connects the top and bottom caps of the stud, allowing it to come together with the socket.
Now that you have a better understanding of the different components, let’s move on to the next step.
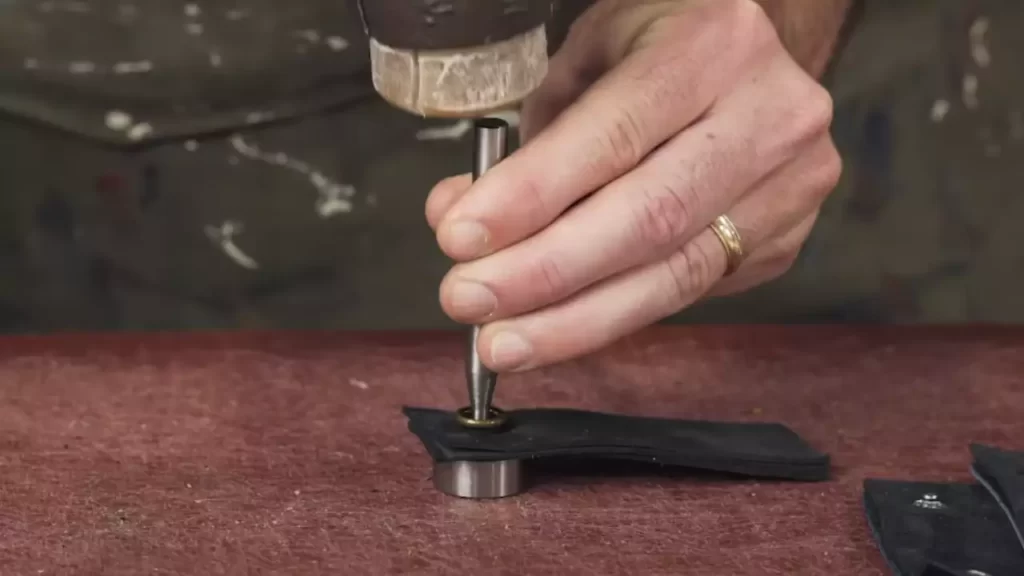
Attaching the Stud to the Socket
Attaching the stud to the socket is a fairly straightforward process. You’ll need a snap setter tool, which is specifically designed to securely fasten the snaps.
- Place the stud: Insert the post of the stud through the hole in the leather where you want the snap to be placed. Make sure the post is facing upward.
- Position the socket: Take the socket and align it with the post of the stud. The socket should fit snugly onto the post.
- Set the snap: Position the snap setter tool above the socket, with the concave side facing down. Apply firm, even pressure on the tool to press the top and bottom caps of the stud together, securing the socket in place.
Repeat this process for each snap you need to install. Remember to double-check the placement and alignment of each snap before setting it in place.
With the studs and sockets securely attached to your leather, you are now ready to move on to the next step, which involves finishing and trimming the excess material. Stay tuned!
Step 3: Setting The Snaps
Step 3: Setting the Snaps
In this step, we will guide you through the process of setting the leather snaps onto your material. Once you have prepared the socket and stud, it’s time to secure them in place. Remember to refer to the leather snaps installation kit you have purchased for specific instructions and safety precautions.
Placing the Socket on the Leather
To begin, position the leather material in front of you with the desired spot where the snap will be placed. Start by aligning the socket over this spot. Hold the socket firmly against the leather, ensuring it is centered and fits snugly.
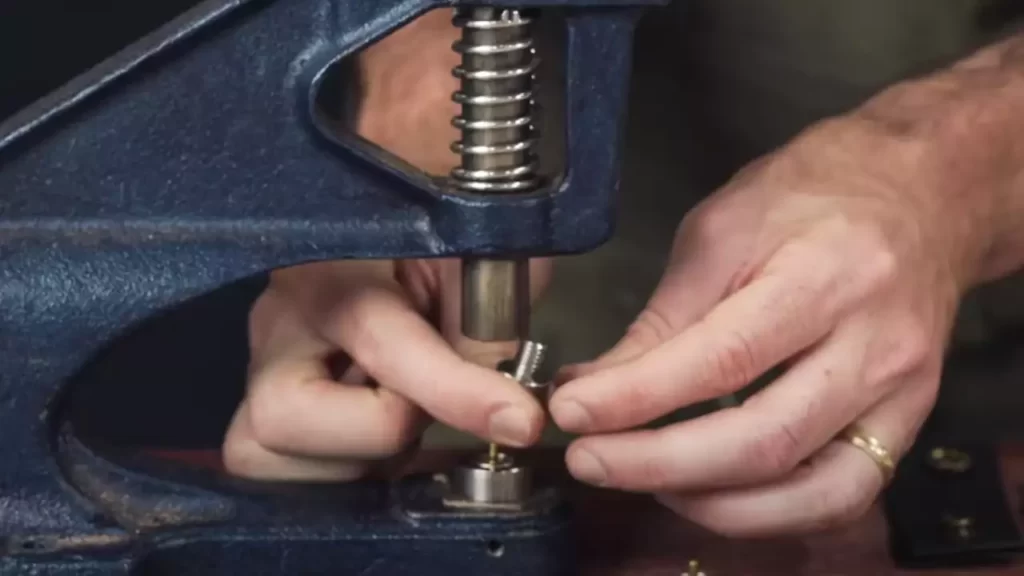
Positioning the Snap Setter on Top of the Socket
With the socket in place, it’s time to position the snap setter on top of it. The snap setter is a specialized tool that allows you to apply pressure and securely fasten the snap together. Make sure the snap setter is aligned with the socket and rests evenly on top.
Striking the Snap Setter with a Rubber Mallet
Once the snap setter is properly positioned, use a rubber mallet to strike the top of the setter firmly. The force from the mallet will drive the socket into the leather, creating a strong bond. Repeat this process for each snap installation, ensuring consistent pressure and accuracy.
Caution: Be cautious when striking the snap setter to avoid injury. Always wear appropriate safety gear, such as goggles or gloves, if necessary.
By following these steps, you can successfully install leather snaps onto your materials. Ensure proper alignment of the socket and snap setter, and strike firmly with a rubber mallet to secure the snap in place. Remember to consult the instructions provided with your leather snaps installation kit for any specific recommendations or tools required.
For a quick recap, here are the steps involved in setting the snaps:
1. Place the socket on the leather, aligning it with the desired spot.
2. Position the snap setter on top of the socket, ensuring it is centered and resting evenly.
3. Use a rubber mallet to strike the snap setter firmly, securing the snap into place.
4. Repeat the process for each snap, maintaining consistent pressure and accuracy.
With these instructions in hand, you’re ready to add leather snaps to your projects with ease.
Step 4: Testing The Snaps
After successfully installing the leather snaps on your project, it is crucial to ensure that they are secure and functioning properly. In this step, we will guide you through the process of testing the snaps to guarantee a secure fit and firm attachment.
Checking for Secure Fit
The first aspect to check when testing the snaps is the secure fit. Carefully inspect each snap to verify that it fits tightly and securely around the corresponding component. A loose snap can result in the detachment of your leather accessories, compromising both the aesthetic appeal and functionality.
To check the secure fit, gently tug on the snap in various directions. If it withstands the pressure and does not come loose easily, you can be confident that it has been properly installed. However, if there is any sign of movement or the snap feels loose, additional reinforcement may be needed.
Inspecting the Snap for Proper Functionality
Aside from the secure fit, it is crucial to inspect the snap for proper functionality. This means ensuring that the snap opens and closes smoothly without any resistance or difficulty. A malfunctioning snap can lead to frustration and inconvenience when using the leather accessories.
To inspect the functionality, simply open and close the snap multiple times. Pay close attention to any unusual noises, stiffness, or resistance during the process. Additionally, check for any signs of misalignment between the male and female parts of the snap.
If the snap functions smoothly, congratulations! You have successfully installed leather snaps that not only look great but also serve their purpose effectively. However, if you encounter any issues during the testing process, it is essential to identify and rectify them promptly.
In conclusion, testing the snaps after installation is a critical step in ensuring their secure fit and proper functionality. By carefully checking for a secure fit and inspecting the snap’s functionality, you can have confidence in the stability and reliability of your leather accessories. Remember, investing time and effort in testing will go a long way in ensuring the longevity and usability of your projects.
Troubleshooting Common Issues
Installing leather snaps on your project can add a touch of elegance and durability. However, even with the right tools and materials, you may encounter some common issues along the way. Understanding these troubleshooting tips will help you overcome any challenges that arise during the installation process.
Snap Not Attaching Properly
If you find that your snaps are not attaching properly, it could be due to a few reasons. One common issue is inadequate pressure during installation. Leather snaps require a firm and even application of pressure to ensure a secure attachment. Try using a snap setter tool or a mallet to apply consistent pressure. Additionally, make sure you are using the correct size of snaps for your leather thickness, as using snaps that are too large or too small can also result in improper attachment.
Misaligned or Crooked Snaps
Another common issue that DIY enthusiasts face when installing leather snaps is misaligned or crooked snaps. This can happen if you don’t take the time to mark and align the positions before attaching the snaps. Start by using a ruler or measuring tape to mark the precise locations where the snaps should be placed. Double-check your measurements to ensure accuracy. Using an awl or a punch, create a small hole for each snap to secure a clean and aligned placement. Taking these extra steps will eliminate the frustration of misaligned or crooked snaps.
Snaps Popping Open
After successfully attaching the snaps, you may encounter an issue where they pop open unexpectedly. This can occur due to insufficient pressure during installation or if the snap components are not fully engaged. To solve this problem, gently tap the installed snaps with a rubber mallet or press them firmly using your fingers to ensure a tight closure. If the issue persists, consider adding additional reinforcement such as adhesive or stitching around the snap area to provide extra durability.
By understanding and implementing these troubleshooting tips, you can overcome common issues that may arise when installing leather snaps. Remember to apply consistent pressure, align the snaps accurately, and ensure a secure closure. With patience and practice, you will master the art of installing leather snaps, adding a professional touch to your projects.
Care And Maintenance Of Leather Snaps
Cleaning and Polishing Snaps
Keeping your leather snaps clean and polished is essential for their longevity and appearance. Here are some steps to follow when cleaning and polishing your snaps:
- Start by removing any dirt or debris from the snaps using a soft brush or a dry cloth. Be gentle to avoid scratching the leather or damaging the snap.
- Mix a small amount of mild soap or leather cleaner with water to create a gentle cleaning solution.
- Dampen a clean cloth with the cleaning solution and gently wipe the snaps. Take care to remove any stains or marks without applying excessive pressure.
- Once the snaps are clean, rinse the cloth with clean water and wipe off any soap residue from the snaps.
- Dry the snaps thoroughly with a soft, absorbent cloth to prevent moisture from seeping into the leather or causing corrosion on the snaps.
- After the snaps are dry, apply a small amount of leather conditioner or polish to a clean cloth.
- Gently rub the conditioner or polish onto the snaps in a circular motion, covering the entire surface.
Regular cleaning and polishing can help maintain the shine and durability of your leather snaps, ensuring they remain in excellent condition for years to come.
Preventing Snap Corrosion
Corrosion can weaken the functionality and lifespan of leather snaps. To prevent snap corrosion, follow these preventive measures:
- Avoid exposing your leather snaps to excessive moisture, such as rain or damp environments. If your snaps do get wet, dry them thoroughly immediately.
- Store your leather items with snaps in a cool and dry place, away from direct sunlight or extreme heat.
- Apply a thin layer of a protective coating such as clear nail polish to the snap surface. This helps create a barrier against moisture and prevents oxidation.
- Regularly inspect your snaps for any signs of corrosion, such as discoloration or rust. If you notice any, follow the steps in the next section to replace the damaged snaps.
By taking these precautions, you can significantly reduce the risk of snap corrosion and prolong the lifespan of your leather snaps.
Replacing Damaged or Worn-out Snaps
Over time, leather snaps may become damaged or worn out. If you notice any signs of damage or weakness, it’s best to replace them promptly. Here’s how to replace leather snaps:
- Start by carefully removing the old snaps using a snap removal tool or a flathead screwdriver. Be cautious not to damage the surrounding leather during this process.
- Once the old snaps are removed, place the new snaps on the leather surface in the desired position.
- Using a snap setting tool or a hammer and punch set, firmly press or strike the snap components together, securing them onto the leather.
- Ensure that the snaps are securely fastened and function properly by testing them before regular use.
It’s important to note that the installation process may vary depending on the type and brand of leather snaps you are using. Always refer to the specific instructions provided by the manufacturer or consult a professional if you are unsure about the installation process for your particular snaps.
Disclaimer: This article is intended for informational purposes only. Always refer to the specific instructions provided by the manufacturer of your leather snaps or consult a professional if you are unsure about the installation process.
Frequently Asked Questions
How Do I Install Snaps Without Tools?
To install snaps without tools, follow these simple steps: 1. Align the snap components properly. 2. Apply pressure using your hands to snap them together. 3. Make sure the snaps are securely fastened. 4. Test the connection to ensure it is strong and reliable.
5. That’s it! You now have installed snaps without the need for any tools.
How Do You Use Leather Snap Fasteners?
To use leather snap fasteners, first, place the male and female parts on each side of the material you want to fasten. Align them properly, ensuring a secure fit. Then, press firmly to snap them together. These fasteners are commonly used in clothing, bags, and other leather goods.
How Do I Install Snaps?
How Do You Install Prong Snaps?
To install prong snaps, follow these steps: 1. Prepare the fabric by marking the placement of snaps. 2. Punch holes using a hole puncher or an awl. 3. Insert the prongs through the fabric from the front. 4. Attach the socket or stud piece to the prongs from the back.
5. Press the prongs down using pliers to secure the snaps.
Conclusion
To sum up, installing leather snaps is a straightforward process that can add a touch of elegance to your leather products. By following the steps mentioned in this blog post, you can ensure a secure and professional finish. Whether you’re looking to repair a garment or create a custom leather item, mastering this technique will enhance your crafting skills.
So, go ahead and give it a try – you won’t be disappointed!