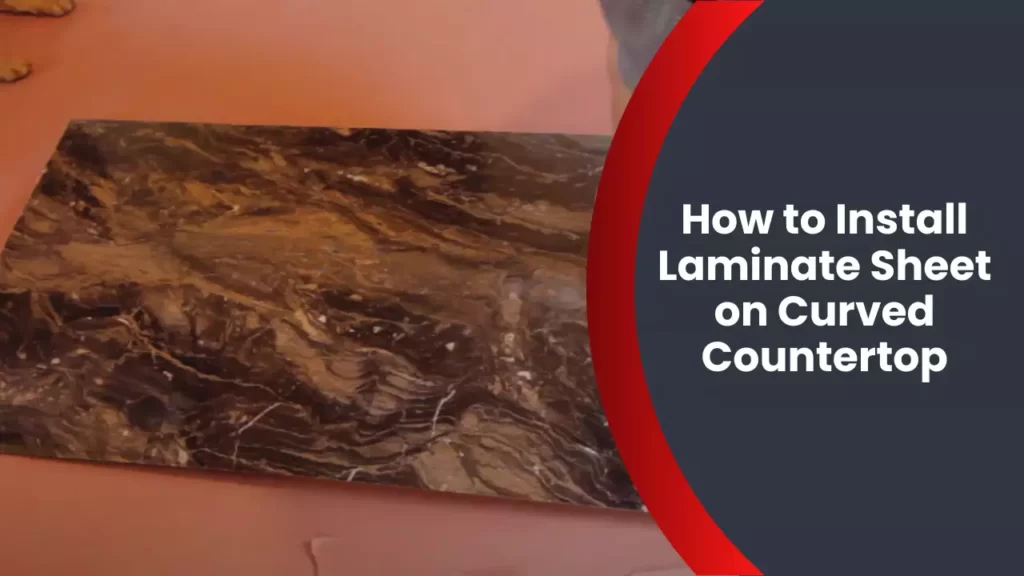
To install laminate sheet on a curved countertop, carefully measure and cut the laminate to fit the curve. Use adhesive to secure the laminate sheet to the countertop, pressing firmly to ensure a strong bond.
Installing laminate sheet on a curved countertop can be a challenging task, but with the right techniques, it is achievable. By following a few simple steps, you can transform your countertop with a sleek and durable laminate surface. We will guide you through the process of installing laminate sheet on a curved countertop, from measuring and cutting the laminate to securing it with adhesive.
With proper preparation and attention to detail, you can achieve professional-looking results that will enhance the beauty and functionality of your kitchen or bathroom. So let’s dive in and learn how to install laminate sheet on a curved countertop.
Selecting The Perfect Laminate Sheet For Your Curved Countertop
Consider the Durability and Thickness of the Laminate Sheet
When it comes to selecting the perfect laminate sheet for your curved countertop, durability and thickness are two key factors to consider. The durability of the laminate sheet will determine how well it stands up to everyday wear and tear, while the thickness will affect its ability to bend seamlessly around the curved surface.
It’s important to choose a laminate sheet that is specifically designed for curved countertops. These sheets are typically made from high-quality materials that are resistant to scratches, stains, and heat. They are also more flexible than traditional laminate sheets, allowing them to conform to the unique shape of your countertop without cracking or peeling.
When comparing different laminate options, pay attention to the thickness of the sheets. Thicker sheets tend to be more durable and provide better protection against impacts, while thinner sheets are more flexible and easier to bend around curved edges. Consider the level of traffic in your kitchen and the amount of use your countertop will receive in order to determine the right balance between durability and flexibility.
Choose a Laminate Design that Complements Your Kitchen Style
Your kitchen is a reflection of your personal style, and the laminate sheet you choose should complement the overall aesthetic of the space. Laminate sheets come in a wide range of designs, from classic wood grains to modern patterns and solid colors.
When selecting a laminate design, consider the existing elements in your kitchen, such as the cabinetry, backsplash, and flooring. Look for a design that harmonizes with these elements, either by matching or contrasting with them. For example, if you have dark wood cabinets, a light-colored laminate with a wood grain pattern can create a beautiful contrast.
Additionally, think about the overall mood and atmosphere you want to create in your kitchen. If you’re going for a sleek and contemporary look, a laminate sheet with a high-gloss finish and modern design will be the perfect choice. On the other hand, if you prefer a cozy and rustic feel, a laminate sheet that mimics the look of natural stone or wood can help you achieve that desired vibe.
Opt for a Laminate Sheet with Flexible Properties
Installing laminate on a curved countertop can be a challenging task, which is why it’s crucial to choose a laminate sheet with flexible properties. This will ensure that the sheet can easily bend and conform to the curved surface without compromising its integrity.
The flexibility of a laminate sheet is determined by its construction and material composition. Look for laminate sheets that are specifically designed for curved applications and have a higher degree of flexibility. These sheets are often made with a combination of materials that allow for easy bending without cracking or breaking.
Before purchasing a laminate sheet, consult with your countertop installer or supplier to ensure that the sheet you choose is suitable for curved countertops. They will be able to guide you towards the best options available and provide expert advice on the installation process.
Clean And Remove Any Existing Materials From The Countertop
Before you can install a laminate sheet on a curved countertop, it is essential to clean and remove any existing materials from the surface. This preparation step is crucial to ensure that the laminate adheres properly and provides a smooth, flawless finish.
Remove Old Laminate or Solid Surface Materials
The first thing you need to do is remove any old laminate or solid surface materials from the countertop. Use a putty knife or a scraper to carefully peel away the existing layers. Pay close attention to any stubborn areas, ensuring you remove all remnants of the old material. Be gentle to avoid damaging the countertop surface.
Clean the Countertop Surface Thoroughly
Once you have removed the old materials, it’s time to clean the countertop surface thoroughly. Start by sweeping away any loose debris, and then wipe the surface with a mild cleanser and warm water. This will remove any dirt, grease, or residue that could hinder the adhesion process. Rinse the countertop with clean water and allow it to dry completely before moving to the next step.
Smooth Out any Imperfections or Bumps
Smooth out any imperfections or bumps on the countertop surface. Use a sanding block, sandpaper, or a power sander to ensure a level and even surface. Pay attention to any rough areas, as the laminate will conform to the existing shape of the countertop. By smoothing out any imperfections, you will achieve a professional-looking finish.
In conclusion, preparing the countertop by cleaning and removing any existing materials is a vital step in installing a laminate sheet on a curved countertop. By following the steps above, you will ensure that the laminate adheres properly and the final result is a beautiful, seamless surface.
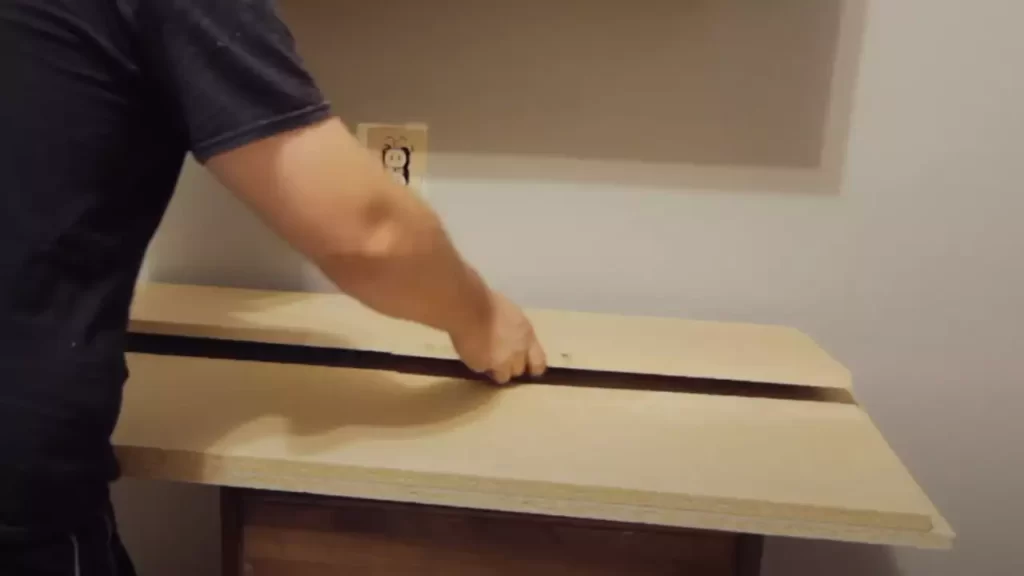
Create A Template For The Curved Countertop Shape
Installing laminate sheet on a curved countertop can seem like a daunting task, but with a well-made template, the process becomes much easier. Creating a template allows you to accurately measure and transfer the curvature onto a piece of plywood, ensuring a precise fit for your laminate sheet. In this guide, we’ll walk you through the steps to create a template for your curved countertop shape.
Measure and Transfer the Curvature onto a Piece of Plywood
The first step in creating a template for your curved countertop is to accurately measure and transfer the curvature onto a piece of plywood. Start by measuring the width and length of the countertop, taking note of any protruding edges or corners. Use a flexible contour gauge or a strip of cardboard to trace the contour of the curved section of the countertop.
Tip: To ensure precise measurements, it’s essential to hold the contour gauge firmly against the countertop and follow the curvature closely.
Once you have traced the contour of the curved section, transfer the measurements onto a piece of plywood. Use a pencil or marker to mark the curve on the plywood, ensuring you replicate the exact shape and measurements from the countertop.
Cut the Plywood Template According to the Curvature
After transferring the curvature onto the plywood, it’s time to cut the template according to the curved shape. Using a jigsaw or a coping saw, carefully cut along the marked curve. Take your time and follow the line accurately to ensure a smooth, precise cut.
Pro tip: To prevent the plywood from splintering, place masking tape along the cut line before using the saw.
Ensure the Plywood Template Fits Accurately on the Countertop
Before placing the laminate sheet on your curved countertop, it’s crucial to ensure that the plywood template fits accurately. Place the template onto the countertop, aligning it with the curved section. Check for any gaps or inconsistencies that may affect the fit of the laminate sheet.
Important: The plywood template should fit snugly against the countertop, without any visible gaps or spaces.
If you notice any discrepancies, make the necessary adjustments to the template by sanding or trimming the edges until it fits perfectly. Remember, the accuracy of the template directly impacts the quality of the final installation.
By creating a template for the curved countertop shape, you’ll ensure a smooth and precise installation of your laminate sheet. The template serves as a guide to transfer the countertop’s curvature, allowing you to cut the plywood accurately and achieve a flawless fit. With the template in hand, you’ll be well-prepared to move on to the next steps of installing laminate sheet on your curved countertop.
Apply Contact Cement On Both The Laminate Sheet And Countertop
Use a Roller to Spread the Contact Cement Evenly
Applying contact cement evenly is crucial for a successful installation of laminate sheet on a curved countertop. Using a roller helps to achieve a smooth and seamless bond between the laminate and the countertop surface.
To start, apply contact cement on both the laminate sheet and the curved countertop using a brush. Make sure to apply an even layer of contact cement, ensuring that all areas are covered.
A tip to ensure even distribution of contact cement is to divide the countertop into sections. Apply contact cement to one section at a time and use the roller to spread it evenly. This will prevent the cement from drying out before you can complete the installation.
Using a roller has several benefits. It helps to eliminate air bubbles that may get trapped between the laminate sheet and the countertop, ensuring a smooth and uniform surface. Additionally, the pressure applied by the roller helps to activate the adhesive properties of the contact cement, ensuring a strong bond between the two surfaces.
Follow the Manufacturer’s Guidelines for Proper Application
To ensure a successful installation, it is essential to adhere to the manufacturer’s guidelines for applying contact cement.
- Read the instructions provided by the manufacturer carefully.
- Ensure that you are using the correct type of contact cement for laminate installations.
- Follow any temperature or humidity recommendations specified by the manufacturer.
- Pay attention to the recommended drying time, as it may vary depending on the brand and type of contact cement used.
Following the manufacturer’s guidelines will help to ensure that the contact cement performs as expected and provides a strong and durable bond between the laminate sheet and the curved countertop.
Allow the Contact Cement to Dry According to the Instructions
Proper drying of the contact cement is crucial for achieving a secure and long-lasting bond.
After applying the contact cement, it is important to allow it to dry according to the instructions provided by the manufacturer. This may involve waiting for a specific amount of time or until the contact cement becomes tacky to the touch.
A useful tip is to lightly touch the contact cement with your finger. If it feels tacky and does not transfer onto your finger, it is likely ready for the next step.
Skipping or rushing the drying process can compromise the bond between the laminate sheet and the curved countertop, resulting in an unstable installation. Take the time to let the contact cement dry properly and ensure a successful outcome.
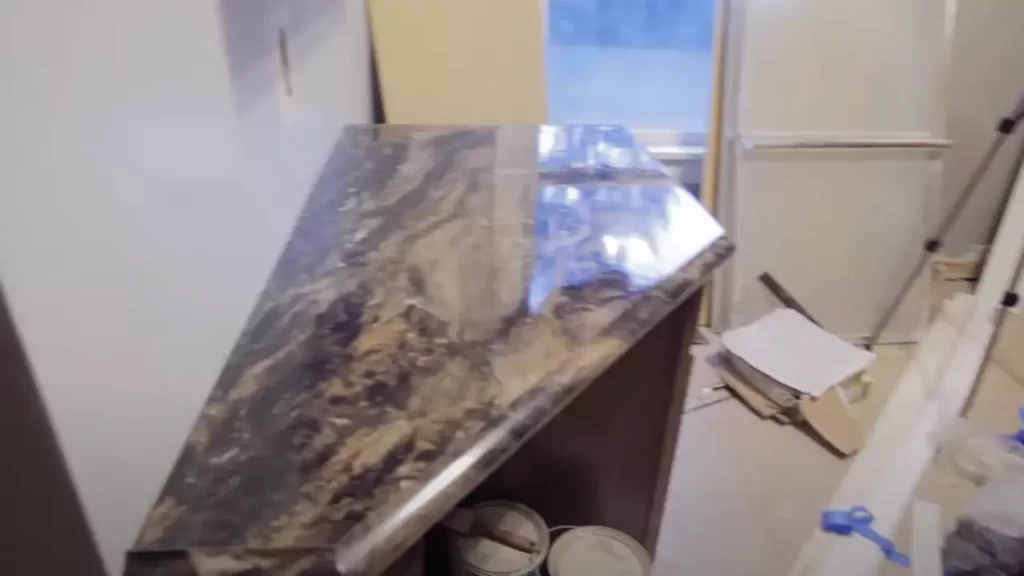
Position And Secure The Laminate Sheet Onto The Countertop
Align the Laminate Sheet with the Curvature of the Countertop
Proper alignment is crucial to ensure a seamless installation of laminate sheet on a curved countertop. Start by carefully placing the laminate sheet onto the countertop, making sure it aligns perfectly with the curvature. Take your time to adjust the sheet until it fits snugly, paying close attention to any corners or tricky areas.
It’s essential to keep a keen eye for any gaps or unevenness along the edges. To check the alignment, run your hand gently along the laminate sheet, feeling for any inconsistencies. Adjust the position as needed until the sheet contours the countertop flawlessly, ready for the next step.
Smooth Out any Air Bubbles or Wrinkles with a Laminate Roller
Once the laminate sheet is correctly positioned, it’s time to eliminate any air bubbles or wrinkles. To achieve this, work systematically from the center to the edges. Place a laminate roller in the middle of the sheet and firmly press down as you roll towards the outer edges.
Continue this process, gradually moving the roller across the entire surface of the laminate sheet. Apply steady and even pressure as you go. This technique ensures any trapped air bubbles or wrinkles are released, resulting in a smooth and professional finish.
Trim Excess Laminate Using a Router with a Flush Trim Bit
After successfully aligning and smoothing the laminate sheet onto the countertop, it’s time to trim away any excess material. A router tool with a flush trim bit is perfect for achieving precise and clean cuts.
Fit the router with a flush trim bit, ensuring it is securely locked in place. Start at one end of the countertop, positioning the router against the edge of the laminate sheet. Gently guide the router along the edge, allowing the bit to trim away the excess material.
Continue moving the router along the edges of the countertop, carefully trimming any protruding laminate. Remember to maintain a steady pace and avoid rushing to ensure an accurate cut. Once complete, inspect the trim to ensure it is smooth and even, ready for the final step.
File the Edges of the Laminate for a Smooth Finish
To achieve a polished and smooth finish, filing the edges of the laminate sheet is essential. Take a file or sandpaper and run it along the trimmed edges, ensuring you maintain even pressure.
Move the file in a back-and-forth motion, gradually smoothing out any roughness or unevenness. Pay close attention to the corners, ensuring they are properly rounded for a professional look. Continuously check the progress by feeling the edges with your hand, ensuring a seamless transition from the laminate to the countertop.
By following these steps and taking your time, you can successfully position, secure, and finish a laminate sheet on a curved countertop. It’s important to have patience and attention to detail throughout the process to achieve the best results.
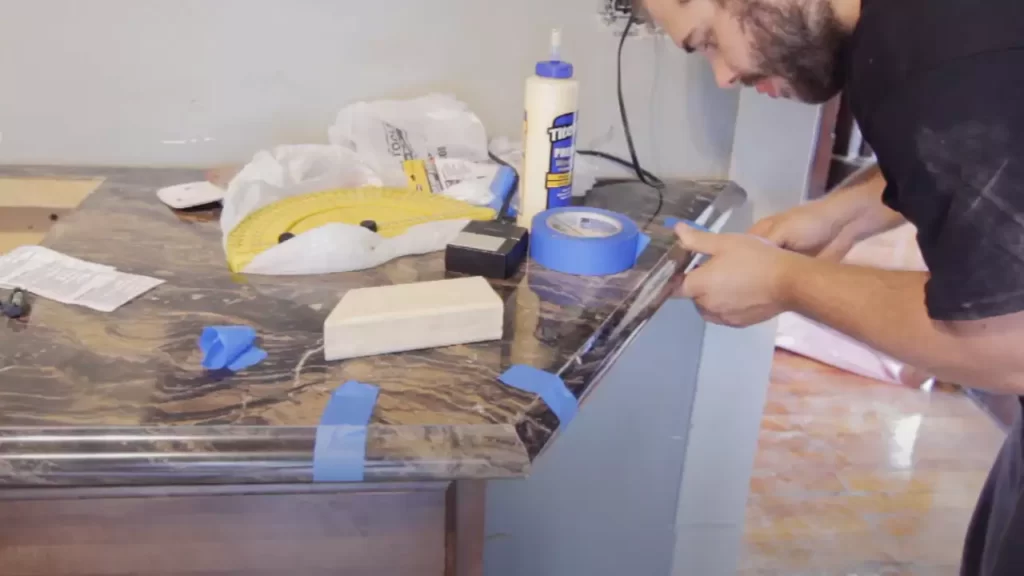
Finish The Edges Of The Laminate Sheet
If you are looking to give your curved countertop a sleek and polished look, finishing the edges of the laminate sheet is an essential step. By adding edge banding and carefully trimming and smoothing the edges, you can achieve a seamless and professional finish that will enhance the overall appearance of your countertop. In this guide, we will walk you through the process of finishing the edges of a laminate sheet on a curved countertop.
Install Edge Banding to Cover the Exposed Edges
The first step in finishing the edges of the laminate sheet is to install edge banding to cover the exposed edges. Edge banding is a thin strip of material that matches the color and texture of the laminate sheet. It is designed to not only provide a decorative finish but also protect the edges from moisture and damage.
To install edge banding, follow these steps:
- Measure the length of the exposed edges and cut the edge banding strips accordingly.
- Apply a thin layer of adhesive to the back of the edge banding strip.
- Position the edge banding strip over the exposed edge, aligning it with the laminate sheet.
- Press firmly along the entire length of the edge banding strip to ensure a strong bond.
Apply Adhesive to the Edge Banding and Press Firmly
Once the edge banding is installed, it is important to apply adhesive to the edge banding and press it firmly onto the exposed edges. This will ensure a secure and long-lasting bond. Follow these steps to apply adhesive:
- Using a brush or applicator, carefully apply a thin layer of adhesive to the edge banding.
- Starting from one end, press the edge banding firmly onto the exposed edge.
- Continue pressing the edge banding along the entire length of the edge, ensuring it adheres evenly.
- Hold the edge banding in place for a few seconds to allow the adhesive to set.
Trim any Excess Edge Banding with a Utility Knife
After the adhesive has set, it is important to trim any excess edge banding to achieve a neat and clean finish. Use a sharp utility knife to carefully trim the edge banding. Follow these steps:
- Hold the utility knife at a slight angle and gently trim away the excess edge banding.
- Take care not to cut into the laminate sheet or damage the surrounding surface.
- Trim the edge banding flush with the surface, ensuring a seamless transition between the laminate sheet and the edge banding.
Smooth and File the Edges for a Seamless Look
Lastly, to achieve a seamless and polished look, it is important to smooth and file the edges of the laminate sheet. This will ensure that there are no rough or uneven edges. Follow these steps:
- Use a sanding block or fine-grit sandpaper to gently sand the edges of the laminate sheet and the edge banding.
- Continue sanding until the edges are smooth and any imperfections are eliminated.
- Use a file or sandpaper to round off any sharp corners or edges for a more polished finish.
- Wipe away any dust or debris with a damp cloth.
By following these steps and taking the time to finish the edges of the laminate sheet on your curved countertop, you can achieve a professional-looking installation. The result will be a beautiful and functional countertop that adds style and elegance to your space.
Clean And Maintain The Laminate Sheet On The Curved Countertop
Keeping your laminate sheet on a curved countertop clean and well-maintained is essential for its longevity and aesthetic appeal. Regular cleaning helps to remove dirt and grime while maintaining the laminate sheet’s shine. To ensure your curved countertop remains in pristine condition, follow these simple cleaning and maintenance tips.
Use Mild Soap and Water for Regular Cleaning
One of the easiest and most effective ways to clean your laminate sheet on a curved countertop is by using mild soap and water. Mix a small amount of mild dish soap with warm water in a bucket or spray bottle. Dampen a soft cloth or sponge with the soapy water solution and gently wipe down the laminate surface, paying attention to any spills, food stains, or fingerprints. Rinse the cloth or sponge thoroughly and wipe the countertop again to remove any soap residue. Finish by drying the surface with a clean, dry cloth to prevent water spots.
Avoid Abrasive Cleaners or Scrubbing Pads that can Scratch the Laminate
When cleaning your laminate sheet, it is important to avoid abrasive cleaners or scrubbing pads as they can scratch and damage the surface. Harsh chemicals, such as bleach or ammonia-based cleaners, should also be avoided as they can cause discoloration or dull the laminate finish. Instead, stick to mild soap and water or specialized laminate cleaners that are specifically formulated for gentle yet effective cleaning.
Use Trivets or Cutting Boards to Protect the Laminate from Heat and Knife Marks
To prevent heat damage and knife marks on your curved countertop, it is essential to use trivets or cutting boards. Hot pots, pans, and dishes should never be placed directly on the laminate surface as they can cause burn marks or discoloration. Similarly, using knives or other sharp utensils directly on the laminate can lead to unsightly scratches. Place a heat-resistant trivet under hot items and always use a cutting board to protect the laminate from knife marks.
Address any Stains or Spills Promptly to Avoid Permanent Damage
Stains and spills should be addressed promptly on a laminate sheet to prevent permanent damage. Clean up any spills as soon as they occur using a soft cloth or sponge dampened with mild soap and water. Blot the area gently instead of rubbing, as rubbing can spread the stain or damage the laminate. For stubborn stains, you can use a mixture of baking soda and water or a non-abrasive stain remover specifically designed for laminate surfaces.
Frequently Asked Questions
Can Laminate Be Applied To Curved Surfaces?
Yes, laminate can be applied to curved surfaces.
Can I Install Laminate Sheet Over Existing Countertop?
Yes, you can install laminate sheet over an existing countertop. Just ensure that the surface is clean, smooth, and dry. Use appropriate adhesive or contact cement to secure the laminate sheet in place. Make sure to follow the manufacturer’s instructions for the best results.
Can You Curve A Laminate Countertop?
No, it is not possible to curve a laminate countertop. Laminate is a rigid material that cannot be bent or molded into curved shapes. If you need a curved countertop, you may need to consider alternative materials such as solid surface or granite.
How Do You Cover Countertops With Laminate Sheets?
To cover countertops with laminate sheets, first clean the surface thoroughly. Measure and cut the laminate sheets to size, leaving a small overhang. Apply adhesive to the countertop and carefully position the laminate, pressing down firmly. Trim any excess and file the edges for a smooth finish.
Conclusion
Installing laminate sheet on a curved countertop can seem intimidating, but with the right techniques, it can be done successfully. By following the steps outlined you can achieve a seamless and professional-looking finish for your countertop. Remember to take your time, use the right tools, and prioritize accuracy for the best results.
Happy installing!