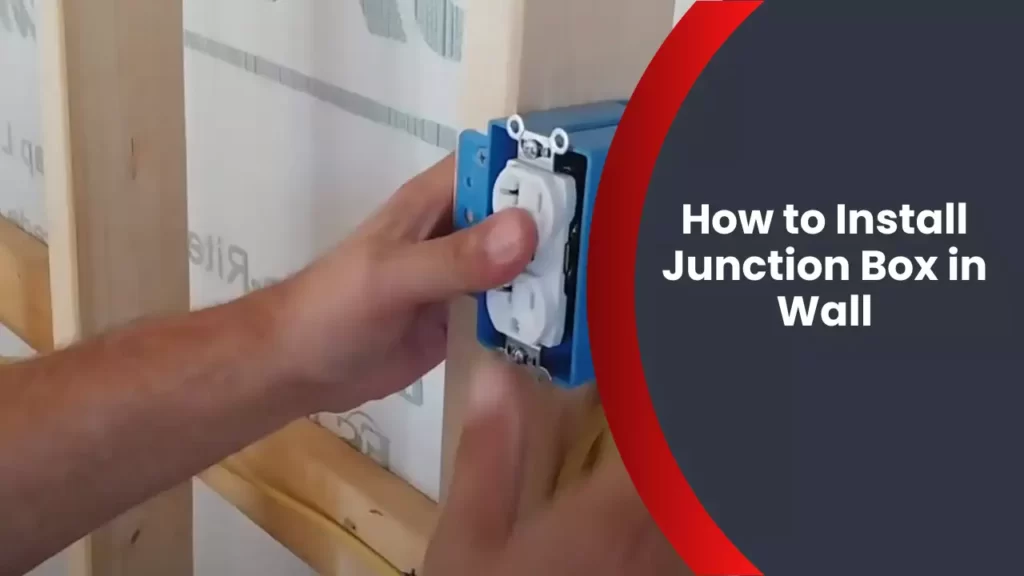
To install a junction box in a wall, start by cutting a hole in the drywall using a keyhole saw or a utility knife. Then, insert the junction box into the hole and secure it with screws or nails.
Finally, connect the wires to the terminals in the junction box using wire connectors. Installing a junction box in a wall is an essential step when dealing with electrical wiring. Whether you are adding new outlets or making repairs, a junction box provides a safe and organized enclosure for electrical connections.
This article will guide you through the process of installing a junction box in a wall, ensuring that you do it correctly and safely. By following a few simple steps, you can complete this task on your own, saving time and money on hiring a professional electrician.
Understanding The Importance Of Junction Boxes In Electrical Installations
The installation of junction boxes is a crucial aspect of any electrical project, as these boxes play a vital role in ensuring the safety and functionality of the electrical system. Understanding the importance of junction boxes in electrical installations is essential for homeowners, electricians, and DIY enthusiasts alike. In this article, we will explore why junction boxes are essential and the significant role they play in electrical safety.
Why Junction Boxes are Essential
Junction boxes are an integral part of electrical installations due to their several important functions. These small containers protect electrical connections, prevent electrical hazards, and make installations more practical and organized. Here are some key reasons why junction boxes are essential:
- Protection of Electrical Connections: Junction boxes provide a protective enclosure for electrical connections, preventing them from being exposed to external elements, such as moisture, dust, and accidental physical damage.
- Prevention of Electrical Hazards: By containing electrical connections within a junction box, the risk of electrical shocks, short circuits, and electrical fires is significantly minimized. The box acts as a barrier between the electrical components and the surrounding environment.
- Facilitating Troubleshooting and Maintenance: Junction boxes make it easier to locate and access electrical connections. If any troubleshooting or maintenance needs to be carried out in the future, having connections inside a junction box simplifies the process.
- Organizing Electrical Wiring: Junction boxes help in keeping electrical wiring neat and organized. The wires are properly arranged and secured within the box, reducing the risk of tangled or loose wires that could lead to accidents or operational failures.
The Role of Junction Boxes in Electrical Safety
Electrical safety should always be a top priority when it comes to any electrical installation. Junction boxes play a critical role in maintaining electrical safety by:
- Containing Sparks and Arcs: In case of any loose connections or faults, junction boxes confine sparks and arcs within the enclosure. This prevents them from igniting nearby flammable materials and reduces the risk of electrical fires.
- Preventing Contact with Live Wires: By providing a sealed enclosure, junction boxes prevent accidental contact with live wires. This significantly minimizes the chances of electrical shocks and electrocution.
- Minimizing the Risk of Overheating: Properly installed junction boxes ensure that electrical connections are done correctly, with tightened connections and appropriate wire sizes. This helps in preventing overheating of wires, which can lead to fire hazards.
- Fulfilling Electrical Code Requirements: Junction boxes are a mandatory requirement in electrical codes and regulations. Adhering to these standards not only ensures safety but also avoids potential legal and insurance issues in the future.
Considering these significant functions, it becomes evident that junction boxes are not just optional accessories but vital components of any electrical installation. Whether you are adding new electrical outlets or wiring an entire room, using junction boxes is essential for a safe and reliable electrical system.
Gathering The Necessary Tools And Materials
Before you can install a junction box in your wall, it is important to gather all the necessary tools and materials. Having everything ready will make the installation process smoother and more efficient, ensuring that you have everything you need to complete the job.
List of tools required
In order to install a junction box in your wall, you will need to have the following tools:
- Screwdriver
- Drill
- Utility knife
- Wire stripper
- Needle-nose pliers
- Level
- Tape measure
Types of junction boxes available
There are several types of junction boxes available, each designed for specific purposes. When choosing a junction box for your installation, it is important to consider the following options:
| Type | Description |
|---|---|
| Plastic junction box | Lightweight and affordable, suitable for most residential applications. |
| Metal junction box | Durable and provides better protection against fire hazards. |
| Weatherproof junction box | Designed to withstand exposure to outdoor elements. |
| In-wall junction box | Recessed into the wall for a cleaner and more seamless appearance. |
Selecting the right junction box for your installation
When selecting a junction box for your installation, it is important to consider the specific requirements of your project. Here are some factors to consider:
- The size of the junction box should accommodate the number of wires and connections you will be making.
- Ensure that the junction box has sufficient mounting space and is compatible with the existing electrical system.
- If you are installing the junction box in a damp or wet location, opt for a weatherproof junction box to prevent any potential damage.
- Consider the aesthetic aspect as well, especially if the junction box will be visible in your wall. Choose a box that blends well with your interior design.
By considering these factors and selecting the right junction box, you can ensure a successful and safe installation.
Preparing The Wall For Junction Box Installation
Before installing a junction box in your wall, it is important to prepare the wall properly. This involves identifying the ideal location for the junction box, measuring and marking the dimensions on the wall, and cutting the opening for the junction box. By following these steps, you can ensure a successful and safe installation.
Identifying the ideal location for the junction box
When determining the location for your junction box, you need to consider a few factors. First, make sure the location is easily accessible and allows for proper wiring connections. Additionally, consider the aesthetics of the area, as the junction box will be visible once installed.
One method to identify the ideal location is to locate the nearest electrical outlet or light switch. Typically, the junction box should be placed near these existing electrical fixtures for easy connection. However, avoid placing it too close to water sources such as sinks or showers to prevent any potential hazards.
Measuring and marking the dimensions on the wall
Now that you’ve determined the location, it’s time to measure and mark the dimensions on the wall. Start by measuring the width and height of the junction box that you’ll be installing. Once you have these measurements, use a pencil or marker to mark the area on the wall where the junction box will be placed.
Ensure that your markings are level and aligned properly with any existing electrical fixtures nearby. This will help ensure a clean and professional-looking installation.
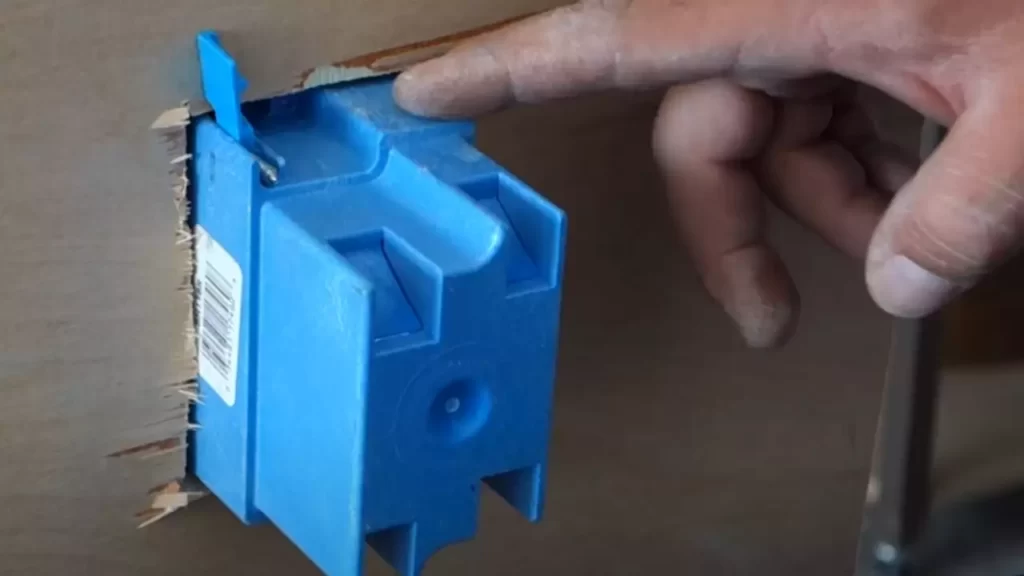
Cutting the opening for the junction box
With the dimensions marked on the wall, it’s time to cut the opening for the junction box. Using a suitable power tool, such as a keyhole saw or reciprocating saw, carefully cut along the marked lines. Take caution to avoid damaging any existing electrical wiring or pipes behind the wall.
As you cut the opening, periodically check the fit of the junction box to ensure that it will sit flush with the wall once installed. If needed, make adjustments to the opening until the box fits properly.
Remember to wear suitable protective gear, such as safety goggles, gloves, and a dust mask, when cutting the opening.
Once the opening is cut, clear away any debris or dust from the area. You are now ready to proceed with the installation of the junction box.
Installing The Junction Box
Installing a junction box is an essential step in any electrical project. A junction box is a protective enclosure that houses electrical connections, ensuring safety and organization. In this guide, we will walk you through the process of installing a junction box in a wall, focusing on the following steps:
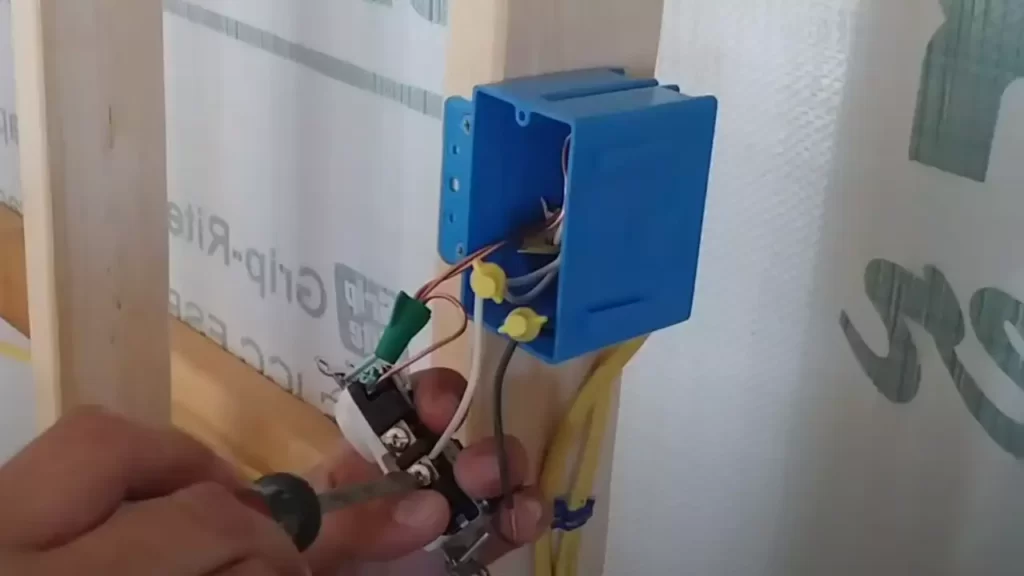
Connecting the electrical wires to the box
Before securing the junction box to the wall, it is crucial to properly connect the electrical wires to the box. Follow these steps:
- First, identify the different colored wires. Typically, black wires are live or “hot” wires, white wires are neutral wires, and green or bare copper wires are ground wires.
- Strip the outer insulation of the wires, exposing about half an inch of each wire.
- Twist the exposed ends of the wires together, ensuring a secure connection.
- Use wire connectors, such as wire nuts, to cover and protect the twisted wire connections. Make sure the wire nuts are tightened securely.
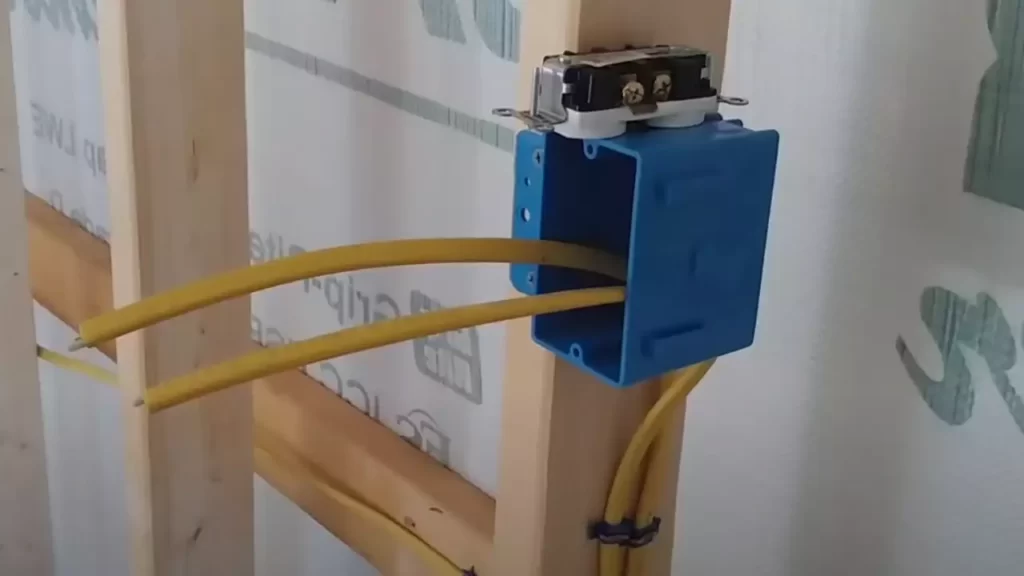
Securing the junction box to the wall
Once the electrical wires are properly connected to the junction box, it’s time to secure the box to the wall. Follow these steps:
- Choose a suitable location on the wall where you want to install the junction box. Mark the position using a pencil or marker.
- Using a drill and the appropriate drill bit, create holes in the wall at the marked positions.
- Insert wall anchors into the holes to provide stability and support for the junction box.
- Align the holes in the junction box with the wall anchors and screw the box firmly into place using screws.
Testing the electrical connections
After securing the junction box to the wall, it’s important to test the electrical connections to ensure everything is functioning correctly. Follow these steps:
- Switch on the power to the circuit connected to the junction box.
- Using a multimeter or a voltage tester, carefully check each wire’s connection to ensure they are receiving the proper voltage.
- If any issues or abnormalities are detected during the testing, turn off the power immediately and recheck the wiring connections.
By following these steps, you can successfully install a junction box in a wall. Remember, if you are unsure about any aspect of the installation process or are not experienced with electrical work, it is always recommended to consult a professional electrician for assistance.
Covering And Finishing The Installation
Now that you have successfully installed the junction box in the wall, it is time to cover and finish the installation to give it a polished and professional appearance. This final step not only adds an aesthetic touch to your electrical system but also ensures the safety of the wires and connections. In this section, we will guide you through the process of installing the junction box cover, concealing it with a wall plate, and performing a final check and cleanup to guarantee a job well done.
Installing the Junction Box Cover
Once the electrical connections have been made and secured inside the junction box, it is important to install the junction box cover to protect the wiring and prevent any accidental contact. Follow these simple steps to complete this task:
- Remove the cover from the junction box cover kit.
- Align the screw holes on the cover with the holes on the junction box.
- Insert the screws into the holes and tighten them using a screwdriver.
- Ensure that the cover is securely attached to the junction box, leaving no gaps.
Concealing the Junction Box with a Wall Plate
Now that the junction box cover is in place, it’s time to conceal it with a wall plate for a clean and neat finish. Follow these steps to complete this task:
- Select a wall plate that matches the style and color of your room décor.
- Align the holes on the wall plate with the screws on the junction box cover.
- Place the wall plate over the junction box cover.
- Secure the wall plate by tightening the screws with a screwdriver.
- Make sure the wall plate is level and flush against the wall surface.
Final Check and Cleanup
With the junction box cover and wall plate in place, it’s time to perform a final check and cleanup to ensure everything is functioning properly. Follow these steps to complete this task:
- Turn on the power to the electrical circuit and test the connections inside the junction box.
- Check for any loose wires or connections and secure them if necessary.
- Use an electrical tester to ensure there is no voltage present in the junction box.
- Remove any excess cables or wires that are not needed inside the junction box.
- Use a wire brush or vacuum to clean up any debris or dust that may have accumulated during the installation process.
Congratulations! You have now successfully covered and finished the installation of the junction box in your wall. With proper covering and finishing, your electrical system will not only look great but also provide the safety and functionality you need.
Tips And Safety Precautions
Installing a junction box in your wall is an important step in ensuring safe electrical connections within your home. Whether you’re adding a new outlet or rewiring a section of your house, following proper tips and safety precautions is crucial for a successful installation. In this section, we’ll discuss the importance of proper grounding techniques, ensuring proper wire connections, and the safety precautions you need to take during the installation process.
Proper Grounding Techniques
Proper grounding is crucial to protect your electrical system from potential electrical shock and to ensure the safe dissipation of electrical faults. Here are some tips to keep in mind when grounding your junction box:
- Ensure your junction box is securely grounded to the building’s grounding system. This involves connecting the grounding conductor to the grounding screw or terminal in the box.
- Use a grounding wire that is appropriately sized for the electrical load and in compliance with local electrical codes. This will help maintain the integrity of the grounding system.
- To ensure a reliable and low-resistance connection, remove any paint, rust, or debris from the grounding connection points before making the connection.
- Regularly check and test the continuity of the grounding system to verify its effectiveness. This can be done using an electrical tester or multimeter.
Ensuring Proper Wire Connections
Proper wire connections are essential for a safe and effective electrical installation. Follow these guidelines to ensure proper wire connections within your junction box:
- Strip the insulation from the wire ends to expose about 3/4 inch of bare wire.
- Twist the bare ends of the wires together tightly, ensuring no strands are sticking out.
- Use wire nuts or other approved connectors to secure the wire connections. Ensure the wire nut is fully tightened and covers all exposed wire.
- Avoid overcrowding the junction box by using appropriate wire connectors and ensuring there is enough space for all the wires. This will prevent overheating and potential fire hazards.
Safety Precautions during Installation
Installing a junction box involves working with electrical wiring, which can be dangerous if proper safety precautions are not followed. Here are some safety tips to keep in mind:
- Before starting the installation, turn off the power to the circuit you’ll be working on by switching off the relevant circuit breaker in your electrical panel.
- Double-check that the power is truly off by using a non-contact voltage tester to ensure there is no electrical current running through the wires.
- Wear appropriate personal protective equipment (PPE) such as gloves and safety glasses to protect yourself against potential electrical shocks and injuries.
- Avoid working on live wires unless absolutely necessary. If you need to work on live wires, take extra caution and ensure you are well-trained in electrical safety procedures.
- Regularly inspect your tools and equipment for any signs of damage or wear. Faulty tools can increase the risk of accidents, so it’s important to use well-maintained tools.
By following these tips and safety precautions, you can ensure a successful and safe installation of a junction box in your wall. Remember, if you’re unsure about any aspect of the installation, it’s always best to consult a qualified electrician.
Troubleshooting Common Installation Issues
While installing a junction box in the wall may seem straightforward, it’s not uncommon to encounter some common installation issues. In this section, we will discuss how to identify and resolve electrical connection problems, deal with loose or damaged wires, and address issues with the junction box cover.
Identifying and resolving electrical connection problems
One of the most common issues during junction box installation is encountering electrical connection problems. These problems can range from wires not securely connected to wrong polarity connections. To identify and resolve these issues:
- Double-check the wiring: Ensure each wire is connected to the appropriate terminal within the junction box. Inspect the connections to ensure they are secure and tight.
- Verify correct polarity: It’s essential to ensure that the hot and neutral wires are connected correctly. Use a voltage tester to confirm the polarity before closing up the junction box.
- Check for loose connections: Loose connections can cause electrical issues, including intermittent power or flickering lights. Tighten any loose connections within the junction box.
Dealing with loose or damaged wires
Another common issue during installation is encountering loose or damaged wires. These issues can lead to electrical hazards if not addressed. Here are the steps to deal with loose or damaged wires:
- Inspect the wires: Check each wire for signs of damage, such as fraying or exposed copper. Replace any damaged wires with new ones.
- Secure loose wires: If you encounter loose wires, use a wire nut or electrical tape to secure them together. Make sure the connection is tight and secure.
- Reposition wires if necessary: If the wires are causing obstruction or interfering with the junction box cover, reposition them to create a clean and organized installation.
Addressing issues with the junction box cover
The junction box cover is crucial for safety and aesthetics. If you encounter any issues with the cover, follow these steps to address them:
- Ensure a proper fit: Make sure the junction box cover fits securely over the junction box. It should align perfectly without any gaps.
- Fix loose covers: If the cover feels loose, tighten the screws or clips that secure it. This will prevent the cover from falling off or exposing the electrical connections.
- Replace damaged covers: If the junction box cover is cracked or damaged, it’s essential to replace it with a new one. This ensures the safety of the electrical connections and enhances the appearance of the installation.
By troubleshooting common installation issues related to electrical connection problems, loose or damaged wires, and the junction box cover, you can ensure a safe and efficient installation of your junction box in the wall.
Frequently Asked Questions
Is It Ok To Put A Junction Box Inside Of A Wall?
Yes, it is acceptable to install a junction box inside a wall. However, it must comply with local electrical codes and be easily accessible for maintenance. It’s recommended to consult with a qualified electrician to ensure proper installation and safety measures are followed.
Should Junction Box Be Attached To Stud?
Yes, a junction box should be attached to a stud for secure mounting and to meet electrical code requirements.
Do You Need An Electrician To Install A Junction Box?
Yes, it is recommended to have an electrician install a junction box. Electricians have the knowledge and expertise to ensure proper installation, ensuring safety and compliance with electrical codes.
How Do You Install An Electrical Junction Box In Drywall?
To install an electrical junction box in drywall, follow these steps: 1. Mark the location on the wall. 2. Cut a hole using a drywall saw or rotary tool. 3. Secure the box to the wall with screws or clamps.
4. Connect the wires and install a cover plate. 5. Test the connection and ensure it’s working properly.
Conclusion
To sum up, installing a junction box in a wall is a crucial step in ensuring electrical safety and organization. By following the step-by-step guide outlined in this blog post, you can easily and confidently install a junction box on your own.
Remember to prioritize safety, proper wiring techniques, and code compliance. With this knowledge, you can tackle this electrical project with ease, saving time and money in the process. Happy wiring!