To install a Hunter Fan, begin by assembling the fan components according to the manufacturer’s instructions, then attach the fan to the ceiling using a mounting bracket. Electrical connections should be made by connecting the fan’s wires to the corresponding wires in the ceiling box, and secure it in place by tightening the screws.
Finally, attach the fan blades to the fan motor using the provided hardware, and secure the fan blades with screws. Now, you are ready to enjoy the cool breeze provided by your Hunter Fan.
Choosing The Right Hunter Fan For Your Space
Installing a Hunter fan can vastly improve the comfort and ambiance of any room. However, with a wide range of options available, it’s important to choose the right fan that suits your space perfectly. In this guide, we will walk you through the factors to consider when selecting a Hunter fan, how to determine the appropriate size and style for your room, and the different types of Hunter fans available.
Factors to consider when selecting a Hunter fan
Before making a decision, it’s important to keep in mind a few key factors that will help you choose the ideal Hunter fan for your space.
- Room size: The size of the room plays a crucial role in determining the size and capacity of the fan you should choose. Larger rooms will require fans with larger blade spans to effectively circulate air.
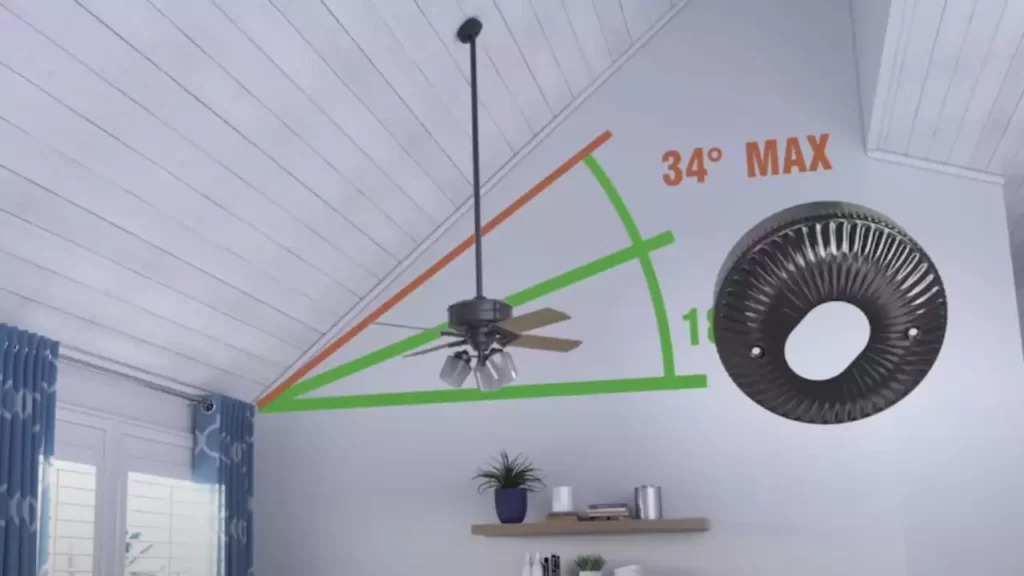
- Ceiling height: Ceiling height is another important consideration. Standard ceiling heights typically range from 8 to 9 feet, but if you have a higher ceiling, you may need a fan with an extended downrod to ensure proper clearance.
- Style and aesthetics: Hunter fans come in a variety of styles, from sleek and modern to classic and traditional. Consider the overall design of your space and choose a fan that complements it seamlessly.
- Budget: It’s essential to establish a budget and determine how much you are willing to spend on a Hunter fan. This will help narrow down your options and prevent overspending.
- Noise level: If noise is a concern, prioritize fans with quiet operation. Many Hunter fans are designed with noise-dampening technologies to ensure a tranquil and peaceful environment.
Determining the appropriate size and style for your room
When it comes to choosing the right fan size and style for your room, several considerations need to be taken into account.
The fan size is determined by the room’s square footage. To find the appropriate size, you can refer to the chart below:
| Room Size | Fan Size |
|---|---|
| Up to 75 sq. ft. | 42-inch to 44-inch fan |
| 76 sq. ft. to 144 sq. ft. | 46-inch to 54-inch fan |
| 145 sq. ft. to 225 sq. ft. | 52-inch to 60-inch fan |
| Above 225 sq. ft. | 62-inch fan or larger |
Additionally, consider the room’s décor and choose a fan style that complements the existing aesthetic. Whether you prefer a contemporary or traditional look, Hunter offers a variety of styles and finishes to suit any preference.
Understanding the different types of Hunter fans available
When it comes to selecting a Hunter fan, you’ll find different types available to suit your specific needs. These include:
- Standard fans: The most common type, these fans mount directly to the ceiling and are ideal for rooms with a standard ceiling height.
- Hugger fans: These fans are designed to be installed close to the ceiling, making them perfect for rooms with low ceilings or limited space.
- Dual-mount fans: These versatile fans offer the option to be installed as a standard fan or as a hugger fan, giving you flexibility based on your ceiling height.
- Ceiling fans with lights: If you need both cooling and lighting solutions, ceiling fans with integrated light fixtures provide an efficient and space-saving option.
- Outdoor fans: Designed specifically for outdoor spaces, these fans are weather-resistant and built to withstand various weather conditions.
By understanding the different types of Hunter fans, you can select the one that best suits your space, needs, and preferences.
Gathering The Tools And Materials
Gathering the tools and materials is an essential step when it comes to installing a Hunter fan in your home. Having the right tools and materials on hand will make the installation process smoother and more efficient. In this section, we will discuss the essential tools needed for the installation process, the additional materials required to complete the installation, and some tips for ensuring you have everything you need before getting started.
Essential tools needed for the installation process
Before you begin the installation of your Hunter fan, you will need to have the following tools:
- Phillips screwdriver: A Phillips screwdriver is necessary for loosening and tightening screws during the installation process. Make sure you have a properly sized screwdriver for optimal performance.
- Wire strippers: Wire strippers are used to remove the insulation from the wires, allowing for proper connection during the installation process. Ensure your wire strippers are suitable for the gauge of wire being used.
- Wire connectors: Wire connectors are necessary for securely connecting the wires of your Hunter fan to the electrical supply. Make sure you have the correct size and type for your specific installation.
- Ladder: Depending on the height of your ceiling, a ladder may be needed to safely reach and install the Hunter fan.
- Hammer: A hammer may be required for any additional hardware installation, such as mounting brackets or junction boxes.
- Pliers: Pliers can be helpful for various tasks during the installation process, such as bending or cutting wires.
- Circuit tester: A circuit tester allows you to check if the electricity is turned off before beginning the installation process. This ensures your safety during the installation.
Additional materials required to complete the installation
In addition to the tools mentioned above, you will also need the following materials to complete the installation:
- Hunter fan: Of course, you will need the Hunter fan itself. Ensure you have purchased the correct model and size for your space.
- Hardware kit: Most Hunter fans come with a hardware kit that includes screws, brackets, and other necessary components for installation. Double-check that you have all the pieces included in the kit.
- Ceiling fan box: If your ceiling does not already have a suitable electrical box for mounting the fan, you will need to purchase a ceiling fan box to provide the necessary support.
- Electrical tape: Electrical tape is useful for securing wire connections and insulating exposed wires.
- Wire nuts: Wire nuts are an alternative to wire connectors and are used to secure and insulate wire connections.
Tips for ensuring you have everything you need before getting started
Before you begin the installation, here are some tips to help ensure you have everything you need:
- Read the installation instructions provided by Hunter thoroughly. This will give you a clear understanding of the tools and materials required for your specific fan model.
- Check your existing electrical supply to ensure it can support the installation of a ceiling fan. You may need to consult an electrician if any modifications are necessary.
- Make a checklist of all the tools and materials needed for the installation. This will help you stay organized and prevent any last-minute trips to the hardware store.
- Inspect the contents of your Hunter fan box and hardware kit before starting the installation. This will ensure you have all the necessary components and prevent any delays during the installation process.
- If you are uncertain about any step of the installation process, it is always best to consult a professional or contact Hunter customer support for guidance.
By gathering the essential tools and materials beforehand, you will be well-prepared to install your Hunter fan successfully. With the right equipment and careful planning, you can enjoy the comfort and functionality of your new fan in no time.
Preparing For The Installation
Before you begin installing your Hunter fan, it’s crucial to take the necessary steps to prepare. By ensuring that the power is turned off, clearing the area, and checking the ceiling for proper support and conditions, you’ll create a safe and frustration-free installation process.
Ensuring the power is turned off before beginning
Before you start any electrical work, always make sure that the power is turned off**. This will help prevent accidents and ensure your safety throughout the installation. Locate the circuit breaker that controls the power supply to the area where you’ll be working. Flip the switch to the “off” position, and use a voltage tester to double-check that the power is indeed off.
Clearing the area and removing any obstacles
Next, it’s important to **clear the area around where the Hunter fan will be installed**. Remove any furniture, fixtures, or decorations that might obstruct your workspace. By having a clear and uncluttered area, you’ll have better access to the ceiling and reduce the chances of accidental damage during the installation process.
Checking the ceiling for proper support and conditions
Before you proceed further, inspect the ceiling to ensure it has the necessary support and conditions for installing a Hunter fan. Begin by checking the ceiling joists or beams. These provide the structural support needed to hold the fan securely in place. Use a stud finder to locate and mark the positions of the joists.
Additionally, check the condition of the ceiling. Look for any cracks, water damage, or signs of deterioration. If you notice any issues, it’s recommended to consult a professional before proceeding with the installation.
Lastly, make sure the ceiling height meets the recommended clearance for the fan blades. Hunter fans typically require a minimum clearance of 7 feet from the floor to the fan blades for optimal performance and safety.
By following these essential steps to prepare for the installation, you’ll set yourself up for success in installing your Hunter fan. Remember to always prioritize safety and take the necessary precautions to ensure a smooth and hassle-free process.
Installing The Mounting Bracket
Installing the Mounting Bracket
When it comes to installing a Hunter fan, one crucial step is attaching the mounting bracket to the ceiling. The mounting bracket plays a vital role in ensuring the stability of your fan. In this section, we will provide you with step-by-step instructions on how to attach the mounting bracket correctly. We’ll also share some insightful tips to help you align the bracket accurately and secure it for optimal stability.
Step-by-Step Instructions for Attaching the Mounting Bracket to the Ceiling
1. Turn Off the Power: Before you begin any electrical work, always ensure to turn off the power at the breaker box. This precautionary measure prevents any potential accidents during the installation.
2. Gather the Required Tools: Make sure you have all the necessary tools at hand, such as a ladder, screwdriver, electrical tape, and a voltage tester. Having everything ready beforehand will ensure a smooth installation process.
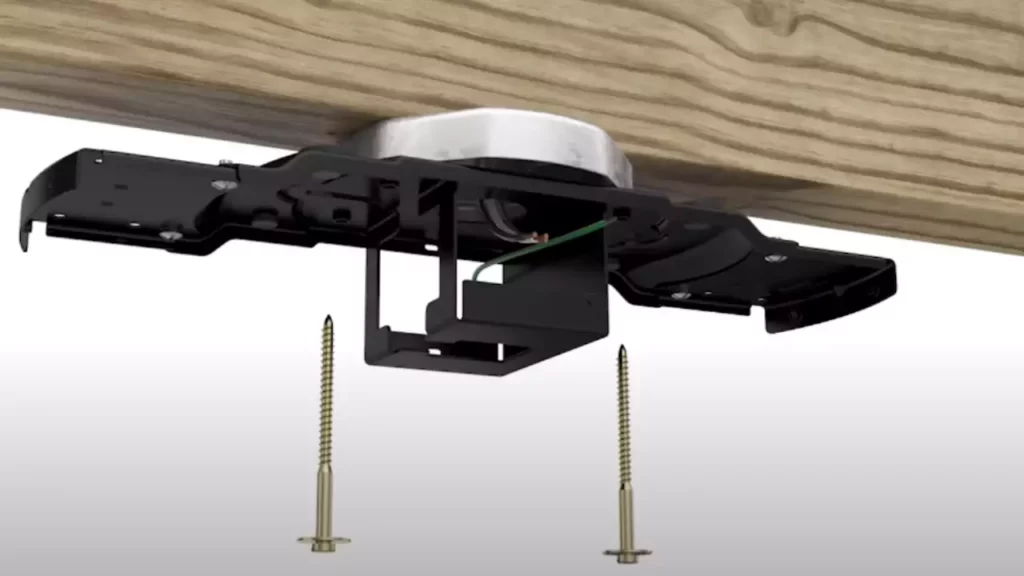
3. Locate the Ceiling Joist: Use a stud finder to locate the ceiling joist. It is essential to attach the mounting bracket to a ceiling joist for maximum support. Once you find the joist, mark it with a pencil for easy identification.
4. Position the Mounting Bracket: Position the mounting bracket over the mark you made on the ceiling joist. Check if the bracket is centered and aligned with the desired fan location. This step is crucial for the fan’s stability and balanced operation.
5. Secure the Mounting Bracket: Using the provided screws, attach the mounting bracket to the ceiling joist securely. Make sure the bracket is tightly fastened to ensure stability during fan operation. A loose mounting bracket can cause unnecessary wobbling or shaking of the fan, compromising its performance.
Tips for Aligning the Bracket Correctly
– To ensure the proper alignment of the mounting bracket, use a level. This tool will help you determine if the bracket is perfectly level or if any adjustments are necessary. A level fan not only enhances the aesthetic appeal of the room but also ensures optimal airflow.
– Take your time to ensure that the mounting bracket is positioned at the correct height. Placing it too high or too low can impact the airflow and overall functionality of the fan. Refer to the manufacturer’s instructions for the recommended height.
Securing the Bracket to Ensure Stability
– Once the mounting bracket is attached, give it a gentle tug to ensure it is secure. A stable and well-secured bracket guarantees the safety and performance of your fan.
– Consider using additional support, such as a brace kit, for added stability. A brace kit provides extra support to the ceiling joist and reduces any chance of the fan shaking or vibrating excessively.
By following these step-by-step instructions and implementing the useful tips provided, you can confidently attach the mounting bracket to your ceiling for a secure and stable installation. Remember, proper alignment and a well-secured bracket are essential for the smooth operation of your Hunter fan.
Wiring The Hunter Fan
Identifying the wiring in your electrical box
Before you start wiring your Hunter Fan, it’s important to identify the wiring in your electrical box. This step ensures that you connect the fan correctly and avoid any electrical mishaps. To begin, turn off the power to the circuit you’ll be working on by flipping the circuit breaker. Safety should always be your top priority when working with electrical systems.
Once the power is off, open up your electrical box and examine the wires inside. Typically, you will find three main wires – a black wire, a white wire, and a green or bare copper wire. The black wire is the hot wire, the white wire is the neutral wire, and the green or bare copper wire is the ground wire.
It’s essential to double-check the wiring in your home as it may slightly differ from the standard. If you have any doubts, it’s best to consult a certified electrician to ensure a proper installation.
Connecting the wires from the fan to the electrical box
Once you have identified the wiring in your electrical box, you can start connecting the wires from your Hunter Fan. The first step is to separate the fan wires from the ceiling wires. The fan wires usually include a black wire, a white wire, and a blue wire.
To make the connections, match the black fan wire with the black electrical box wire, the white fan wire with the white electrical box wire, and the blue fan wire with the black electrical box wire labeled for the light. Remember to securely connect these wires using wire nuts, ensuring they are tightly twisted together and there are no loose ends.
It’s crucial to pay attention to the manufacturer’s instructions included with your Hunter Fan, as they may provide specific instructions for your particular model. Always follow these guidelines for the safest and most effective installation process.
Properly grounding the fan for safety
Grounding your Hunter Fan is an essential step for safety. The green or bare copper wire from the fan should be connected to the green or bare copper wire in your electrical box. This connection ensures that any excess electrical current is safely directed away from the fan, reducing the risk of electric shock.
To properly ground the fan, strip about 1/2 inch of insulation from the green or bare copper wire from the fan and twist it together with the green or bare copper wire in the electrical box. Use a wire nut to secure the connection tightly. Make sure there are no exposed wires or bare copper showing after the connection is made.
By following these steps and adhering to the manufacturer’s instructions, you can confidently wire your Hunter Fan and enjoy a cool breeze in no time. Remember, if you’re unsure or uncomfortable working with electrical systems, it’s always best to seek professional assistance. Safety is paramount when dealing with electricity, so never take any risks!
Attaching The Fan Blades And Canopy
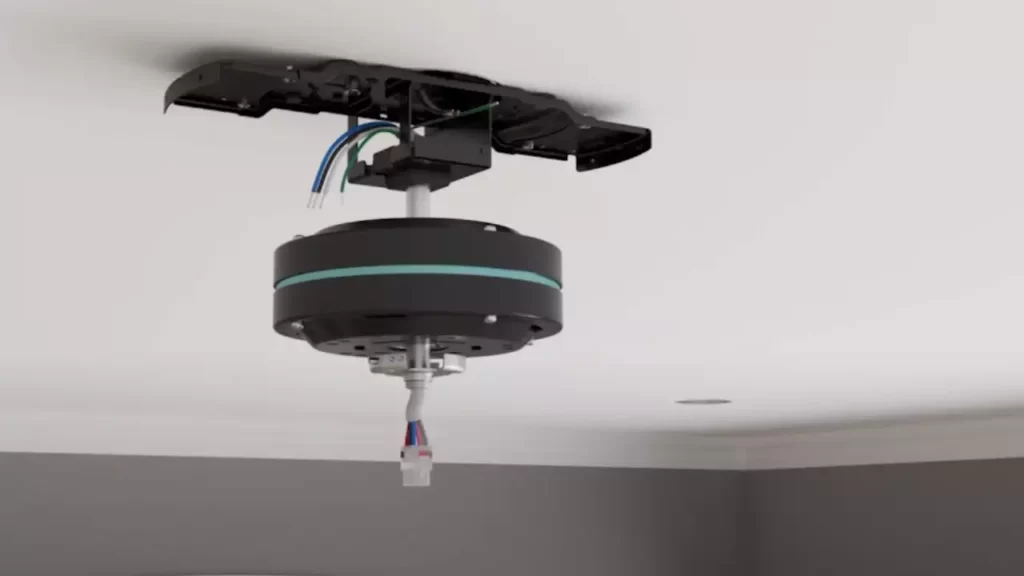
After successfully mounting the fan motor to the ceiling, it’s time to move on to the next crucial steps: attaching the fan blades and canopy. This is where the aesthetics of your Hunter fan really take shape. In this section, we will guide you through understanding different blade assembly types, securing the blades to the fan motor, and attaching the canopy to conceal the wirings, ensuring a seamless and visually appealing installation.
Understanding the different blade assembly types
Before diving into the blade attachment process, it’s essential to familiarize yourself with the different blade assembly types available for your Hunter fan. This knowledge will help you identify the specific instructions that apply to your particular model. Hunter offers two common blade attachment types: the blade iron and the blade attachment screws.
| Blade Assembly Type | Description |
|---|---|
| Blade Iron | The blade irons have pre-attached bracket-like components that easily slide onto the fan motor. |
| Blade Attachment Screws | In this type, the blades are connected to the motor using screws that are usually included in the package. |
Securing the blades to the fan motor
Regardless of the blade assembly type, securing the blades to the fan motor is a straightforward process. To attach the blades, follow these steps:
- Using the provided screws, align each blade with the corresponding pre-drilled holes on the fan motor.
- Insert the screws through the designated holes and tighten them using a screwdriver. Ensure they are securely fastened, but be cautious not to overtighten as it can damage the blade or motor.
- Repeat this process for all the blades, ensuring they are evenly spaced and properly aligned.
Attaching the canopy to conceal the wiring
Once the blades are securely in place, it’s time to attach the canopy, which serves the dual purpose of concealing the wiring and adding a finishing touch to the fan installation. Follow these steps to attach the canopy:
- Hold the canopy against the base of the fan motor, aligning the screw holes.
- Insert and tighten the screws through the holes, ensuring the canopy is snugly attached to the motor.
- Check that the canopy is level and aligned with the ceiling, making any necessary adjustments.
With the blades attached and the canopy in place, your Hunter fan installation is almost complete. However, before enjoying the refreshing breeze, ensure you have completed all electrical connections and testing to guarantee a safe operation.
Now that you know how to attach the fan blades and canopy, it’s time to move on to the final steps of your Hunter fan installation.
Installing The Pull Chain And Light Kit (If Applicable)
Step-by-step instructions for installing a pull chain control
Installing a pull chain control for your Hunter fan is a straightforward process that can be completed in just a few steps. Before starting the installation, make sure you have all the necessary tools and equipment:
- Wire cutters
- Wire strippers
- Phillips screwdriver
- Flathead screwdriver
- Electrical tape
- Pull chain control kit
1. Switch off the power
Prior to any electrical work, always switch off the power to the room where the fan is being installed. Locate the circuit breaker panel and flip the switch that controls the fan’s circuit to the off position.
2. Remove the fan housing cover
Using a Phillips screwdriver, remove the screws holding the fan housing cover in place. Carefully lift the cover off and set it aside.
3. Identify the wiring connections
Locate the existing wiring connections inside the fan. Typically, you will find a set of three wires, each a different color: black (hot), white (neutral), and green or copper (ground).
4. Disconnect the existing pull chain control
Using wire cutters, carefully disconnect the wires from the existing pull chain control. Disconnect the black wire from the black wire, the white wire from the white wire, and the green or copper wire from the grounding screw.
5. Install the new pull chain control
Take the new pull chain control kit and connect the black wire from the kit to the black wire from the fan. Connect the white wire from the kit to the white wire from the fan. Finally, connect the green or copper wire from the kit to the grounding screw inside the fan. Use wire strippers to remove a small portion of insulation from each wire if necessary.
6. Secure the connections
Once the wires are securely connected, use wire connectors or electrical tape to insulate and protect each connection. This will help prevent any loose or exposed wires, ensuring the safety and proper functioning of your fan.
7. Replace the fan housing cover
With the pull chain control successfully installed and the connections secured, carefully place the fan housing cover back onto the fan. Use the Phillips screwdriver to screw it back into place.
Adding a light kit to your Hunter fan
If you would like to add a light kit to your Hunter fan, follow these steps:
1. Switch off the power
Before starting any electrical work, ensure the power to the fan is switched off. Locate the circuit breaker panel and turn off the corresponding switch.
2. Remove the fan housing cover
Using a Phillips screwdriver, remove the screws securing the fan housing cover. Lift the cover off and set it aside.
3. Install the light kit
Take the light kit and align it with the pre-drilled holes on the fan housing. Use the provided screws to attach the light kit securely.
4. Connect the wiring
Inside the fan housing, you will find wiring connections specifically designed for the light kit. Connect the black wire from the light kit to the black wire from the fan, and the white wire from the light kit to the white wire from the fan.
5. Secure the connections
Ensure the wiring connections are tightly connected and secure. Use wire connectors or electrical tape to insulate and protect each connection.
6. Replace the fan housing cover
Put the fan housing cover back in place and secure it with the screws.
Wiring the pull chain and light kit for proper functionality
To ensure the pull chain and light kit function properly, follow these wiring instructions:
1. Connect the pull chain control
If you have installed a pull chain control, connect the pull chain control wires to the corresponding wires inside the fan. The black wire connects to the black wire, the white wire connects to the white wire, and the green or copper wire connects to the grounding screw.
2. Connect the light kit
If you have added a light kit, connect the black wire from the light kit to the black wire from the fan, and the white wire from the light kit to the white wire from the fan.
3. Secure all the connections
After making the necessary connections, ensure that each connection is securely fastened. Use wire connectors or electrical tape to insulate and protect each connection.
4. Test the fan and light
Once all the wiring is complete, switch on the power and test the fan and light kit. Pull the chain to control the fan’s speed, and turn on the light to ensure it is functioning correctly. If all is working as expected, your Hunter fan is now ready to provide comfort and illumination to your space.
Testing And Troubleshooting
Once you’ve successfully installed your Hunter Fan, it’s important to test it and troubleshoot any issues that may arise. This step ensures that your fan is working properly and provides optimal airflow and comfort in your space. In this section, we will discuss some valuable tips for testing the fan after installation, common troubleshooting steps to address any issues, and how to ensure proper airflow and comfort in your space.
Tips for Testing the Fan After Installation
After the installation of your Hunter Fan, it’s essential to test it to ensure it’s functioning correctly. Here are some useful tips to help you during this testing phase:
- Turn on the fan: Before you start testing, make sure the fan is powered on and properly connected to the electricity source.
- Check the speed settings: Use the fan’s remote control or wall switch to adjust the speed settings. Start with the lowest speed setting and gradually increase it to higher levels to see if the fan responds accordingly.
- Listen for any unusual sounds: While the fan is running, listen for any abnormal noises, such as rattling or grinding. These may indicate a problem that needs to be addressed.
- Inspect the fan blades: Observe the fan blades while they are in motion. Ensure that they are balanced and not wobbling excessively. If there is excessive wobbling, it may be necessary to readjust the blade attachments.
- Test the fan’s direction: Most ceiling fans have a switch on the motor housing that allows you to change the direction of the blades. Test both the forward and reverse directions to ensure they are functioning correctly.
Common Troubleshooting Steps for Any Issues that May Arise
Even with proper installation, occasional issues may arise with your Hunter Fan. Here are some common troubleshooting steps to address any problems:
- Check the power supply: Ensure that the fan is securely connected to a power source and that the circuit breaker or fuse is not tripped.
- Inspect the remote control or wall switch: Make sure the remote control or wall switch is functioning correctly. Replace batteries in the remote control if necessary.
- Verify the installation: Double-check that the fan blades are properly attached and securely fastened. Loose blades can cause excessive noise or wobbling.
- Clean the fan blades and motor housing: Dust and debris can accumulate over time and affect the fan’s performance. Regularly clean the blades and motor housing to maintain optimal functionality.
- Contact customer support: If the troubleshooting steps mentioned above do not resolve the issue, reach out to Hunter Fan’s customer support for further guidance and assistance.
Ensuring Proper Airflow and Comfort in Your Space
A Hunter Fan not only adds style to your space but also improves airflow and comfort. Here are some tips to ensure your fan is maximizing comfort:
- Position the fan correctly: Install the fan in the center of the room and at least 8 feet above the floor for proper airflow. Additionally, ensure that there are no obstructions around the fan that could hinder its performance.
- Use the fan in conjunction with air conditioning: Optimize energy efficiency by using the fan in conjunction with your air conditioning system. The fan will help circulate the cool air, allowing you to set the thermostat at a higher temperature.
- Consider the fan size: Choose the appropriate fan size for your space. A larger room may require a fan with longer blades for better air distribution.
- Regularly clean and maintain the fan: Dust and dirt can accumulate on the blades and motor housing over time, reducing airflow. Regularly clean the fan to ensure it operates at its highest efficiency.
Finalizing The Installation
Now that you’ve successfully installed your Hunter fan, it’s time to finalize the installation by securing all connections, ensuring stability, and cleaning up any debris or packaging materials. Once that’s done, you’ll be able to enjoy the comfort and aesthetics of your new Hunter fan to the fullest.
Securing all connections and ensuring stability
Before you start enjoying the cool breeze of your Hunter fan, it’s crucial to ensure that all the connections are securely in place and that the fan is stable. This will not only prevent any potential accidents but also ensure proper functioning of the fan.
- Tighten all the screws and bolts that hold the fan’s motor housing to the ceiling bracket. Check for any loose connections and tighten them if necessary.
- Ensure that the downrod is tightly fastened to the motor housing to provide stability.
- Check that the fan blades are securely attached to the motor housing and properly balanced. Improper balancing can cause wobbling and noise during operation.
Cleaning up any debris or packaging materials
Now that your Hunter fan is securely installed, take a few minutes to clean up any debris or packaging materials left behind. This will not only enhance the appearance of your fan but also prevent any potential hazards.
- Remove any plastic wrap, stickers, or protective coverings from the fan blades and motor housing.
- Dispose of any packaging materials such as cardboard boxes or Styrofoam safely and responsibly.
- Use a soft, damp cloth to remove any dust or dirt that may have accumulated during installation.
By taking these small steps, you’ll ensure that your Hunter fan looks its best and operates at its optimal performance.
Enjoying the comfort and aesthetics of your new Hunter fan
Now that you’ve finalized the installation and cleaned up, it’s time to sit back, relax, and enjoy the comfort and aesthetics of your new Hunter fan. Feel the gentle breeze as it cools down the room and admire the sleek design that adds a touch of elegance to your space.
Whether you’re reading a book, working on your laptop, or simply unwinding after a long day, your Hunter fan will create the perfect ambiance for any occasion. With its reliable performance and stylish looks, it’s sure to become a favorite feature of your home.
So, make the most of your new Hunter fan and enjoy the benefits it brings – from improved air circulation to energy efficiency and style. Sit back, relax, and let the soothing breeze of your Hunter fan envelop you in a world of comfort.
Frequently Asked Questions
Are Hunter Fans Easy To Install?
Yes, Hunter fans are easy to install. They come with detailed instructions and can be installed by following a few simple steps.
How Do You Install A Ceiling Fan For Beginners?
To install a ceiling fan as a beginner, follow these steps: 1. Turn off the power and gather the necessary tools: screwdrivers, wire connectors, etc. 2. Assemble fan components according to the manual. 3. Attach fan bracket to the ceiling and secure it properly.
4. Connect fan wires to the house wiring, matching colors. 5. Attach the fan blades and turn on the power. Enjoy your new ceiling fan!
Where Does Blue Wire Go On Ceiling Fan?
The blue wire on a ceiling fan typically connects to the fan’s light kit. It’s important to consult the fan’s installation manual for specific wiring instructions.
What Wires Go Where On A Ceiling Fan?
The wires on a ceiling fan connect to specific areas. The green wire connects to the ground screw on the fan bracket. The white wire connects to the neutral wire. The black wire connects to the live wire, and the blue wire connects to the light kit wire, if applicable.
Conclusion
Installing a Hunter fan is a simple process that can greatly enhance the comfort and visual appeal of your home. By following the step-by-step instructions outlined in this guide, you can easily install a Hunter fan without the need for professional assistance.
From mounting the fan to connecting the wiring, this article has covered all the essential steps to ensure a successful installation. So go ahead and enjoy the cool breeze and stylish design that a Hunter fan brings to your space.