To install a GFCI outlet with 4 wires, connect the 2 hot wires to the GFCI’s LINE terminals and the 2 neutral wires to the GFCI’s LINE terminals. Installing a GFCI outlet with 4 wires is a straightforward process that can improve electrical safety in your home.
Ground Fault Circuit Interrupter (GFCI) outlets are designed to protect against electrical shocks by quickly shutting off power when they detect a fault in the electrical circuit. This guide will walk you through the steps to properly install a GFCI outlet with 4 wires.
By following these instructions, you can ensure the safe and effective installation of a GFCI outlet in your home.
Understanding The Basics Of Gfci Outlets
When it comes to electrical safety, one of the most important components you need to consider is the Ground Fault Circuit Interrupter (GFCI) outlet. These outlets are specifically designed to protect you from electrical shocks and potential fire hazards. Understanding the function and importance of GFCI outlets is crucial for ensuring the safety of your electrical system.
Function of GFCI outlets
GFCI outlets serve a vital function by constantly monitoring the flow of electricity through a circuit. They are designed to detect ground faults, which occur when an electrical current escapes from the intended path and flows through unintended routes, such as through a person’s body. This can happen if an appliance or tool comes into contact with water or gets damaged in some way. The GFCI outlet is able to detect these leaks and quickly interrupt the circuit, preventing serious injuries or even fatalities.
Importance of GFCI outlets in electrical safety
The importance of GFCI outlets in electrical safety cannot be overstated. These outlets are specifically designed to protect you and your property from electrical hazards. Here are a few reasons why GFCI outlets are indispensable:
- Reduces the risk of electrical shock: GFCI outlets provide an additional layer of protection by immediately cutting off power when a ground fault is detected. This greatly reduces the risk of electrical shock to anyone using the outlet or nearby.
- Prevents electrical fires: Ground faults can potentially lead to electrical fires. By quickly interrupting the circuit, GFCI outlets can prevent such fires from starting and spreading.
- Meets electrical safety codes: GFCI outlets are required by electrical safety codes in many areas, especially in areas where water is present, such as kitchens, bathrooms, and outdoor spaces. Installing GFCI outlets ensures compliance with these codes and avoids potential penalties.
- Protects sensitive electronic devices: In addition to protecting people, GFCI outlets also safeguard your valuable electronic devices. Ground faults can cause damage to electronic equipment, and by stopping the flow of electricity in the event of a fault, GFCI outlets help prevent such damage.
In conclusion, understanding the basics of GFCI outlets is essential for maintaining electrical safety in your home or workplace. These outlets play a crucial role in preventing electrical shocks, fires, and damage to your electronic devices. By adhering to electrical safety codes and ensuring the proper installation of GFCI outlets, you can create a safe environment for yourself and others.
Different Types Of Gfci Outlets
Different Types of GFCI Outlets
When it comes to electrical safety in your home, GFCI outlets play a crucial role in protecting you and your family from electrical shocks. GFCI stands for Ground Fault Circuit Interrupter, and these outlets are designed to instantly detect any electrical imbalances and shut off the power to the circuit if a fault is detected. This feature makes GFCI outlets a necessity in areas where the risk of electrical shock is high, such as kitchens, bathrooms, and outdoor spaces.
There are different types of GFCI outlets available, each catering to specific wiring configurations. Knowing about these different types can help you choose the right GFCI outlet for your specific electrical setup. Let’s take a closer look at the two main types:
Standard GFCI Outlets
Standard GFCI outlets are designed to work with a typical wiring setup, which includes three wires: the hot wire (usually black), the neutral wire (usually white), and the ground wire (usually green or bare copper). These outlets are commonly used in homes where the electrical system follows a conventional wiring pattern.
When installing a standard GFCI outlet, you simply need to connect the wires to their corresponding terminals on the device. The hot wire is connected to the brass-colored terminal, the neutral wire is connected to the silver-colored terminal, and the ground wire is connected to the green-colored terminal. Once the wiring is complete, you can simply attach the outlet to the electrical box and secure it in place.
GFCI Outlets with 4 Wires
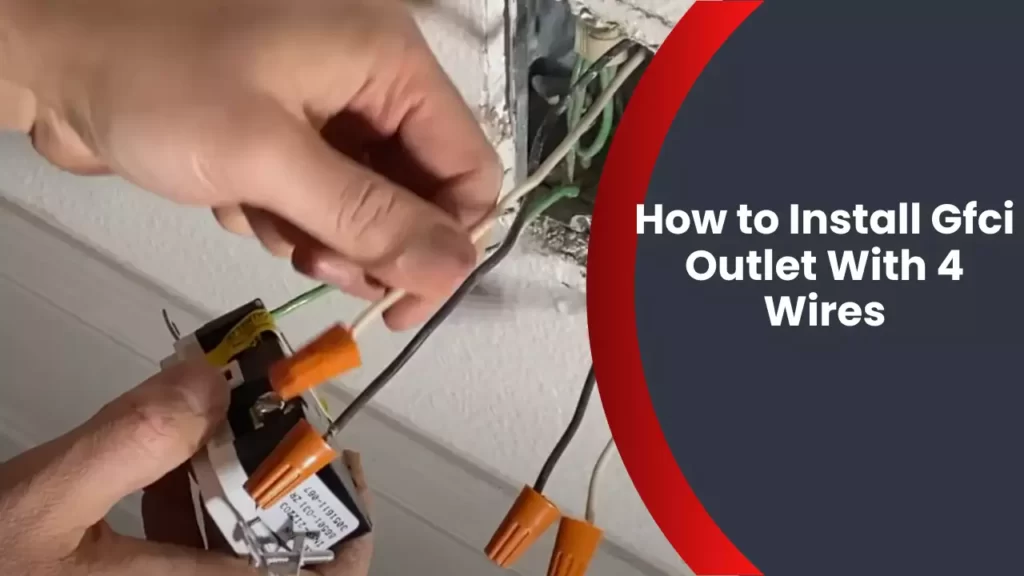
In certain situations, you may come across GFCI outlets with four wires instead of three. These outlets are commonly used in electrical setups that include an additional load wire or in scenarios where a GFCI outlet is connected in series with another GFCI outlet. The additional load wire is usually red in color and serves to supply power to another outlet or switch downstream.
When installing a GFCI outlet with four wires, the wiring process is slightly different. In addition to the hot wire, neutral wire, and ground wire, you will also have the load wire to connect. The load wire is connected to the brass-colored terminal along with the hot wire, while the neutral wire is connected to the silver-colored terminal, and the ground wire is connected to the green-colored terminal.
It is important to remember that GFCI outlets with four wires should not be used as a replacement for standard GFCI outlets unless specifically required by your electrical setup. Always consult a qualified electrician or refer to the manufacturer’s instructions to ensure proper installation and adherence to electrical codes.
In conclusion, understanding the different types of GFCI outlets available will help you make an informed decision when it comes to electrical safety in your home. Whether you need a standard GFCI outlet or one with four wires, following the correct installation procedures is essential for maintaining a safe and secure electrical system.

Step-By-Step Guide To Installing Gfci Outlet With 4 Wires
Installing a GFCI outlet with four wires may seem intimidating, but with the right tools and materials, it can be a straightforward process. In this step-by-step guide, we will walk you through the process of installing a GFCI outlet with four wires. From gathering the necessary tools and materials to testing the outlet for proper installation, we’ve got you covered.
Before you begin the installation process, it’s important to gather all the necessary tools and materials. By having everything at hand, you can work efficiently and ensure a smooth installation. Here are the tools and materials you will need:
| Tools | Materials |
|---|---|
| – Screwdriver set | – GFCI outlet |
| – Wire stripper | – Wire nuts |
| – Needle-nose pliers | – Electrical tape |
| – Voltage tester | – Wire connectors |
| – Wire cutter | – Electrical box |
Before you start working on the outlet, it’s crucial to identify the circuit that powers it and turn off the power. This step ensures your safety and prevents any electrical accidents. Follow these steps:
- Locate the circuit breaker box in your home.
- Identify the circuit that controls the outlet you’re going to replace with the GFCI outlet.
- Flip the switch to the “off” position to cut off the power supply.
- Double-check the outlet with a voltage tester to ensure it’s not live.
Once you have disconnected the power, it’s time to identify the existing outlet wiring. This step will help you understand the connection and ensure a smooth replacement process. Follow these steps:
- Remove the faceplate of the existing outlet using a screwdriver.
- Inspect the wiring and note down the colors of the wires.
- Typically, you will find a black (hot) wire, a white (neutral) wire, a green or bare (ground) wire, and a red (secondary hot) wire if the outlet is part of a split receptacle.
- Take a picture or make a diagram for reference during the installation.
Now that you have identified the existing outlet wiring, it’s time to prepare the new GFCI outlet for installation. By following these steps, you ensure a better fit and easier wiring:
- Start by turning over the GFCI outlet and loosening the terminal screws using a screwdriver.
- Remove the knockout on the back to create a hole for the wires.
- Ensure you have the appropriate size and type of electrical box for the GFCI outlet.
- Remove the screws on the existing outlet and disconnect the wires.
With the necessary preparations done, it’s time to wire the GFCI outlet with the 4 wires. By following these steps carefully, you can ensure a secure and efficient connection:
- Start by connecting the green or bare (ground) wire to the green grounding screw on the GFCI outlet.
- Connect the white (neutral) wire to the silver terminal screw labeled “LINE” on the outlet.
- Connect the black (hot) wire to the brass terminal screw labeled “LINE” on the outlet.
- If you have a red (secondary hot) wire, connect it to the brass terminal screw labeled “LOAD.”
- Make sure to tighten the screws securely with a screwdriver.
After the wiring process, it’s crucial to test the GFCI outlet to ensure it’s properly installed and functioning correctly. Follow these steps:
- Restore the power supply by flipping the circuit breaker switch back to the “on” position.
- Press the “reset” button on the GFCI outlet.
- Plug in a test device or appliance to the outlet.
- Press the “test” button on the GFCI outlet and verify that the power is cut off.
- Press the “reset” button again to restore the power.
By following these step-by-step instructions, you can successfully install a GFCI outlet with four wires. Remember to always prioritize safety when working with electricity and consult a professional if you’re uncertain about any part of the installation process. Enjoy the benefits of a safer electrical outlet in your home!
Gathering The Necessary Tools And Materials
Before you begin installing a GFCI outlet with four wires, it’s important to gather all the necessary tools and materials. Having everything you need ready beforehand will save you time and make the installation process smoother. Below, you’ll find a list of the required tools and materials:
List of required tools:
- Screwdriver
- Wire pliers
- Wire stripper
- Wire cutter
- Voltage tester
- Electrical tape
Having these tools at your disposal will ensure that you have everything needed to safely and efficiently complete the installation.
List of required materials:
- GFCI outlet
- Wire connectors
- Wall plate
The GFCI outlet will be the centerpiece of your installation, providing you with added electrical safety compared to a standard outlet. Additionally, wire connectors will be crucial for securely connecting the wires, while a wall plate will give the final touch to the installation. Make sure you have these materials ready to go.
By having all the necessary tools and materials prepared, you can confidently proceed with installing a GFCI outlet with four wires. Each tool and material listed above serves a specific purpose in the installation process, so it’s important not to skip any of them. Now that you have everything ready, it’s time to move on to the next steps of the process.
Identifying The Circuit And Turning Off The Power
Identifying the circuit breaker
Before you begin the process of installing a GFCI outlet with 4 wires, it is crucial to identify the specific circuit breaker that supplies power to the outlet you will be working on. This step is important to ensure your safety and prevent any potential electrical shocks or accidents. Here’s how you can locate the circuit breaker:
- Take a look at the circuit breaker panel in your home. It is typically located in a basement, utility room, or garage.
- If the circuit breaker panel is not labeled, you will need to identify the correct breaker manually.
- Start by turning off all electronic devices connected to the outlet you will be working on.
- Plugging in a lamp or other easily recognizable device into the outlet can help you determine which breaker operates that particular circuit.
- With the help of an assistant, systematically turn off each circuit breaker one by one while checking the outlet to see if it has powered off. When you find the correct breaker, the power to the outlet should be cut off.
- Once you have identified the circuit breaker that controls the outlet, proceed to the next step to turn off the power.
Turning off the power to the circuit
Now that you have identified the correct circuit breaker, it’s time to turn off the power to the circuit completely. Following these steps will ensure a safe working environment:
- Double-check to ensure your identification of the circuit breaker is accurate before proceeding.
- Using caution, determine if other outlets, lights, or appliances are connected to the same circuit. Unplug or turn off any devices that share the circuit to avoid accidental power surges.
- With protective gloves on, firmly switch the identified circuit breaker to the “off” position. You should hear a click or feel a resistance when the breaker is turned off.
- Since some circuit breakers might be difficult to identify, it’s important to use a voltage tester to confirm that the power is indeed off. This simple tool will ensure that no electricity is flowing through the wires.
- Insert the voltage tester into the outlet you plan to install the GFCI and check for any active current. If the tester indicates no power, you can proceed with the installation safely.
By following these steps carefully, you can confidently move forward with installing a GFCI outlet with 4 wires and ensure your own safety throughout the process.
Identifying The Existing Outlet Wiring
Understanding the Wiring Configuration
Before you can install a GFCI outlet with 4 wires, it’s important to understand the existing outlet wiring. This will help you identify the line and load wires, which are crucial for the correct installation. Here’s what you need to know:
Identifying the Line and Load Wires
When it comes to GFCI outlets, it’s essential to correctly identify the line and load wires. These wires serve different purposes and connecting them incorrectly can result in a faulty installation. To ensure you get it right, follow these steps:
- Start by shutting off the power to the outlet at the circuit breaker. This is crucial for your safety as well as to prevent any damage to the electrical system.
- Remove the cover plate of the existing outlet by unscrewing the screws holding it in place. Be careful not to touch any exposed wires.
- With the cover plate removed, you will now see the wiring inside the electrical box. Take note of the different wires and their locations.
- The line wires supply power from the electrical panel to the outlet. They are typically black and white or black and red in color. In some cases, they may be labeled as “LINE”.
- The load wires extend power to other outlets or devices. They are usually connected to the downstream outlets. These wires may also be black and white or black and red in color. Look for any wires that are connected to the outlet’s terminals.
By identifying the line and load wires, you can ensure a successful installation of your GFCI outlet with 4 wires. Remember to always double-check your work and consult a professional electrician if you have any doubts or concerns during the installation process.
Preparing The New Gfci Outlet
Installing a Ground Fault Circuit Interrupter (GFCI) outlet can greatly enhance the safety of your electrical system. If you have a GFCI outlet with 4 wires, proper installation is essential for optimal function. In this guide, we will walk you through the steps to prepare and install the new GFCI outlet, ensuring a secure and reliable electrical connection.
Understanding the different terminal screws
Before diving into the installation process, it’s important to understand the purpose of each terminal screw on the GFCI outlet. This will help you correctly connect the wires for a safe and efficient installation. Here are the different types of terminal screws you may encounter:
| Screw Color | Purpose |
|---|---|
| Black or Brass | Line (power supply) connection |
| White or Silver | Neutral connection |
| Green or Bare Copper | Ground connection |
Installing the wiring and attaching the ground wire
Now that you have a clear understanding of the different terminal screws, it’s time to install the wiring and attach the ground wire to the new GFCI outlet. Follow these steps to ensure a proper connection:
- Start by turning off the power supply to the circuit you’ll be working on. This can typically be done by switching off the corresponding circuit breaker in the electrical panel.
- Once the power is off, remove the old outlet and disconnect the wires from the terminal screws. Take note of which wires are connected to the line and load terminals.
- Inspect the wires for any signs of damage or wear. It’s important to have clean and intact wires for a reliable electrical connection.
- Attach the ground wire to the green or bare copper terminal screw on the GFCI outlet. If necessary, strip the insulation from the end of the ground wire and wrap it around the screw clockwise. Tighten the screw to secure the connection.
- Connect the black or brass wire from the power supply to the line terminal screw on the GFCI outlet. Similarly, connect the white or silver wire to the neutral terminal screw. Ensure that the wires are securely tightened to their respective screws.
- Double-check all the connections to ensure they are tight and secure. Any loose connections can result in poor electrical performance or potential hazards.
With the wiring and ground wire properly connected, you’re ready to move forward with the GFCI outlet installation. Stay tuned for the next section, where we’ll guide you through the final steps of installing and testing the new GFCI outlet.
Wiring The Gfci Outlet With 4 Wires
Installing a GFCI outlet can enhance safety in your home by providing protection against electrical shocks. If you have a GFCI outlet with four wires, it’s important to understand how to properly wire it to ensure it functions correctly. In this section, we will guide you through the process of wiring a GFCI outlet with four wires, step by step.
Connecting the Line and Load Wires to the GFCI Outlet
First, let’s start by understanding the purpose of the line and load wires in a GFCI outlet. The line wires, also known as the supply wires, bring power from the electrical panel to the GFCI outlet. On the other hand, the load wires distribute power from the GFCI outlet to other outlets downstream.
To connect the line and load wires to the GFCI outlet, follow these steps:
- Start by turning off the power to the circuit at the electrical panel. This is crucial to ensure your safety during the installation process.
- Remove the cover plate from the GFCI outlet and unscrew the outlet from the electrical box. Take note of the line and load terminals on the GFCI outlet.
- Identify the line wires, which are typically black and white. Connect the black line wire to the brass or gold-colored terminal labeled “Line” on the GFCI outlet. Similarly, connect the white line wire to the silver-colored terminal labeled “Line.”
- Once the line wires are securely connected, identify the load wires. These wires may also be black and white, but they will be connected to the downstream outlets. Connect the black load wire to the brass or gold-colored terminal labeled “Load” on the GFCI outlet. Likewise, connect the white load wire to the silver-colored terminal labeled “Load.”
Securing the Connections with Wire Nuts
After connecting the line and load wires to the GFCI outlet, it’s important to secure these connections properly. Wire nuts are commonly used in electrical installations to ensure a tight and secure connection. Follow these steps to secure the connections with wire nuts:
- Trim the excess wires to an appropriate length, leaving about 6-8 inches of wire exposed.
- Twist the corresponding line and load wires together in a clockwise direction, ensuring the bare copper ends are tightly joined.
- Place a wire nut over the twisted wires and screw it on in a clockwise direction until it is tight and secure.
- Give the wire nut a gentle tug to ensure the connection is snug and won’t come loose.
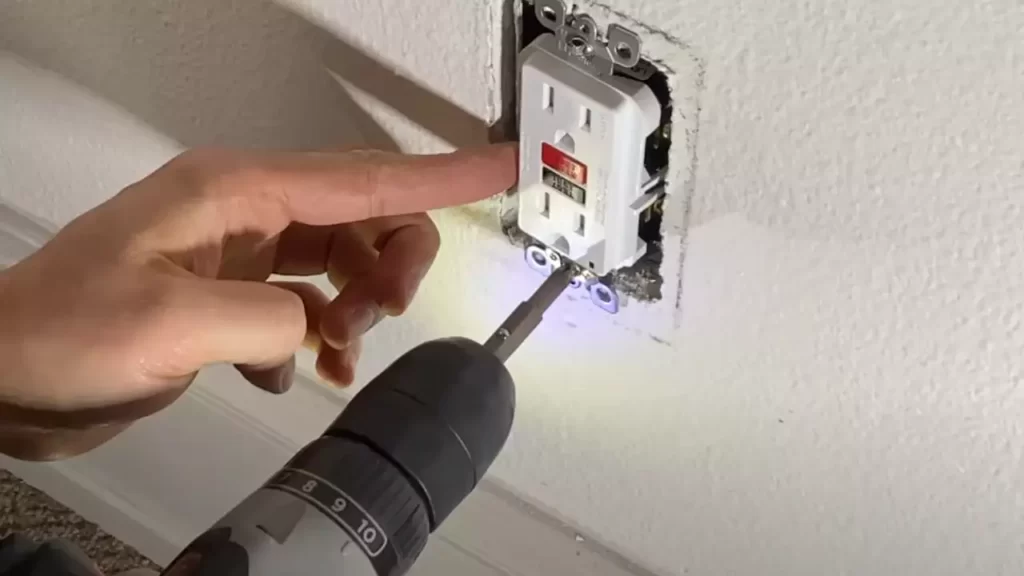
Attaching the Outlet to the Electrical Box
Now that the line and load wires are connected and secured, it’s time to attach the GFCI outlet to the electrical box. Follow these steps:
- Position the GFCI outlet in the electrical box, ensuring that none of the wires are pinched or overtightened.
- Align the screw holes on the GFCI outlet with the corresponding holes on the electrical box.
- Insert the screws into the holes and tighten them gently until the GFCI outlet is secure.
- Finally, reattach the cover plate to the GFCI outlet, ensuring it is properly aligned.
Congratulations! You have successfully wired a GFCI outlet with four wires. Before restoring power to the circuit, it’s crucial to double-check all connections and ensure everything is properly secured. Safety should always be the top priority when working with electrical installations.
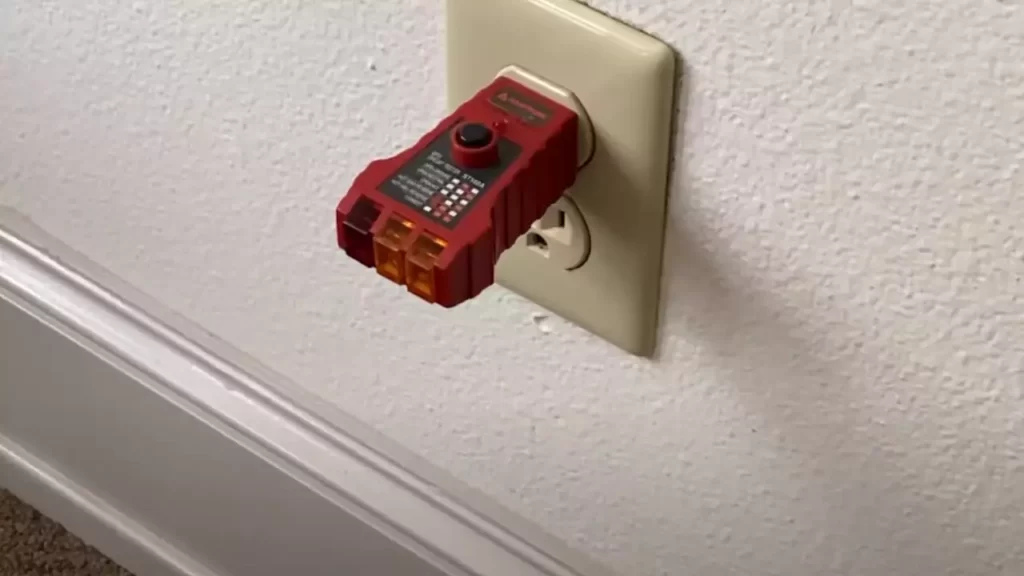
Testing The Gfci Outlet For Proper Installation
Following the Recommended Testing Procedure
Testing a GFCI outlet is essential to ensure that it has been installed correctly and is functioning properly. This step is crucial for your safety and the protection of electrical devices in your home. By following the recommended testing procedure, you can easily determine if your GFCI outlet is working as it should. Let’s take a look at how you can test the GFCI outlet for a proper installation.
Verifying the Functionality of the GFCI Outlet
Once the GFCI outlet is installed, it is crucial to verify its functionality to ensure it provides optimum protection against electrical shocks and hazards. By following these steps, you can easily determine if your GFCI outlet is working as intended:
- Start by plugging a lamp or any other electrical device into the GFCI outlet.
- Turn the device on to ensure that it is receiving power.
- Next, press the “Test” button on the GFCI outlet. This simulates a ground fault to test the device’s response.
- If the GFCI outlet is working correctly, the device plugged into it should immediately turn off.
- After pressing the “Test” button, the GFCI outlet’s “Reset” button should pop out, indicating that the device has tripped and needs to be reset.
- Press the “Reset” button on the GFCI outlet to restore power to your device. It should turn on again.
It is crucial to note that if pressing the “Test” button does not turn off the plugged-in device or does not cause the “Reset” button to pop out, it indicates a potential issue with the GFCI outlet. In such cases, it is recommended to consult a professional electrician to diagnose and rectify any problems.
Remember, regular testing of your GFCI outlet should be a part of your home maintenance routine. It is advised to perform this test at least once a month to ensure your electrical safety. By following the recommended testing procedure and verifying the functionality of your GFCI outlet, you can have peace of mind knowing that you have taken the necessary steps to protect yourself and your electrical devices from potential hazards.
Safety Tips For Installing Gfci Outlet With 4 Wires
When it comes to electrical installations, safety should always be a top priority. This is especially true when installing a GFCI outlet with 4 wires, as the process involves working with live electrical connections. To ensure a smooth and accident-free installation, it is essential to follow safety guidelines and take necessary precautions. In this section, we will explore the importance of wearing safety gear and the precautions you should take while working with electricity.
Importance of wearing safety gear
Wearing the appropriate safety gear is crucial when working with electricity. It provides protection against potential hazards, minimizing the risk of accidents and injuries. Here are some reasons why wearing safety gear is important:
- Protective gloves: Insulated gloves are designed to prevent electrical shocks and burns. They act as a barrier between your hands and the live wires, reducing the chances of accidents.
- Safety goggles: When dealing with electrical connections, there is always a risk of sparks or debris flying into your eyes. Wearing safety goggles shields your eyes from these hazards and ensures clear vision.
- Non-conductive footwear: Electric shocks can pass through the body via the feet. Wearing non-conductive footwear, such as rubber-soled shoes, helps to prevent electric shock.
- Protective clothing: Electricians often wear flame-resistant clothing to minimize the risk of burns in case of an electrical fire. Additionally, avoid loose or dangling clothing that could get caught in the wires.
Precautions to take while working with electricity
Working with electricity can be dangerous if not approached with caution. To ensure your safety during the installation of a GFCI outlet with 4 wires, it is vital to take the following precautions:
- Turn off the power: Before starting any electrical work, always turn off the power supply to the circuit you’ll be working on. This can be done by switching off the circuit breaker at the main electrical panel.
- Test the wires: Once you have turned off the power, it is essential to double-check by using a voltage tester to confirm that the wires are not live. This simple step can prevent accidental shocks.
- Handle wires carefully: Treat all wires as if they are live, even if you have confirmed they are not. Always hold wires by their insulation and avoid contact with bare ends.
- Properly secure and insulate connections: Make sure all wire connections are securely tightened, and electrical tape or wire connectors are used to insulate them. Loose connections can lead to electrical hazards.
- Avoid overloading the circuit: Ensure that the circuit you are working on is not overloaded with too many devices. Overloading can cause overheating and potentially lead to electrical fires.
- Seek professional help if unsure: If you find yourself unsure about any aspect of the installation or encounter any unexpected issues, it is always wise to seek assistance from a qualified electrician.
By following these safety tips and precautions, you can minimize the risks associated with installing a GFCI outlet with 4 wires. Remember, electrical work should only be undertaken if you have sufficient knowledge and experience. If in doubt, consulting a professional is the best course of action to ensure a safe and successful installation.
Frequently Asked Questions
How Many Wires Can You Connect To A Gfci?
You can connect multiple wires to a GFCI, but it’s crucial to follow the manufacturer’s guidelines for the specific model. Be sure to strip the wires to the correct length, attach them securely to the appropriate terminals, and use wire connectors for a safe and reliable connection.
Does A Gfci Need 4 Wires?
No, a GFCI does not need 4 wires. A GFCI typically requires three wires, including a hot wire, a neutral wire, and a ground wire. These wires are essential for the proper functioning of the GFCI to ensure electrical safety in the circuit.
What Is The Difference Between Line And Load On A Gfci Outlet?
The line on a GFCI outlet is the incoming power source, while the load is the additional devices or outlets connected downstream. The line is where you connect the wires from the main power supply, and the load is where you connect devices that need to be protected by the GFCI.
What Wire Goes Where On A Gfci Outlet?
The black wire connects to the brass screw and the white wire connects to the silver screw on a GFCI outlet. Make sure to connect the green or bare copper wire to the grounding screw.
Conclusion
To successfully install a GFCI outlet with four wires, follow these step-by-step instructions. Begin by turning off the power and ensuring the correct circuit is identified. Then, remove the old outlet and connect the wires to the new GFCI outlet, making sure to follow the specific wiring diagram.
Finally, test the outlet to ensure it is properly functioning and providing the necessary protection. By following these guidelines, you can confidently and safely install a GFCI outlet with four wires.