To install a GFCI breaker, turn off the power supply and remove the panel cover. Replace the existing breaker with the GFCI breaker, making sure to connect the wires correctly.
Installing a GFCI breaker ensures electrical safety by providing protection against electric shocks and preventing electrical fires. By following a few simple steps, you can successfully install a GFCI breaker, even if you have limited electrical knowledge. In this guide, we will walk you through the process of installing a GFCI breaker, helping you understand the necessary precautions and procedures to complete the installation safely and effectively.
So, let’s get started on ensuring the safety of your electrical system with a GFCI breaker installation.
Understanding Gfci Breakers: An Introduction
What is a GFCI breaker and why is it important?
Understanding GFCI (Ground Fault Circuit Interrupter) breakers is crucial when it comes to ensuring electrical safety in your home or workplace. A GFCI breaker is a type of circuit breaker that helps protect you from electric shocks by quickly shutting off power to the circuit if it detects a ground fault or an imbalance in current flow. This is especially important in areas where water is present, such as kitchens, bathrooms, and outdoor outlets.
The benefits of installing a GFCI breaker
– Enhanced safety: The primary advantage of installing a GFCI breaker is the enhanced safety it provides. It significantly reduces the risk of electrical shocks, which can be life-threatening, especially in wet locations.
– Code compliance: Many electrical codes now require the use of GFCI breakers in specific areas or for certain types of outlets. By installing a GFCI breaker, you ensure your electrical system meets these code requirements, avoiding any potential violations.
– Protection for individuals with electrical sensitivity: People with electrical sensitivity or medical conditions that make them more susceptible to electric shocks greatly benefit from the protection offered by GFCI breakers. These devices provide an added layer of safety and peace of mind.
– Safeguarding electronics and appliances: GFCI breakers not only protect individuals from electrical hazards but also help prevent damage to expensive electronics and appliances. In the event of a ground fault, the prompt shut-off of power prevents excessive current flow that could damage these devices.
How does a GFCI breaker work?
A GFCI breaker works by continuously monitoring the flow of current in an electrical circuit and comparing the current that enters the circuit with the current that leaves it. If it detects a difference of even a few milliamperes, it instantly shuts off power to the circuit.
To understand this better, let’s explore how a GFCI breaker operates:
- Current flowing into the circuit is measured by the breaker as it passes through the hot wire.
- The GFCI breaker compares this current with the current flowing out through the neutral wire.
- If the GFCI breaker detects any imbalance, it concludes that there is a ground fault, meaning that some current is unintentionally flowing through a route other than the intended circuit.
- In response to this imbalance, the GFCI breaker trips and interrupts the flow of electricity to the circuit, preventing electric shocks and potential hazards.
GFCI breakers contain built-in test buttons that allow you to periodically check if they are functioning correctly. By pressing the test button, you can simulate a ground fault and ensure that the GFCI breaker successfully shuts off power to the circuit. It is essential to test GFCI breakers regularly to guarantee their continued reliability and effectiveness.

Preparing For Installation: Tools And Materials Needed
Before you start installing a GFCI breaker, it is important to gather the necessary tools and materials. Having the right equipment on hand will ensure a smooth and successful installation process. In this section, we will discuss the essential tools and materials you will need to get started.
Essential tools for installing a GFCI breaker
When it comes to installing a GFCI breaker, there are a few key tools you will need:
- Screwdriver: A screwdriver is essential for removing and installing screws, which you will need to do during the installation process.
- Wire stripper: A wire stripper will come in handy for removing the insulation from the ends of the wires, allowing for proper electrical connections.
- Multimeter: A multimeter is a versatile tool that can be used to measure electrical voltage, current, and resistance. It will help you ensure that the circuit is properly functioning before and after installation.
Required materials for the installation process
In addition to the tools mentioned above, you will also need the following materials:
- GFCI breaker: The GFCI breaker itself is the heart of the installation. Make sure you have the correct type and size of breaker for your electrical panel.
- Electrical tape: Electrical tape is used to insulate and protect exposed wires, providing an extra layer of safety.
- Wire nuts: Wire nuts are connectors that are used to join multiple wires together. They provide a secure and reliable connection.
By having these essential tools and materials ready, you will be well-prepared for installing a GFCI breaker. Remember to follow all safety precautions and guidelines provided by your electrical panel manufacturer and ensure the power is turned off before starting the installation. Now that you are prepared, let’s move on to the next section where we will walk you through the step-by-step process of installing a GFCI breaker.

Step 1: Turning Off The Power Supply
In order to safely install a GFCI breaker, it is crucial to follow the proper steps to ensure your safety. One of the first and most important steps is turning off the power supply. By doing so, you eliminate the risk of electrocution and potential damage to the breaker or electrical system. In this blog post, we will guide you through the process of turning off the power supply, locating the main circuit breaker panel, and switching off the main circuit breaker.
Importance of Turning Off the Power before Installation
Before we dive into the step-by-step instructions, let’s emphasize the importance of turning off the power supply before installing a GFCI breaker. This step is crucial as it ensures your safety and prevents any potential electrical accidents from occurring. By turning off the power, you eliminate the risk of getting shocked by the electrical current and protect your equipment from damage due to power surges. So, before you even think about installing the GFCI breaker, remember to turn off the power supply.
Locating the Main Circuit Breaker Panel
The main circuit breaker panel is usually located in a utility room, basement, or garage. Its exact location may vary depending on the layout of your house. To find the main circuit breaker panel:
- Start by looking for a metal box mounted on a wall.
- Check the areas near your electric meter or electrical service entrance.
- If you’re still unsure, consult the electrical layout plan or contact a professional electrician for assistance.
Once you have located the main circuit breaker panel, move on to the next step.
Switching Off the Main Circuit Breaker
Now that you have found the main circuit breaker panel, it’s time to switch off the power. Follow these steps:
- Open the door to the main circuit breaker panel. Make sure you have enough light to see the breakers clearly.
- Locate the main circuit breaker. It is usually larger in size and positioned at the top or bottom of the panel.
- Flip the main circuit breaker switch to the “Off” position. This will cut off power to the entire electrical system.
Once you have successfully switched off the main circuit breaker, you can proceed with the installation of the GFCI breaker. Remember, safety should always be your top priority when working with electricity.
Step 2: Removing The Existing Breaker
Now that you have taken the necessary safety precautions mentioned in Step 1, it is time to proceed with removing the existing breaker. This step requires careful precision to ensure a smooth and successful installation of your new GFCI breaker. Let’s break it down into the following subheadings for a clear understanding:
Safety Precautions Before Removing the Old Breaker
Before you start working inside the electrical panel, it is crucial to prioritize safety. Here are a few precautions you must adhere to:
- Wear rubber-soled shoes and non-conductive gloves.
- Make sure the power to the panel is turned off. Double-check by using a non-contact voltage tester.
- Never touch the wires or any metal inside the panel with bare hands.
Removing the Panel Cover
Once you have ensured your safety, the first step in removing the old breaker is to remove the panel cover. Follow these steps:
- Using a screwdriver, unscrew the screws holding the panel cover in place.
- Gently lift off the panel cover and set it aside in a safe place.
- Take a moment to familiarize yourself with the layout of the panel. Identify the location of the breaker you want to remove.
Identifying the Circuit to Be Replaced
Now that the panel cover is off, it’s time to identify the specific circuit that needs to be replaced. Follow these steps:
- Locate the circuit breaker that corresponds to the circuit you want to replace.
- Take note of the label or number associated with the breaker.
- If the breaker is not labeled, you can identify the circuit by turning off one breaker at a time and testing the circuit to see which one is affected.
- Once you have identified the correct breaker, make sure to turn it off before proceeding.
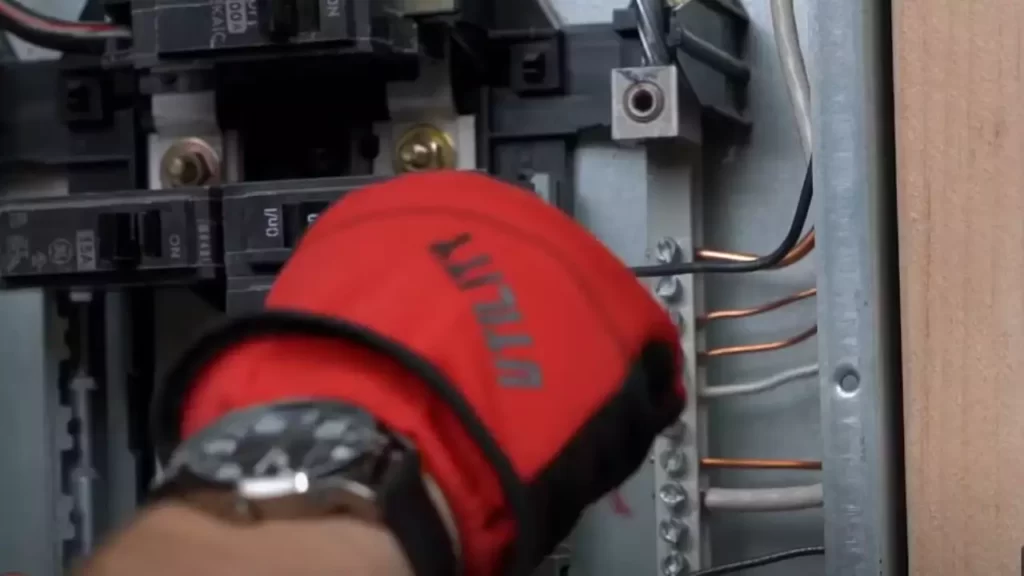
Detaching the Wires from the Old Breaker
With the circuit breaker and corresponding circuit identified, it’s time to detach the wires from the old breaker. Follow these steps:
- Using caution, gently loosen the screw or screws holding the wires connected to the old breaker.
- Once the screws are loose, carefully remove the wires from the terminals.
- Ensure that each wire is separated and not touching any other wires or metal parts.
Congratulations! You have successfully completed the second step of the GFCI breaker installation process. The next step will guide you through the process of installing your new GFCI breaker.

Step 3: Installing The Gfci Breaker
Now that you have understood the different types of GFCI breakers and positioned them correctly in the panel, it is time to move on to the actual installation process. This step is crucial to ensure the safety of your electrical system and protect against ground faults. In this section, we will guide you through the process of installing the GFCI breaker, covering everything from connecting the wires to ensuring proper grounding.
Understanding the different GFCI breaker types
Before you begin installing the GFCI breaker, it’s important to have a clear understanding of the different types available. GFCI breakers come in various forms, including single-pole, double-pole, and combination types.
A single-pole GFCI breaker is suitable for circuits with only one hot wire and one neutral wire. On the other hand, a double-pole GFCI breaker is designed for circuits with two hot wires and one neutral wire. Lastly, a combination GFCI breaker is used for circuits that require both GFCI protection and standard circuit protection.
Positioning the GFCI breaker in the panel
Once you have determined the appropriate type of GFCI breaker for your circuit, it’s time to position it correctly in the electrical panel. Ensure that the circuit breaker is in the “off” position before proceeding with the installation.
To install the GFCI breaker, follow these steps:
- Locate an open slot in the panel: Identify an available slot where you can insert the GFCI breaker. Avoid placing it next to other breakers, as this may cause interference.
- Align the breaker with the slot: Carefully position the GFCI breaker to align it with the open slot in the panel. Make sure it is perpendicular to the panel, with the connection pins lined up correctly.
- Insert the breaker into the panel: Gently push the breaker into the slot, ensuring it is securely seated. Apply firm pressure until you hear a click, indicating that the breaker is properly installed.
Connecting the wires to the GFCI breaker
Now that the GFCI breaker is installed in the panel, you can proceed with connecting the wires. Follow these steps:
- Identify the hot and neutral wires: Locate the hot wire, usually black or red in color, and the neutral wire, typically white or gray.
- Strip the wire insulation: Use a wire stripper to remove a small section of insulation from the end of each wire, exposing the bare copper.
- Attach the wires to the breaker: Insert the stripped ends of the wires into the appropriate terminals on the GFCI breaker. The hot wire should go into the brass or black terminal, while the neutral wire goes into the silver or white terminal. Use a screwdriver to tighten the terminal screws, ensuring a secure connection.
Ensuring proper grounding of the GFCI breaker
Proper grounding of the GFCI breaker is essential to ensure its effective operation. Follow these guidelines:
- Verify the presence of a grounding conductor: Check if your electrical system has a grounding conductor, usually a green or bare copper wire. This wire must be connected to the ground bus bar in the electrical panel.
- Connect the grounding wire: If a grounding conductor is present, connect it to the designated grounding terminal on the GFCI breaker. Use a screwdriver to tighten the terminal screw, ensuring a solid connection.
- Test the breaker: After completing the installation, perform a test to verify that the GFCI breaker is functioning correctly. Press the “test” button on the breaker, which should cause it to trip. Then, press the “reset” button to restore power.
By following these steps, you can successfully install a GFCI breaker in your electrical panel, providing crucial protection against ground faults. Remember, if you are not confident in your electrical abilities, it is always best to consult a professional.
Step 4: Testing The Gfci Breaker
Now that you have successfully installed the GFCI breaker and connected it to the circuit, it is crucial to test its functionality. This step is essential, as it ensures that the breaker is properly installed and will effectively protect you against electrical hazards. In this section, we will discuss the importance of testing the GFCI breaker, how to perform an initial test, using a multimeter to verify proper installation, and troubleshooting common issues that may arise.
Importance of Testing the GFCI Breaker Functionality
Regularly testing the GFCI breaker is vital for your safety. This device is designed to detect ground faults and immediately cut off power to prevent electric shocks, which can be life-threatening. By testing the functionality of the GFCI breaker, you can ensure that it is working correctly and will provide reliable protection. This step should not be overlooked as it guarantees that your electrical system is in top condition and ready to safeguard you whenever a ground fault occurs.
Performing the Initial Test
To perform the initial test of the GFCI breaker, follow these simple steps:
- Begin by plugging a lamp or small appliance into one of the outlets that are protected by the GFCI breaker.
- Turn on the appliance and make sure it is working properly.
- Next, press the “Test” button on the GFCI breaker. This should cause the power to the appliance to be immediately cut off.
- The lamp or appliance should no longer be receiving power. If it is still functioning or receiving power, there may be an issue with the GFCI breaker installation.
- Press the “Reset” button on the GFCI breaker to restore power to the outlets.
- If the appliance now works again, your GFCI breaker is functioning correctly. If not, further investigation and troubleshooting may be necessary.
Using a Multimeter to Verify Proper Installation
To ensure that the GFCI breaker is installed correctly, you can use a multimeter to test the voltage across the circuit. Here’s how:
- Set your multimeter to measure AC voltage and choose an appropriate range.
- Carefully touch the black probe of the multimeter to the neutral (white) wire in the breaker panel.
- Now, touch the red probe of the multimeter to the hot (black) wire connected to the GFCI breaker.
- If you get a voltage reading close to the line voltage (e.g., 120V), it indicates that the breaker is correctly installed and functioning.
- A reading of zero or a significantly lower voltage may suggest a problem with the installation or the breaker itself, requiring further investigation.
Troubleshooting Common Issues
While installing and testing the GFCI breaker, you may encounter some common issues. Here are a few troubleshooting tips:
- If the GFCI breaker won’t reset or keeps tripping after installation, first ensure that all the wiring connections are secure and correctly positioned.
- Check if there are any ground faults present by using a multimeter to measure the resistance between the hot (black) wire and the ground wire. If you detect a low resistance, there may be a ground fault.
- Inspect for loose connections or damaged wires in the circuit. Sometimes, a loose or damaged wire can trigger the GFCI breaker to trip repeatedly.
- Consider consulting a licensed electrician if you are unable to resolve the issue or if you are uncertain about troubleshooting electrical problems.
By following these steps outlined in this guide, you can safely install and test a GFCI breaker, maintaining the electrical safety of your home or workplace. Remember, ensuring the proper functionality of the GFCI breaker is crucial in providing protection against electrical hazards.
Step 5: Reconnecting Power And Final Checks
After completing the previous steps of installing a GFCI breaker, it’s time to reconnect the power and perform some final checks. Following these last important steps and observing the breaker’s behavior will ensure a safe and effective installation.
Turning the power supply back on
Once you have double-checked all the connections and ensured that everything is properly secured, it’s time to restore the power supply. Locate the main electrical panel and locate the breaker that controls the circuit you have been working on.
Important: Before proceeding, switch the GFCI breaker to the “OFF” position.
Next, turn on the main breaker, allowing the electrical power to flow back into the circuit. Once the main breaker is on, you can then flip the GFCI breaker to the “ON” position. This will activate the ground fault circuit interrupter, allowing it to monitor the electrical current and protect against any potential ground faults.
Observing the GFCI breaker’s behavior
After reconnecting the power, it is essential to observe the behavior of the GFCI breaker. Take note of the LED indicators on the breaker itself. These indicators will help you ensure that the breaker is functioning correctly.
1. Power Indicator: Check whether the power indicator light on the breaker is illuminated. If it is, this means that the breaker has power and is functioning correctly.
2. Ground Indicator: Similarly, check whether the ground indicator light is also lit. If the ground indicator light is not illuminated, this may indicate a wiring issue or a faulty breaker. In such cases, it is recommended to consult a qualified electrician for further troubleshooting.
Checking for any system failures
After observing the GFCI breaker’s behavior, it’s time to perform a final system check to ensure that everything is working as expected. Check all the outlets, appliances, and devices connected to the circuit protected by the GFCI breaker.
1. Test Function: Press the “TEST” button on the GFCI outlet or use a GFCI tester to simulate a ground fault. The GFCI breaker should trip and cut off power to the circuit, indicating that it is functioning correctly.
2. Reset Function: After performing the test function, press the “RESET” button on the GFCI outlet or use a GFCI tester to reset the GFCI breaker. This will restore power to the circuit, ensuring that everything is back to normal operation.
Final tips for maintaining a GFCI breaker installation
Once the installation is complete and everything is functioning as expected:
- Regularly test the GFCI outlets using the “TEST” and “RESET” buttons to ensure they are working properly.
- Periodically inspect the GFCI breaker for any signs of damage or wear and tear. If any issues are detected, it’s recommended to replace the breaker promptly.
- Consider installing GFCI protection for all outlets in potentially wet or damp areas, such as kitchens, bathrooms, outdoor areas, and basements.
- Stay updated with the latest electrical safety regulations and guidelines in your area to ensure compliance and maintain a safe electrical system.
Note: If you are unsure about any part of the GFCI breaker installation or encounter any difficulties during the process, it is always best to consult a qualified electrician for assistance. Electrical work should only be done by individuals with the necessary knowledge and expertise to ensure safety.
Frequently Asked Questions
How Does A Gfci Breaker Work?
A GFCI breaker works by constantly monitoring the flow of electricity in a circuit. If it detects any variation between the incoming and outgoing currents, it quickly trips to prevent electric shock. It helps protect against ground faults, which occur when a live wire comes in contact with a conductive surface.
Why Should I Install A Gfci Breaker?
Installing a GFCI breaker is crucial for the safety of your electrical system. It provides protection against electrical shocks and reduces the risk of electrocution. It’s especially important in areas prone to water exposure, such as bathrooms, kitchens, and outdoor outlets.
A GFCI breaker is a reliable safeguard that can save lives.
How Do I Install A Gfci Breaker?
To install a GFCI breaker, first, turn off the power to the circuit at the main electrical panel. Remove the panel cover and the wire from the breaker. Connect the neutral and hot wires to the corresponding terminal screws on the GFCI breaker.
Finally, attach the breaker to the panel and restore power to test its functionality.
Can I Install A Gfci Breaker Myself?
While it’s possible to install a GFCI breaker yourself, it’s recommended to hire a licensed electrician for safety and compliance reasons. Electricians have the knowledge and expertise to ensure the breaker is installed correctly and in accordance with local electrical codes.
It’s always better to prioritize safety and consult a professional.
Conclusion
Installing a GFCI breaker is an essential step towards ensuring electrical safety in your home. By following the step-by-step guide provided in this blog post, you now have the knowledge required to successfully install a GFCI breaker and protect yourself and your loved ones from electric shocks.
Remember, safety should always be the top priority when working with electricity, and with this newfound understanding, you can confidently tackle this task. So go ahead, equip your home with GFCI breakers and enjoy peace of mind knowing you’ve taken a proactive approach towards electrical safety.