Installing a floor transition requires measuring, cutting, and securing the transition strip between two types of flooring. To install a floor transition, measure the width of the doorway, cut the transition strip to fit, and attach it using adhesive or screws.
Understanding Floor Transitions
What are floor transitions?
Floor transitions are the strips or molding used to bridge the gaps between different types of flooring materials. These transitions not only enhance the aesthetics of your space but also serve functional purposes. They provide a smooth and safe transition between rooms and protect the edges of your flooring from damage. Properly installing floor transitions is crucial to ensure a seamless and visually appealing transition between two adjacent floors.
Importance of proper floor transitions
Proper floor transitions are essential for both the visual appeal and longevity of your flooring. They create a cohesive look by seamlessly blending different flooring materials, making your space appear more spacious and well-planned. Additionally, they prevent tripping hazards by eliminating the height difference between two floors. By protecting the edges of your flooring, floor transitions also reduce the risk of wear and tear caused by foot traffic and furniture movement. It is important to install floor transitions correctly to ensure their effectiveness and durability.
Different types of floor transitions
There are several types of floor transitions available, each designed to accommodate specific flooring materials and height differences. Here are some commonly used floor transitions:
| Type of Transition | Usage/Application |
|---|---|
| T-Molding | Used to bridge the gap between two floors of equal height, typically used for laminate, hardwood, or engineered wood flooring. |
| Reducer | Ideal for transitioning between floors of different heights, such as from a laminate floor to a vinyl floor. |
| Threshold | Used to transition between a room and another area with a different flooring type, like a doorway or an entrance. |
| Stair Nosing | Designed to provide a secure edge on staircases, preventing slips and falls. It is commonly used on stairs with carpet, vinyl, or laminate flooring. |
Remember, choosing the right type of floor transition is crucial for achieving a seamless and safe transition. Consider factors such as the height difference between floors, the type of flooring materials, and the overall aesthetic you want to achieve. By selecting the appropriate floor transition and installing it correctly, you can enhance the overall look and functionality of your space while ensuring the durability of your flooring.
Tools And Materials Needed
Essential tools for installation
Before you start installing a floor transition, make sure you have the essential tools ready. These tools will help ensure a smooth and efficient installation process. Here are the must-have tools:
- Measuring tape
- Pencil or marker
- Utility knife
- Circular saw or miter saw
- Chisel
- Hammer
- Drill
- Screwdriver
- Level
- Tapping block
- Bar clamps
- Wood glue or construction adhesive
Necessary materials for floor transition installation
In addition to the tools, you will need specific materials to complete your floor transition installation. These materials will vary depending on the type of transition and flooring you are working with. Here’s a list of necessary materials:
For wood-to-wood transition:
- Transition strip
- Underlayment or moisture barrier
- Screws or nails
For wood-to-tile or wood-to-laminate transition:
- Transition strip
- Tile adhesive or laminate flooring glue
- Underlayment or moisture barrier
- Screws or nails
For carpet-to-wood or carpet-to-tile transition:
- Transition strip with a ramp
- Carpet tack strips
- Tile adhesive or laminate flooring glue
- Underlayment or moisture barrier
- Screws or nails
Safety precautions to consider
While installing a floor transition, it’s important to prioritize safety. Here are a few precautions to consider:
- Wear safety goggles and gloves to protect your eyes and hands from any potential injury.
- Use caution when operating power tools and keep them away from children or pets.
- Ensure the work area is well-ventilated to avoid inhaling dust particles or fumes from adhesives.
- Follow the manufacturer’s instructions and guidelines for each tool and material.
- Keep the work area clean and free from any obstructions.
By having the necessary tools and materials handy and prioritizing safety precautions, you’ll be well-prepared to install a floor transition seamlessly.
Preparation
Before you start the installation of floor transitions, proper preparation is essential to ensure a smooth and successful project. This includes measuring the area for floor transition installation, evaluating the existing flooring conditions, and choosing the appropriate floor transition type. By following these steps, you can ensure a seamless transition between different types of flooring and enhance the overall aesthetic appeal of your space.
Measuring the area for floor transition installation
Accurate measurements are crucial when installing floor transitions. To get started, grab a tape measure and determine the length and width of the area where the transition will be installed. Make sure to account for any irregularities or obstructions that may affect the installation process. By taking precise measurements, you can ensure that the transition will fit seamlessly into the space, leaving no gaps or uneven edges that could pose a tripping hazard.
Evaluating the existing flooring conditions
Before proceeding with the installation, it’s important to assess the condition of the existing flooring. Check for any damages, such as loose tiles, cracks, or uneven surfaces. These issues should be addressed and repaired before installing the floor transition. Additionally, take note of the type of flooring material used, as this will influence your choice of transition type. Evaluating the existing flooring conditions will help you determine the best approach to ensure a durable and visually appealing transition.
Choosing the appropriate floor transition type
Once you have measured the area and evaluated the flooring conditions, the next step is to select the appropriate floor transition type. There are various types of transitions available, including T-molding, reducer, threshold, and stair nose transitions. Consider the height difference between the two flooring materials and the style of your space. For example, T-molding transitions are ideal for connecting two types of flooring that are of equal height, while reducer transitions are suitable for connecting two materials with a significant height difference. By carefully choosing the right transition type, you can achieve a seamless and aesthetically pleasing transition between your floors.

Installation Process
Installation Process
Installing floor transitions can significantly enhance the overall appearance and functionality of your floors. A well-installed transition provides an attractive, seamless transition between different types of flooring, protecting the edges and ensuring a smooth, even surface throughout. In this guide, we will walk you through the step-by-step process of installing a floor transition, ensuring a durable and professional finish.
Removing any existing floor transitions
Before installing a new floor transition, it is essential to remove any existing transitions that may be in place. This ensures a clean and smooth installation of the new transition. Using a pry bar or a hammer and chisel, gently remove the old transition, taking care not to damage the surrounding flooring. Clean up any residue or adhesive left behind using a scraper or a solvent specifically designed for this purpose.
Cleaning the subfloor and ensuring it’s level
Once the previous transition is removed, the subfloor needs to be cleaned and inspected for any unevenness or imperfections. A level subfloor is crucial for the proper installation of the new floor transition, ensuring a flush and secure fit. Begin by thoroughly sweeping or vacuuming the subfloor to remove any dirt or debris.
Next, check for any high or low spots on the subfloor using a level. If there are any uneven areas, use a floor leveling compound to even out the surface. Follow the manufacturer’s instructions for mixing and applying the compound, ensuring a smooth and level subfloor.
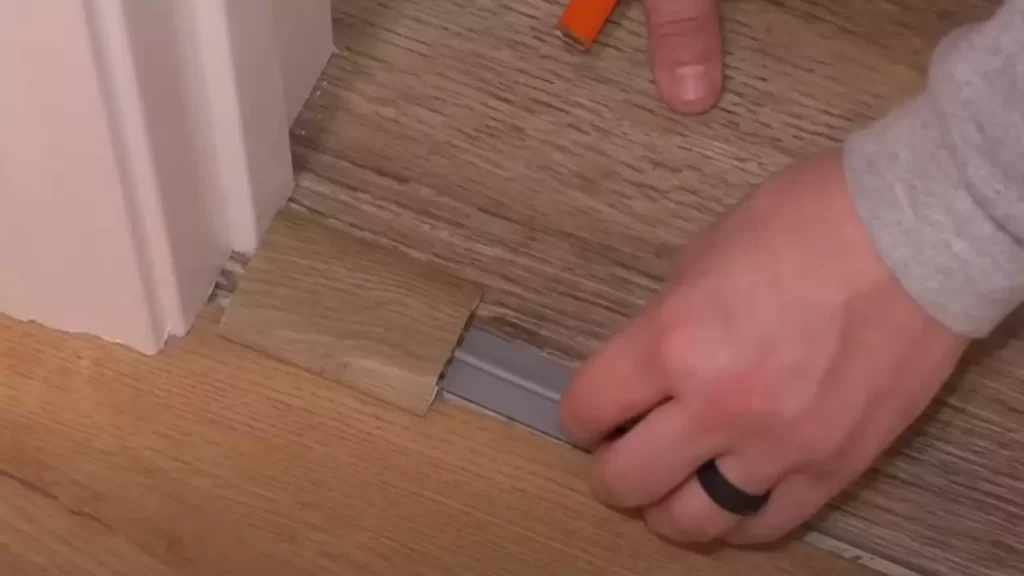
Cutting the floor transition to the required length
Measure the width of the doorway or the area where the floor transition will be installed. Using a measuring tape, transfer the measurements onto the new floor transition. It is essential to leave a small gap on either end to allow for expansion and contraction of the flooring material. Using a hacksaw or a miter saw, carefully cut the transition to the desired length.
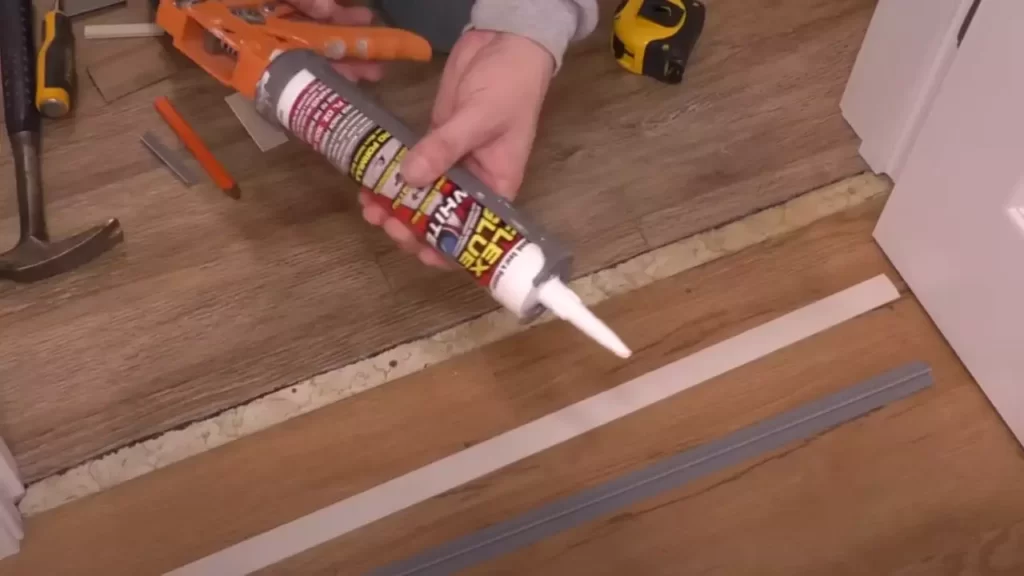
Preparing and applying adhesive or screws
Depending on the type of floor transition you are installing, you may need to apply adhesive or use screws to secure it into place. For adhesive installation, read the manufacturer’s instructions and apply a small bead of adhesive along the back of the transition. Press the transition firmly onto the subfloor, ensuring it is aligned with the edge of the flooring on either side.
If the transition requires screws, pre-drill holes through the transition and into the subfloor. Use a drill bit slightly smaller than the diameter of the screws to prevent splitting the wood. Insert the screws into the pre-drilled holes and tighten until the transition is securely fastened.
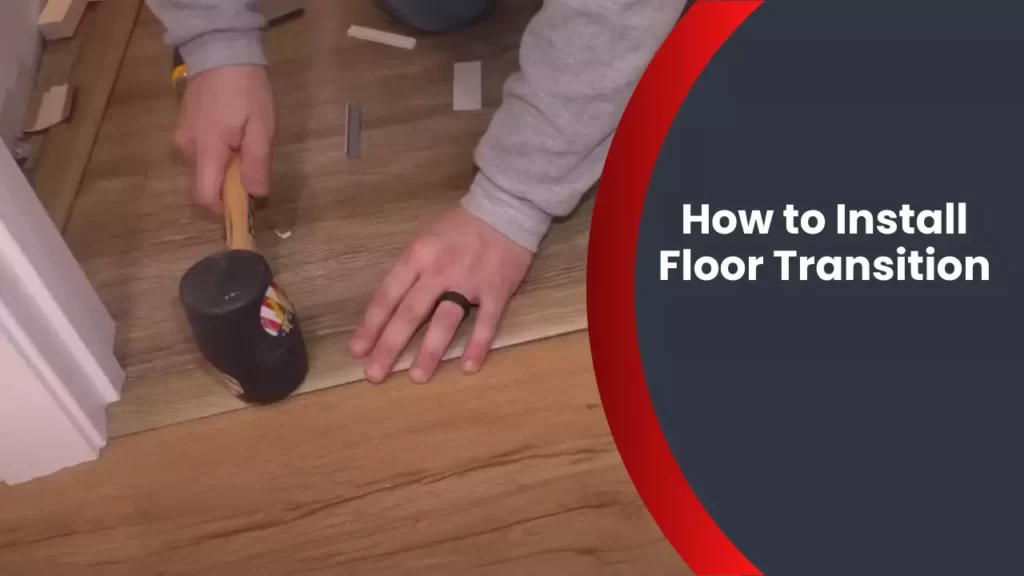
Securing the floor transition into place
Once the adhesive or screws are in place, carefully press down on the transition to ensure a secure bond or a tight fit. Wipe away any excess adhesive with a damp cloth or sponge. Allow the adhesive to cure or dry according to the manufacturer’s instructions before walking or placing heavy items on the transition.
Congratulations! You have successfully installed a floor transition, completing the seamless and professional look of your floors. Take a moment to admire your handiwork and enjoy the enhanced functionality and aesthetic appeal of your new transition.
Finishing Touches
Checking for any gaps or loose ends
Before considering the installation process complete, take a few moments to inspect your newly installed floor transition for any gaps or loose ends. These can not only affect the aesthetic appeal of your flooring but also create a tripping hazard. To ensure a seamless finish, carefully examine the transition area, paying particular attention to the edges where the transition meets the adjacent flooring materials.
If you notice any gaps or unevenness, don’t fret! There are straightforward solutions to rectify these issues and achieve a flawless transition. The first step is to identify the cause of the problem. Gaps can occur due to improper installation or inconsistencies in the subfloor. Loose ends may result from incorrect placement or inadequate adhesion.
Filling in gaps and ensuring a smooth transition
To address gaps in the floor transition, you can utilize various materials, depending on the size and severity of the gaps. Epoxy-based fillers are an excellent option for larger gaps, as they provide a durable and long-lasting solution. For smaller gaps, you may opt for silicone-based or acrylic-based sealants that allow for flexibility and ease of application.
When filling in the gaps, it’s crucial to apply the filler material evenly and ensure a seamless transition. Use a putty knife or a caulking gun for precise application. Once applied, smooth out the filler material and remove any excess using a clean cloth or the edge of the putty knife.
Additionally, if the loose ends are causing the transition to appear uneven, you can use a high-quality adhesive specifically designed for flooring materials to secure the transition firmly in place. Apply the adhesive according to the manufacturer’s instructions and allow it to dry thoroughly before allowing foot traffic on the transition area.
Cleaning and maintaining the installed floor transition
Now that your floor transition is flawlessly installed, it’s essential to maintain its appearance and longevity. Regular cleaning and maintenance practices will prevent dirt accumulation and damage.
To clean the installed floor transition:
- Sweep or vacuum the transition area to remove dust, dirt, and debris.
- Use a mild cleaning solution suitable for your specific flooring materials. Avoid harsh chemicals that can cause discoloration or damage.
- Dampen a clean microfiber cloth or mop with the cleaning solution and gently wipe the transition area. Pay attention to any crevices or textured surfaces.
- Rinse the cloth or mop with clean water and repeat the process to remove any remaining cleaning solution residue.
- Dry the transition area using a dry cloth or towel to prevent moisture damage or slipping.
In addition to regular cleaning, it’s advisable to inspect the floor transition periodically for any signs of wear or damage. Address any issues promptly to avoid further complications and extend the lifespan of your floor transition.
Troubleshooting Tips
Troubleshooting Tips: Common Issues with Floor Transition Installation
Installing floor transitions can be a straightforward process, but sometimes unexpected challenges can arise. To help you overcome these roadblocks, here are some common issues that you may encounter during installation and a troubleshooting guide to resolve them.
Common issues with floor transition installation
1. Uneven surfaces: One of the most common problems occurs when the surfaces you are transitioning between are not level. This can result in an unsightly gap or an unstable transition. To fix this issue, you can:
- Use a floor leveling compound to even out the surface before installing the transition.
- Trim the higher surface slightly to reduce the height difference between the two surfaces.
2. Incorrect measurement: Another common mistake is measuring the length of the transition incorrectly. This can lead to uneven lengths or gaps between sections. To avoid this, be sure to measure twice and cut once. Use a miter saw or a suitable cutting tool to achieve clean and accurate cuts.
3. Inadequate adhesive: Insufficient adhesive can cause the transition to come loose over time. Make sure to choose a high-quality adhesive that is suitable for the type of flooring you are working with. Follow the manufacturer’s instructions for application and allow enough time for the adhesive to dry properly.
Troubleshooting guide for specific problems
If you encounter any specific problems during floor transition installation, refer to the troubleshooting guide below for solutions:
| Problem | Solution |
|---|---|
| Gaps between the transition and the floor | Fill the gap with a flexible silicone-based sealant that matches the color of the transition. |
| Transition not fitting properly | Check if the transition is the correct size and shape for the flooring. You may need to trim or adjust it accordingly. |
| Noise or squeaking | Apply a lubricant or an anti-squeak adhesive under the transition to reduce friction and eliminate noise. |
| Visible nails or screws | Remove the transition, countersink the nails or screws properly, and then reinstall it securely. |
By understanding these common issues and following the troubleshooting guide, you can overcome potential challenges during floor transition installation. Remember to take your time, measure accurately, and make use of the appropriate tools and materials to ensure a successful and aesthetically pleasing outcome.
Frequently Asked Questions
What Is The Best Adhesive For Floor Transitions?
The best adhesive for floor transitions is a high-quality flooring adhesive that can securely bond different materials. Choose an adhesive that is specifically designed for transitions and ensures a strong, durable bond. Check the product specifications and consult with professionals for recommendations.
How Do You Nail Down Transition Strips?
To nail down transition strips, follow these steps: 1. Measure and mark the locations for the strips. 2. Use a drill to create pilot holes at the marks. 3. Align the strip and secure it with screws or nails through the pilot holes.
4. Repeat the process for all transition strips. 5. Ensure the strips are firmly attached for a secure transition between flooring surfaces.
Where Should Floor Transitions Be Placed?
Floor transitions should be placed in doorways or where two types of flooring meet. They help create a smooth and seamless transition between different floors, ensuring safety and preventing tripping hazards. By placing floor transitions strategically, you can enhance the overall appearance and functionality of your space.
Where Do You Put Flooring Transitions In A Doorway?
Flooring transitions are typically placed in doorways to create a smooth and seamless transition between different types of flooring. These transitions help to prevent trip hazards and maintain the aesthetic appeal of the space. It is essential to position them where the two flooring materials meet, ensuring a secure fit and a visually pleasing result.
Conclusion
To sum up, installing a floor transition may seem daunting at first, but with the right guidance and tools, it can be a relatively simple process. By following the steps outlined in this blog post, you can ensure a smooth and professional-looking transition between different types of flooring.
Remember to measure carefully, choose the right transition strip, and use appropriate adhesives or fasteners. With a little patience and attention to detail, your floor transition will seamlessly blend into your space, adding both function and aesthetic appeal.