To install fence slats, begin by measuring the length of your fence and determining the number of slats needed. Then, secure the slats to the fence posts using screws, ensuring they are evenly spaced.
If you’re looking to add privacy and aesthetic appeal to your fence, installing fence slats can be a great solution. Fence slats are long, narrow pieces of material that are attached to the fence posts, creating a visually pleasing and private fence.
They are available in various materials like wood, vinyl, or metal, allowing you to choose the option that suits your needs. We will guide you through the simple steps to install fence slats, enabling you to transform your fence into a secure and attractive boundary for your property. So, let’s get started!
Getting Started
If you are looking to enhance the privacy and aesthetic appeal of your fence, installing fence slats can be an excellent solution. Fence slats not only provide additional security but also add a touch of style to your outdoor space. To help you get started with this process, we have broken down the steps and provided some essential tips to ensure a successful installation.
Measure and Assess Your Fence for Slat Installation
Before diving into the installation process, it’s crucial to measure and assess your fence to determine the number of slats required. This step will help you avoid any unforeseen hurdles or last-minute trips to the hardware store. So grab your measuring tape and follow these steps:
- Measure the length and height of your fence using a measuring tape.
- Based on your measurements, calculate the number of slats needed. Remember to consider the desired spacing between each slat for privacy purposes.
- Inspect your fence for any damage or loose boards that might hinder the installation process. It’s important to address these issues beforehand to ensure a secure installation.
Gather the Necessary Tools and Materials
Once you have assessed your fence and determine the number of slats needed, it’s time to gather the necessary tools and materials. Ensuring you have everything on hand will save you time and prevent any delays during installation. Here is a list of essential tools and materials you’ll need:
| Tools | Materials |
|---|---|
| Measuring tape | Fence slats |
| Drill | Screws |
| Level | Wood glue |
| Saw | Sandpaper |
| Safety goggles | Paint or stain (optional) |
Prepare Your Fence for Slat Installation
With the tools and materials in hand, it’s now time to prepare your fence for the slat installation. Proper preparation will ensure the longevity and stability of your fence slats. Follow these steps:
- Inspect the surface of your fence and make sure it is clean and free from any debris. Scrub off any dirt or mildew using a brush and mild soap.
- If necessary, sand down any rough spots or splinters on the fence to create a smooth surface for the slats.
- If you plan to paint or stain your fence slats, now is the time to do it. Apply a suitable outdoor paint or stain and let it dry completely before proceeding with the installation.
By following these steps and adequately preparing your fence, you will be well on your way to installing fence slats that will enhance both the privacy and beauty of your outdoor space.
Choosing The Right Fence Slats
When it comes to enhancing the functionality and aesthetics of your fence, installing fence slats is an ideal solution. Fence slats not only offer additional privacy but can also beautify your outdoor space. However, with the myriad of options available in the market, choosing the right fence slats can seem overwhelming. To simplify the process, it’s crucial to understand the different types of fence slats and consider factors such as material, design, and privacy level.
Understand the different types of fence slats
The first step in choosing the right fence slats is understanding the different types available. Fence slats come in various materials, including wood, metal, and vinyl, each offering its own unique benefits. Wood slats, such as cedar or pine, provide a natural and rustic look, while metal slats offer durability and a modern aesthetic. Vinyl slats, on the other hand, are low-maintenance and resistant to rot and pests.
Consider factors such as material, design, and privacy level
After identifying the different types of fence slats, it’s important to consider factors such as material, design, and privacy level. The material you choose should complement your existing fence and withstand the local weather conditions. Additionally, consider the design of the slats – whether you prefer a horizontal or vertical arrangement, or if you want a decorative pattern.
Privacy level is another crucial factor to evaluate. Some fence slats offer complete privacy by tightly fitting together, while others provide a semi-private option with small gaps between the slats. The level of privacy you desire depends on your specific needs, such as whether you have nosy neighbors or want to block the view of a busy street.
Evaluate the compatibility of the slats with your fence
Before finalizing your choice, it’s crucial to evaluate the compatibility of the fence slats with your existing fence. Consider the measurements of your fence and ensure that the slats are available in the appropriate size. It’s also important to check for any specific installation requirements or recommendations from the manufacturer to ensure a seamless installation.
By understanding the different types of fence slats and considering factors such as material, design, and privacy level, you can make an informed decision when choosing the right fence slats for your property. Remember to evaluate the compatibility of the slats with your fence to ensure a successful and visually appealing installation.
Preparing Fence Slats For Installation
Before you can install your fence slats, it’s important to properly prepare them for the job. This preparation process will ensure that your slats are ready to withstand the elements and provide optimal functionality. In this section, we will discuss the necessary steps to clean and treat the slats if necessary, cut them to the desired length, and apply any desired finishes or coatings.
Clean and Treat the Slats if Necessary
The first step in preparing your fence slats is to ensure they are clean and free from any dirt or debris. Depending on the condition of the slats, you may need to clean them thoroughly before proceeding with any further steps.
If your slats are relatively new or have been stored in a clean, dry environment, a simple wipe-down with a damp cloth may suffice. However, if your slats have been exposed to the elements or have accumulated dirt and grime over time, a more thorough cleaning may be necessary.
| Materials: | Instructions: |
|---|---|
| Water | 1. Fill a bucket with water. |
| Mild detergent | 2. Add a small amount of mild detergent to the water. |
| Brush or sponge | 3. Dip a brush or sponge into the soapy water and gently scrub the slats. |
| Rinse | 4. Rinse the slats with clean water to remove any soap residue. |
| Towel or air dry | 5. Dry the slats thoroughly with a clean towel or allow them to air dry. |
Once your slats are clean, you may also need to treat them to protect against rot, pests, or other potential damage. Depending on the material of your slats, different treatment options may be suitable. For example, wooden slats can benefit from a wood preservative or sealant, while metal slats may require a rust-resistant coating.
Cut the Slats to the Desired Length
After ensuring your slats are clean and treated, the next step is to cut them to the desired length. Take careful measurements of the area where you plan to install the slats and mark the appropriate lengths on each slat.
If you are using wooden slats, a saw will likely be required to cut through the material. Ensure that you have the appropriate safety equipment, such as goggles and gloves, before proceeding with the cutting process. Remember to make precise and straight cuts to ensure a neat and professional-looking installation.
Apply Any Desired Finishes or Coatings to the Slats
After cutting your slats to the desired length, you may choose to apply any desired finishes or coatings to enhance their appearance and durability. This step is particularly important for wooden slats, as finishes or coatings can help protect them from moisture and sun damage.
Some popular finishes for wooden slats include stains, paints, or clear sealants. These finishes can add color, sheen, and protection to the slats, depending on your preferences. Ensure that each slat is coated evenly and allow sufficient drying time before handling or installing them.
By properly preparing your fence slats before installation, you can ensure a strong and visually appealing fence that will stand the test of time. Remember to clean and treat the slats if necessary, cut them to the desired length, and apply any desired finishes or coatings. With these steps completed, you’ll be ready to move on to the installation process and enjoy the benefits of your new fence.
Installing Fence Slats
Installing fence slats is an essential step in completing your fence installation project. Fence slats not only provide privacy and security to your property but also enhance the overall look of your fence. To ensure a successful installation, it is important to follow a step-by-step process and pay attention to details like determining the starting point, positioning the first slat, and maintaining proper alignment and spacing throughout the installation. In this guide, we will walk you through the process of installing fence slats, helping you achieve a professional and polished result.
Determine the starting point for slat installation
The first step in installing fence slats is to determine the starting point for the installation. This will depend on your preference and the style of fence slats you have chosen. You can start from one end or from the center of the fence. Additionally, consider the side of the fence that will face outward and be visible to passersby. Once you have decided on the starting point, mark it using a pencil or tape measure.
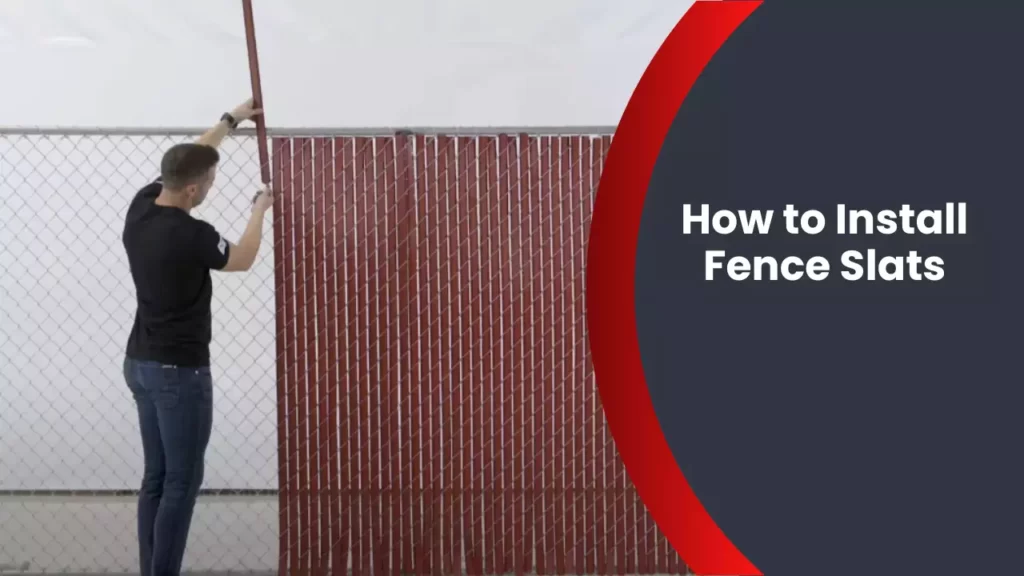
Position the first slat and secure it to the fence
With the starting point determined, it’s time to position the first slat. Place the slat vertically against the fence posts, making sure it aligns with the top and bottom rails. Use a level to ensure that the slat is perfectly vertical. Once the slat is properly positioned, secure it to the fence using screws or nails. Be careful not to overtighten, as it may cause damage to the slat or the fence itself.
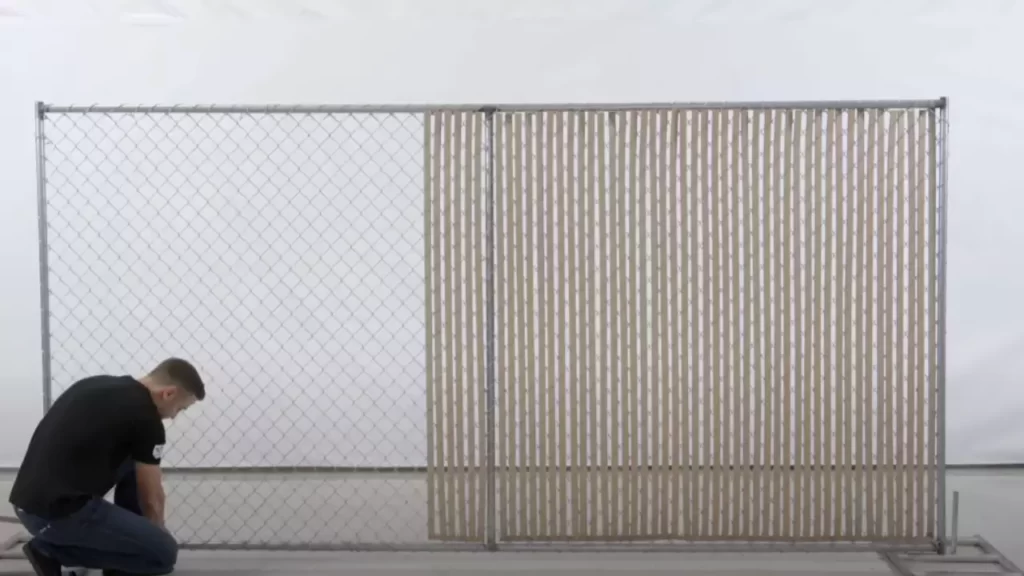
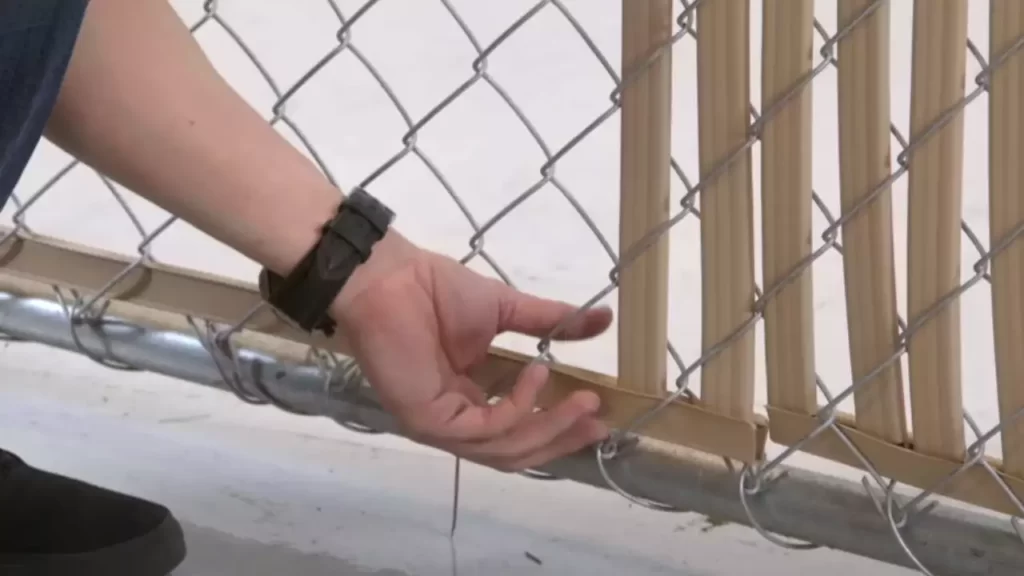
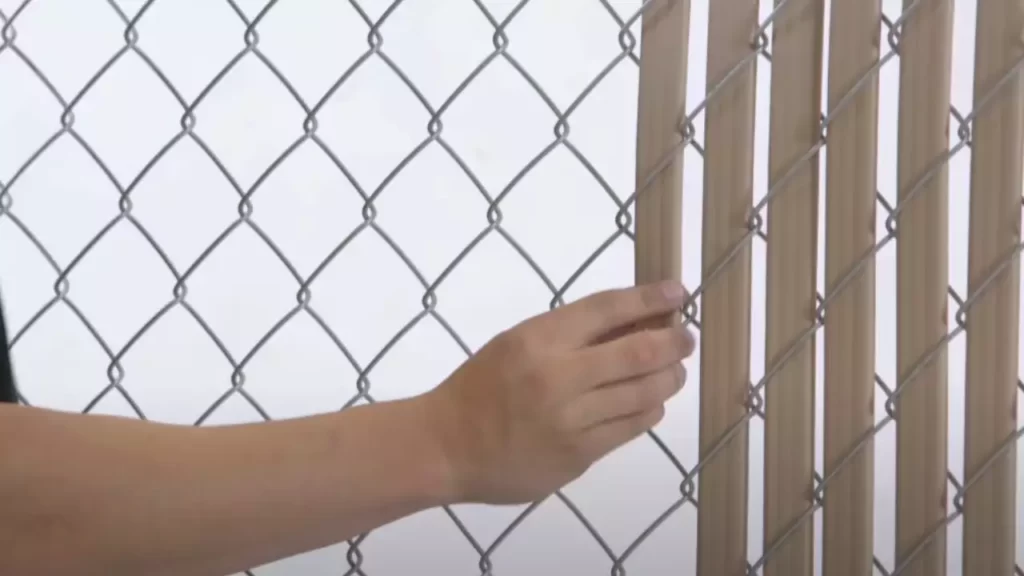
Continue installing slats, ensuring proper alignment and spacing
After securing the first slat, continue installing the remaining slats in the same manner. Place each slat against the fence posts, aligning it with the top and bottom rails. Use a level to ensure vertical positioning and maintain consistency throughout the installation. Pay close attention to the spacing between each slat, ensuring they are evenly spaced for a visually appealing result. Use spacers or a tape measure to achieve consistent spacing. Secure each slat to the fence with screws or nails, making sure they are secure but not over tightened.
In summary, the process of installing fence slats involves determining the starting point, positioning the first slat, and continuing the installation while ensuring proper alignment and spacing. By following these steps, you can achieve a professionally installed fence that provides privacy, security, and enhances the aesthetic value of your property. Remember to take your time and pay attention to the details to ensure a successful installation.
Securing Fence Slats
When it comes to installing fence slats, securing them properly is crucial for the overall stability and longevity of your fence. Without proper security, the slats may become loose or wobbly over time, compromising the privacy and functionality of your fence. In this section, we will discuss some essential steps to ensure the slats are securely fastened and reinforce the stability of your fence.
Use Appropriate Fasteners or Brackets to Secure the Slats
To begin with, it’s important to choose the right fasteners or brackets for securing the fence slats. These fasteners or brackets play a significant role in holding the slats in place, preventing any unwanted movement. Depending on the type of fence slats you have, you may need specific fasteners or brackets designed for the material and dimensions of the slats.
For example, if you have wooden slats, using nails or screws with enough length and thickness is crucial. Ensure that the fasteners are durable and corrosion-resistant to withstand varying weather conditions. On the other hand, if you have metal slats, you may need specialized brackets designed specifically for metal fences.
Consider Additional Reinforcement Techniques for Added Stability
In addition to using appropriate fasteners or brackets, it’s worth considering additional reinforcement techniques to enhance the stability of your fence slats. Reinforcement techniques can provide extra strength, particularly when dealing with taller or longer fences that are prone to more significant forces such as strong winds or accidental impacts.
One effective reinforcement technique is adding horizontal braces between the fence posts. These braces act as additional supports, distributing the load evenly and reducing the chances of slat movement or damage. You can use sturdy wooden beams or metal rods as braces, ensuring they are securely attached to the fence posts and connected to the slats where necessary.
Check the Slats for Any Potential Wobbling or Loose Ends
Once you have securely fastened the fence slats and added any necessary reinforcement, it’s essential to give the fence a thorough inspection. Check each slat for any signs of wobbling or loose ends. Even with the use of appropriate fasteners and additional reinforcement, it’s possible for minor adjustments to be needed.
If you detect any wobbling or loose ends, it’s crucial to tighten the fasteners or brackets and ensure all connections are secure. This step will help maintain the overall stability and prevent potential damage to the slats or the fence structure itself.
In conclusion, securing fence slats properly is a critical step in the installation process. By using the appropriate fasteners or brackets, considering additional reinforcement techniques, and checking for any potential wobbling or loose ends, you can ensure a sturdy and durable fence that will withstand the test of time.
Finishing Touches And Maintenance
When it comes to installing fence slats, it’s not just about securing them in place. Paying attention to the finishing touches and ongoing maintenance is crucial to ensure the longevity and aesthetic appeal of your fence. In this section, we will discuss two important steps: trimming any excess slat length if needed and applying a final coat of protective finish or sealant. Additionally, we will explore the importance of regularly inspecting and maintaining your fence slats for their long-lasting durability.
Trim any excess slat length if needed
If you find that some of your fence slats are slightly longer than desired, it’s essential to trim them to achieve a cohesive look. Trimming excess slat length is a straightforward process that requires a few basic tools.
- Measure and mark the desired length of the slat that needs to be trimmed.
- Using a saw or appropriate cutting tool, carefully cut the slat along the marked line.
- File or sand the cut edge to ensure a smooth finish.
Take caution while trimming to avoid any injuries or damage to the surrounding slats. Once you have trimmed the excess length, you’ll notice how precise and neat your fence slats appear.
Apply a final coat of protective finish or sealant
To enhance the durability and safeguard against the elements, applying a final coat of protective finish or sealant is crucial. This additional layer of protection will help resist moisture, UV rays, and other potential damage, prolonging the life of your fence slats.
Before applying the finish or sealant, it’s important to clean the fence slats thoroughly to remove any dirt or debris that could hinder the adhesion process. A mild detergent mixed with water and a soft cloth or brush can be used for this purpose. Rinse the slats with clean water and allow them to dry completely before proceeding.
Once the slats are clean and dry, apply the protective finish or sealant according to the manufacturer’s instructions. Using a brush or roller, ensure even coverage on all surfaces of the slats. Pay special attention to the edges and ends, where moisture is more likely to penetrate.
Allow the finish or sealant to dry completely before exposing the fence slats to any moisture or weather conditions. This final coat will not only provide an appealing finish but also contribute to the long-lasting beauty of your fence.
Regularly inspect and maintain the fence slats for longevity
Ensuring the ongoing maintenance of your fence slats is essential for their longevity and optimal performance. Regular inspections will help identify any potential issues or damage that may need immediate attention.
Here are a few maintenance tips to keep your fence slats in excellent condition:
- Inspect the slats for any signs of cracks, warping, or splitting.
- Repair or replace any damaged slats promptly to prevent further deterioration.
- Check the fasteners and ensure they are secure and intact.
- Remove any debris or vegetation that may accumulate around the fence slats, as they can contribute to moisture retention and decay.
- Consider applying a fresh coat of protective finish or sealant periodically to maintain the slats’ resistance to weather-related stresses.
By following these simple maintenance practices, you can significantly extend the lifespan of your fence slats and keep them looking their best for years to come.
Troubleshooting Common Issues
Installing fence slats can enhance the privacy and aesthetic appeal of your property. However, like any DIY project, there may be common issues that arise when installing fence slats. In this section, we will address some of these issues and provide simple solutions to ensure your fence slat installation is a success.
Addressing slats that are too long or short
If you find that your fence slats are too long or short for your fence, there are a few steps you can take to address this issue:
- Measure twice, cut once: Ensure accurate measurements before cutting your fence slats. Use a tape measure and ensure that you consider any variations in height along the fence line.
- Trimming excess length: If your fence slats are too long, carefully trim the excess using a saw or appropriate cutting tool. Be sure to follow safety guidelines when cutting.
- Adding extensions: In the case of slats that are too short, you can add extensions to the slats to achieve the desired length. Use additional fence slats or wooden blocks cut to size and attach them securely to the existing slats.
Fixing loose or unstable slats
Loose or unstable fence slats can compromise the overall stability and durability of your fence. Here’s how you can fix this issue:
- Tightening or replacing fasteners: Inspect the fasteners used to secure the slats to the fence frame. If any fasteners are loose or damaged, tighten them or replace them with suitable alternatives.
- Adding additional support: If the slats are still loose after securing the fasteners, consider adding additional support. This could involve attaching strong wire or cables horizontally across the slats to provide extra stability.
- Tightening the frame: Sometimes, loose slats can be a result of a loose or unstable fence frame. Check the overall structure and tighten any loose connections or joints in the frame.
Dealing with slats that don’t match the fence design
It can be disappointing to realize that the fence slats you’ve purchased don’t match the design or style of your existing fence. Here are some solutions to consider:
- Painting or staining: If the slats are made of wood, consider painting or staining them to match the fence design. Choose a color that complements the existing fence and follow proper paint or stain application techniques for best results.
- Replacing select slats: In some cases, it may be possible to replace only the slats that don’t match the fence design. This can be done by carefully removing the mismatched slats and replacing them with slats that match the style and material of the rest of the fence.
- Adding decorative elements: If the mismatched slats cannot be easily replaced or modified, you can incorporate decorative elements such as vinyl decals, metal panels, or planters to add visual interest and distract from the mismatch.
By addressing these common issues that may arise during fence slat installation, you can ensure a smooth and successful project that will enhance both the functionality and aesthetics of your fence.
Enhancing Your Fence With Additional Features
When it comes to adding appeal and functionality to your fence, there are several ways you can enhance it with additional features. From decorative elements to gate slats for easy access, incorporating these enhancements will not only make your fence stand out, but also provide practical benefits. In this article, we will explore three effective ways to elevate your fence design and turn it into a real eye-catcher.
Adding Decorative Elements to the Fence Slats
To truly make a statement with your fence, consider adding decorative elements to the slats. These elements can range from simple accents to intricate designs, depending on your personal preference and the overall aesthetic you want to achieve. Not only do decorative elements enhance the visual appeal of your fence, but they also add a touch of personality and uniqueness to your outdoor space.
One way to incorporate decorative elements is by choosing fence slats with unique patterns or shapes. For example, you can opt for slats with arched tops or scalloped edges, giving your fence a more elegant and sophisticated look. Another option is to attach decorative finials or post caps on the top of each slat, providing a stylish finishing touch.
Furthermore, you can explore artistic possibilities by painting or staining the slats in different colors or creating a mural-like design. This will transform your fence into a work of art, reflecting your personal taste and showcasing your creative side.
Installing Gate Slats for Easy Access
If you frequently need to access your backyard or garden, installing gate slats is a practical addition to your fence design. Gate slats allow you to easily open and close a section of your fence, offering convenient access whenever necessary. Whether you have a large gate for vehicles or a smaller gate for pedestrians, this feature ensures easy movement without compromising security.
To install gate slats, start by selecting a gate kit that suits your fence style and measurements. Follow the manufacturer’s instructions to assemble the gate frame and attach it securely to the fence. Once the frame is in place, carefully attach the slats, making sure they align properly and are firmly secured.
Gate slats not only provide convenience, but they can also enhance the aesthetic appeal of your fence. Use slats that complement the rest of your fence design, ensuring a seamless and cohesive look. Additionally, consider adding decorative hardware, such as ornate hinges or latches, to further elevate the gate’s appearance.
Incorporating Lighting or Vegetation into the Fence Design
To create a truly captivating and dynamic fence design, incorporating lighting or vegetation is a game-changer. Adding lighting elements not only enhances the visual appeal of your fence but also improves safety and functionality, especially during evening hours. Installing solar-powered lights along the fence posts or underneath the top rail will create a soft and inviting ambiance.
Furthermore, if you have a green thumb, why not incorporate vegetation into your fence design? Consider adding planter boxes or hanging baskets that can be attached to the fence. This will not only soften the harsh lines of the fence but also bring a touch of nature to your outdoor space. Choose plants that thrive in your climate and require minimal maintenance to ensure long-term success.
| Benefits of Enhancing Your Fence |
|---|
| 1. Enhanced visual appeal and uniqueness |
| 2. Improved practicality and convenience |
| 3. Increased safety and security |
| 4. Enhanced ambiance and atmosphere |
| 5. Addition of natural elements to the outdoor space |
In conclusion, by enhancing your fence with additional features such as decorative elements, gate slats, and lighting or vegetation, you can transform it into a visually stunning and practical element of your outdoor space. Whether you want to showcase your creativity, improve accessibility, or create a tranquil atmosphere, incorporating these enhancements will undoubtedly elevate your fence design to the next level. Implement these ideas and turn your fence into a focal point that impresses both guests and passersby.
Frequently Asked Questions
How Do You Install Bottom Locking Fence Slats?
To install bottom locking fence slats, start by measuring the distance between the posts and trim the slats accordingly. Insert the slats from the bottom, making sure they lock securely into place. Repeat this process until you have filled the desired area.
It’s that simple!
How Long Does It Take To Install Fence Slats?
Installing fence slats typically takes a few hours or a day, depending on the length and complexity of the project. It’s best to consult with a professional for an accurate estimate based on your specific requirements.
How Do You Install Top Locking Fence Slats?
To install top locking fence slats, follow these steps: 1. Start by inserting the top locking portion of the slat into the top channel of the fence. 2. Slide the slat down to the desired height and make sure it is securely locked in place.
3. Repeat this process for each slat, ensuring they are evenly spaced. 4. Use a rubber mallet to hammer each slat into place, if necessary. 5. Once all the slats are installed, double-check for any loose or uneven ones and adjust as needed.
How Do You Install Winged Slats?
To install winged slats, follow these steps: 1. Start by measuring the width of your fence panels. 2. Slide each slat vertically through the chain-link fence mesh. 3. Make sure the wings are facing the inside of the fence. 4. Adjust the slats evenly to achieve the desired privacy or wind protection.
5. Lock the slats in place by using the provided locking channels or clips. Remember to respect the word limit and utilize short, active sentences for better readability and SEO optimization.
Conclusion
Installing fence slats can be a simple and effective way to enhance the privacy and aesthetic appeal of your property. By following the step-by-step guide provided in this blog post, you can easily install fence slats yourself and achieve professional-looking results.
Remember to gather all the necessary tools and materials, measure and prepare the fence properly, and be patient and meticulous throughout the installation process. With a little time and effort, you can create a beautiful, functional, and secure fence that will stand the test of time for years to come.