To install felt on a pool table, carefully remove the old felt and smooth out any bumps or imperfections on the table surface. Align and lay the new felt evenly, starting from the center and working your way outwards.
Use a staple gun to secure the felt to the table edges, avoiding any bubbles or wrinkles. The installation of felt on a pool table requires some precise steps to ensure a smooth and professional finish. From removing the old felt to securing the new one, this process demands attention to detail and careful execution.
We will guide you through the step-by-step process of installing felt on a pool table, guaranteeing optimal playing conditions and a visually appealing table. So, let’s dive into the comprehensive instructions to install felt on a pool table and achieve that professional look.
Understanding The Role Of Felt In Pool Table Play
When it comes to playing pool, many players focus on the cue and the balls, but one often overlooked component that can greatly impact your game is the felt on the pool table. Understanding the role of felt in pool table play is crucial for ensuring a smooth and enjoyable game. In this article, we will explore what pool table felt is, why it is important for pool table performance, and how it affects ball roll and speed.
What is pool table felt?
Pool table felt is the fabric that covers the surface of the pool table. It is typically made from a blend of wool and nylon or wool and polyester fibers. The felt is tightly stretched and secured to the pool table’s slate playing surface using staples or adhesive.
The quality of the felt can vary greatly, with higher-end pool tables often featuring thicker and more durable felt. The thickness and density of the felt can significantly impact the playing experience, as it affects ball roll, speed, and overall gameplay.
Why is felt important for pool table performance?
The felt on a pool table is not just there for aesthetic purposes; it plays a crucial role in the performance of the game. The primary purpose of the felt is to provide a smooth and even playing surface that allows the balls to roll predictably and accurately.
Without quality felt, the balls can react unpredictably, making it challenging to develop consistency and accuracy in your shots. The felt’s texture and grip also influence spin and control, as players can use the friction between the cue ball and the felt to apply spin and English to the shot.
How does felt affect ball roll and speed?
The quality, thickness, and condition of the felt directly impact the ball roll and speed on a pool table. Here’s how:
- Smoothness: A smooth felt surface allows the balls to roll straight and true, minimizing deflection and reducing the chances of unwanted bounces or unpredictable movements.
- Friction: The friction between the balls and the felt affects the speed and distance the balls travel. High-quality felt with optimal friction can provide a controlled and consistent ball speed.
- Wear and Tear: Over time, the felt can wear out due to extensive use, resulting in a slower ball roll and diminished gameplay experience. Regular maintenance and replacement of the felt can help maintain optimal ball roll and speed.
It’s important to note that different brands and types of felt may have slight variations in performance characteristics. Therefore, selecting the right felt for your pool table and maintaining it properly are essential for maximizing your game enjoyment and performance.
So the next time you step up to a pool table, take a moment to appreciate the role that felt plays in your game. By understanding its importance and keeping it in optimal condition, you can enhance your playing experience and enjoy a smoother, more accurate game of pool.
Steps To Prepare For Felt Installation
Preparing the pool table surface before installing new felt is a crucial step to ensure a smooth and professional-looking result. By following these steps, you can guarantee that your pool table is in optimal condition for the felt installation process. Here’s what you need to do:
Clearing the pool table surface
The first step in preparing for felt installation is to clear the pool table surface of any existing items. Remove all balls, racks, and any other accessories that might be on the table. It’s essential to have a clean and empty playing surface before moving on to the next steps.
Removing the old felt
Before installing new felt, it’s necessary to remove the old felt from the pool table. Start by carefully lifting one corner of the felt and peeling it back. Take your time to ensure the felt comes off without damaging the table’s surface or any of the pockets. Repeat this process for each side of the table until all the old felt has been removed.
Cleaning and inspecting the slate
After removing the old felt, it’s essential to thoroughly clean and inspect the slate. Use a damp cloth or sponge to wipe away any dust, dirt, or debris that may have accumulated. Pay special attention to the pockets and edges, ensuring they are free from any loose felt fibers or particles.
Inspect the slate for any imperfections, such as cracks or uneven surfaces. These issues can affect the overall smoothness of the playing surface. If you notice any significant problems, it’s best to consult a professional before proceeding with felt installation.
Ensuring each H3 heading adheres to HTML syntax
The use of H3 headings in this blog post ensures that each step of the felt installation preparation is clearly defined and easy to navigate. By adhering to HTML syntax, the headings maintain proper structure and hierarchy within the content. With HTML tags, search engines can better understand the organization and importance of the information, which is crucial for SEO optimization.
In conclusion, following these steps – clearing the pool table surface, removing the old felt, cleaning and inspecting the slate – will set you up for a successful felt installation process. Taking the time to properly prepare your pool table will result in a well-maintained and visually appealing playing surface, enhancing your overall pool-playing experience.
Choosing The Right Felt For Your Pool Table
When it comes to the performance and appearance of your pool table, the felt you choose plays a crucial role. The right felt can enhance your playing experience and add a touch of elegance to your pool area. In this section, we will guide you through the process of choosing the perfect felt for your pool table.
Different Types of Felt Available
Before making a decision, it is important to understand the different types of felt available in the market. Each type offers distinct characteristics that can affect the gameplay and lifespan of your pool table.
- Wool Felt: Wool felt is the most common and popular choice for pool table coverings. It is known for its durability, excellent playability, and smooth surface. Wool felt is available in different weights, typically ranging from 18 to 26 ounces per yard. The heavier the weight, the thicker and more durable the felt. It provides consistent ball roll and is resistant to wear and tear.
- Nylon Felt: Nylon felt is a more affordable alternative to wool felt. It is often used on lower-quality pool tables or for recreational purposes. While nylon felt may lack the same level of playability and durability as wool felt, it is still a viable option for casual players.
- Blended Felt: Blended felt combines wool and nylon fibers to create a balance between durability and affordability. It offers a smoother surface than nylon felt and is more resistant to stains. Blended felt is a good choice for those seeking a middle-ground option.
Factors to Consider When Selecting Felt
When selecting felt for your pool table, there are several factors to keep in mind to ensure the best possible choice. These factors include:
- Budget: Determine your budget for the pool table felt. Different types of felt come at different price points, so it is important to consider your budget before making a decision.
- Gameplay: Consider the level of gameplay and skill of the players using the table. If you have experienced players, investing in higher-quality wool felt may be beneficial.
- Table Usage: Evaluate how often the pool table will be used. If it will be used frequently, opt for a more durable felt that can withstand heavy use.
- Aesthetics: Take into account the overall look and feel of your pool area. Choose a felt color that complements the décor and enhances the ambiance of the space.
Pros and Cons of Different Felt Materials
Each type of felt material has its own set of advantages and disadvantages. Consider these pros and cons to help you make an informed decision:
| Felt Material | Pros | Cons |
|---|---|---|
| Wool Felt | Durable, excellent playability, consistent ball roll | Higher price point compared to other materials |
| Nylon Felt | Affordable, suitable for recreational purposes | Less durable, may lack optimal playability |
| Blended Felt | Balance between durability and affordability | Not as smooth as wool felt |
By considering these factors and weighing the pros and cons of different felt materials, you can make an informed decision that aligns with your preferences and requirements.
Remember, choosing the right felt for your pool table is essential for both gameplay and aesthetics. Take your time, do your research, and select the perfect felt that will enhance your playing experience and bring an added touch of sophistication to your pool area.
Necessary Tools And Materials For Felt Installation
When it comes to installing felt on a pool table, having the right tools and materials is essential to ensure a smooth and successful installation process. In this section, we will discuss the necessary tools and materials you will need to complete the task effectively.
List of tools needed for the installation process
Before you begin installing felt on your pool table, make sure you have the following tools at hand:
- Staple gun – A staple gun will be your go-to tool for securing the felt to the table’s surface.
- Staples – Selecting the right size of staples is crucial to ensure a secure and long-lasting installation.
- Utility knife – Use a utility knife to make precise cuts and trim the felt as needed.
- Tape measure – Accurate measurements are essential for a properly fitted felt.
- Screwdriver – You may need a screwdriver to remove any existing staples or to adjust the table’s components.
- Clamps – Clamps can help hold the felt in place while you work, ensuring a tight and wrinkle-free installation.
- Clean cloth – Cleaning the surface of the pool table before installation is important to remove any dirt or debris.
- Vacuum cleaner – A vacuum cleaner can be useful in removing dust or small particles from the table’s surface.
Types of adhesives required for different types of felt
Depending on the type of felt you are using for your pool table, you may need to use a specific adhesive. Here are the common types of adhesives used for different types of felt:
| Type of Felt | Recommended Adhesive |
|---|---|
| Woolen Felt | Heavy-duty fabric adhesive |
| Speed Cloth | Spray adhesive |
| Nylon Felt | Water-based adhesive |
Choosing the right adhesive is crucial to ensure a secure and durable bond between the felt and the pool table’s surface. Make sure to read the instructions provided by the adhesive manufacturer and apply it according to the guidelines.
By having the necessary tools and materials, including a staple gun, staples, utility knife, tape measure, screwdriver, clamps, clean cloth, and the appropriate adhesive for your chosen felt material, you will be well-prepared to install felt on your pool table with ease.
Step-By-Step Guide To Felt Installation
Installing felt on a pool table is an essential step in maintaining its playing surface. With the right tools and proper technique, you can easily give your pool table a fresh and professional look. In this step-by-step guide, we will walk you through the process of preparing the pool table surface, measuring and cutting the felt, applying the adhesive, and attaching and stretching the felt. Read on to learn how to install felt on a pool table like a pro.
Preparing the Pool Table Surface for Installation
Before you start the felt installation process, it is crucial to prepare the pool table surface properly. Follow these steps to ensure a smooth and even installation:
- Clear the pool table of any balls, racks, or other accessories.
- Remove the old felt carefully by peeling it off and scraping away any remaining stubborn adhesive.
- Inspect the table surface for any damages or imperfections. Sand down any rough spots and fill in any dents or gouges with wood filler.
- Clean the table surface thoroughly to remove any dirt, dust, or debris that may hinder the adhesion of the new felt.
Measuring and Cutting the Felt
Accurate measurements and precise cutting are vital to achieving a seamless and professional-looking felt installation. Here’s what you need to do:
- Measure the dimensions of your pool table, allowing a few inches of excess on each side for wrapping the felt.
- Spread the felt on a clean and flat surface, ensuring it is free from wrinkles or creases.
- Using a straight edge and a sharp utility knife, carefully cut the felt according to your measurements.
Applying the Adhesive and Attaching the Felt
Now that you have the felt cut to size, it’s time to apply adhesive and fix it on the pool table. Follow these steps:
- Apply a thin, even layer of felt adhesive to the pool table surface, working in small sections.
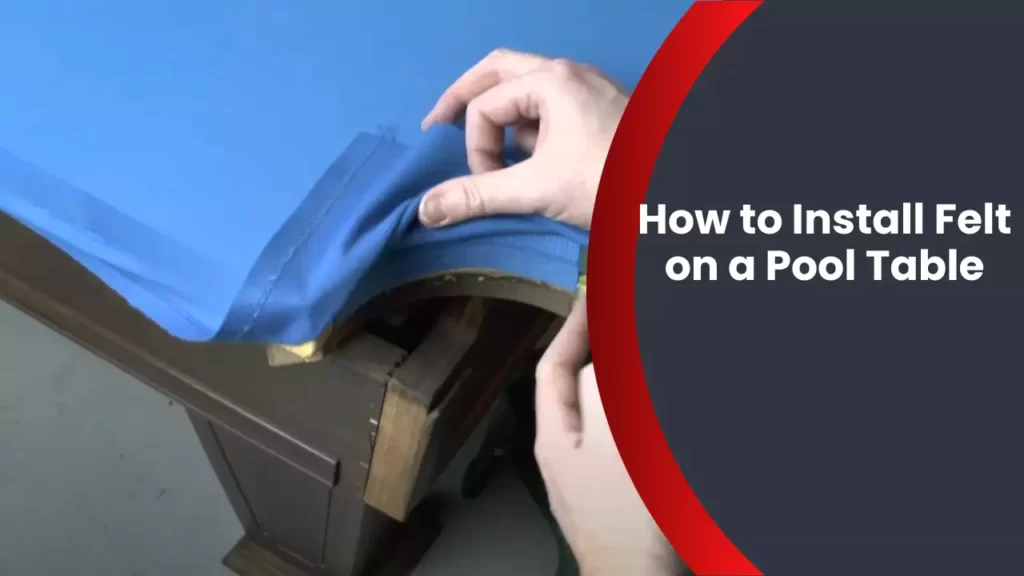
- Place the cut felt onto the pool table, starting from one end and slowly unrolling it over the adhesive, ensuring it aligns with the edges of the table.
- Smooth out the felt with your hands, eliminating any air bubbles or wrinkles as you go along.
- Repeat this process for the remaining sections of the pool table until the entire felt is securely attached.
Stretching and Smoothing the Felt
Once the felt is attached, it’s important to stretch and smooth it for a perfectly leveled playing surface. Follow these final steps:
- Starting from the center and working your way outwards, gently stretch the felt towards the corners of the table.
- Use a felt brush or a soft cloth to smooth out any wrinkles and ensure a flat playing surface.
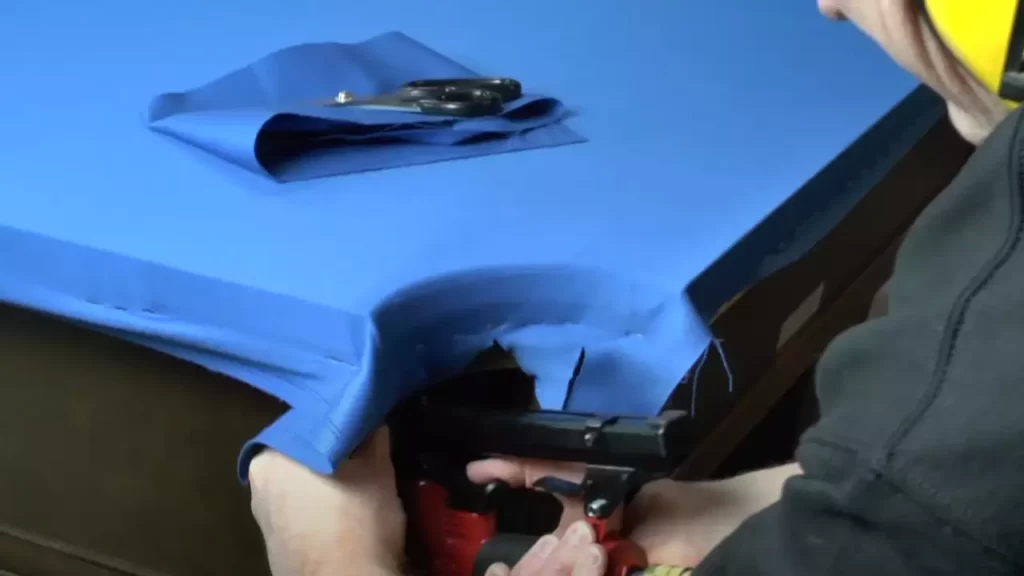
- Trim any excess felt hanging over the edges of the table using a sharp knife.
By following this step-by-step guide, you’ll be able to install felt on your pool table with ease. Remember to take your time, measure accurately, and pay attention to detail for a high-quality result. With a fresh felt surface, your pool table will not only look great but will also provide an optimal playing experience for years to come.
Tips And Tricks For A Successful Felt Installation
Common Mistakes to Avoid During the Installation Process
Installing felt on a pool table may seem like a straightforward task, but it’s important to be aware of common mistakes that can lead to a subpar result. By avoiding these errors, you can ensure a smooth and professional-looking installation.
- Neglecting to clean the slate: Before applying the felt, it’s crucial to clean the slate thoroughly. Any dust or debris left on the surface can cause bumps or imperfections in the felt.
- Rushing the cutting process: Cutting the felt to the exact dimensions of the pool table requires precision. It’s essential to measure accurately and take your time to ensure a proper fit.
- Using inadequate adhesive: Failing to use a high-quality adhesive can result in the felt coming loose over time. Invest in a reliable adhesive that is specially designed for pool table felt.
- Not stretching the felt properly: To achieve a wrinkle-free surface, it’s essential to stretch the felt evenly across the table. Neglecting this step can result in unsightly wrinkles and an uneven playing surface.
- Forgetting to secure the edges: While stretching the felt, it’s crucial to secure the edges firmly. This helps to keep the felt in place and prevents it from shifting during gameplay.
Techniques for Achieving a Smooth and Wrinkle-Free Surface
Ensuring a smooth and wrinkle-free felt surface not only enhances the appearance of your pool table, but it also improves the overall playing experience. Here are some techniques to help achieve a professional-looking installation.
- Start from the center: When stretching the felt, begin from the center and work your way outwards. This technique helps distribute tension evenly and minimizes the risk of wrinkles.
- Use a heat source: To remove any minor wrinkles or imperfections, lightly apply heat to the felt using a hairdryer. Be careful not to overheat the felt, as this can cause damage.
- Apply pressure evenly: As you stretch the felt, use firm and consistent pressure to ensure it adheres uniformly to the table. This helps eliminate any potential lumps or bumps.
- Smooth out wrinkles: If wrinkles do appear, gently pull the felt in the opposite direction to remove them. Smooth out the area until it is taut and wrinkle-free.
- Allow for proper settling: After installation, give the felt some time to settle. This allows any minor imperfections or wrinkles to naturally dissipate, resulting in a smooth playing surface.
Proper Care and Maintenance of the Felt After Installation
Once the felt is successfully installed, proper care and maintenance are essential to prolong its lifespan and keep it in excellent condition. Follow these tips to ensure your pool table felt remains in top shape:
- Regular brushing: Use a soft brush to remove chalk dust and debris from the felt’s surface. Regular brushing helps maintain a smooth and consistent playing surface.
- Avoid excessive moisture: Pool table felt is not resistant to moisture, so it’s important to keep liquids away from the playing surface. Wipe up spills immediately to prevent staining or damage.
- Protect from direct sunlight: Prolonged exposure to direct sunlight can cause the colors of the felt to fade. Consider using blinds or curtains to shield your pool table from excessive sunlight.
- Minimize friction: Avoid sliding or dragging heavy objects across the felt’s surface to prevent premature wear and tear. Always lift and move items carefully to minimize friction.
- Replace worn-out spots: Over time, spots on the felt may become worn or threadbare. It’s important to replace these spots promptly to maintain a consistent playing surface.
By following these tips and tricks, you can ensure a successful installation of felt on your pool table and enjoy a smooth, wrinkle-free playing experience for years to come!
Dealing With Bubbles And Wrinkles
When it comes to installing felt on your pool table, dealing with bubbles and wrinkles can be a frustrating task. However, with the right techniques and a little patience, you can easily fix and prevent these issues. In this section, we will discuss the causes of bubbles and wrinkles in the felt and provide you with effective methods for fixing and preventing them.
Causes of bubbles and wrinkles in the felt
Understanding the causes of bubbles and wrinkles is crucial for addressing the issue effectively. Here are some common factors that contribute to these problems:
- Improper stretching: When the felt is not stretched tightly enough during installation, it can lead to the formation of bubbles and wrinkles.
- Poor adhesive application: Insufficient or unevenly applied adhesive can prevent the felt from adhering properly to the pool table surface, causing it to bubble or wrinkle.
- Inadequate surface preparation: A dirty or uneven surface can interfere with the smooth installation of the felt, resulting in the formation of bubbles and wrinkles.
Methods for fixing and preventing these issues
Now that we understand the causes, let’s explore some effective methods for fixing and preventing bubbles and wrinkles in the felt:
- Tight stretching: Ensure that the felt is stretched tightly during the installation process. Use a staple gun or adhesive to secure the edges firmly to the table’s frame, eliminating any potential for slack.
- Proper adhesive application: Apply a sufficient amount of adhesive evenly across the pool table’s surface before laying the felt. Take care to avoid excessive adhesive which can cause wrinkles.
- Surface preparation: Before installing the felt, make sure to clean the surface thoroughly, removing any debris or dust. Additionally, check for any unevenness and fix it, ensuring a smooth and level playing surface.
Avoiding bubbles and wrinkles in your pool table felt is essential for a seamless and enjoyable playing experience. By following these methods for fixing and preventing these issues, you can achieve a professionally installed and smooth playing surface for your pool table.
Replacing Damaged Or Worn Out Felt
Signs that indicate the need for felt replacement
If you own a pool table, you may have noticed signs of wear and tear on the felt over time. The felt on a pool table is a crucial element that not only enhances the playing experience but also protects the table’s surface from scratches and damage. Over time, the felt can become frayed, faded, or even develop tears or holes. These signs indicate that it’s time to replace the old or damaged felt. In this section, we’ll explore the steps to remove and replace the felt on your pool table, ensuring you can continue to enjoy a smooth and enjoyable game.
Steps to remove and replace old or damaged felt
Replacing the felt on a pool table may seem like a daunting task, but with the right tools and a little patience, it can be easily accomplished. Follow these step-by-step instructions to remove and replace the old or damaged felt:
- Clear the playing surface: Remove all the balls, cues, and any other accessories from the pool table. It’s important to work on a clean and clutter-free surface.
- Remove the staples: Use a staple remover or a flathead screwdriver to carefully remove the staples that hold the old felt in place. Take your time and be gentle to avoid damaging the pool table.
- Detach the old felt: Once the staples are removed, you can start detaching the old felt from the pool table. Begin at one corner and slowly work your way around the table, pulling the felt gently to release it from the table’s surface.
- Inspect the pool table surface: With the old felt removed, take a moment to inspect the pool table surface for any damage or imperfections. If you notice any dents or uneven spots, address them before proceeding further.
- Secure the new felt: Lay the new felt carefully over the pool table surface, making sure it is centered and aligned correctly. Use a staple gun to secure the felt in place, starting from the center and working your way outwards. Be sure to stretch the felt tight to avoid wrinkles or sagging.
- Trim the excess felt: Once the new felt is secured, trim any excess material using a sharp utility knife. Take your time and make clean, precise cuts to achieve a professional-looking result.
- Smooth out the felt: Use a pool table brush to smooth out the newly installed felt, ensuring a uniform and even surface. Brush in one direction to remove any wrinkles or creases.
- Reassemble the accessories: Finally, reassemble the balls, cues, and any other accessories onto the pool table. Double-check that everything is properly arranged and ready for your next game.
By following these steps, you can easily remove and replace the old or damaged felt on your pool table. Not only will your pool table look refreshed and inviting, but you’ll also enjoy a smoother playing surface for years to come. Remember, taking proper care of your pool table and keeping the felt in good condition is essential for maintaining its longevity and performance.
Frequently Asked Questions About Felt Installation
In this section, we will address some of the commonly asked questions about installing felt on a pool table. Whether you’re a seasoned player or just starting out, understanding the basics of felt installation and maintenance is crucial for the longevity and performance of your pool table. So, let’s dive into these frequently asked questions!
What is the average lifespan of pool table felt?
When it comes to the lifespan of pool table felt, several factors come into play. The quality of the felt, the frequency of use, and proper maintenance all contribute to how long the felt will last. On average, good quality pool table felt can last anywhere from 3 to 5 years with regular use and proper care.
It’s important to note that as the felt ages, it may show signs of wear and tear, such as pilling or thinning in certain areas. This can affect the playability of the table and may require replacement. Regular inspection and maintenance can help extend the lifespan of your pool table felt, ensuring optimal performance and durability.
Can I install felt on a pool table by myself?
Absolutely! Installing felt on a pool table is a task that you can tackle on your own, given that you have the right tools and follow the proper steps. While it may seem daunting at first, with a bit of patience and attention to detail, you can achieve professional-looking results.
Before you begin the installation process, make sure you have all the necessary equipment, including a staple gun, scissors, a chalk line, and of course, the felt itself. It’s also helpful to have an extra pair of hands to assist you during the process.
- Start by removing the old felt carefully, making sure to avoid damaging the table surface.
- Next, clean the slate bed and rails thoroughly to ensure a smooth surface for the new felt.
- Roll out the new felt and align it with the table, leaving excess material on each side to be trimmed later.
- Using a staple gun, secure the felt to the slate bed, starting from the center and working your way outwards. Make sure to stretch the felt tightly to avoid wrinkles or sagging.
- Trim off the excess felt, leaving a neat and clean edge along the edges of the table.
- Finally, use a chalk line to mark the position of the rail cushions and staple the felt securely to the table rails.
By following these steps carefully, you’ll be able to install felt on your pool table like a pro.
How often should I clean and maintain the felt?
Maintaining and cleaning the felt is an essential part of keeping your pool table in top condition. Regular maintenance not only prolongs the lifespan of the felt but also ensures optimal playing conditions.
It’s recommended to brush the felt regularly using a soft-bristled brush to remove any dust, chalk particles, or debris that may have accumulated on the surface. This helps to maintain the smooth and consistent playability of the table.
In addition to regular brushing, it’s a good idea to spot clean any spills or stains that may occur during gameplay. Using a damp cloth and a mild, non-abrasive cleaner, gently blot the affected area, being careful not to saturate the felt. Once clean, allow the area to air dry completely.
While general cleaning should be done on a regular basis, deep cleaning of the felt should be done once or twice a year, depending on usage. Deep cleaning involves vacuuming the felt with a handheld vacuum or a vacuum cleaner set to a low suction setting.
By implementing these cleaning and maintenance practices, you can ensure that your pool table felt remains in excellent condition for years to come.
Frequently Asked Questions
How Do You Attach Felt To A Pool Table?
To attach felt to a pool table, follow these steps: 1. Clean the table’s surface thoroughly. 2. Apply adhesive to the edges of the table. 3. Start in the center and smooth the felt over the surface, ensuring no wrinkles.
4. Trim excess felt and fold it under the table’s edges. 5. Allow the adhesive to dry before playing on the table.
Can You Refelt A Pool Table Yourself?
Yes, you can refelt a pool table yourself. It is a DIY task that requires some time and patience.
Which Side Of Felt Goes Up On Pool Table?
The smooth side of the felt should face up on a pool table.
What Kind Of Glue To Use On Pool Table Felt?
Use a high-quality adhesive specifically designed for pool table felt. Apply it carefully to ensure proper adhesion and smooth playing surface. Follow the manufacturer’s instructions for best results.
Conclusion
Installing felt on a pool table is a straightforward process that can greatly enhance your playing experience. By following the step-by-step instructions outlined in this guide, you’ll be able to transform your table into a smooth and professional playing surface.
Remember to choose high-quality felt and take your time during the installation to ensure a perfect result. With a newly installed felt, you’ll be ready to enjoy countless hours of gameplay and impress your friends with your stylish and well-maintained pool table.