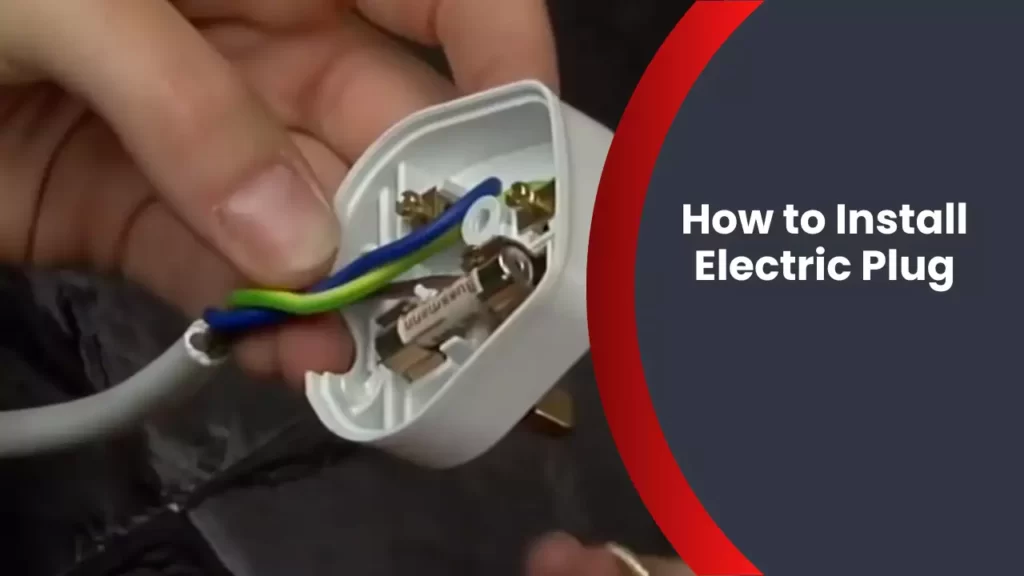
To install an electric plug, first turn off the power supply, then remove the cover plate and the mounting screws. Next, connect the wires to the appropriate terminals, making sure to match the colors correctly.
Finally, screw the outlet into the electrical box and replace the cover plate. Once completed, turn the power back on and test the plug for functionality. Installing an electric plug may seem daunting, but with a little guidance, it can be a simple task.
Whether you’re replacing an old plug or adding a new one, this article will explain the step-by-step process in clear and concise terms. By following these instructions, you can ensure a safe and successful installation. So, let’s get started and learn how to install an electric plug without any hassle.
Understanding The Basics Of Electric Plugs
Electric plugs are a crucial element in our daily lives, allowing us to conveniently power up various devices and appliances. It’s important to have a good understanding of the basics of electric plugs to ensure their proper installation and use. In this section, we’ll delve into what an electric plug is, its components, the importance of proper plug installation for safety, and the various types of electric plugs and their uses.
What is an Electric Plug and its Components?
An electric plug, also known as a power plug or mains plug, is the interface between an electrical appliance and the main power supply. It consists of several key components:
- Prongs: These are the metal pins that connect to the conductors in the power socket.
- Socket Holes: These are the openings in the power socket where the prongs are inserted.
- Insulation: The body of the plug is made of an insulating material to prevent electrical shock.
- Grounding: Some plugs also have a grounding prong for extra safety.
- Wiring: The plug contains internal wiring that connects the prongs to the device’s power supply.
Importance of Proper Plug Installation for Safety
Proper plug installation is vital to ensure the safety of both the user and the electrical system. Incorrect installation can lead to various hazards, including electric shocks, fires, and damage to connected devices. It’s essential to follow the correct installation procedures to minimize these risks. By installing plugs correctly, you can protect yourself and your property from potential electrical accidents.
The Different Types of Electric Plugs and Their Uses
Electric plugs come in various types, each designed for specific purposes and geographic locations. Here are some common types:
| Type | Description | Uses |
|---|---|---|
| Type A | Two flat parallel pins | Commonly used in North America, Central America, and parts of South America, Japan, and China. |
| Type B | Two flat parallel pins and a grounding pin | Similar to type A, but with an additional grounding pin. Widely used in North America. |
| Type C | Two round pins | Commonly used in Europe, South America, Asia, and Africa. |
| Type D | Three round pins in a triangular configuration | Used in India, Sri Lanka, Nepal, and other Central Asian countries. |
These are just a few examples, and there are many more plug types worldwide. It’s important to understand the specific plug requirements for your region and the devices you intend to connect.
Now that we’ve covered the basics of electric plugs, their components, the importance of proper installation for safety, and the different types of plugs and their uses, we’re ready to dive into the How to Install Electric Plug Guide in the next section. This guide will provide step-by-step instructions on installing electric plugs correctly to ensure safe and efficient electrical connections.
Checking Safety Precautions And Gather Tools
Before diving into the installation process of an electric plug, it is crucial to prioritize safety and take necessary precautions. Mishandling electrical installations can lead to serious accidents or damage to property. In this section, we will discuss the importance of turning off the power supply before installation, the necessary safety equipment to handle electrical installations, and the tools required for installing an electric plug.
Importance of turning off the power supply before installation
When it comes to electrical installations, safety should always be the number one priority. One of the most critical safety precautions before installing an electric plug is to turn off the power supply. This step prevents the risk of electrical shock by eliminating the flow of electricity.
Turning off the power supply is vital to:
- Avoid accidental electric shock during installation.
- Prevent damage to the electrical circuit or the plug itself.
- Ensure a safe working environment for the installer.
Necessary safety equipment for handling electrical installations
In addition to turning off the power supply, it is essential to utilize the right safety equipment for handling electrical installations. This equipment provides an extra layer of protection and minimizes the risk of accidents. Here are some suggested safety equipment items:
- Safety gloves: Insulated gloves protect the installer from electric shock and provide a barrier between their hands and live wires.
- Safety goggles: Goggles shield the eyes from potential sparks or debris that may occur during the installation process.
- Protective clothing: Wearing non-conductive clothing, such as a long-sleeved shirt and non-metallic shoes, reduces the chances of accidental electrical contact.
Tools needed for installing an electric plug
To successfully install an electric plug, gather the following tools:
| Tool | Description |
|---|---|
| Screwdriver | A flat-head or Phillips screwdriver is necessary for securing the wires and tightening the plug. |
| Wire strippers | These tools allow you to remove the outer covering of wires, exposing the bare copper wires for connection. |
| Pliers | Utilize pliers to twist and secure wires, ensuring a tight and secure connection. |
| Tester or multimeter | A tester or multimeter is used to check if the power supply is indeed turned off before starting the installation process. |
| Tape measure | Measuring the length of wires and determining the appropriate size of the plug box can be easily done with a tape measure. |
| Wire connectors | Wire connectors are required to secure the connections between wires, providing a reliable and long-lasting electrical connection. |
By gathering the necessary tools and understanding the safety precautions, you are now prepared to take the next steps in installing an electric plug. Remember, safety should never be compromised, and the use of appropriate equipment enhances the overall safety of the installation process.
Step-By-Step Guide To Installing An Electric Plug
If you’re looking to install an electric plug, it’s essential to follow a step-by-step guide to ensure a safe and successful installation. In this guide, we’ll walk you through the process, from identifying the circuit and turning off the power supply to replacing the outlet cover and ensuring a snug fit. Following these steps will help you complete the installation with ease. Let’s get started!
Step 1: Identifying the circuit and turning off the power supply
The first step in installing an electric plug is to identify the circuit that supplies power to the outlet and turn off the power supply. This is crucial for your safety and the integrity of the installation. Locate the circuit breaker panel and identify the breaker that controls the outlet. Flip the switch to the “off” position and use a non-contact voltage tester to confirm that the power is indeed off. Safety should always come first in any electrical project.
Step 2: Removing the existing outlet cover and screws
Once the power is turned off, it’s time to remove the existing outlet cover and screws. Use a screwdriver to unscrew the plate cover, keeping the screws in a safe place. Gently pry the cover away from the wall, revealing the electrical outlet underneath. Take care not to damage any wires or surrounding wall surfaces in the process.
Step 3: Disconnecting the old wiring from the outlet
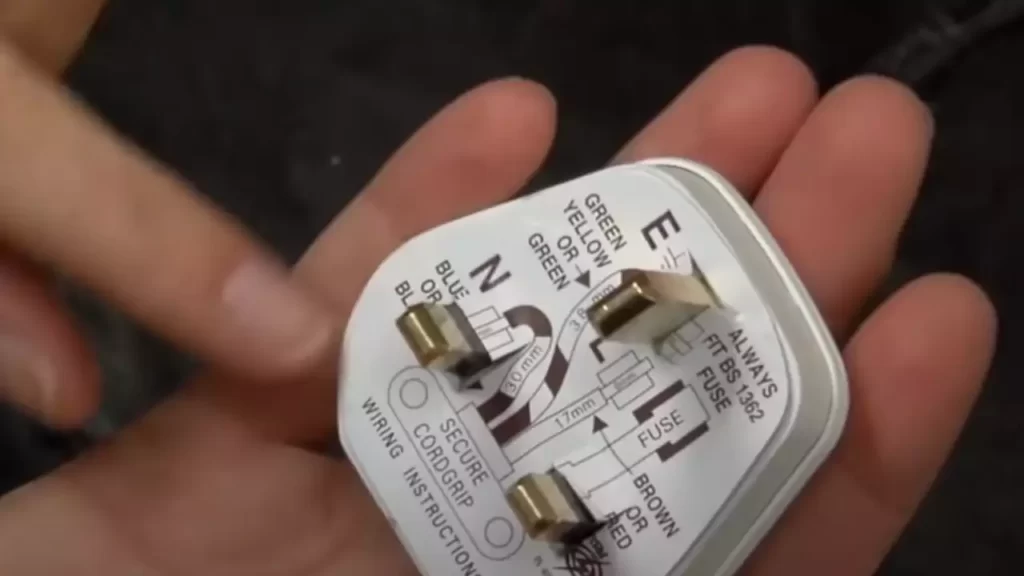
Before installing the new electric plug, you’ll need to disconnect the old wiring from the outlet. Identify the three wires attached to the outlet: black (hot), white (neutral), and green or copper (ground). Loosen the terminal screws connecting the wires to the outlet and carefully remove them. Keep the wires separated and avoid any contact between the exposed ends and other surfaces.
Step 4: Preparing the new electric plug for installation
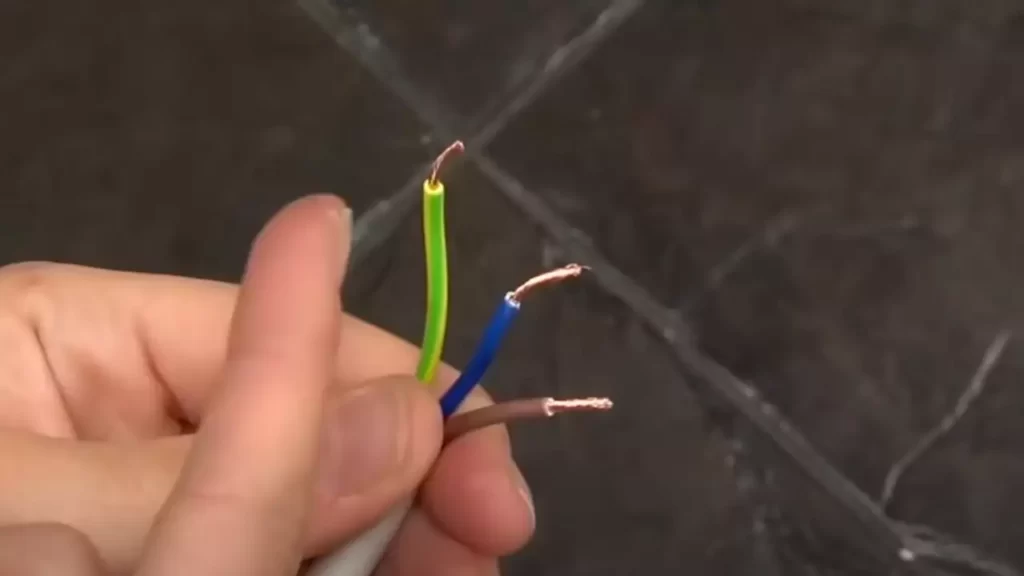
With the old wiring disconnected, it’s time to prepare the new electric plug for installation. Check if the new plug matches the voltage and amperage requirements of the circuit. Strip about 1/2 inch of insulation from the ends of the wires, exposing the copper conductors. If necessary, trim any excess wire length to ensure a clean and manageable connection.
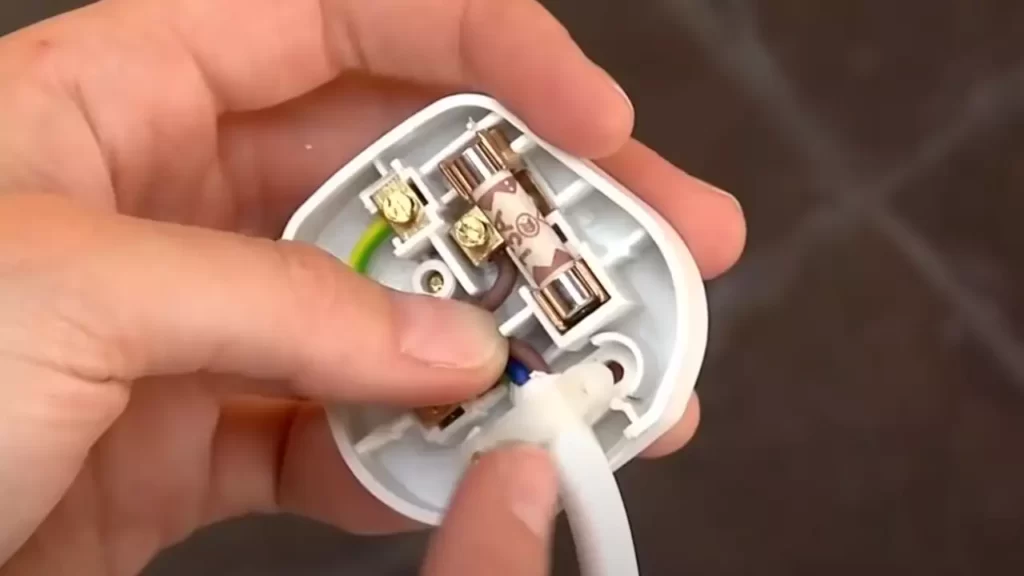
Step 5: Connecting the new plug to the wiring
Now that you have prepared the plug and wires, it’s time to connect them. Identify the terminal screws on the new plug, usually labeled for easy identification. Wrap the exposed end of the black wire around the brass (or dark-colored) terminal screw and tighten it securely. Repeat this process for the white wire, connecting it to the silver (or light-colored) terminal screw. Finally, connect the ground wire to the green (or grounding) terminal screw.
Step 6: Securing the plug in place and tightening the screws
With the wiring connected, it’s essential to secure the new plug in place. Fold the connected wires neatly into the electrical box, and carefully line up the plug with the screw holes on the box. Insert the screws provided with the plug into the holes and tighten them using a screwdriver. Make sure the plug sits flush against the wall, ensuring a solid and secure installation.
Step 7: Replacing the outlet cover and ensuring a snug fit
The final step in installing the electric plug is to replace the outlet cover and ensure a snug fit. Line up the cover with the holes on the plug and insert the screws through the cover and into the plug. Tighten the screws until the cover is securely fastened, but be careful not to overtighten and crack the cover. Give the entire installation a final inspection to ensure everything is in place and properly aligned.
Congratulations! You have successfully installed an electric plug. Remember, if you’re unsure or uncomfortable with any part of the installation process, it’s always best to consult a professional electrician for assistance.
Troubleshooting And Common Issues With Plug Installation
Installing an electric plug may seem like a simple task, but various issues can arise during the installation process. Being aware of these common problems and knowing how to troubleshoot them can save you time, money, and ensure the safety of your electrical system. In this section, we will explore the most common issues that may occur during plug installation and provide helpful tips to overcome them.
Identifying common problems during installation
When it comes to installing an electric plug, certain problems can occur that may hinder the process or pose a risk to your electrical system. By identifying these common issues, you can address them effectively. Some problems you may come across include:
- Loose connections
- Faulty wiring
- Inadequate grounding
- Power supply issues
Dealing with loose connections and faulty wiring
A common problem encountered during plug installation is loose connections, which can lead to an unreliable connection and potential electrical hazards. Loose wires can become a safety concern and may even cause shorts or electrical fires. To deal with loose connections and faulty wiring, follow these steps:
- Ensure the power is OFF before working on any wiring.
- Carefully inspect the wiring connections for any signs of damage or looseness.
- If you find loose wires, use a wire stripper to remove the insulation, twist the strands together tightly, and secure them properly within the plug terminal.
- If the wires are damaged, it’s crucial to replace them with the correct gauge and type of wire for your plug.
- Once the connections are secure, double-check them to ensure they are tight.
Understanding the importance of proper grounding
Proper grounding is vital for electrical safety. Without it, there is a risk of electrical shock or damage to appliances. To ensure proper grounding during plug installation:
- Identify the ground wire, usually green or bare copper, and attach it securely to the grounding terminal of the plug.
- Confirm that the grounding wire is free from any damages or breaks.
- Double-check that the grounding connection is tight and secure.
Troubleshooting issues with power supply after installation
After successfully installing the electric plug, you may encounter power supply issues. The most common problem is the plug not receiving electricity. To troubleshoot this problem:
- Check the circuit breaker or fuse box to ensure the circuit is properly connected.
- If the circuit is functioning correctly, inspect the plug for loose connections or faulty wiring that may have occurred during installation.
- Verify the power supply to the area or room where the plug is installed.
- If the problem persists, it may be necessary to consult a qualified electrician to assess and resolve the issue.
Tips for avoiding common mistakes during installation
To ensure a successful plug installation and avoid common mistakes, follow these tips:
- Read and follow the manufacturer’s instructions carefully.
- Invest in quality plugs and wiring materials.
- Use the appropriate tools for the installation.
- Double-check the polarity before connecting the wires.
- Test the plug after installation to ensure it is functioning correctly.
By being aware of these common issues and following the troubleshooting steps provided, you can navigate the installation process with confidence and maintain a safe electrical system. Remember, if you ever feel unsure or overwhelmed, consult a professional electrician for assistance.
Final Checks And Safety Measures
After successfully installing an electric plug, it is crucial to perform final checks and safety measures to ensure proper functionality and prevent potential electrical hazards. These steps include ensuring proper grounding for the electric plug, testing it for functionality and safety, following maintenance tips, and consulting a professional electrician if there is any uncertainty regarding the installation process.
Ensuring proper grounding for the electric plug
One of the most critical aspects of installing an electric plug is ensuring proper grounding. Poor grounding can lead to electrical shocks, damage to electrical equipment, and even fires. To provide a safe grounding connection, the following steps should be followed:
- Identify the grounding wire: In a standard electric plug, the grounding wire is typically the green or bare copper wire.
- Connect the grounding wire: Attach the grounding wire securely to the designated grounding terminal on the plug or the outlet.
- Check for continuity: Use a continuity tester to ensure a continuous path between the grounding wire and the ground.
By adhering to these steps, you can help eliminate the risk of electrical accidents related to poor grounding.
Testing the plug for functionality and safety
Once the electric plug is installed and grounded, it is important to test it for functionality and safety. This ensures that the plug is working correctly and minimizes the risk of electrical hazards. Following are a few tests:
| Test | Description |
| Visual inspection | Check for any visual damages, loose connections, or exposed wires. |
| Outlet polarity test | Use a multimeter or outlet tester to confirm that the hot, neutral, and ground wires are connected correctly. |
| Continuity test | Ensure that the continuity is maintained throughout the plug, including the terminals and wires. |
| GFCI test (if applicable) | If the plug is near water sources, test the Ground Fault Circuit Interrupter (GFCI) functionality to ensure it trips correctly. |
By performing these tests, you can have peace of mind knowing that the plug is not only functional but also safe for everyday use.
Tips for maintaining the plug and preventing electrical hazards
To prolong the lifespan of the electric plug and minimize the risk of electrical hazards, it is essential to follow these maintenance tips:
- Regularly inspect the plug for damages, such as frayed wires or loose connections.
- Keep the plug and surrounding area clean and free from dust, debris, or moisture.
- Avoid overloading the plug by connecting too many devices, as this can cause overheating and potential fire hazards.
- Never force a plug into an outlet or use a damaged plug.
- Ensure that children and pets are kept away from electrical outlets to prevent accidents.
- If you notice any signs of malfunction or unusual behavior, such as flickering lights or buzzing sounds, disconnect the plug and consult a professional electrician.
By following these maintenance tips, you can extend the life of the plug and reduce the risk of electrical accidents.
Importance of consulting a professional electrician if unsure
While installing an electric plug may seem straightforward, it is essential to remember that electrical work can be dangerous if not done correctly. If you are uncertain or lack experience in electrical installations, it is highly recommended to consult a professional electrician. They have the knowledge, skills, and expertise to ensure proper installation, identify potential hazards, and resolve any issues that may arise during the process. Prioritizing safety should always be the number one concern when dealing with electrical installations.
Frequently Asked Questions
How Do You Install An Outlet Plug?
To install an outlet plug, follow these steps: 1. Turn off power to the outlet at the circuit breaker. 2. Remove the existing outlet cover plate using a screwdriver. 3. Unscrew the outlet from the electrical box. 4. Connect the wires to the corresponding terminals on the new outlet.
5. Secure the outlet to the electrical box and attach the cover plate. Remember to follow safety precautions and consult a professional if needed.
Can I Install An Electrical Outlet Myself?
No, it is not recommended to install an electrical outlet yourself. It is a task best left to professional electricians to ensure safety and compliance with local regulations. Hiring a licensed electrician will ensure proper installation and reduce the risk of electrical hazards.
How Do You Add A Plug To An Electrical Wire?
To add a plug to an electrical wire, simply follow these steps: 1. Cut the wire to the desired length. 2. Strip about an inch of the wire insulation using wire strippers. 3. Loosen the screws on the plug, then insert the exposed wire ends into the respective terminal slots.
4. Tighten the screws securely. 5. Ensure the plug is correctly polarized before plugging it into an outlet.
Does It Matter Which Wire Goes Where On An Outlet?
It is important to connect wires correctly on an outlet. Incorrect wiring can cause electrical hazards. To ensure safety, consult an electrician or follow electrical codes.
Conclusion
To wrap up, installing an electric plug is a simple yet essential task that anyone can accomplish with the right knowledge. By following the step-by-step instructions we provided, you can safely and efficiently complete the installation process. Remember to prioritize safety, double-check your work, and consult a professional if you encounter any difficulties.
With this newfound skill, you can confidently handle future electrical projects and save money on hiring a professional. Happy DIY-ing!