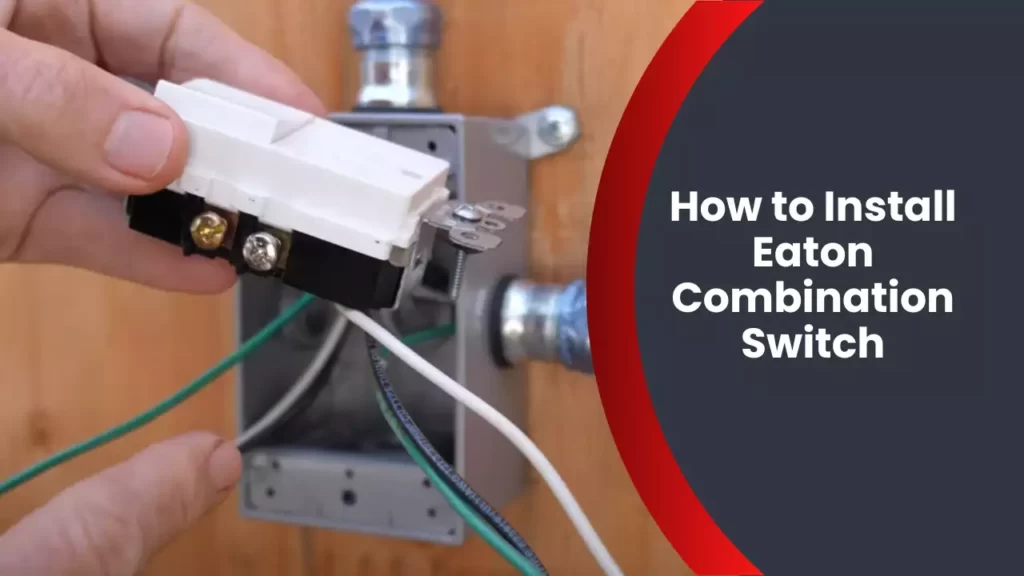
To install an Eaton combination switch, turn off the power, remove the existing switch, connect the wires to the new switch according to the instructions, and secure the switch in place. The Eaton combination switch allows you to control both a light and a fan from a single switch, providing convenience and functionality.
By following these simple steps, you can easily install an Eaton combination switch and enjoy its benefits in your home.
What Is An Eaton Combination Switch?
Brief overview of Eaton Combination Switch
An Eaton Combination Switch is a versatile electrical device that combines the functions of a switch and a receptacle in a single unit. It allows you to control electrical power to a circuit while also providing an outlet for plugging in various devices. The switch component allows you to turn the power on or off, while the receptacle component is used for connecting electrical devices such as lamps, appliances, or other electrical equipment.
Its importance in electrical systems
Eaton Combination Switches play a crucial role in electrical systems due to their ability to perform two functions in one compact unit. These switches are commonly used in residential, commercial, and industrial applications. They are especially valuable in situations where it is necessary to control power to a specific circuit while simultaneously providing a convenient outlet for connecting devices.
By using an Eaton Combination Switch, you can avoid the hassle of installing separate switches and outlets, saving time and effort during installation. These switches are designed to meet various electrical code requirements, ensuring safety and compliance in your electrical system.
Benefits of using Eaton Combination Switch
There are several benefits to using Eaton Combination Switches in your electrical system:
- Convenience: The combination of a switch and a receptacle in one unit provides the convenience of controlling power and connecting devices in a single location.
- Cost-effective: By eliminating the need for separate switches and outlets, Eaton Combination Switches help reduce the overall cost of your electrical installation.
- Space-saving: These switches are compact and take up less wall space compared to separate switches and outlets that would require additional wiring.
- Easy installation: Eaton Combination Switches are designed for easy installation, making them suitable for both DIY enthusiasts and professional electricians.
- Flexibility: These switches are available in various configurations, including single-pole, three-way, and combination devices, allowing for flexibility in meeting your specific electrical requirements.
With an Eaton Combination Switch, you can simplify your electrical system while enjoying the convenience and versatility it offers. Whether you are upgrading your home’s electrical system or working on a commercial project, Eaton Combination Switches are a reliable choice for efficient power control and device connectivity.
Tools And Materials Needed
Before you begin installing the Eaton Combination Switch, it is essential to have the right tools and materials on hand. This will ensure a smooth and successful installation process. In this section, we will outline the various tools required, the types and sizes of wires necessary, and the recommended safety equipment.
List of tools required for installation
Here is a comprehensive list of tools you will need to complete the installation:
- Phillips screwdriver
- Flat-head screwdriver
- Wire stripper
- Needle-nose pliers
- Wire connectors
- Electrical tape
- Wire cutter
Types and sizes of wires necessary
When it comes to wiring, it is crucial to use the correct types and sizes to ensure safety and optimal performance. Here are the necessary wires:
| Type | Size |
|---|---|
| Black wire (hot) | 12-gauge |
| White wire (neutral) | 12-gauge |
| Green or bare wire (ground) | 12-gauge |
Recommended safety equipment
Prioritizing safety is essential during any electrical installation. It is recommended to have the following safety equipment:
- Safety glasses
- Insulated gloves
- Non-contact voltage tester
- Work gloves
- Ear protection
- Step ladder
By having the necessary tools and materials, as well as prioritizing safety with the recommended equipment, you can proceed confidently with the installation of your Eaton Combination Switch.
Preparing For The Installation
Before you begin installing your Eaton Combination Switch, it is important to take the necessary steps to ensure a safe and successful installation process. This includes turning off the power supply, identifying the location for the switch, and inspecting the existing wiring.
Turning off the power supply
First and foremost, always prioritize safety when working with electrical installations. To start the installation process, you need to turn off the power supply to the area where the switch will be installed. This will help prevent any electrical accidents or injury during the installation process. To turn off the power, follow these simple steps:
- Locate the circuit breaker box in your home.
- Open the circuit breaker box.
- Find the circuit breaker that controls the power supply to the area where the switch will be installed.
- Switch the circuit breaker to the “off” position.
- Once the power is off, you can proceed with the installation process safely.
Identifying the location for the switch
After turning off the power supply, the next step is to identify the location where you will be installing the Eaton Combination Switch. The switch should be conveniently located for easy access and functionality. Consider the following factors when determining the location:
- Ensure the switch is easily reachable and visible.
- Choose a location near the existing wiring where the switch will control the desired lights or appliances.
- Make sure there is enough space on the wall for the switch and that it is at a suitable height for convenient operation.
Take your time to carefully select the best location for your switch, as this will affect its overall usability and functionality.
Inspecting the existing wiring
Before proceeding with the installation, it is crucial to inspect the existing wiring to ensure it is compatible with the Eaton Combination Switch. Inspecting the wiring will help you identify any potential issues that may arise during the installation process. Follow these steps to inspect the wiring:
- Ensure the existing wiring is in good condition and free from any damage.
- Check that the wiring is properly grounded and meets the necessary electrical standards.
- Take note of the wire colors and their corresponding functions.
- If you notice any faulty or damaged wiring, it is recommended to consult a professional electrician to address the issue before proceeding with the installation.
By thoroughly inspecting the existing wiring, you can ensure a smooth and problem-free installation process for your Eaton Combination Switch.
Step 1: Removing The Old Switch
Before installing a new Eaton combination switch, you need to remove the old switch from the electrical circuit. This process ensures a safe and effective installation. Here’s a step-by-step guide on how to remove the old switch:
Turning off the circuit breaker
The first thing you need to do is turn off the circuit breaker that supplies power to the switch. This will prevent any accidental electrical shock while working on the installation. Locate the circuit breaker panel or fuse box in your home and find the switch that corresponds to the circuit connected to the old switch. Flip the circuit breaker switch to the “Off” position.
Removing the switch cover plate
Once the power is off, you can proceed to remove the switch cover plate. The cover plate is typically held in place by a few screws. Use a screwdriver to carefully unscrew and remove the screws. Set the screws aside in a safe place, as you will need them later for the new switch installation. After removing the screws, gently pull the switch cover plate away from the wall to expose the switch and wires.
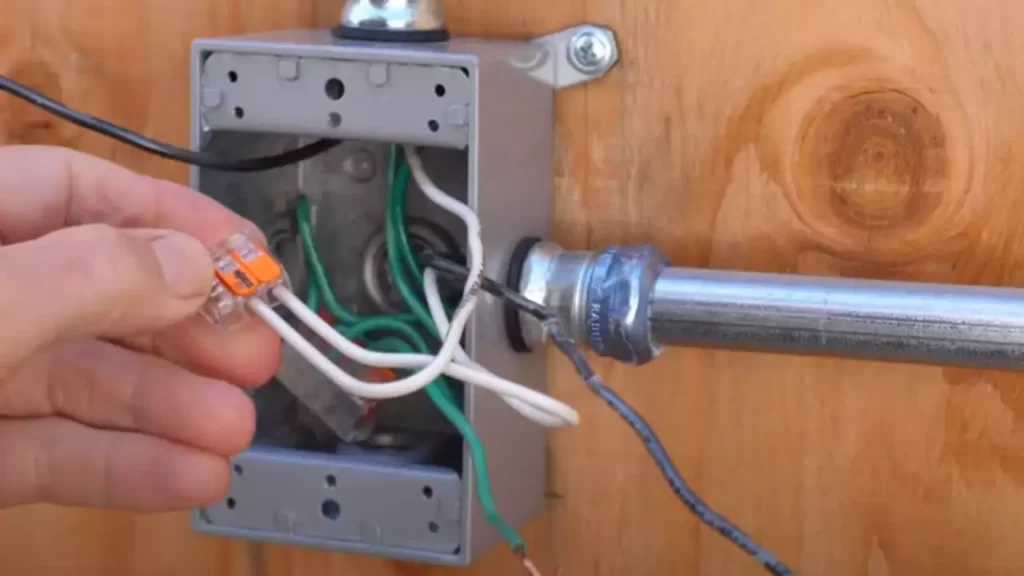
Disconnecting the wires from the old switch
Now it’s time to disconnect the wires from the old switch. Take note of the wire colors and their respective connections. Loosen the terminal screws on the old switch to release the wires. Depending on the switch type, you may need to use a screwdriver or pliers to loosen the screws. Carefully detach each wire from its corresponding terminal, ensuring that they do not touch each other or any metal surfaces.
Important: Do not proceed to the next step until you have disconnected all the wires from the old switch.
Once you’ve successfully removed the old switch, you are now ready to install the new Eaton combination switch. Stay tuned for the next step in our installation guide!
Step 2: Wiring The Eaton Combination Switch
Once you have familiarized yourself with the Eaton Combination Switch and its components, it’s time to move on to the next step: wiring the switch. This step is crucial as it involves connecting the necessary wires to the switch and ensuring a proper and secure connection. In this section, we will guide you through the process, from familiarizing yourself with the switch’s terminals and screws to properly tightening the screws for a safe and effective installation.
Familiarizing with the switch’s terminals and screws
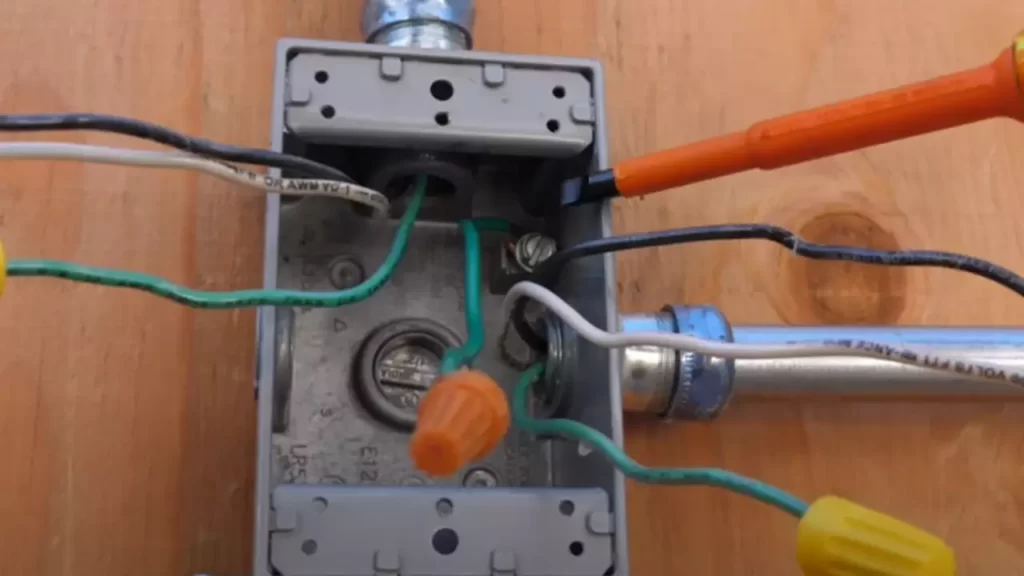
Before you start wiring the Eaton Combination Switch, take a moment to understand the switch’s terminals and screws. The switch typically comes with three screws labeled as Line, Load, and Ground. The Line screw is where the power supply wire is connected, while the Load screw connects to the wire leading to the desired outlet or fixture. The Ground screw is where the grounding wire should be connected to ensure electrical safety. Familiarizing yourself with these terminals will help you wire the switch accurately and minimize the risk of mistakes.
Connecting the wires to the switch
Now that you are familiar with the switch’s terminals and screws, it’s time to connect the wires. Start by turning off the power supply to the switch to ensure your safety. Use wire strippers to remove the insulation from the wires, exposing the bare copper. Once the wires are prepared, connect the Line wire to the Line screw and the Load wire to the Load screw. Make sure to tighten the screws securely to create a solid connection. Finally, connect the grounding wire to the Ground screw, ensuring it is tightly secured. Properly connecting the wires is essential for the switch to function effectively and prevent any electrical hazards.
Properly tightening the screws
To complete the wiring process, it is crucial to properly tighten the screws on the Eaton Combination Switch. Loose screws can result in poor electrical connections or even short circuits. Use a screwdriver to tighten each screw firmly but be cautious not to overtighten and risk damaging the switch. A properly tightened screw will ensure a secure connection, minimizing the chances of any electrical issues. Double-check each screw to ensure they are tightened adequately before proceeding to the next step of the installation process.
In conclusion, wiring the Eaton Combination Switch requires you to familiarize yourself with its terminals and screws, connect the wires accurately, and properly tighten the screws for a safe and efficient installation. By following these steps, you can ensure the switch is correctly wired, minimizing the risk of electrical issues and ensuring a reliable electrical system in your home or workspace. So, let’s move on to step three and continue with the installation process.
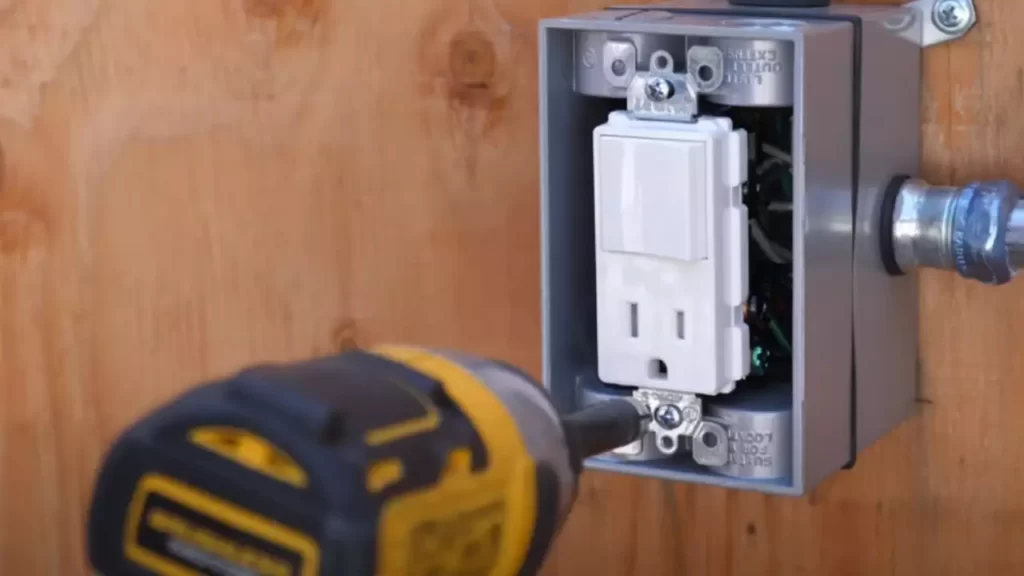
Step 3: Mounting The Eaton Combination Switch
In this step, we will guide you on how to properly mount the Eaton Combination Switch to ensure it is securely installed and ready to use. Mounting the switch is an essential part of the installation process, as it determines the stability and functionality of the switch.
Choosing the appropriate mounting method
When it comes to mounting the Eaton Combination Switch, you have two options: surface mount or flush mount. The mounting method you choose depends on your specific needs and preferences.
If you prefer a sleek and seamless look, flush mounting is the way to go. This method involves recessing the switch into the wall, creating a seamless integration with the electrical box. On the other hand, if you prefer simplicity and ease of installation, surface mounting is a great option. This method involves attaching the switch directly onto the surface of the electrical box, without any recessing required.
Aligning the switch with the electrical box
Once you have chosen the appropriate mounting method, it is important to align the Eaton Combination Switch with the electrical box before attaching it. Alignment ensures that the switch fits perfectly and functionally integrates with the box. To align the switch correctly, follow these steps:
- Ensure that the electrical box is level and securely installed.
- Hold the switch against the electrical box, making sure the screw holes on the switch align with the holes on the box.
- Use a level to double-check the alignment and adjust if necessary.
Attaching the switch to the electrical box securely
Once the switch is properly aligned with the electrical box, it’s time to attach it securely. Attaching the switch ensures that it stays in place and functions properly without any loose or wobbly parts. Follow these steps to securely attach the Eaton Combination Switch:
- Using appropriate screws and a screwdriver, insert the screws through the screw holes on the switch and into the pre-drilled holes on the electrical box. Make sure to tighten the screws firmly but not excessively to avoid damaging the switch or the electrical box.
- Once all the screws are tightened, gently wiggle the switch to check for any looseness. If the switch feels wobbly, tighten the screws further until the switch is firmly secured to the electrical box.
- Finally, visually inspect the switch to ensure it is flush against the wall and aligned with adjacent switches or outlets, if any.
By following these mounting guidelines, you can easily and securely mount the Eaton Combination Switch, ensuring a seamless installation and reliable functioning. Now that you have successfully completed this step, you are one step closer to enjoying the convenience and control offered by your new Eaton Combination Switch.
Step 4: Testing The Installation
Congratulations on successfully installing the Eaton Combination Switch! Now, it’s time to test the installation to ensure everything is working as it should. By following these simple steps, you can verify the functionality of the switch and check its compatibility with other devices.
Turning on the power supply
To begin the testing process, switch on the power supply by turning the main circuit breaker back on. Make sure you handle electrical components with caution and wear appropriate safety gear throughout the testing phase.
Checking if the switch is functioning correctly
To confirm the Eaton Combination Switch is operating properly, you need to evaluate its functionality. Follow these steps:
- Turn the switch to the ‘On’ position and check if the corresponding lights or appliances connected to the switch turn on. For example, if the switch is connected to a lighting fixture, ensure the lights illuminate.
- Next, turn the switch to the ‘Off’ position and verify that the lights or appliances connected to it also turn off. This step ensures that the switch is appropriately controlling the power supply.
- If you have dimmer functionality on your Eaton Combination Switch, adjust the dimmer level to different settings and confirm that the lights respond accordingly. This allows you to ensure the switch’s dimming feature is working flawlessly.
By carefully conducting these tests, you can be confident that the Eaton Combination Switch is functioning correctly.
Verifying the switch’s compatibility with other devices
You may have multiple devices connected to the Eaton Combination Switch, such as lamps, ceiling fans, or kitchen appliances. It’s crucial to verify that the switch is compatible with all these devices to avoid any compatibility issues. Follow these steps:
- Test each device individually by turning them on and off using the switch. Make sure the devices respond promptly and function as desired.
- If you encounter any issues with a specific device, refer to the device’s user manual or contact the manufacturer for troubleshooting guidance.
- Ensure that the switch’s capacity aligns with the power requirements of the connected devices. Exceeding the switch’s maximum capacity can lead to performance issues or even damage the devices.
By verifying the compatibility of the Eaton Combination Switch with your connected devices, you can prevent any potential problems and enjoy seamless operation.
Take the time to thoroughly test your Eaton Combination Switch installation. This ensures that it functions correctly, operates your connected devices properly, and provides you with a safe and efficient electrical system.
Troubleshooting Tips
Potential issues during installation
During the installation of an Eaton Combination Switch, you may encounter a few potential issues. It’s essential to troubleshoot these problems to ensure your installation goes smoothly. Some common issues to watch out for include:
- Improper wiring connections
- Incorrect switch configuration
- Interference or disruptions in power supply
- Faulty or damaged components
Solutions to common problems
To address the potential issues mentioned earlier, here are some solutions you can try:
- Double-check all wiring connections to ensure they are properly secured and matched according to the manufacturer’s instructions. This helps prevent any loose connections that may cause electrical hazards or malfunctions.
- Verify the switch configuration by carefully following the installation manual. Make sure the switch is set correctly for your intended use, whether it is a single-pole, double-pole, or three-way configuration.
- Inspect the power supply for any disruptions or interference. Ensure that the power source is stable and free from any electrical disturbances that may affect the performance of the switch.
- If you suspect any faulty or damaged components, contact the manufacturer for replacements or troubleshooting guidance. It is important not to install a switch with compromised components, as it may compromise safety and functionality.
Remember, if you are unsure about any aspect of the installation process or encounter persistent issues even after troubleshooting, it is advisable to seek professional help. Professional electricians or technicians have the expertise to diagnose the problem accurately and address it effectively, ensuring a safe and successful installation.
By following these troubleshooting tips and seeking professional help when necessary, you can overcome any installation challenges that may arise when installing an Eaton Combination Switch.
Additional Considerations And Safety Precautions
When it comes to installing the Eaton Combination Switch, there are some important additional considerations and safety precautions that you should keep in mind. Ensuring compliance with local electrical codes, properly grounding the switch, and regular maintenance and inspections are all key factors to consider to ensure the safety and efficiency of your installation. In this section, we will discuss each of these considerations in detail.
Ensuring compliance with local electrical codes
Before beginning the installation process, it is crucial to familiarize yourself with the local electrical codes that apply to your area. These codes are in place to ensure the safety of the electrical system and those using it. Reading and understanding the codes relevant to your installation will help you adhere to proper practices and avoid any potential hazards that may arise from non-compliance.
Properly grounding the Eaton Combination Switch
Proper grounding is essential for the safe operation of any electrical device, and the Eaton Combination Switch is no exception. Grounding helps protect against electrical shocks by providing a path for the current to follow in case of a fault or surge. When installing the switch, it is important to ensure that it is securely grounded according to the manufacturer’s instructions and local electrical codes.
Tip: When grounding the switch, be sure to use the appropriate grounding conductor and connect it to a designated grounding point, such as a grounding rod or a metal water pipe that meets the local electrical code requirements.
Regular maintenance and inspections
Once the Eaton Combination Switch is installed, it is essential to perform regular maintenance and inspections to ensure its proper functioning and longevity. Regularly inspecting the switch for any signs of wear, damage, or loose connections will help prevent potential malfunctions or electrical accidents. Additionally, practicing routine maintenance, such as cleaning and tightening connections, can extend the lifespan of the switch and maintain its optimal performance.
Tip: Consider creating a maintenance schedule or checklist to keep track of when inspections and maintenance tasks should be performed. This will help ensure that nothing gets overlooked and that your combination switch continues to operate safely and efficiently.
In conclusion, by ensuring compliance with local electrical codes, properly grounding the Eaton Combination Switch, and performing regular maintenance and inspections, you can install and maintain a safe and reliable electrical switch. Taking these additional considerations and safety precautions will not only protect you and your property but also ensure the durability and effectiveness of your switch installation for years to come.
Frequently Asked Questions
How Do You Wire 2 Way Switches For 1 Way Switching?
To wire two-way switches for one-way switching: 1. Connect the line terminal of one switch to the live wire coming from the power source. 2. Link the common terminal of this switch to the common terminal of the second switch.
3. Connect the load terminal of the second switch to the live wire going to the light fixture. 4. Finally, connect the neutral wire of the light fixture directly to the neutral wire from the power source. 5. Ensure all connections are secure and tested before use.
How Do You Wire A Two Way Switch Diagram?
To wire a two-way switch diagram, follow these steps: 1. Turn off the power supply. 2. Connect the live wire to the common terminal of the first switch. 3. Connect the traveler wires from the first switch to the corresponding terminals of the second switch.
4. Connect the live wire from the second switch to the light fixture. 5. Finally, connect the neutral wire to the light fixture and restore power.
What Does The Common Wire Do On A Light Switch?
The common wire on a light switch is an important part of the electrical circuit. It carries power from the electrical panel to the switch and then to the light fixture. It ensures that the switch can control the flow of electricity, allowing you to turn the light on or off.
How Do You Add A Switch To Control An Outlet?
To add a switch to control an outlet, first, turn off the power. Next, locate the hot wire in the outlet box, which is typically black. Connect the hot wire to one side of the switch, and then run a new wire from the other side of the switch to the outlet.
Secure the connections and replace the cover plate.
Conclusion
To sum up, installing an Eaton Combination Switch is a straightforward process that can bring convenience and safety to your electrical system. By following the step-by-step instructions outlined in this guide, you can confidently take on this task. Remember to prioritize your safety and consult a professional if needed.
So go ahead, enhance your home’s electrical setup with the reliable and efficient Eaton Combination Switch.