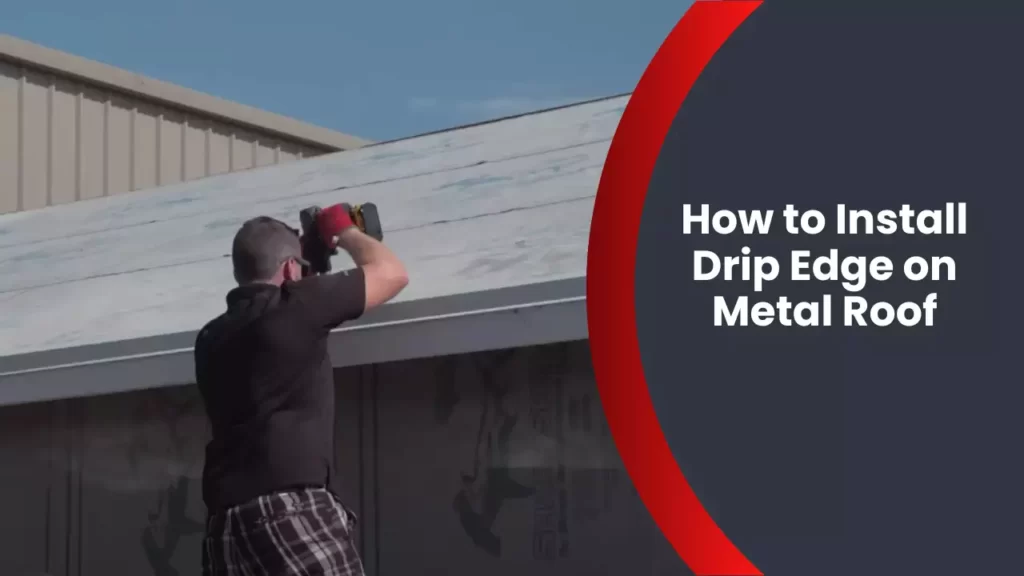
To install drip edge on a metal roof, position the drip edge along the eave, secure it with roofing nails, and overlap the sections. Installing drip edge on a metal roof is an essential step in ensuring proper water drainage and preventing moisture damage.
With its angled shape, drip edge diverts rainwater away from the fascia board and onto the ground. This not only protects the roof and fascia from potential water damage but also helps to maintain the integrity of the overall structure.
We will guide you through the process of installing drip edge on a metal roof, providing step-by-step instructions to ensure a successful installation. So, read on to learn how to properly install drip edge on a metal roof and safeguard your roof from water-related issues.
Understanding The Importance Of Drip Edge For Metal Roofs
Understanding the Importance of Drip Edge for Metal Roofs
When it comes to installing a metal roof, understanding the importance of a drip edge is crucial. A drip edge is a small, but mighty, component that plays a vital role in protecting your roof and home from potential water damage. In this section, we will delve into all the reasons why a drip edge is essential for metal roofs, outlining what it is, why it is important, and the benefits it brings.
What is a Drip Edge?
A drip edge is a metal flashing that is installed along the edges of a roof. It is typically made of aluminum or galvanized steel, and its main purpose is to prevent water from seeping into the roof deck, fascia, or soffit. This thin, angled strip is designed to redirect water away from vulnerable areas and ensure it flows into the gutters, keeping your roof and home protected.
Why is a Drip Edge Essential for Metal Roofs?
Installing a drip edge is especially essential for metal roofs due to their unique properties. Unlike other roofing materials, metal roofs are susceptible to water intrusion if not properly protected. Metal panels have seams and gaps where water can infiltrate, making a drip edge an indispensable component.
One of the primary reasons a drip edge is essential for metal roofs is its ability to channel rainwater away from the metal panels, preventing corrosion and rust. Without a drip edge, water can accumulate on the edges of the roof, causing moisture problems and compromising the structural integrity of your roof.
Benefits of Installing a Drip Edge on Metal Roofs
The benefits of installing a drip edge on metal roofs are numerous. Here are some key advantages:
1. Water Protection: By directing water away from the edges of the roof, a drip edge helps prevent water damage to the roof deck, fascia, and soffit.
2. Prevents Rot and Mold: By redirecting water away from vulnerable areas, a drip edge helps prevent the growth of rot and mold, which can have detrimental effects on the overall health of your roof and home.
3. Enhances Longevity: A properly installed drip edge extends the lifespan of your metal roof by minimizing the chances of water-related issues, such as rust and corrosion.
4. Aesthetically Pleasing: A professionally installed drip edge provides a finished and polished appearance to the roof, enhancing its overall aesthetic appeal.
In conclusion, understanding the importance of a drip edge for metal roofs is essential for any homeowner considering a metal roof installation. From protecting against water intrusion to preventing rot and mold, installing a drip edge offers multiple benefits. Therefore, it is crucial to ensure that your metal roof is fitted with a high-quality drip edge to safeguard your investment and maintain the long-term durability of your roof.
Preparing For Drip Edge Installation On Metal Roof
Before you proceed with installing drip edge on your metal roof, it’s important to adequately prepare for the task at hand. Taking the time to gather the necessary tools and materials, as well as considering safety precautions, will ensure a successful installation and a roof that is protected from water damage for years to come.
Tools and Materials Required
To start off, gather the following tools and materials before beginning the installation process:
| Tools | Materials |
|---|---|
|
|
Safety Precautions to Consider
When working on your metal roof, it’s crucial to prioritize safety. Take the necessary precautions to protect yourself from potential injuries or accidents:
- Wear safety goggles and gloves to shield your eyes and hands from sharp edges and flying debris.
- Use a sturdy ladder and make sure it is securely anchored before climbing onto the roof.
- Work on a clear, dry day to minimize the risk of slipping on a wet surface.
- Be cautious of overhead electrical wires and ensure you maintain a safe distance.
- Always read and follow the manufacturer’s instructions for the tools and materials you are using.
- Inform a trusted person of your whereabouts and have someone available to provide assistance if needed.
By adhering to these safety precautions, you’ll create a safe working environment and minimize any potential risks during the drip edge installation process.
Now that you’ve gathered the necessary tools, materials, and safety precautions, you’re ready to move on to the next step in the installation process. In the next section, we’ll guide you through the process of measuring and cutting the drip edge to fit your metal roof perfectly.
Step 1: Measuring And Cutting The Drip Edge
Step 1: Measuring the Roof Dimensions for Drip Edge Placement
Before you can start installing the drip edge on your metal roof, it’s important to accurately measure the dimensions of your roof. This will ensure that the drip edge is cut to the correct size and properly covers the roof’s edge. Follow these steps to measure your roof dimensions:
- Start by measuring the length of each side of your roof. Use a measuring tape to measure from the edge of the roof to the point where you want the drip edge to extend.
- Next, measure the width of the roof. This measurement will determine the length of the drip edge needed for each side of the roof.
- Make note of the measurements and record them for later use when cutting the drip edge.
- It’s also a good idea to add an extra inch or two to the measurement to account for any overlapping of the drip edge pieces.
By accurately measuring the dimensions of your roof, you can ensure that the drip edge will fit properly and provide effective protection against water damage.
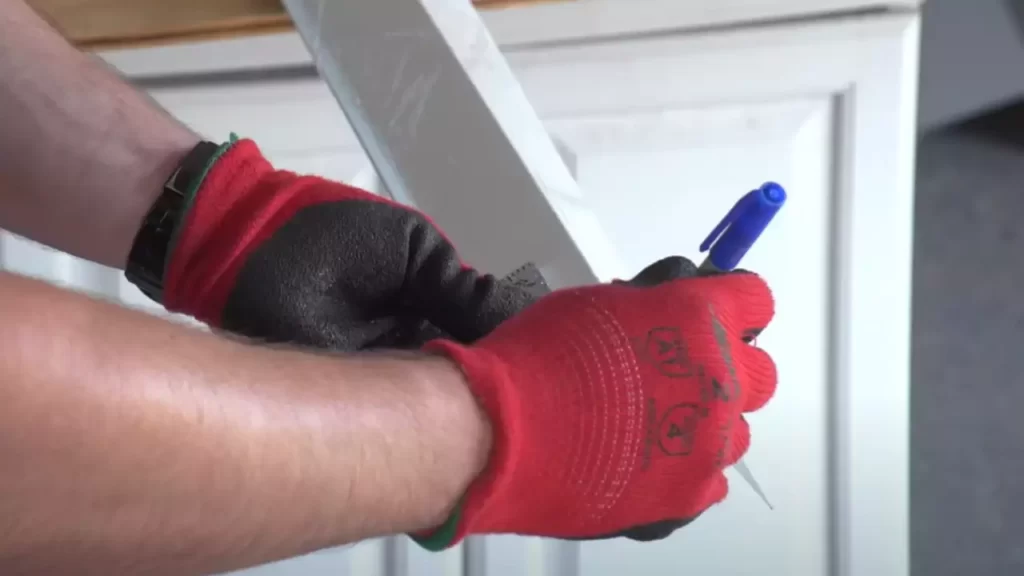
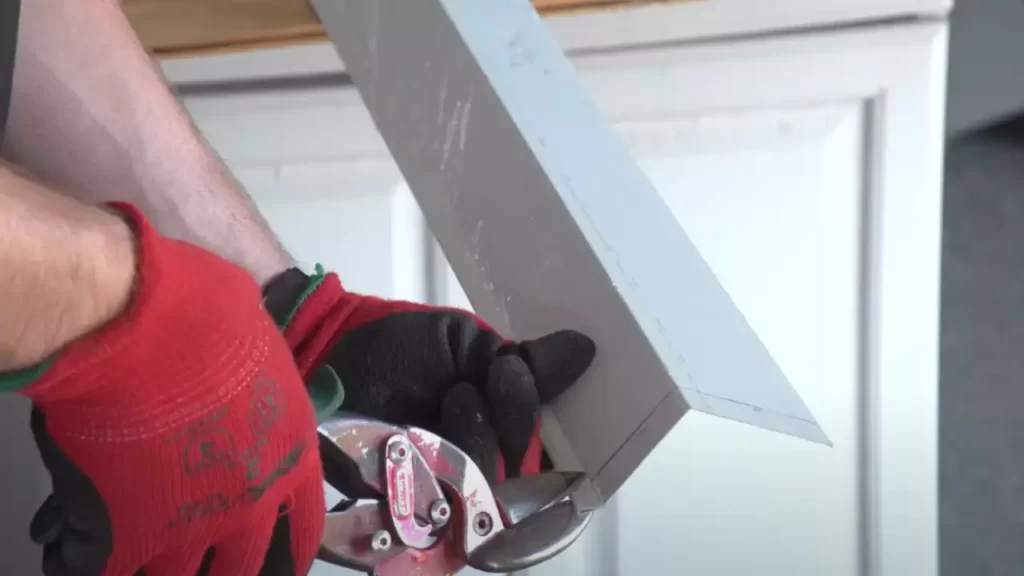
Step 1: Cutting the Drip Edge to the Correct Size
Once you have measured the dimensions of your roof, it’s time to cut the drip edge to the correct size. Follow these steps to ensure that the drip edge is cut accurately:
- Start by marking the measurements you recorded earlier on the drip edge material. Use a pencil or a marker to make clear and visible marks.
- Using tin snips or a metal-cutting saw, carefully cut along the marked lines to create individual pieces of drip edge for each side of the roof.
- Take your time and make precise cuts to avoid any jagged edges or uneven lines.
- Remember to wear safety gloves and goggles while cutting the drip edge to protect yourself from any sharp edges or debris.
Once you have cut the drip edge to the correct size, you are ready to move on to the next step of the installation process. Cutting the drip edge accurately is crucial for a proper fit and effective water runoff, so be sure to take your time and double-check your measurements before making any cuts.
Step 2: Installing The Drip Edge Starter Strip
Step 2: Installing the Drip Edge Starter Strip
Once you have prepared the metal roof by cleaning the surface and ensuring it is dry, it’s time to move on to the next step of the installation process: installing the drip edge starter strip. This step is crucial as it provides a solid foundation for the drip edge and helps prevent water damage to the eaves of your roof.
Positioning the Starter Strip Along the Eaves
The first task is to position the starter strip along the eaves of the roof. The starter strip is a metal flashing that is specifically designed to fit under the first row of metal roofing panels. Its purpose is to provide a smooth and even surface for the first row of panels to rest on. To position the starter strip correctly, follow these steps:
- Measure the length of the eaves and cut the starter strip accordingly, ensuring it extends about 1/2 inch beyond the fascia board.
- Place the starter strip along the eaves, aligning it with the edge of the roof. Make sure it is straight and level.
- Use roofing nails or screws to secure the starter strip in place, placing them about 12 inches apart along the strip. Be cautious not to hammer the nails too tightly, as it may cause the metal to deform.
Securing the Starter Strip to Ensure Stability
To ensure the starter strip remains stable and secure, you need to take a few additional steps:
- Apply a generous bead of roofing sealant along the bottom edge of the starter strip. This will provide an extra layer of protection against water penetration.
- Overlap the ends of the starter strip by about 2 inches and secure them together with roofing sealant or metal lap screws.
- Use a level to check that the starter strip is still straight and adjust if necessary.
- Inspect the entire length of the starter strip to ensure it is securely fastened to the roof. Make any necessary adjustments or add more fasteners if needed.
By following these steps, you will effectively install the drip edge starter strip on your metal roof. Remember, correctly positioning and securing the starter strip is crucial to the overall integrity and longevity of your roof.
Step 3: Installing The Drip Edge On The Eaves
Once you have prepared the starter strip and ensured a secure foundation for your metal roof, it’s time to move on to the next crucial step: installing the drip edge on the eaves. This step is essential as it helps protect your roof and prevent any water damage. In this section, we will guide you through the process of placing the drip edge over the starter strip and securing it using nails or screws.
Placing the Drip Edge Over the Starter Strip
To begin, position the drip edge over the starter strip, making sure it extends over the eaves by at least an inch. The drip edge should align perfectly with the edge of the starter strip, creating a solid connection. This will effectively direct water away from the edge of the roof, preventing any potential leaks or damage.
Using a ladder, carefully climb up and position yourself near the edge of the eaves. Take the drip edge and place it horizontally, with the wide flange facing downwards. This will ensure that any water flowing off the roof will be directed away from the underlying structure.
Make sure that the drip edge covers the entire length of the eaves, leaving no gaps or openings. Adjust the position if necessary, ensuring a snug fit against the starter strip. It’s crucial to be meticulous in this step to guarantee adequate protection and a seamless finish.
Securing the Drip Edge Using Nails or Screws
With the drip edge properly positioned, it’s time to secure it in place. Depending on the requirements of your specific roofing system, you can either use nails or screws to fasten the drip edge. Check the manufacturer’s instructions or consult with a professional to determine the recommended method for your particular metal roof.
If you are using nails, drive them into the drip edge through the pre-punched holes. Make sure to place the nails at regular intervals, approximately 6 to 8 inches apart. This will help ensure secure attachment and prevent any potential loosening over time.
Alternatively, if screws are recommended, position them through the pre-drilled holes and tighten them with the appropriate tools. Be careful not to over-tighten the screws, as this may cause damage to the drip edge or the underlying structure of the roof.
Remember, the importance of a properly installed drip edge cannot be overstated. It acts as a crucial barrier against water infiltration, protecting your metal roof and extending its lifespan. Taking the time to install it correctly will help you avoid costly repairs and potential leaks in the future.
By following these steps and carefully adhering to the manufacturer’s guidelines, you will complete the installation of the drip edge on the eaves and be one step closer to a durable and reliable metal roof that will withstand the test of time.
Step 4: Installing The Drip Edge On The Gable Ends
Now that you have successfully installed the drip edge along the eaves, it’s time to move on to the gable ends of your metal roof. This step is crucial for achieving proper water runoff and protection against leaks.
Ensuring Proper Overhang Measurements on the Gable Ends
Before you start attaching the drip edge, it’s important to ensure that the overhang measurements on the gable ends are correct. A proper overhang is essential to prevent water from seeping under the metal panels and causing damage to your roof structure. To achieve the optimal overhang:
- Measure the distance from the edge of the gable end to the nearest panel.
- Ensure that the drip edge will extend past the edge of the panel by at least 1 inch.
- Mark the desired overhang measurement using a pencil or marker.
By following these simple steps, you can ensure that the drip edge provides adequate protection and helps maintain the integrity of your metal roof.
Attaching the Drip Edge to the Gable Ends
Now that you have measured and marked the proper overhang on the gable ends, it’s time to attach the drip edge. Follow these steps:
- Starting at the bottom corner of the gable end, align the drip edge with the marked overhang measurement.
- Secure the drip edge using roofing nails or screws.
- Continue attaching the drip edge along the gable end, making sure it is straight and flush with the edge.
- Overlap each section of the drip edge by at least 2 inches to ensure proper water runoff.
Remember to repeat these steps on the opposite gable end to provide complete coverage and protection for your metal roof.
By following these simple instructions and ensuring proper installation of the drip edge on the gable ends, you can help prolong the lifespan of your metal roof and prevent potential leaks and water damage.
Step 5: Overlapping The Drip Edge Sections
When it comes to installing a drip edge on a metal roof, properly overlapping the sections is a crucial step in ensuring its effectiveness. This step, which we’ll cover in detail in this section, ensures that the drip edge provides maximum protection against water damage and helps maintain the integrity of your roof.
Understanding the Importance of Overlapping Drip Edge Pieces
Overlapping the drip edge sections is essential because it creates a seamless barrier against water intrusion. The purpose of the drip edge is to direct water away from the roof and into the gutter system, preventing water from seeping under the roof and causing damage.
By overlapping the sections, you create a tight fit that leaves no gaps for water to penetrate. This is particularly important in areas prone to heavy rainfall, as even the smallest gap can lead to significant water damage over time.
Proper Technique for Overlapping and Securing Drip Edge Sections
The following steps outline the proper technique for overlapping and securing drip edge sections on a metal roof:
Step 1: Measure and Cut
- Start by measuring the length of the section you need to overlap.
- Cut the drip edge using tin snips or a similar cutting tool, ensuring it is slightly longer than the measurement to allow for overlap.
Step 2: Position the First Section
- Position the first section of the drip edge along the roof’s edge, ensuring it is aligned properly.
- Secure it using roofing nails or screws, placing them at regular intervals to ensure a secure fit.
Step 3: Overlap the Sections
- Take the second section of the drip edge and align it with the first section.
- Ensure that there is enough overlap between the two sections, typically around 2 inches.
Step 4: Secure the Overlapping Sections
- Secure the overlapping sections using roofing nails or screws, making sure to place them evenly along the overlap.
- Make sure the nails or screws are flush with the drip edge to prevent any potential water penetration.
Step 5: Inspect and Test
- Once all the drip edge sections are installed and overlapped, inspect the entire length to ensure a proper fit and alignment.
- Take a hose or a bucket of water and simulate rainfall to test the effectiveness of the drip edge in directing water away from the roof.
By following these steps and properly overlapping the drip edge sections on your metal roof, you can ensure the longevity and efficiency of your roof’s water protection system. Taking the time to install the drip edge correctly will save you costly repairs down the road and help maintain the overall integrity of your roof.
Step 6: Sealing And Finishing The Drip Edge Installation
Now that you have successfully installed the drip edge on your metal roof, it’s time to focus on sealing and finishing the installation. This step is crucial in preventing water penetration and ensuring the longevity of your roof. Here are two essential tasks you need to perform to complete the process effectively.
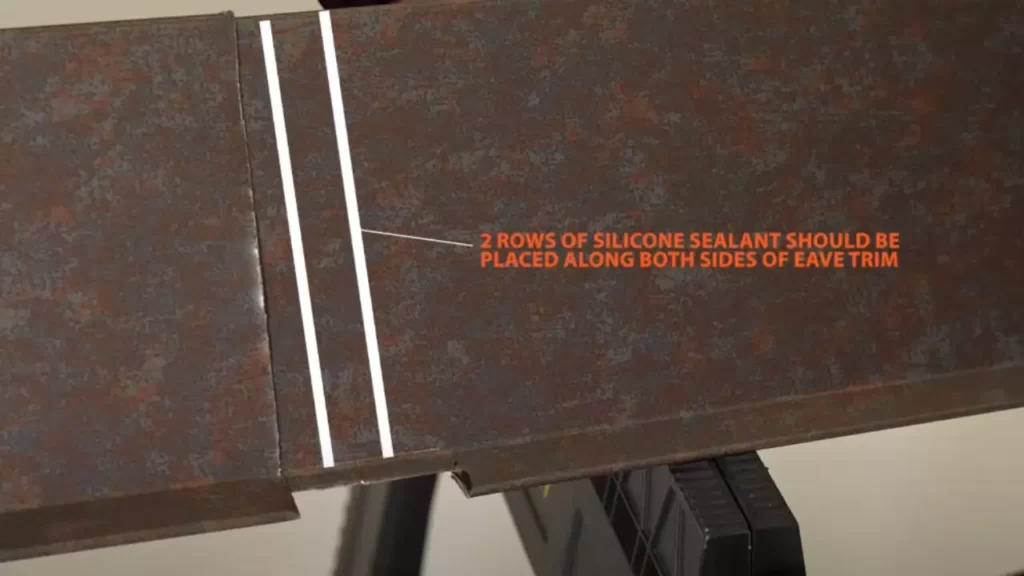
Applying Sealant to Prevent Water Penetration
To protect your roof from potential leaks, it’s crucial to apply sealant along the edges of the drip edge. This sealant will create a waterproof barrier, preventing water from seeping beneath the drip edge and compromising the roof’s integrity.
To apply the sealant, follow these steps:
- Choose a high-quality sealant specifically designed for metal roofing. Look for one that is weather-resistant, durable, and compatible with the materials used in your roof.
- Clean the surface of the drip edge using a brush or cloth to remove any dust, debris, or loose particles. This will ensure proper adhesion of the sealant.
- Apply a thin, even layer of sealant along the edges of the drip edge, making sure to cover the entire surface.
- Use a caulking gun or a trowel to spread the sealant evenly and smooth out any excess. Pay extra attention to gaps or seams, as these areas are more susceptible to water penetration.
- Allow the sealant to dry according to the manufacturer’s instructions. Typically, it takes a few hours for the sealant to cure completely.
By applying sealant to your drip edge, you take an additional step towards safeguarding your metal roof from water damage and ensuring its longevity.
Checking for Proper Alignment and Secure Installation
Once you have applied the sealant, it’s important to verify that the drip edge is properly aligned and securely installed. This will help guarantee its effectiveness in diverting water away from your roof and preventing potential leaks.
To check for proper alignment and secure installation, follow these guidelines:
- Visually inspect the drip edge to ensure it is evenly aligned and snug against the edge of the roof. Any misalignment can compromise its functionality.
- Check that the drip edge is securely fastened to the roof. Ensure that all nails or screws used in the installation are tightly in place and that there are no loose or missing fasteners.
- Gently press along the drip edge to ensure it is firmly attached and there are no areas of detachment.
- Scan the entire installation for any signs of gaps, cracks, or separations. If you find any, address them immediately by resealing or reattaching the drip edge as needed.
By regularly inspecting the alignment and installation of your drip edge, you can prevent any potential issues and maintain the efficiency of your metal roof for years to come.
Frequently Asked Questions
How Do You Install Metal Drip Edge?
To install metal drip edge, follow these steps: 1. Measure the roof edge and cut the drip edge accordingly. 2. Align the drip edge with the edge of the roof. 3. Secure the drip edge with roofing nails, leaving a small gap between each nail.
4. Repeat the process for all edges of the roof. 5. Make sure the drip edge is properly sealed and overlapping the shingles to prevent water damage.
How Far Should Metal Roof Overhang Drip Edge?
The metal roof overhang should typically extend 1 to 2 inches beyond the drip edge.
What Is The Best Drip Edge For A Metal Roof?
The best drip edge for a metal roof depends on the specific needs of your project. However, popular options include aluminum, PVC, and galvanized steel drip edges. Consider factors like durability, compatibility, and cost when choosing the right one for your metal roof.
Does Metal Drip Edge Go Over Or Under Felt?
Metal drip edge should be installed under the felt.
Conclusion
Installing drip edge on a metal roof is a crucial step to ensure its longevity and protection against water damage. By following the steps outlined in this guide, you can confidently tackle this task. Remember to choose the appropriate materials, measure accurately, and secure the drip edge properly.
With proper installation, your metal roof will be able to effectively shed water and maintain its structural integrity for years to come.