To install a double light switch, turn off the power supply, remove the existing switch, connect the wires to the new switch, and mount it to the wall. Installing a double light switch involves basic electrical skills and should only be done by a qualified person.
It is important to turn off the power supply at the breaker panel before starting the installation process to prevent accidents. By following the proper steps and precautions, you can successfully install a double light switch and improve the functionality of your lighting system.
Understanding The Double Light Switch
If you’re planning to upgrade your home’s lighting system or simply replace an old switch, understanding the double light switch is essential. A double light switch, also known as a two-gang switch, allows you to control two independent light fixtures or sets of lights from a single switch panel. This convenient switch offers flexibility and convenience, giving you the ability to control multiple lights in a room simultaneously.
Learn the basics of a double light switch and its functionality
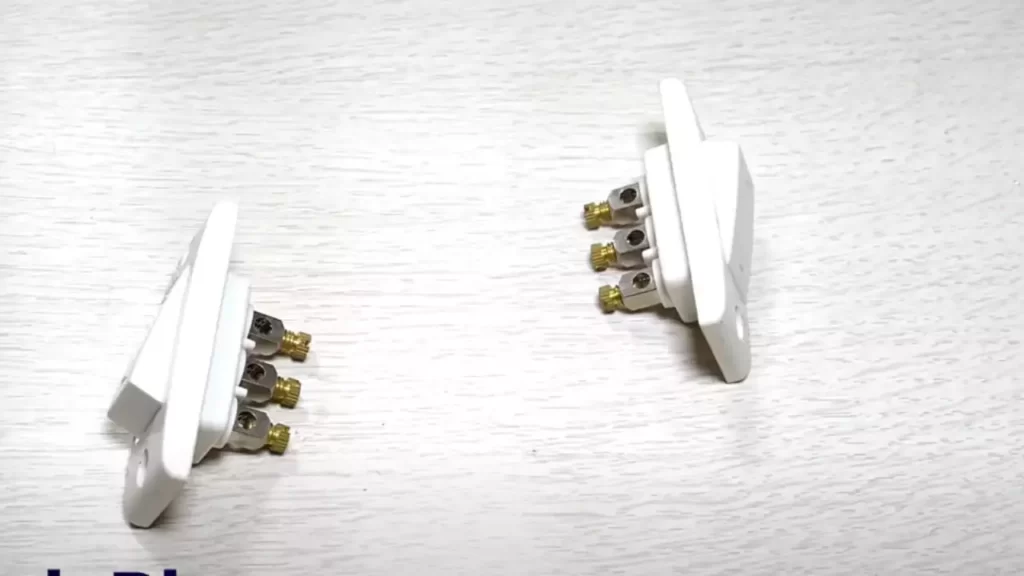
A double light switch consists of two individual switch mechanisms, housed within a single switch panel. Each switch can be operated independently, allowing you to control different sets of lights. This switch is ideal for areas where you want to control the lighting separately, such as a hallway where you may want to turn on the top and bottom lights separately.
Understanding the functionality of a double light switch is crucial before attempting to install one. When wired correctly, flipping either of the switches will control the respective light or lighting fixture. To ensure safety and efficiency, it’s important to follow proper wiring procedures or consult a professional electrician.
Differentiate between a single pole switch and a double pole switch
Before installing a double light switch, it’s essential to differentiate between a single pole switch and a double pole switch, as they serve different purposes. The basic difference lies in how many hot wire connections each switch has.
| Switch Type | Hot Wire Connections | Functionality |
|---|---|---|
| Single Pole Switch | One hot wire connection | Controls a single light or lighting fixture |
| Double Pole Switch | Two hot wire connections | Controls two independent lights or lighting fixtures |
Understanding this distinction is important as the wiring requirements for each type differ. It’s crucial to identify the type of switch you are working with and to follow the appropriate wiring instructions to ensure proper installation and functionality of the double light switch.
In conclusion, understanding the double light switch and its functionality is key to successfully installing and using this versatile switch. Knowing how it operates and differentiating it from other switch types like the single pole switch will help you make the right wiring connections and take full control of your home’s lighting.
Tools And Materials Needed
Before you begin installing a double light switch, make sure you have the necessary tools and materials. Having everything prepared in advance will save you time and frustration during the installation process. In this section, we will guide you through the list of essential tools and materials required for installing a double light switch.
List of essential tools required for the installation process
To successfully install a double light switch, you will need the following tools:
- Screwdriver set
- Wire stripper
- Wire cutter
- Voltage tester
- Needle-nose pliers
- Electrical tape
- Marker or pen
Overview of the materials needed for installing a double light switch
In addition to the tools, you will also need the following materials:
| Materials | Quantity |
|---|---|
| Double light switch | 1 |
| Electrical wires | As needed |
| Wire nuts | As needed |
| Mounting screws | As needed |
Having these materials ready will ensure a smooth and hassle-free installation process for your double light switch.
Preparing For Installation
Before beginning the installation process for a double light switch, it is crucial to take certain preparatory steps to ensure a safe and successful installation. By following these steps, you can prevent any potential electrical hazards and make the installation process smoother. This section will guide you through the initial steps you need to take before getting started.
Turn off the power supply to ensure safety
The first step in preparing for the installation of a double light switch is to turn off the power supply to the area where you will be working. This is essential for your safety and to avoid any electrical accidents. To cut off the power supply, you need to locate the main electrical panel in your home. Open the panel door and identify the breaker that corresponds to the area you will be working on, then switch it off. To be extra cautious, you can use a non-contact voltage tester to verify that the power is indeed turned off.
Remove the existing switch plate and determine wiring type
Once you have ensured that the power supply is switched off, you can proceed to remove the existing switch plate. Use a screwdriver to gently unscrew the screws holding the switch plate in place. Carefully remove the switch plate to expose the wiring behind it.
At this stage, it is crucial to determine the type of wiring you have in order to connect the new double light switch correctly. Generally, you will encounter two types of wiring: single-pole and three-way. A single-pole switch controls a single light or a group of lights from one location, while a three-way switch allows you to control a light or set of lights from two different locations. Identify which type of wiring you have to ensure a proper installation.
Here’s a quick summary of the steps:
- Turn off the power supply by locating the corresponding breaker in the main electrical panel and switching it off.
- Use a screwdriver to remove the existing switch plate.
- Determine the type of wiring you have, whether it’s single-pole or three-way.
By adhering to these steps, you are well-prepared to install a double light switch safely and efficiently.
Wiring Preparation And Identification
Identify the different wires and their functions
Before you begin installing a double light switch, it is crucial to understand the wires involved and their functions. This knowledge will help you properly connect the switch and ensure the safety of your electrical system. Take the time to identify each wire to avoid confusion during the installation process.
Hot wire (black)
The hot wire, often referred to as the “line” or “power” wire, carries the electrical current from the circuit breaker panel to the switch. It is usually coated in black insulation, but it can also be red or another color. The hot wire supplies power to the switch, allowing it to control the flow of electricity to the connected lights or fixtures. Remember to exercise caution when handling the hot wire, as it carries a live current.
Neutral wire (white)
The neutral wire completes the circuit and provides a return path for the electrical current. It is typically covered in white insulation. Unlike the hot wire, the neutral wire does not carry a live current and is considered safe to handle. Connect the neutral wire to the appropriate terminal or wire connector in the electrical box.
Ground wire (green or copper)
The ground wire serves as a safety measure to prevent electrical shocks. It is usually coated in green insulation or left bare, revealing the copper conductor. Connect the ground wire to the grounding terminal or screw in the electrical box. This wire connects your electrical system to the grounding rod or conductor, protecting you from electrical faults and ensuring safe operation of your switch.
Traveler wires (red, black, or brass)
If you are installing a double light switch for a three-way configuration, you will have traveler wires in addition to the hot, neutral, and ground wires. Traveler wires allow you to control the same set of lights from different switches in different locations. These wires are usually coated in red, black, or brass insulation. Ensure that these wires are correctly connected to the appropriate terminals on the switch to enable proper functionality.
Examine the electrical box for any potential issues or constraints
Once you have identified the different wires and their functions, it is crucial to examine the electrical box to ensure it can accommodate the double light switch. Look for any potential issues or constraints that may affect the installation process. Here are a few things to consider:
- Space: Check if the electrical box has enough space to accommodate the addition of a double light switch. Double switches require a slightly larger electrical box to accommodate two switches side by side.
- Compatibility: Ensure that the existing electrical box is compatible with the type of double light switch you plan to install. Different switches have varying dimensions, and it is important to choose a switch that fits securely in the electrical box.
- Wiring condition: Inspect the condition of the existing wiring in the electrical box. Look for any signs of wear, fraying, or damage. If you notice any issues, consider contacting a qualified electrician to address them before proceeding with the installation.
- Support: Confirm that the electrical box is securely mounted and provides adequate support for the double light switch. A stable mounting is essential for proper functioning and safety.
By thoroughly examining the electrical box for any potential issues or constraints, you can ensure a smooth installation process and minimize the risk of complications.
Removing The Old Switch
Before you can install a new double light switch, you need to remove the old one. This step-by-step guide will walk you through the process of safely disconnecting the wires from the existing switch and properly disposing of the old switch and its components.
Safely disconnect the wires from the existing switch
The first step in removing the old light switch is to ensure your safety by turning off the power to that specific circuit from the main electrical panel. This is crucial to avoid any potential electric shock during the process. Once you have cut off the power, follow these simple steps:
- Use a voltage tester to confirm that the power is indeed off before proceeding.
- Gently remove the cover plate by unscrewing the screws holding it in place.
- Next, unscrew the screws holding the switch to the electrical box. There are usually two screws, one on top and one on the bottom of the switch.
- Hold the switch in place while removing the wires. Start by loosening the screws or releasing the backstab connectors on the old switch.
- Carefully pull the wires away from the old switch, ensuring not to damage or break any of the wires.
- Once the wires are disconnected, use electrical tape to wrap the exposed ends to prevent any accidental contact.
Properly dispose of the old switch and components
Now that the wires are safely disconnected from the old switch, it’s important to dispose of the old switch and its components properly. Follow these guidelines:
- Double-check your local regulations regarding the disposal of electronic waste. Some areas have specific guidelines or recycling programs for these types of items.
- If your local regulations permit, you can dispose of the old switch in your regular household trash. However, it’s best to separate the switch from other household waste to avoid potential harm to the environment.
- Consider recycling options for electronic waste. Many communities provide designated recycling centers or collection events for the proper disposal of items like light switches.
- Ensure any accompanying packaging or materials used for the new double light switch are also disposed of properly.
By following these steps, you can safely remove the old light switch and prepare for the installation of your new double light switch. Remember to double-check your local regulations and always prioritize safety throughout the process.
Installing The Double Light Switch
Installing the Double Light Switch
When it comes to installing a double light switch, proper steps should be followed to ensure safety and functionality. In this section, we will guide you through the process of connecting the wires to the new double light switch and ensuring proper grounding for safety purposes.
Connect the wires to the new double light switch
1. Begin by turning off the power to the circuit from the main electrical panel. This is crucial to avoid any accidents or injuries while working with the electrical wires.
2. Next, remove the existing single light switch from the wall by unscrewing the mounting screws and gently pulling it away from the electrical box.
3. Now, take a closer look at the wires inside the electrical box. You will typically find three different colored wires – black, white, and copper. The black wire is the hot wire, the white wire is the neutral wire, and the copper wire is the ground wire.
4. Before connecting the wires to the new double light switch, it’s important to identify which wires are connected to the top and bottom switches. Use a voltage tester to determine this. The wires that show voltage are the ones connected to the switches.
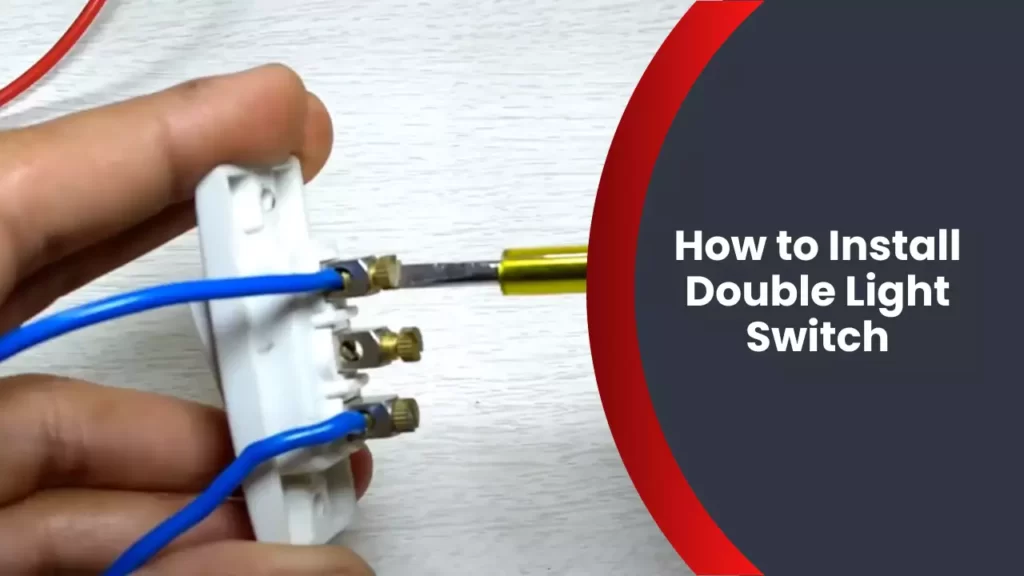
5. Once you have identified the wires, carefully loosen the terminal screws on the double light switch and strip the ends of the wires if needed. Remember to strip only about 1/2 inch of insulation to avoid any exposed wires.
6. Start by connecting the black wires to the brass terminal screws on the double light switch. Loosen the screws, insert the wires into the appropriate terminals, and tighten the screws to secure the connection. It’s essential to ensure a tight and secure connection to prevent any loose connections that could cause problems.
7. Next, connect the white wires to the silver terminal screws on the double light switch. Follow the same process of loosening the screws, inserting the wires into the appropriate terminals, and tightening the screws.
8. Lastly, connect the copper wires to the green grounding screw on the double light switch. This step ensures proper grounding for safety purposes, preventing electrical shocks or fires. Loosen the grounding screw, insert the wires into the appropriate terminal, and tighten the screw to secure the connection.
Ensure proper grounding for safety purposes
Proper grounding is essential to ensure the safety of the electrical system and everyone in the vicinity. The green grounding screw on the double light switch allows you to connect the copper grounding wires. By securely connecting the copper wires to the grounding screw, you create a pathway for electrical currents to be directed away in the event of a fault or surge.
Remember, grounding is an important safety measure that helps protect against electric shock and reduce the risk of fire hazards. Always make sure to follow local electrical codes and regulations when installing a double light switch or any electrical fixture.
By following these steps and ensuring proper grounding, you can successfully install a double light switch in your home. Keep in mind that if you’re uncertain about any step or encounter any difficulties, it’s always best to consult a professional electrician for assistance. Safety should be the top priority when working with electrical systems.
Securing And Testing The Installation
Secure the double light switch in the electrical box
Once you have successfully connected the wires and positioned the double light switch, it’s time to secure it in the electrical box. This step is crucial to ensure the safety and stability of the installation. Follow these simple steps to securely mount the switch:
- Make sure the switch is positioned symmetrically within the electrical box. This ensures that it is centered and aligned correctly.
- Tighten the screws on the top and bottom of the switch. These screws are typically located on the sides of the switch plate.
- Double-check that the switch is firmly attached to the electrical box by gently pulling on it.
- If the switch wiggles or feels loose, tighten the screws further until it is snug and secure.
Securing the double light switch properly not only ensures its stability, but it also prevents any potential hazards caused by loose connections. Take a few extra moments to ensure the switch is secure and properly aligned before moving on to the final step.
Turn the power back on and test the functionality of the switch
Now that the double light switch is securely mounted, it’s time to test its functionality. Follow these steps to ensure that the switch is working correctly:
- Turn on the circuit breaker or replace the fuse that controls the power to the electrical box.
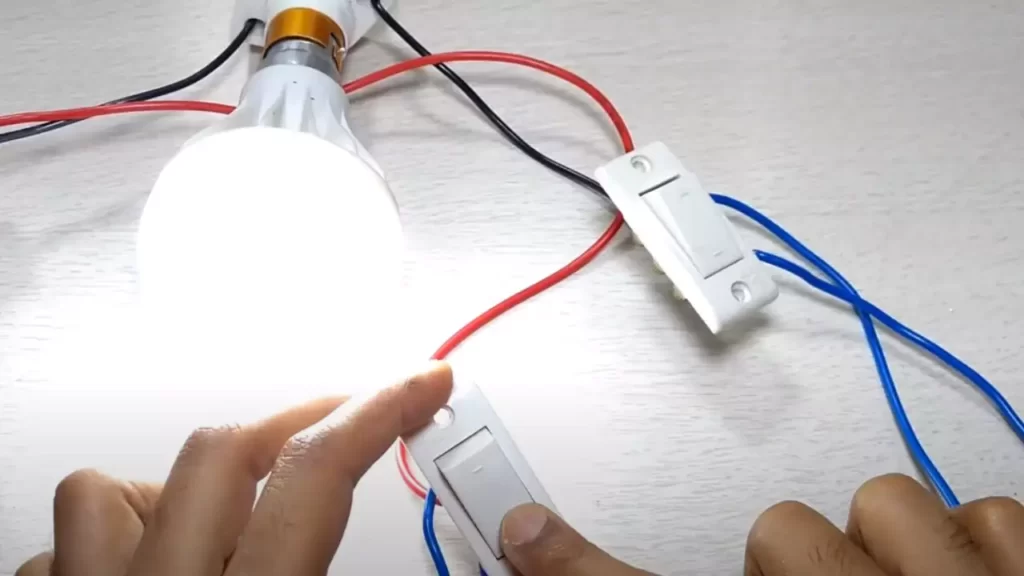
- With the power back on, test each switch individually by toggling them on and off.
- Observe whether the lights connected to the switch turn on and off accordingly.
If the lights respond as expected, congratulations! You have successfully installed and tested your double light switch. However, if any issues arise, such as lights not turning on or flickering, there may be a wiring problem. In that case, it’s best to consult a professional electrician to ensure a safe and functioning installation.
Remember, electrical work should always be approached with caution, and safety should be your top priority. With these simple steps, you can confidently secure and test your double light switch, ensuring a reliable lighting system in your home.
Troubleshooting Tips
Installing a double light switch may seem daunting at first, but with the right guidance, it can be a smooth process. However, like any electrical installation, there may be some common issues or wiring problems that can arise. In this section, we will discuss some troubleshooting tips to help you navigate through potential challenges and ensure your double light switch operates seamlessly.
Common Issues and Solutions while Installing a Double Light Switch
During the installation of a double light switch, you may encounter a few common issues. By understanding these issues and their solutions, you can overcome them with confidence.
Issue: One Light Not Working
Solution: If one light connected to the double light switch is not working, it is likely due to a loose wire connection. Start by turning off the power and checking that all wires are securely connected to their respective terminals. Tighten any loose connections and test the light again.
Issue: Lights Flickering
Solution: Flickering lights can be caused by a loose connection, faulty wiring, or incompatible bulbs. Begin by ensuring all wire connections are tight. If the issue persists, try using different bulbs or consulting a licensed electrician to check your wiring.
Issue: Switch Not Working Properly
Solution: If the double light switch is not functioning as expected, it could be due to a faulty switch. Check if the switch is properly aligned and securely installed. If the problem persists, consider replacing the switch with a new one.
Troubleshooting Steps for any Wiring or Functionality Problems
Aside from the common issues discussed above, there may be other wiring or functionality problems that you might encounter while installing a double light switch. Here are some troubleshooting steps to help you resolve these problems:
- Double-check the wiring connections: Ensure that all wires are properly attached to their respective terminals. Any loose or disconnected wires can lead to malfunctioning switches or lights.
- Verify the circuit breaker: Check if the circuit breaker for the affected lights is not tripped. If it has tripped, reset it and see if the lights start working.
- Test with a voltage tester: Use a voltage tester to ensure there is power running to the switch. If no power is detected, check the connections and the circuit breaker.
- Consider the load capacity: Double light switches are designed to handle a certain amount of electrical load. If you are connecting multiple lights or devices to the switch, make sure the combined load does not exceed the switch’s capacity.
- Consult a professional if needed: If you have exhausted all troubleshooting steps and still face issues, it is best to seek help from a licensed electrician. They have the expertise to identify and resolve complex wiring or functionality problems.
By following these troubleshooting steps, you can address any wiring or functionality problems that may arise while installing a double light switch. Remember to always prioritize safety by turning off the power before working on any electrical installations.
Frequently Asked Questions
How Do You Wire A Two Switch Light?
To wire a two switch light, you need a power supply, two switches, and the light fixture. Connect the power supply to the first switch, then run a three-wire cable to the second switch. Connect the cable to the light fixture and both switches, ensuring they all have a secure connection.
How Do You Wire A Two Way Light Switch One Way?
To wire a two-way light switch one way, you need to connect the common terminal of one switch to the live wire and connect the common terminal of the other switch to the switch wire leading to the light. Use the traveler wires to establish the connection between the switches.
What Is A Double Two Way Switch?
A double two-way switch is a device that allows you to control the same electrical appliance or light from two different locations. It is commonly used in staircases or hallways, where you can turn the light on or off from either end.
What Is A Double Pole Switch Used For?
A double pole switch is used to control the power supply for two different electrical circuits at the same time. It can either connect or disconnect both circuits simultaneously, providing enhanced safety and convenience for various applications.
Conclusion
To wrap up, installing a double light switch may seem intimidating, but with the right tools and instructions, it can be a straightforward process. By following the step-by-step guide provided in this blog post, you can successfully replace a single switch with a double switch and enhance the functionality of your lighting system.
Remember to turn off the power, take safety precautions, and consult a professional if needed. With this newfound knowledge, you’ll be able to conquer any light switch installation project with confidence.