To install a dimmable light switch, first turn off the power to the switch at the main circuit breaker. Then, remove the existing switch cover and switch from the electrical box, disconnecting the wires.
Connect the dimmable light switch’s wires to the corresponding wires in the electrical box, using wire connectors. Attach the dimmable light switch to the electrical box and secure it with screws. Finally, replace the switch cover and restore power at the circuit breaker.
Are you looking to upgrade your home’s lighting system? Installing a dimmable light switch is a simple and effective way to adjust the brightness of your lights according to your needs. Whether you want to create a cozy ambience or brighten up a room for a task, installing a dimmable light switch can give you complete control over your home’s lighting. This guide will walk you through the step-by-step process of installing a dimmable light switch, ensuring a safe and successful installation. Let’s get started!
Tools Needed For Installing A Dimmable Light Switch
Installing a dimmable light switch can instantly enhance the ambiance and functionality of your space. To successfully complete this project, you will need a few essential tools. In this section, we will discuss the key tools needed for installing a dimmable light switch, and how each tool plays a crucial role in the process.
Screwdriver
A screwdriver is an indispensable tool for installing a dimmable light switch. It allows you to securely fasten the switch to the electrical box. When choosing a screwdriver, opt for one that matches the type of screws used in your electrical box. This ensures a proper fit and prevents damage to the screws.
Wire stripper
A wire stripper is another essential tool required for installing a dimmable light switch. This tool enables you to remove the insulation from the electrical wires, preparing them for connection. Make sure to select a wire stripper that is specifically designed for the gauge of wires you are working with, as different wire sizes require different stripping capabilities.
Voltage detector
Before starting any electrical work, it is crucial to prioritize safety. A voltage detector is a tool designed to detect the presence of electrical current in a circuit. By using a voltage detector, you can ensure that the power is fully switched off before you begin working on the dimmable light switch. This step is vital to prevent accidents or electrical shock.
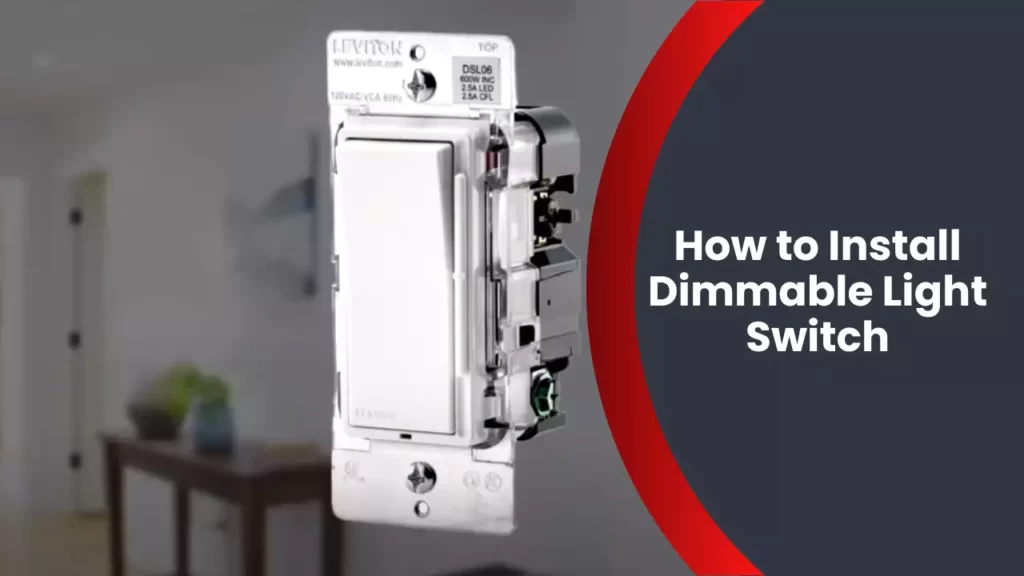
Dimmable light switch
Of course, you cannot install a dimmable light switch without actually having one. When selecting a dimmable light switch, consider the specific requirements of your lighting system. Some switches are designed for specific bulb types, such as LED or incandescent, while others may have additional features like remote control capabilities. Make sure to choose a switch that suits your needs and preferences.
Now that we have discussed the essential tools for installing a dimmable light switch, you are one step closer to transforming your space. Remember to prioritize safety and select the appropriate tools for the task. In the next section, we will guide you through the step-by-step process of installing a dimmable light switch.
Step-By-Step Guide To Install A Dimmable Light Switch
Installing a dimmable light switch not only adds convenience, but also allows you to create the perfect ambiance in any room. Whether you want to dim the lights for a romantic dinner or brighten up a workspace, the process is straightforward. In this step-by-step guide, we’ll walk you through the installation process, ensuring that you can easily upgrade your light switch without any hassle.
-
Turn off power to the light switch
The first step in installing a dimmable light switch is to turn off the power to the light switch you’ll be working on. Locate the circuit breaker box and switch off the breaker that controls the specific area. This will ensure your safety during the installation process.
-
Use a voltage detector to ensure power is off
Before proceeding further, it’s essential to verify that the power is indeed off. Use a voltage detector to check for any electricity in the switch box. This small device will beep or light up if there is still power running to the switch.
-
Remove the existing light switch cover
Next, remove the cover plate from the existing light switch by unscrewing the mounting screws. Set the cover plate aside for later use.
-
Unscrew the old light switch
Using a screwdriver, loosen the screws that secure the old light switch to the electrical box. Gently pull the switch from the box, exposing the wiring behind it.
-
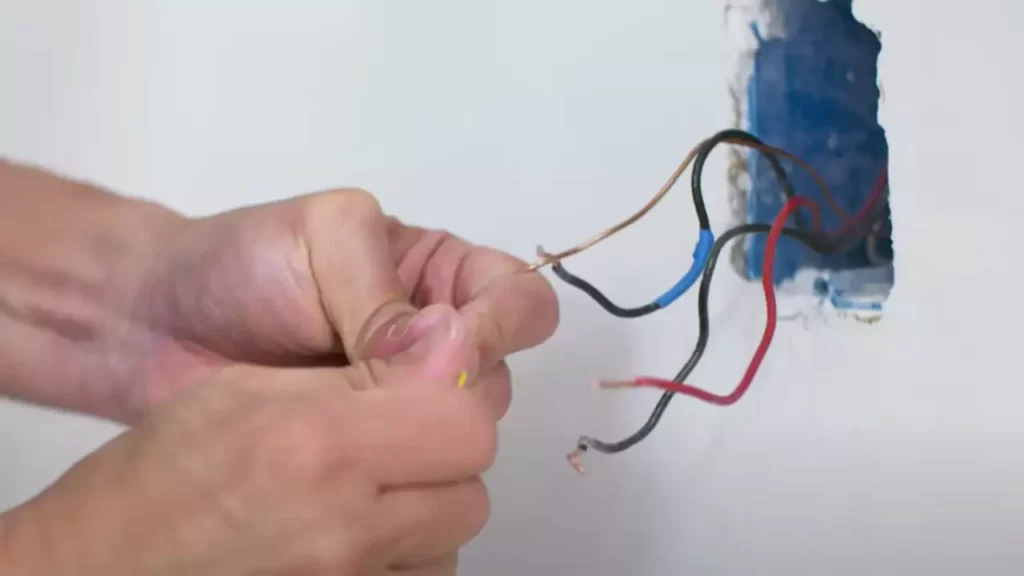
Disconnect the wiring from the old switch
Carefully disconnect the wires from the old switch. Take note of the wire color codes and their corresponding locations for a smooth installation process.
-
Strip the ends of the wires
Using wire strippers, remove a small portion of the insulation from the ends of the wires. Ensure that you strip enough of the wire to make a secure connection with the new dimmable light switch.
-
Connect the wires to the dimmable light switch
Now, it’s time to connect the wires to the dimmable light switch. Follow the manufacturer’s instructions to identify the correct wire terminals on the switch and make the necessary connections. Typically, this involves twisting the ends of the wires together and securing them with wire nuts.
-
Screw the dimmable light switch into the electrical box
With the wires safely connected, carefully push the dimmable light switch back into the electrical box. Secure it in place by tightening the screws on the switch. Make sure it fits snugly without any wobbling.
-
Attach the cover plate to the dimmable light switch
Lastly, attach the cover plate to the dimmable light switch by aligning the mounting holes and securing it with the screws provided. Ensure that the cover plate is securely fastened and sits flush against the wall.
By following this step-by-step guide, you can easily install a dimmable light switch and enhance the lighting in your living space. Remember to always prioritize safety and consult a professional electrician if you are unsure about any part of the installation process.
Tips For Installing A Dimmable Light Switch
Read the instructions that come with the dimmable light switch
Before you begin the installation process, take the time to carefully read the instructions provided with your dimmable light switch. These instructions will guide you through the necessary steps and provide important information specific to the model you have chosen. While it may be tempting to skip this step, understanding the manufacturer’s recommendations can help ensure a successful installation.
Double check the wiring connections
When installing a dimmable light switch, it is crucial to double check the wiring connections to ensure everything is properly connected. One wrong wire can result in a non-functioning or even hazardous switch. Before attaching the switch to the wall and securing the faceplate, take a moment to review the instructions and verify that each wire is securely connected to the appropriate terminal. It may be helpful to use a voltage tester to confirm that there is no live electricity present before making any adjustments.
Test the dimmable light switch before fully installing it
Once the wiring is confirmed to be correct, it is essential to test the dimmable light switch before completing the installation. This can help identify any potential issues prior to permanently mounting the switch. Turn on the power supply and ensure that the switch is functioning as intended. Adjust the dimming range and observe how the connected bulbs respond. Checking the switch’s functionality now will save you the inconvenience of having to make additional adjustments later.
Ensure the dimmable light switch is compatible with the type of bulbs you are using
Before installing your dimmable light switch, it is important to ensure that it is compatible with the type of bulbs you plan to use. Dimmable switches may not work properly with all types of bulbs, so check the switch’s specifications or consult the manufacturer to verify compatibility. Using the wrong type of bulbs can cause flickering, buzzing, or even damage to the switch. Take the time to confirm compatibility to ensure optimal performance and longevity of both the switch and the bulbs.
Frequently Asked Questions
Do You Need An Electrician To Install A Dimmer Switch?
No, you don’t need an electrician to install a dimmer switch. It can be done as a DIY project if you have basic electrical knowledge. Just make sure to follow the manufacturer’s instructions and turn off the power before starting.
Is It Hard To Install Dimmable Light Switch?
Installing a dimmable light switch is not difficult. Just follow the instructions provided with the switch, turn off the power, remove the old switch, and connect the wires to the dimmer switch. Finally, attach the switch to the wall and restore power to enjoy adjustable lighting.
Can You Make Any Light Switch To Use Dimmable Light?
Yes, most light switches can be replaced with dimmable switches to control the brightness of the light.
Does A Light Fixture Have To Be Dimmable To Use A Dimmer Switch?
A light fixture doesn’t necessarily have to be dimmable in order to use a dimmer switch. However, for optimal performance, it’s recommended to use a dimmable light fixture with a dimmer switch to control the brightness levels effectively.
Conclusion
To sum up, installing a dimmable light switch is a straightforward process that can greatly enhance your lighting experience. By following the steps mentioned in this post, you can easily achieve the desired level of brightness in your space, while also saving energy.
Make sure to choose a high-quality dimmable light switch and consult an electrician if you are unsure about any aspect of the installation. Enjoy a more personalized and efficient lighting system in your home or office!