To install a Comcast modem and router, connect the modem to your cable outlet and establish an internet connection. Then connect the router to the modem, and power on both devices.
Installing a Comcast modem and router is a straightforward process. In this guide, we will cover the necessary steps to set up your equipment and get your internet connection up and running in no time. By following these instructions, you will be able to enjoy fast and reliable internet service from Comcast.
So let’s dive in and get started with the installation process.
Check Your Equipment Compatibility
Before you start the process of installing a Comcast modem and router, it is crucial to first verify if your current equipment is compatible with Comcast’s services. Ensuring compatibility will save you time and potential frustration during the installation process. Here’s a step-by-step guide to help you check your equipment compatibility:
Verify that your current modem and router are compatible with Comcast’s services
The first step is to make sure that your existing modem and router are compatible with the Comcast service. Comcast provides a list of approved devices on their website, which you can easily access and check. To do this:
- Open your web browser and go to Comcast’s official website.
- Search for the approved modem and router list or navigate to the support section.
- Look for the section that provides a list of compatible devices.
- Find your current modem and router models in the list.
If your equipment is on the approved list, then you can proceed with the installation. However, if your modem and router are not on the list, you will need to contact Comcast for further assistance. They can recommend compatible equipment that will work seamlessly with their services.
It is important to note that using non-approved equipment may result in compatibility issues, slower speeds, or even a complete inability to connect to Comcast’s network. Therefore, it is always recommended to check the compatibility before you begin the installation process.
By taking the time to verify your equipment compatibility, you ensure a smoother installation process and a better overall internet experience with Comcast.

Purchase Or Lease A Comcast Compatible Modem
Are you considering setting up Comcast internet service at your home or office? One of the first steps you’ll need to take is choosing a modem and router that are compatible with Comcast. While Comcast offers the option to lease their equipment, purchasing your own modem and router can be a cost-effective choice in the long run. In this guide, we’ll explore Comcast’s approved modem list and help you decide whether to purchase or lease a Comcast compatible modem.
Explore Comcast’s approved modem list and choose a modem that suits your needs
Comcast has a list of approved modems that have been tested and certified to work seamlessly with their internet service. To find this list, head over to the official Comcast website and search for “approved modem list.” Once you have the list in front of you, take the time to go through it and find a modem that suits your needs. Consider factors such as modem speed, compatibility with your Comcast internet plan, and any additional features you may require. By choosing a modem from this approved list, you can ensure compatibility and avoid any compatibility issues in the future.
Compare purchasing and leasing options and select the most cost-effective option
Once you have narrowed down your choices, the next step is to decide whether to purchase or lease a Comcast compatible modem. Let’s weigh the pros and cons of each option to help you make an informed decision:
Purchasing a modem:
Purchasing your own Comcast compatible modem gives you complete ownership and control over your equipment. You have the freedom to choose the modem that best suits your needs and can upgrade or replace it whenever you want, without any additional fees or obligations. While the initial cost may be higher, purchasing a modem can save you money in the long run, as you won’t have to pay the monthly equipment rental fee charged by Comcast. Additionally, owning your modem allows you to customize its settings and ensures that you are in control of your internet experience.
Leasing a modem:
On the other hand, if you decide to lease a Comcast compatible modem, you’ll be renting the equipment from Comcast for a monthly fee. This option may appeal to those who don’t want to make a significant upfront investment or aren’t comfortable troubleshooting modem issues themselves. Leasing a modem also offers the convenience of Comcast being responsible for any repairs or replacements if the equipment malfunctions. However, it’s important to note that over time, the rental fees can add up and surpass the cost of purchasing your own modem outright.
Ultimately, the decision to purchase or lease a Comcast compatible modem depends on your individual needs and preferences. If you value ownership, control, and long-term savings, purchasing your own modem is the way to go. However, if upfront costs and technical support are major concerns for you, leasing a modem may be a more suitable option. Consider your budget, internet usage, and future plans before making your final decision.
By exploring Comcast’s approved modem list and carefully considering the pros and cons of purchasing and leasing options, you can confidently choose the most cost-effective solution for your Comcast internet setup. Enjoy fast and reliable internet connectivity with a modem and router that meets your specific requirements!
Prepare Your Setup Area
Before you start installing your Comcast modem and router, it’s important to find a suitable location near a cable outlet and power source. This will ensure that you have a strong, stable connection and easy access to power when needed. Here are the steps to follow:
Find a suitable location near a cable outlet and power source for your modem and router.
To begin, survey your home or office space and identify a location that is:
- Easily accessible: Choose a spot that is convenient for you to reach, in case you need to troubleshoot or make any changes to your setup.
- Near a cable outlet: Look for a nearby coaxial cable outlet, as this is where you will connect your Comcast modem. Ideally, the outlet should be in an area where you plan to use the internet most frequently.
- Close to a power source: Ensure that the chosen location is within reach of an electrical outlet. Both the modem and router will require a power source to function properly, so it’s important to have one nearby.
When selecting a spot, keep in mind that the closer your modem and router are to each other, the better their signal strength will be. If you have multiple devices that require an internet connection, it may be helpful to choose a central location to ensure equal coverage throughout your space.
Once you have found the ideal location, it’s time to proceed with the installation process. Make sure you have all the necessary equipment and cables ready before getting started.

Unbox Your Modem
So you’ve just gotten your hands on a brand new Comcast modem and router, and now it’s time to start the installation process. The first step is to unbox your modem. This may seem like a simple task, but it’s important to do it carefully to ensure that everything is in order and you have all the necessary components.
Carefully unbox your modem and ensure that all the necessary components are included.
When unboxing your Comcast modem, follow these steps to ensure a smooth setup:
- Find a suitable workspace: Start by choosing a clean, well-lit area to unbox your modem. Make sure you have enough space to spread out the components and any accompanying paperwork.
- Gently open the box: Take care when opening the packaging to avoid damaging any of the contents. Slowly lift the top of the box and set it aside.
- Inspect the contents: After opening the box, inspect the contents to ensure nothing is missing or damaged. Your Comcast modem package should typically include the following components:
| Component | Description |
|---|---|
| Modem | The main device that connects to your internet service and enables you to access the internet. |
| Power adapter | A power adapter that connects the modem to an electrical outlet to provide it with power. |
| Ethernet cable | A cable used to connect the modem to your computer or router using an Ethernet port. |
| Coaxial cable | A coaxial cable that connects the modem to your cable outlet to receive the internet signal. |
| Quick start guide | A simple guide that provides basic instructions on setting up your Comcast modem. |
If any of these components are missing or damaged, contact Comcast support for assistance.
Now that you’ve unboxed your modem and verified that you have all the necessary components, you’re ready to move on to the next step in the installation process. Stay tuned for our next blog post, where we’ll guide you through the process of connecting and configuring your Comcast modem and router.
Connect Your Modem
Once you have your Comcast modem ready, it’s time to connect it to your cable internet service. This step is crucial as it establishes the connection between your modem and the cable outlet, allowing you to enjoy high-speed internet. Here’s how you can connect your modem in a few simple steps:
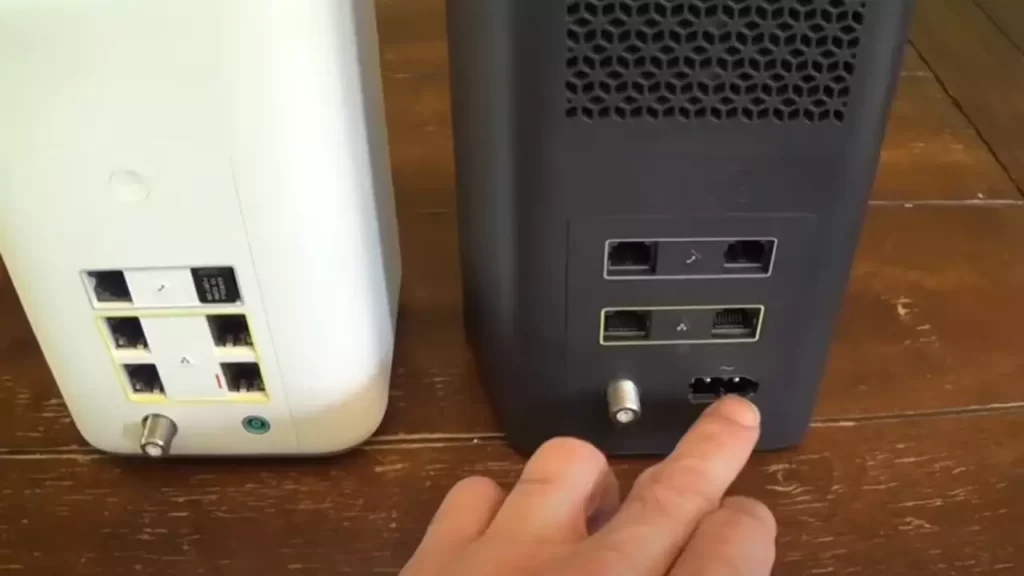
Connect one end of the coaxial cable to the cable outlet and the other end to the modem’s coaxial input.
The first step in connecting your Comcast modem is to establish a physical connection between the cable outlet and the modem itself. To do this, follow the steps below:
- Locate the cable outlet in your home. It is usually found on a wall or in a central area.
- Take the coaxial cable, which should have come with your Comcast modem, and connect one end to the cable outlet.
- Locate the coaxial input on your modem. It is usually labeled as “CABLE IN” or something similar.
- Connect the other end of the coaxial cable to the modem’s coaxial input by screwing it in securely.
- Once the connection is secure, make sure to tighten the screws to prevent any signal loss.
By following these steps, you have successfully connected the cable outlet to your Comcast modem using the coaxial cable.
Use an Ethernet cable to connect the modem’s Ethernet port to your computer.
After establishing the coaxial connection, the next step is to connect your modem to your computer via an Ethernet cable. This will allow your computer to communicate with the modem and access the internet. Here’s how you can do this:
- Locate the Ethernet port on your Comcast modem. It is usually labeled as “LAN” or “ETHERNET”.
- Take an Ethernet cable, which is often included with the modem, and connect one end to the modem’s Ethernet port.
- On your computer, find the Ethernet port, which is typically located on the back or side of the device.
- Connect the other end of the Ethernet cable to your computer’s Ethernet port.
- Ensure that both ends of the cable are securely connected.
By completing these steps, you have now established a physical connection between your Comcast modem and your computer using an Ethernet cable. This connection is essential to access the internet and enjoy all the benefits of your high-speed Comcast internet service.
Now that you have successfully connected your Comcast modem, you can move on to configuring the settings and activating your internet service. Stay tuned for the next steps in our guide on how to install your Comcast modem and router!
Power Up Your Modem
Once you have successfully connected your Comcast modem and router, it’s time to power up your modem. This step is crucial as it ensures the modem is receiving the necessary power to function properly. Follow the steps below to power up your modem:
Plug the power adapter into the modem and connect it to a power source.
To begin, locate the power adapter that came with your Comcast modem. It should have a connector that fits into the power port on the modem. Insert the power adapter into the modem’s power port until it is securely snug.
Next, find a power source near your modem. It could be a wall outlet or a power strip. Ensure that the power source is easily accessible and does not have any obstructions. Insert the power adapter into the power source, making sure it is firmly connected.
It is essential to mention that using a surge protector can provide an extra layer of protection for your modem against power spikes or surges. Though not mandatory, it is highly recommended for added safety and peace of mind.
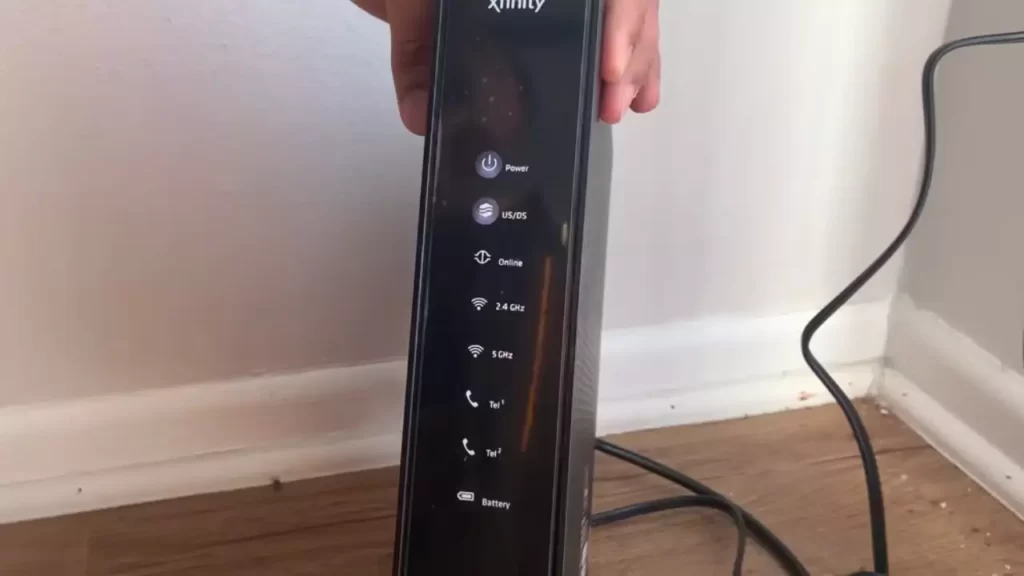
Ensure that the modem’s power light turns on, indicating that it is receiving power.
With the power adapter properly connected, take a moment to check the modem’s power indicator light. Located on the front or top of the modem, this light is a reliable indicator of the modem’s power status and helps you verify the power connection.
When the modem is correctly receiving power, you should see the power light turn on and stay illuminated. The power light is typically labeled or symbolized with “Power” or a recognizable power icon. Be patient, as it may take a few seconds for the light to come on after plugging in the power adapter.
Upon confirming that the power light is displaying a steady, glowing illumination, you can proceed with the next steps of setting up your Comcast modem and router.
Remember, a properly powered modem is fundamental to establish a stable and reliable internet connection. By following these steps and ensuring that the power light is on, you are well on your way towards a successful Comcast modem installation.
Activate Your Modem
Once you’ve successfully set up your Comcast modem and router, the next crucial step is to activate your modem. Activation ensures that your modem is properly connected to Comcast’s network, enabling you to access high-speed internet without any interruptions. In this section, we’ll guide you through the process of activating your modem in just a few simple steps.
Open a web browser and visit Comcast’s activation page.
The first step to activate your Comcast modem is to open a web browser on your computer or mobile device. Ensure that your device is connected to the modem’s Wi-Fi network or using an Ethernet cable. Once your browser is open, type in the address bar the URL for Comcast’s activation page: https://www.comcast.com/activate. Press enter or click on the go button to continue.
Follow the on-screen instructions to activate your modem.
The Comcast activation page will take you through the necessary steps to activate your modem. Simply follow the on-screen instructions, carefully reading each step before proceeding to the next. The instructions may vary slightly depending on your Comcast plan and the type of modem you have, but the overall process remains the same.
Generally, you will be prompted to enter specific information during the activation process. This information may include your Comcast account number, your S/N or serial number, and the MAC address of your modem. Ensure that you have this information readily available to expedite the activation process.
Once you have provided the necessary information, Comcast will validate and activate your modem, allowing you to start enjoying seamless high-speed internet. It may take a few minutes for the activation process to complete, but once finished, you should be good to go!
Remember: If you encounter any issues during the activation process or if you need further assistance, don’t hesitate to reach out to Comcast’s customer support. They are available 24/7 and will be more than happy to help you.
Congratulations! You have successfully activated your Comcast modem, and now you can fully utilize your internet connection. In the next section, we will explore some troubleshooting tips that can help you resolve any connectivity issues that may arise.
Unbox Your Router
Unbox your router and ensure that all the necessary components are included.
Before you begin the installation process for your Comcast modem and router, it is crucial to unbox your router properly and ensure that all the necessary components are included. This step will not only help you avoid any confusion later on but also ensure a smooth setup process. Let’s dive into the details of unboxing your router.
Once you have received your Comcast modem and router package, carefully remove the outer packaging. Inside, you will find the router box, which typically contains the following components:
- Router
- Power adapter
- Ethernet cable
- Quick start guide
Ensure that all these components are present in the box. If anything is missing, it is essential to contact Comcast immediately to resolve the issue. Having all the necessary components will enable a seamless installation process.
Next, let’s briefly go over the significance of each component:
- Router:
- The router is the main device that will distribute your internet connection and create a Wi-Fi network in your home or office.
- Power adapter:
- The power adapter is used to connect your router to a power source, ensuring that it remains powered on at all times.
- Ethernet cable:
- The Ethernet cable is used to establish a wired connection between your modem and router if desired. This connection can provide a faster and more stable internet connection.
- Quick start guide:
- The quick start guide is a booklet or document that provides step-by-step instructions on how to install and set up your Comcast modem and router. It is essential to refer to this guide for accurate and detailed instructions.
With all the necessary components in hand, you can now proceed to the next steps of the installation process. Remember to keep your components organized and easily accessible for a hassle-free setup.
Now that we have successfully unboxed your router and checked for all the necessary components, it’s time to move on to the next step in installing your Comcast modem and router. Stay tuned for the next installment of our guide, where we will discuss connecting and configuring your Comcast modem and router.
Connect Your Router
Once you have successfully installed and activated your Comcast modem, it is time to move on to connecting your router. The router allows you to create a wireless network in your home, enabling multiple devices to connect to the internet wirelessly. Follow the steps below to ensure a smooth and seamless connection between your modem and router.
Use an Ethernet cable to connect the modem’s Ethernet output to the router’s WAN or Internet port.
One of the easiest ways to connect your modem and router is by using an Ethernet cable. This cable transmits data between the two devices, ensuring a stable and reliable connection. To get started, follow these steps:
- Locate the Ethernet output on your Comcast modem. This port is typically labeled as “Ethernet” or “LAN.”
- Take one end of the Ethernet cable and plug it into the modem’s Ethernet output.
- Next, find the WAN or Internet port on your router. This port is usually labeled as “WAN” or “Internet.”
- Connect the other end of the Ethernet cable to the router’s WAN or Internet port. Make sure the connection is secure.
By connecting the Ethernet cable from the modem’s Ethernet output to the router’s WAN or Internet port, you establish a direct link between the two devices. This step allows the router to receive internet signals from the modem, which can then be distributed wirelessly to your connected devices.
Remember to check that both ends of the Ethernet cable are securely connected. Loose connections can result in reduced internet speeds or intermittent connectivity.
Once you have completed the connection, proceed to the next steps to complete the setup process of your Comcast modem and router.
Power Up Your Router
When it comes to installing your Comcast modem and router, one of the crucial steps is to power up your router. This step is essential as it ensures that your router is connected to a power source and ready to provide you with reliable internet connectivity. Follow the steps below to successfully power up your router and get your Comcast internet up and running smoothly.
Plug the power adapter into the router and connect it to a power source.
Before you power up your router, make sure you have your power adapter and a power source ready. The power adapter is typically provided with your Comcast modem and router package. It should have a plug at one end and a connector at the other end that fits into your router’s power port. Insert the connector into the router’s power port, ensuring a secure connection.
Once the power adapter is plugged into the router, it’s time to connect it to a power source. Locate an available power outlet near your router’s installation location. Ensure that the outlet is easily accessible and not blocked by any obstacles. Insert the plug of the power adapter into the power outlet with a firm push, ensuring a snug fit.
Ensure that the router’s power light turns on, indicating that it is receiving power.
With the power adapter connected to the router and the power adapter plugged into a power source, it’s time to check if your router is receiving power. Look for a power light indicator on your router, which is usually located on the front panel. The power light may vary depending on the make and model of your router.
- If the power light is off or blinking, verify the power connection. Ensure that the power adapter is securely plugged into the router and the power source. If necessary, unplug and re-plug the power adapter to ensure a proper connection.
- If the power light still does not turn on, try connecting the power adapter to a different power outlet. Sometimes, a faulty power outlet can prevent the router from receiving power.
- If after trying different power outlets, the power light remains off, make sure to contact Comcast customer support for further assistance. They can help troubleshoot the issue and provide you with necessary steps to resolve it.
By following these steps, you can power up your router and ensure that it is receiving the necessary power to provide you with a stable internet connection. Remember to always refer to your router’s user manual for specific instructions, as the steps may vary slightly depending on the make and model. With your router powered up, you’re one step closer to enjoying fast and reliable internet from Comcast.
Access The Router’S Configuration Page
Accessing the router’s configuration page is an essential step in the process of installing a Comcast modem and router. By accessing this page, you can customize the settings of your router, such as updating the firmware, changing the Wi-Fi password, and adjusting security options. Follow the steps below to easily access the router’s configuration page:
Open a Web Browser and Enter the Router’s Default IP Address
To begin, open a web browser on your computer or mobile device. In the address bar of the browser, enter the router’s default IP address. The default IP address is usually mentioned in the router’s user manual. Look for the section that provides information about the router’s default settings. This IP address will typically resemble something like “192.168.1.1” or “10.0.0.1”.
Login to the Router’s Configuration Page Using the Default Username and Password
Once you have entered the router’s default IP address, press the “Enter” key on your keyboard. This will take you to the router’s login page. As an additional step, you can also bookmark the router’s configuration page for future quick access.
To log in, enter the default username and password. These credentials are also mentioned in the router’s user manual. The default username is typically “admin” or “root”, while the default password can vary depending on the router’s manufacturer. If you can’t find the default username and password in the user manual, you can search for it on Comcast’s official support website.
After entering the correct username and password, click on the “Login” or “Submit” button. If the credentials are correct, you will be granted access to the router’s configuration page.
Once you have gained access to the configuration page, it is recommended to change the default username and password for improved security. This will prevent unauthorized access to your router’s settings and protect your network from potential threats.
Now that you have successfully accessed the router’s configuration page, you can explore the various settings and options available to customize and optimize your network. Remember to refer to the user manual or Comcast’s support website for any specific instructions or troubleshooting information related to your Comcast modem and router model.
Configure Your Home Network Settings
Follow the router’s configuration wizard to set up your wireless network name (SSID) and password.
Once you have successfully connected your Comcast modem and router, it’s time to configure your home network settings to ensure a secure and efficient connection. The first step in this process is to set up your wireless network name (SSID) and password. This will allow you to easily identify and connect to your network, while also keeping unauthorized users at bay. To perform this task, follow the steps below:
- Open a web browser on a device connected to your home network.
- Type in the default IP address of your Comcast router in the address bar. The default IP address is usually 10.0.0.1 or 192.168.0.1.
- You will be prompted to enter your router’s default username and password. These credentials can usually be found on the label on the back of your router. Enter the information and click “Login”.
- Navigate to the wireless settings section, usually located under the “Wireless” or “Network” tab in your router’s configuration interface.
- Look for the option to change your wireless network name (SSID). Enter a unique and easily recognizable name for your network. Avoid using personal information in the SSID to maintain security.
- Create a strong and secure password for your network. It is recommended to use a combination of uppercase and lowercase letters, numbers, and special characters.
- Click “Save” or “Apply” to save your changes. Your router will then restart, and your wireless network will be updated with the new SSID and password.
Customize any additional settings according to your preferences.
Configuring your home network settings doesn’t end with just setting up your wireless network name and password. There are various additional settings that you can customize according to your preferences. These settings can enhance your internet experience and improve the security of your network. Here are a few options to consider:
- Change the default login credentials: It is crucial to change the default username and password for your router to prevent unauthorized access. Set a strong and unique combination that only you know.
- Enable guest network: If you frequently have guests visiting your home, enable a separate guest network with limited access to ensure the security of your main network.
- Configure parental controls: If you have children at home, take advantage of the parental control settings to restrict access to certain websites and content.
- Set up port forwarding: If you use specific applications or services that require port forwarding, configure the necessary ports to ensure smooth functionality.
- Enable firewall and security features: Activate the built-in firewall and other security features provided by your router to protect your network from potential threats.
Remember, customization options may vary depending on the model and brand of your Comcast router. Therefore, it is recommended to consult the user manual or visit the manufacturer’s website for detailed instructions specific to your device.
In conclusion, configuring your home network settings is an essential step after installing your Comcast modem and router. Follow the router’s configuration wizard to set up your wireless network name (SSID) and password, ensuring a secure and easily identifiable connection. Additionally, customize any supplementary settings according to your preferences to enhance your internet experience and maintain network security.
Router Connectivity Issues
Troubleshoot Common Connectivity Issues
Experiencing slow or inconsistent internet connection can be incredibly frustrating. Fortunately, there are several steps you can take to troubleshoot and resolve these common router connectivity issues. By following these simple guidelines, you can ensure a seamless internet experience.
1. Check the Placement of Your Router
The placement of your router can have a significant impact on its performance. Ensure that your router is placed in a central location, away from obstructions such as walls or furniture that can interfere with the signal. Elevate your router to a higher level, like a shelf or table, to improve its range. Avoid placing the router near other electronic devices that emit wireless signals, as this can cause interference.
2. Check for Firmware Updates
Regularly updating the firmware on your router is crucial for optimal performance. Firmware updates often include bug fixes, security patches, and new features that can resolve connectivity issues. To check for updates, log in to your router’s admin panel. Navigate to the firmware settings section and follow the instructions to download and install the latest firmware version. Remember to back up your router settings before proceeding with the update.
3. Ensure Proper Network Authentication
Network authentication is essential for securing your internet connection from unauthorized access. It is recommended to use a strong password and enable WPA2 security protocol on your router. Regularly change your router password to prevent potential security breaches. Additionally, avoid using easily guessable passwords and keep them confidential.
4. Avoid Signal Interference
Signal interference can negatively affect your router’s performance. Cordless phones, microwave ovens, and baby monitors are some common household devices that can interfere with Wi-Fi signals. To minimize interference, keep these devices away from your router or switch to a different wireless channel. This can be done in the router settings section of the admin panel.
Check for Firmware Updates for Your Router to Ensure Optimal Performance
Firmware updates play a vital role in maintaining the optimal performance of your router. By regularly updating the firmware, you can improve the router’s stability, security, and overall functionality. Here are a few easy steps to check for firmware updates:
- Access the router’s admin panel by entering the IP address in your web browser. Typically, the IP address is 192.168.0.1 or 192.168.1.1, but it may vary depending on your router model. Check the router’s manual or look for the IP address on the manufacturer’s website.
- Once you’ve accessed the admin panel, navigate to the firmware settings section. The location may vary depending on your router’s interface.
- Look for an option to check for firmware updates. Sometimes, this option is labeled as “Update Firmware,” “Firmware Upgrade,” or something similar.
- Click on the firmware update option and follow the on-screen instructions to download and install the latest firmware version. Be patient as this process may take a few minutes.
- After the update is complete, restart your router for the changes to take effect.
- It’s always a good idea to make a backup of your router settings before updating the firmware. This will allow you to revert to the previous configuration if any issues arise.
Regularly checking for firmware updates ensures that your router is equipped with the latest improvements and fixes. By staying up to date, you can optimize its performance and resolve any connectivity issues that may arise. Remember to prioritize security by keeping your firmware current and by implementing strong passwords.
Modem And Router Placement
Optimize the placement of your modem and router for better signal strength and coverage
Proper placement of your Comcast modem and router is crucial in ensuring optimal signal strength and coverage throughout your home. By strategically positioning these devices, you can avoid potential obstacles and interference that may degrade your Wi-Fi connection. Here are some tips to help you optimize the placement of your modem and router:
Avoid placing them near obstacles or interference-causing devices
When it comes to the placement of your modem and router, it’s vital to steer clear of any obstacles or devices that could potentially interfere with the Wi-Fi signal. By locating your devices away from these obstructions, you can enhance your signal strength and experience a more reliable connection. Here are some common obstacles and interference-causing devices to avoid:
- Walls, furniture, or other large objects: Thick walls and bulky furniture can obstruct Wi-Fi signals and limit the coverage area. Aim to position your modem and router in an open area, if possible.
- Microwaves and cordless phones: These devices operate on similar frequencies as Wi-Fi signals and can cause interference. Keep your modem and router away from the kitchen area or any spots where cordless phones are frequently used.
- Metal objects: Metal objects like mirrors and filing cabinets can reflect Wi-Fi signals, causing signal degradation. Keep your devices away from such objects to avoid interference.
- Electrical appliances: Electrical devices like refrigerators and televisions generate electromagnetic waves that can disrupt Wi-Fi signals. Place your modem and router away from these appliances to maintain a strong and stable connection.
By avoiding these obstacles and interference-causing devices, you can optimize your Wi-Fi signal strength and coverage, ensuring a seamless browsing and streaming experience throughout your home.
Contacting Comcast Support
If you encounter any difficulties during the installation process, contact Comcast’s customer support for assistance.
Contacting Comcast Support is an essential step if you encounter any difficulties during the installation process of your Comcast modem and router. The support team at Comcast is dedicated to providing you with the assistance you need to get your internet connection up and running smoothly. Whether you are facing technical issues, configuration problems, or simply need guidance, reaching out to Comcast’s customer support will ensure that you receive real-time solutions and expert advice. Below, we have provided the necessary steps to contact Comcast support and get the assistance you need.
Contact Comcast’s Customer Support
When it comes to contacting Comcast’s customer support, you have several convenient options to choose from. Here are the ways in which you can reach out to the support team for assistance:
1. Phone Support:
– By calling Comcast’s dedicated customer support helpline at [INSERT PHONE NUMBER], you can directly speak with a representative who will guide you through the troubleshooting process.
– Make sure to have your account information and any relevant details about the issue at hand ready before making the call. This will help the support team assist you more effectively.
2. Live Chat:
– If you prefer a more online-oriented approach, you can engage in a live chat with customer support. Visit Comcast’s official website and look for the live chat option to start a conversation with a representative.
– Live chat enables you to explain your issue in detail while receiving step-by-step guidance from the support team.
3. Social Media Support:
– Comcast also offers customer support through social media platforms such as Twitter and Facebook. These channels allow you to directly message the support team with your queries.
– Keep in mind that social media responses might take slightly longer than phone or live chat support, but it provides an alternative means of reaching out to Comcast’s customer support.
When contacting Comcast support, be sure to provide a clear and concise explanation of the issue you are facing. Include any error messages, device details, and steps you have already taken to troubleshoot the problem. This will help the support team understand your situation better and provide you with the most relevant and effective solutions.
Frequently Asked Questions
How Do I Setup My Xfinity Wi-Fi Modem And Router?
To set up your Xfinity Wi-Fi modem and router, follow these steps: 1. Connect the modem to a power source and the cable jack. 2. Connect your computer or device to the modem using an Ethernet cable or Wi-Fi. 3. Open a web browser and enter “xfinity.
com/myxFi” in the address bar. 4. Follow the on-screen instructions to activate and configure your modem and router settings. 5. Once the setup is complete, you can connect your devices to your Wi-Fi network using the provided network name and password.
How Do I Install My Comcast Modem?
To install your Comcast modem, follow these steps: 1. Unbox the modem and connect it to your cable outlet. 2. Connect your modem to a power source and turn it on. 3. Connect your modem to your computer or router using an Ethernet cable.
4. Wait for the modem to establish a connection, which may take a few minutes. 5. Finally, open a browser and follow the on-screen instructions to activate your modem.
Do I Need To Call Comcast If I Get A New Modem?
No, you don’t need to call Comcast if you get a new modem. Simply connect your modem to your coaxial cable, then activate it online or call the self-activation phone number provided.
Do You Need Both Router And Modem For Xfinity?
Yes, you need both a router and modem for Xfinity. The modem connects to your internet service provider, while the router distributes the internet signal to your devices. Both are necessary for accessing and using Xfinity’s internet services.
Conclusion
Installing a Comcast modem and router doesn’t have to be a daunting task. By following the step-by-step instructions in this blog post, you can easily set up your internet connection in no time. Remember to connect the modem to the router, activate your services, and secure your network with a strong password.
With these simple steps, you’ll be enjoying high-speed internet in no time. Happy browsing!