To install a coaxial cable in a wall, drill a hole in the desired area, feed the cable through the hole, and secure the cable with a wall plate. This seamless installation ensures a neat and organized appearance while providing a reliable connection for your cable needs.
When setting up a home entertainment system or connecting devices to a cable service, installing coaxial cable within the wall can help create a clean and clutter-free look. By following a few simple steps, you can easily install a coaxial cable in your wall, ensuring a seamless connection and a tidier setup.
In this guide, we will walk you through the process of installing coaxial cable in a wall, providing you with an efficient and professional-looking installation. So let’s get started!
Factors To Consider When Selecting Coaxial Cable
When it comes to installing coaxial cable in your walls, there are several factors that you need to consider in order to ensure optimal performance. Two crucial factors to pay attention to are the cable gauge and impedance, as well as the type of cable that best suits your needs. Additionally, the length of cable needed should be carefully calculated to avoid any signal loss or poor quality connections. Let’s dive deeper into these factors:
Cable Gauge and Impedance
The cable gauge and impedance are key factors that determine the quality of your signal transmission. The cable gauge refers to the thickness of the cable’s conductor. A thicker conductor typically results in better signal quality and less signal loss. Generally, a coaxial cable with a gauge of RG6 is recommended for most applications – it strikes a good balance between signal transmission and cost-effectiveness. However, if you are dealing with long cable runs or require higher frequencies, you may want to consider a thicker cable such as RG11.
The impedance of the coaxial cable, usually measured in Ohms, is another important consideration. The most common impedance for coaxial cables is 75 Ohms, which is suitable for residential and commercial applications. This impedance ensures compatibility with most devices and maximizes signal transfer. However, for specific applications, such as long-distance transmission or professional video production, you may require a cable with 50 Ohms impedance.
Type of Cable (RG-6, RG-59, etc.)
When it comes to the type of cable, there are various options available, with RG-6 and RG-59 being the most commonly used. RG-6 is known for its enhanced signal quality and lower signal loss over longer distances, making it an ideal choice for most residential and commercial installations. On the other hand, RG-59 is more cost-effective and suitable for shorter cable runs. However, it is important to note that RG-59 has higher signal loss compared to RG-6, so it may not be the best choice for long-distance installations.
In addition to RG-6 and RG-59, there are other types of coaxial cables available in the market, each designed to meet specific requirements. For example, RG-11 is a thicker cable that offers even better signal quality over longer distances. It is commonly used for satellite or cable TV installations that require extended cable runs.
Length of Cable Needed
The length of the coaxial cable needed for your installation should be carefully considered. Using excessive cable length can result in unnecessary signal loss, degrading the quality of the signal or even causing it to be completely lost. On the other hand, using less cable than necessary can lead to poor connection quality. Therefore, it is important to measure the distance accurately and add a little extra for flexibility. Once you have calculated the total length required, you can select the appropriate cable length that comes closest to your measurement.
By considering these factors – cable gauge and impedance, type of cable, and length needed – you can ensure that your coaxial cable installation is optimized for performance and provides you with a reliable and high-quality signal for your TV, internet, or other applications.
List Of Tools
Before you begin installing coaxial cable in your wall, it’s important to ensure you have the right tools on hand. These tools will not only make the installation process easier but also help you achieve a professional-looking result. Here’s a list of must-have tools for installing coaxial cable:
Coaxial cable stripper
The first tool you’ll need is a coaxial cable stripper. This tool is specifically designed to remove the outer insulation from the coaxial cable without damaging the inner components. With a coaxial cable stripper, you can effortlessly strip the cable and prepare it for installation.
Coaxial cable compression tool
Next on the list is a coaxial cable compression tool. This tool is essential for attaching connectors to the coaxial cable. It ensures a secure and reliable connection, preventing signal loss or interference. With a coaxial cable compression tool, you’ll be able to professionally terminate the cable ends.
Drill
A drill is needed to create holes in the wall where you’ll be routing the coaxial cable. Make sure to use a drill bit that is suitable for your wall material to ensure clean and precise holes. Additionally, having a drill with adjustable speed settings allows you to control the drilling process more effectively.
Fish tape
A fish tape is a flexible tool used for pulling the coaxial cable through the wall. It eliminates the need to remove large portions of the wall to thread the cable. With a fish tape, you can easily guide the coaxial cable from one point to another, making the installation process much smoother.
Level
To ensure that your coaxial cable runs straight along the wall, a level is necessary. A level helps you achieve a professional and visually appealing installation by ensuring that the cable is perfectly horizontal or vertical. This is especially important if you want to maintain a neat and tidy appearance.
Screwdriver
A screwdriver is essential for securing connectors and wall plates. Make sure you have both Phillips and flathead screwdrivers in your toolbox, as different connectors may require different types of screws. Having the right screwdriver ensures a secure and sturdy installation.
Now that you have a comprehensive list of tools needed for your coaxial cable installation, you can be confident in your ability to complete the project successfully. Remember to use these tools safely and follow the necessary precautions to achieve a tidy and professional-looking installation.
Materials Needed
Before you begin installing coaxial cable in your wall, it’s important to gather all the necessary materials. Having the right tools and supplies on hand will ensure a smooth and successful installation process. Here are the essential materials you will need:
Coaxial cable
One of the key components of this installation is the coaxial cable itself. It is crucial to choose a high-quality coaxial cable that meets your specific requirements. Look for cables with good shielding and a thicker gauge, as these will provide better signal transmission and minimize interference.
Coaxial cable connectors
To connect the coaxial cable to various devices, such as TVs, cable boxes, or modems, you will need coaxial cable connectors. There are several types of connectors available, including F-type connectors, which are the most common for residential use. Make sure to choose connectors that are compatible with your cable and devices.
Wall plates
To create a clean and professional-looking installation, wall plates are essential. These plates provide a neat way to conceal and protect the coaxial cable connections. You can choose from various styles and finishes to match your room’s decor. Make sure to get wall plates with the appropriate coaxial connector cutouts for a proper fit.
Coaxial cable staples
Coaxial cable staples are used to secure the cable to your wall and prevent it from being accidentally pulled or damaged. These staples are designed specifically for coaxial cables and have built-in clips that securely hold the cable without crushing or pinching it. It is important to use the correct size staples for your cable and wall surface.
Wall anchors
In some cases, you may need to install the coaxial cable in a wall where there are no pre-existing cable runs. For these situations, wall anchors are necessary to provide a stable mount for your cable. Wall anchors come in various sizes and types, such as plastic or metal, and are designed to securely hold the cable in place.
By making sure you have all the necessary materials before starting the installation, you can ensure a hassle-free and efficient process. Now that you have the right tools and supplies, let’s move on to the step-by-step installation guide.
Assessing The Room Layout
Before installing coaxial cable in your wall, it is crucial to assess the room layout to ensure that you have a clear understanding of the main TV location, determine the wall cavity to run the cable through, and check for any obstacles or obstructions that may impede the installation process. By properly assessing the room layout, you can plan and execute the installation effectively, ensuring a seamless experience.
Identifying the main TV location
The first step in assessing the room layout is to identify the main TV location. This is where you plan to place the television set or the primary source of entertainment in the room. By determining the main TV location, you can then identify the most suitable wall where you would like to run the coaxial cable.
Determining the wall cavity to run the cable
Once you have identified the main TV location, the next step is to determine the wall cavity through which the coaxial cable will be run. It is crucial to select a wall that allows for easy access to the main TV location and is conducive to running the cable smoothly. Take the time to examine the room layout carefully and consider any factors that may impact the cable installation, such as the proximity to power outlets and the availability of sufficient space within the wall cavity.
Checking for obstacles or obstructions
Before proceeding with the installation, it is important to check for any obstacles or obstructions that may hinder the smooth routing of the coaxial cable. Obstacles can include electrical wiring, insulation materials, studs, or pipes within the wall. Ensure that the chosen wall does not have any significant obstructions that could either impede the cable route or damage the cable during installation. By thoroughly checking for obstacles in advance, you can avoid potential issues and ensure a successful installation.
Assessing the room layout is a key preliminary step in installing coaxial cable in the wall. By correctly identifying the main TV location, determining the wall cavity for cable installation, and checking for obstacles or obstructions, you can effectively plan and execute the installation process. This will result in optimal connectivity and a clean, organized look for your entertainment setup.
Measuring And Mapping The Route
When it comes to installing coaxial cable in your walls, taking accurate measurements and mapping out the route is crucial for a successful installation. In this section, we will guide you through the process of measuring distances, identifying electrical outlets and stud locations, and mapping the cable route.
Measuring the distance from the main TV to the wall cavity
To start, measure the distance from your main TV to the wall cavity where you plan to install the coaxial cable. This measurement will determine how much cable you need to run from point A to point B. Using a measuring tape, take the measurement in feet or meters, and make a note of it.
Identifying electrical outlets and stud locations
Next, it’s important to identify electrical outlets and stud locations along the desired cable route. This step is crucial to avoid any interference or damage to electrical wiring or structural elements. Start by visually inspecting the wall to locate electrical outlets. Use a stud finder to determine the exact position of studs in the wall. Mark these locations with a pencil or tape so that you can avoid them while running the cable.
Mapping the cable route
With the measurements and stud locations at hand, it’s time to map out the cable route. Consider the shortest and most direct path between the main TV and the wall cavity, while also avoiding obstacles such as furniture or other obstructions.
Using a pencil, lightly mark the route on the wall, indicating any turns or corners that the cable will need to navigate. Take note of any areas where you will need to drill holes to pass the cable through walls or other surfaces.
Pro Tip: If you have multiple walls to run the cable through, consider using a fish tape or a flexible cable snake to make the installation process easier. These tools can help guide the cable through tight spaces and reduce the risk of damaging walls or other components during the installation.
Once you have a clear map of the cable route, you are ready to move on to the next step of the installation process. In our next section, we will guide you through the process of preparing the walls and installing the coaxial cable, so stay tuned!
Using A Fish Tape
Installing coaxial cable in your wall can improve the quality of your audio and video signals, providing a clean and professional look. One of the most effective ways to accomplish this task is by using a fish tape. Fish tapes are flexible and allow you to navigate through tight spaces within your wall, making it easier to run the coaxial cable. In this guide, we will walk you through the process of using a fish tape to install coaxial cable in the wall.
Preparing the fish tape
Before you start feeding the fish tape through the wall cavity, it is important to prepare it properly. Here are the steps to follow:
- Measure the length of the coaxial cable that needs to be installed and add a few extra feet for allowance.
- Attach the coaxial cable to the end of the fish tape, making sure it is securely fastened.
- If the fish tape is not already extended, uncoil it and straighten it to its full length.
- Ensure that the end of the fish tape is free from any sharp edges or obstructions that could damage the wall.
Feeding the fish tape through the wall cavity
Now that your fish tape is ready, it’s time to feed it through the wall cavity. Follow these steps:
- Identify the starting point and the destination wall cavity where you want to install the coaxial cable.
- Carefully insert the end of the fish tape into the starting point, pushing it gently until it reaches the other side of the wall cavity.
- Slowly guide the fish tape through the wall cavity, making sure it follows a straight path without getting tangled.
- Continue feeding the fish tape until it reaches the destination wall cavity, ensuring it extends beyond the intended exit point.
- If you encounter any obstacles along the way, gently maneuver the fish tape around them to avoid causing damage to the wall or the cable.
Retrieving the fish tape at the destination wall cavity
Once the fish tape reaches the destination wall cavity, it’s time to retrieve it and prepare for the installation of the coaxial cable. Follow these steps:
- Gently pull the fish tape back towards the starting point, ensuring that the coaxial cable attached to it follows along.
- If the fish tape gets stuck or you encounter resistance, try gently wiggling it back and forth to dislodge it.
- Once the fish tape has been fully retrieved, detach the coaxial cable from it.
- You can now proceed with connecting the coaxial cable to the desired audio or video equipment.
Using a fish tape to install coaxial cable in the wall may seem daunting at first, but with careful preparation and execution, it can be a straightforward process. By following these steps, you can achieve a clean and professional installation that enhances the audio and video performance of your home entertainment system.
Marking Outlet Locations
When it comes to installing coaxial cable in a wall, one of the essential steps is marking the outlet locations. This ensures that you have a clear plan for where the cable will be installed and makes the process much easier. In this section, we will discuss how to identify the location for the wall plate and how to mark the spot for the coaxial cable outlet.
Identifying the location for the wall plate
The first step in marking outlet locations is identifying where you want to install the wall plate. This is where the coaxial cable will terminate and provide access for connecting your TV or other devices. To determine the best location for the wall plate, consider factors such as:
- The proximity to your devices: Choose a location that is easily accessible for connecting devices, such as your TV or cable box.
- The aesthetics of the room: Consider the placement of furniture and other wall-mounted items to ensure the wall plate blends in seamlessly.
- The existing electrical outlets: If possible, try to install the wall plate near an existing electrical outlet to minimize the length of cable needed.
Once you have identified the ideal location for the wall plate, use a pencil or a marker to mark the spot on the wall. Make sure to measure and double-check the position to ensure accuracy.
Marking the spot for the coaxial cable outlet
After marking the location for the wall plate, it’s time to mark the spot for the coaxial cable outlet. This is where the cable will enter the wall and connect to the wall plate. Here’s how to do it:
- Choose the desired height for the coaxial cable outlet. Generally, it is recommended to place it at a height of about 12-18 inches above the floor, but you can adjust this based on your preferences.
- Hold the coaxial cable against the wall, starting from the marked location of the wall plate. Move it vertically to find the appropriate spot for the outlet. You can use a level to ensure the cable will be straight.
- Once you have determined the exact spot for the coaxial cable outlet, mark it with a pencil or marker.
Now, with the wall plate location and coaxial cable outlet spot marked, you are ready to proceed with the installation. These markings will serve as reference points throughout the process, making it easier to execute the installation accurately and efficiently.
Drilling Holes
Choosing the appropriate drill bit
Before you begin drilling holes to install coaxial cable in your wall, it’s important to choose the right drill bit for the job. The drill bit you select will depend on the type of wall material you are working with. Here are some common types of drill bits and the materials they are best suited for:
| Drill Bit Type | Best Suited for Wall Materials |
|---|---|
| Masonry drill bit | Concrete, brick, or stone walls |
| Wood drill bit | Wood paneling or drywall with wooden studs |
| Tile drill bit | Ceramic or porcelain tile |
Using the appropriate drill bit will ensure a clean and precise hole, making the cable installation process much easier.
Drilling holes for cable routing
Once you have selected the right drill bit, it’s time to start drilling holes for routing your coaxial cable. Here are some steps to follow:
- Locate the area where you want to install your wall plate for the coaxial cable.
- Use a stud finder to identify any studs or other obstacles behind the wall. This will help you determine the best path for your cable.
- Mark the locations where you will drill your holes. It’s recommended to mark both the entry and exit points for the cable.
- Drill a hole at the entry point using your chosen drill bit. Start drilling at a slow speed and gradually increase until you penetrate the wall.
- If necessary, use a fish tape or a coat hanger to help guide the cable through the wall cavity.
- Once the cable is in place, drill a hole at the exit point using the same drill bit. Make sure the hole is aligned with the entry point for a smooth cable routing.
Remember to be cautious while drilling to avoid damaging any electrical wires or plumbing behind the wall. Take your time and use steady pressure to ensure a clean and precise hole.
By following these steps and using the appropriate drill bit, you can confidently install coaxial cable in your wall with ease. Happy drilling!
Running The Cable
Preparing the coaxial cable
To run the coaxial cable through the walls, you first need to prepare the cable. Ensure that you have the necessary tools for this task, including a coaxial cable stripper, a cable cutter, and a compression tool. Begin by removing about an inch of the outer sheath from each end of the cable using the stripper. Be careful not to damage the inner conductors while doing this. Once the sheath is removed, separate the shielding and the insulation layers.
Fishing the cable through the walls using the fish tape
Now that the coaxial cable is prepared, you can begin fishing it through the walls using a fish tape. Start by locating the access points in the walls where you want to run the cable. These can be existing holes or openings that you create. Insert the fish tape into one of the access points and carefully push it through the wall cavity towards the desired exit point. Use a twisting motion if needed to navigate any obstacles or corners along the way. Once the fish tape reaches the exit point, attach the prepared coaxial cable to it securely using electrical tape.
Pulling the cable through the wall cavity
With the coaxial cable properly attached to the fish tape, you can now pull it through the wall cavity. Slowly retract the fish tape while simultaneously applying gentle tension to the cable. Be cautious not to pull too hard, as this can damage the cable or cause it to get stuck. Pay close attention to any snag points or resistance while pulling the cable, adjusting your technique as necessary. Take your time to ensure that the cable is pulled smoothly and evenly through the wall cavity.
Once the cable is completely pulled through, inspect both ends to ensure that there are no visible damages. Trim any excess cable if necessary, leaving enough length to reach your intended connection points. Congratulations! You have successfully run the coaxial cable through the walls, ready to connect your devices and enjoy a seamless audio or visual experience.
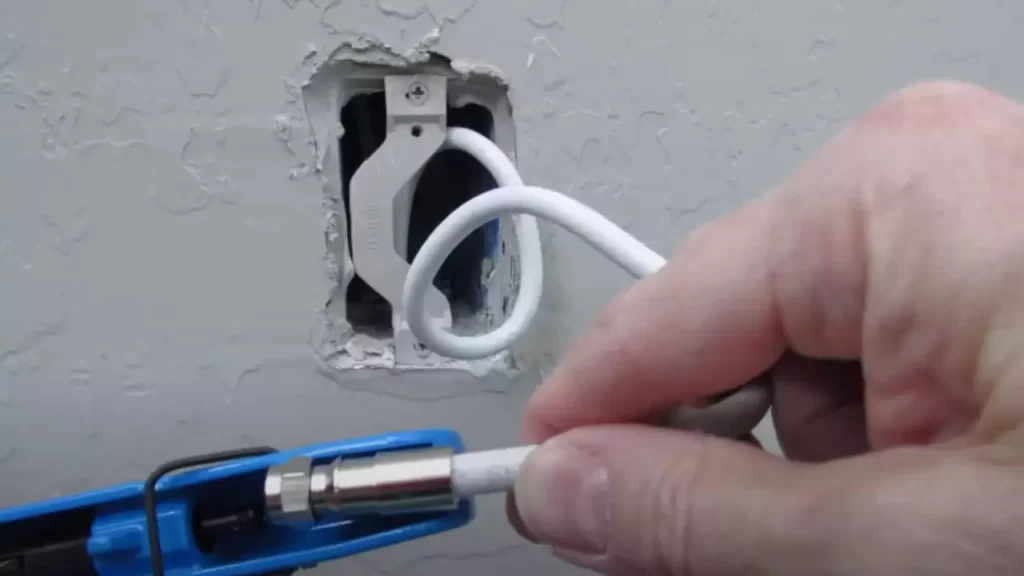
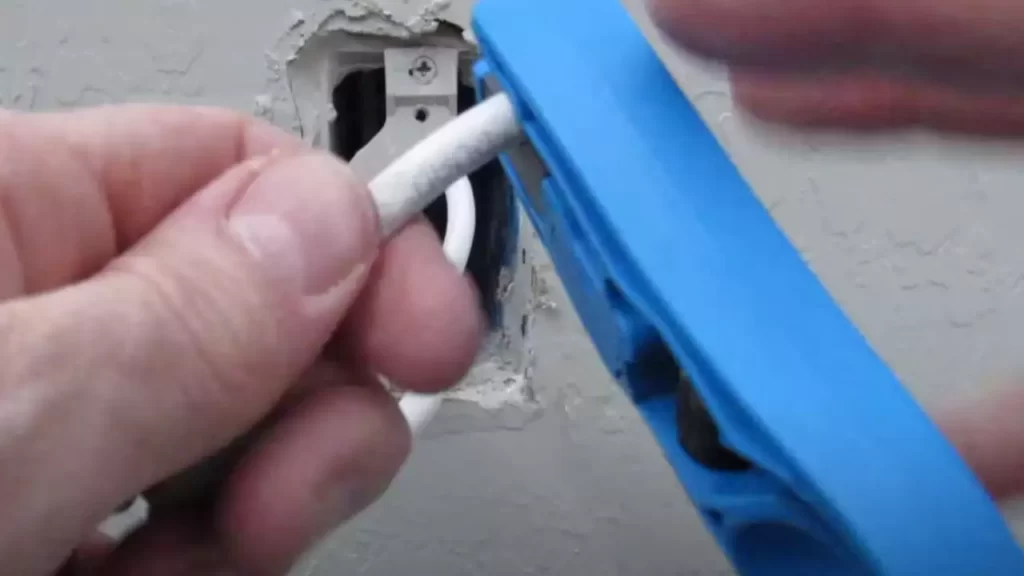
Attaching Coaxial Cable Connectors
When it comes to installing coaxial cable in a wall, one of the most important steps is attaching the connectors to the cable. This ensures a secure and reliable connection for your television or other electronic devices. In this section, we will walk you through the process of attaching coaxial cable connectors, step by step.
Stripping the outer insulation of the cable
The first step in attaching a coaxial cable connector is to strip the outer insulation of the cable. This allows you to expose the inner conductor and prepare it for connection. To do this, you will need a coaxial cable stripper tool.
To strip the outer insulation, follow these steps:
- Select the appropriate slot on the coaxial cable stripper tool that matches the size of your cable.
- Place the cable into the slot, ensuring it is fully inserted.
- Rotate the tool around the cable in a smooth motion, applying gentle pressure.
- Continue rotating until the tool cuts through the outer insulation.
- Remove the stripper tool, and gently pull the stripped insulation away from the cable.
Attaching the connector to the cable
Once you have stripped the outer insulation of the cable, you are ready to attach the connector. For this step, you will need a coaxial cable connector, which can be either a compression connector or a crimp connector.
To attach the connector to the cable, follow these steps:
- Place the connector over the exposed inner conductor of the cable.
- Make sure the connector is aligned properly with the cable.
- For compression connectors, use a compression tool to secure the connector onto the cable. Insert the cable into the compression tool, and apply steady pressure to compress the connector onto the cable.
- For crimp connectors, use a crimping tool to secure the connector onto the cable. Insert the cable into the crimping tool, and squeeze the handles firmly to crimp the connector onto the cable.
- Once the connector is attached, give it a gentle tug to ensure it is firmly in place.
Securing the connector with a compression tool
To ensure a secure and reliable connection, it is important to secure the connector with a compression tool. This tool helps to create a tight, waterproof seal between the connector and the cable.
Follow these steps to secure the connector with a compression tool:
- Place the connector into the compression tool, ensuring it is fully inserted.
- Apply steady pressure to compress the connector onto the cable.
- Continue applying pressure until the compression tool reaches its stopping point.
- Release the compression tool, and give the connector a gentle tug to ensure it is securely attached.
- Repeat the process for any additional connectors you need to attach.
By following these steps, you can successfully attach coaxial cable connectors, allowing you to enjoy a clear and reliable signal for your television or other electronic devices.
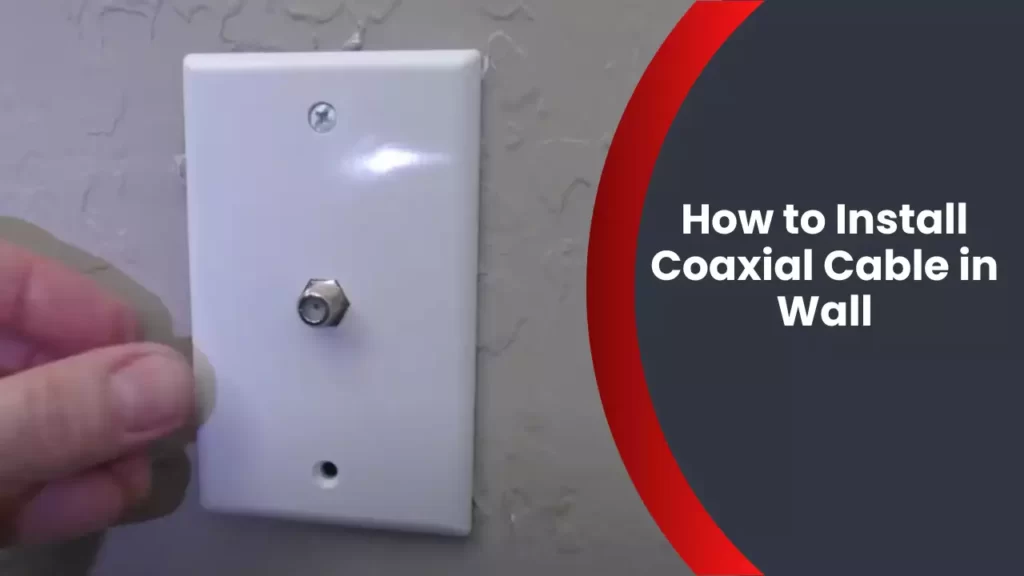
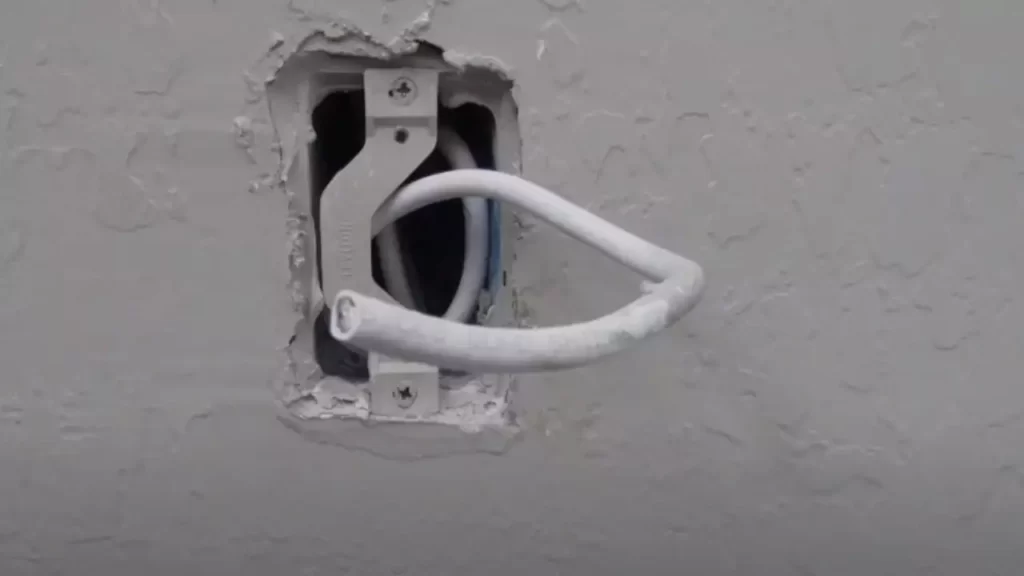
Installing Wall Plates
The process of installing coaxial cable in a wall involves several important steps, and one of those steps is installing wall plates. Wall plates provide a clean and professional look, while also protecting the cable and ensuring a secure connection. In this guide, we will walk you through the process of installing wall plates, so you can have a seamless and efficient installation.
Inserting the cable through the wall plate hole
To begin, you will first need to insert the coaxial cable through the hole in the wall plate. This hole is specifically designed to fit the cable snugly, preventing any potential signal loss or interference. Make sure the cable is properly stripped and prepared before inserting it through the hole. You can use a cable stripper tool to remove the outer protective layer and expose the inner conductor. Once the cable is ready, carefully insert it through the hole until the connector is fully seated against the wall plate. Take care not to bend or kink the cable during this process, as it can affect the signal quality.
Securing the wall plate to the wall
After inserting the cable through the wall plate, the next step is to secure the wall plate to the wall. This ensures that the wall plate stays in place and provides a stable connection for your coaxial cable. Start by aligning the screw holes on the wall plate with the corresponding holes on the wall. Insert the provided screws into the holes and tighten them using a screwdriver or drill. Make sure not to overtighten the screws, as it can damage the wall plate or the wall itself.
If you’re installing a wall plate on a drywall, you may need to use wall anchors for added stability. Wall anchors are small plastic or metal devices that provide extra support for the screws. To use wall anchors, simply insert them into the pre-drilled holes on the wall and then screw the wall plate onto the anchors. This will ensure a secure and long-lasting installation.
Once the wall plate is securely fastened to the wall, you can test the connection by connecting your coaxial cable to a TV or other device. Make sure the connection is tight and secure, and check for any signs of signal loss or interference. If everything looks good, you’re all set!
Installing wall plates is an essential step in the process of installing coaxial cable in a wall. By following these simple steps, you can ensure a professional-looking installation that provides a reliable and high-quality connection for your devices.
Connecting To Devices
Once you have successfully installed a coaxial cable in the wall, the next step is to connect it to your devices. This includes connecting the coaxial cable to your TV and also connecting it to a signal source such as a cable box or antenna. In this section, we will guide you through the process of making these connections to ensure a smooth and successful setup.
Connecting the coaxial cable to the TV
Connecting the coaxial cable to your TV is a relatively straightforward process. Here are the steps to follow:
- Locate the ‘Cable In’ or ‘RF In’ port on the back of your TV. This port is typically labeled and can often be found near the other input ports.
- Take the male end of the coaxial cable and insert it into the ‘Cable In’ or ‘RF In’ port on the TV. Make sure it is securely connected.
- Once the cable is connected, tighten the connector by turning it clockwise to ensure a solid connection.
- Now, switch on your TV and use the remote control to access the ‘Input’ or ‘Source’ button. This will allow you to select the input source for your TV.
- Select the appropriate input source that corresponds to the coaxial cable connection. This may be labeled as ‘Antenna’, ‘Cable’, or ‘TV’ depending on your TV model.
- Your TV should now be successfully connected to the coaxial cable. You can proceed to scan for channels or access cable programming, depending on your setup.
Connecting the cable to a signal source (cable box, antenna, etc.)
If you are using a signal source such as a cable box or antenna, you will need to connect the coaxial cable to that device as well. Here are the steps to follow:
- Locate the ‘Cable In’ or ‘RF In’ port on the back of your signal source device. This port is typically labeled and can often be found near the other input ports.
- Take the male end of the coaxial cable and insert it into the ‘Cable In’ or ‘RF In’ port on the signal source device. Make sure it is securely connected.
- Once the cable is connected, tighten the connector by turning it clockwise to ensure a solid connection.
- If you are using a cable box, make sure it is powered on and connected to your TV using an HDMI or composite cable.
- If you are using an antenna, make sure it is positioned properly to receive a good signal.
- With the signal source device powered on, switch on your TV and select the corresponding input source for the coaxial cable connection.
- You should now be able to access the signal from your signal source device through your TV.
By following these steps, you can easily connect your coaxial cable to your TV and signal source device, allowing you to enjoy high-quality audio and video content without any hassle. Ensure that all connections are tight and secure to avoid any signal loss or interference. Happy viewing!
Checking Signal Strength And Quality
Once the coaxial cable has been properly installed in the wall, it is important to check the signal strength and quality to ensure optimal performance of your television or internet connection. By following a few simple steps, you can ensure that you are getting the best possible signal for crystal-clear picture and reliable internet speeds.
Scanning for available channels
The first step in checking the signal strength and quality of your coaxial cable is to scan for available channels on your television. This can be easily done by accessing the settings menu on your TV and selecting the “auto-tune” or “channel scan” option. During the scanning process, your television will search for available channels and save them for future viewing. Make sure to perform a full channel scan to ensure that you are not missing out on any new or recently added channels.
Testing the signal strength and quality
Once the channel scan is complete, you can now test the signal strength and quality of each channel. This will help you identify any potential issues, such as weak signals or signal interference, which may affect your viewing experience or internet connection. Here are a few methods to test signal strength and quality:
- Check the signal strength indicator on your television: Most modern televisions have a built-in signal strength indicator, which can be found in the settings menu. This indicator will provide you with a visual representation of the signal strength for each channel. Ensure that the signal strength is at an optimal level for good reception.
- Analyze the signal quality data: Some televisions also provide the option to analyze the signal quality data. This includes metrics such as signal-to-noise ratio and bit error rate. A higher signal-to-noise ratio and a lower bit error rate indicate better signal quality.
- Perform a manual channel test: If you notice any issues with specific channels, you can also perform a manual channel test. This involves manually tuning to the desired channel and checking for any pixelation, distortion, or freezing of the image. These issues may indicate a weak signal or interference.
- Use a signal strength meter: For a more accurate measurement, you can use a signal strength meter. This device measures the signal strength and quality of the coaxial cable directly. Simply connect the meter to the coaxial cable and tune to the desired channel. The meter will display the signal strength and quality, allowing you to make adjustments if needed.
By following these steps to scan for available channels and test the signal strength and quality, you can ensure that your coaxial cable installation is complete and functioning optimally. Remember to periodically recheck the signal strength and quality to maintain the best possible performance for your television or internet connection.
Securing The Cable
Properly securing the coaxial cable along its route is essential to ensure a clean and professional installation. By using cable staples, you can neatly fasten the cable to the wall and keep it safely in place. Here is a step-by-step guide on how to secure your coaxial cable using cable staples:
Step 1: Gather the Tools
Before you begin, make sure you have all the necessary tools and materials. Here’s what you’ll need:
- Cable staples
- Staple gun
- Tape measure
- Pencil or marker
- Drill (optional)
Step 2: Determine the Route
Decide on the path you want the coaxial cable to take along the wall. Use a tape measure to measure the length of the cable needed, and mark the route with a pencil or marker.
Step 3: Secure the Cable
Once you have marked the route, it’s time to start securing the cable. Follow these steps:
- Starting at one end of the route, position the coaxial cable against the wall.
- Take a cable staple and place it over the cable, ensuring that the staple is perpendicular to the wall.
- Using the staple gun, firmly press the staple into the wall, securing the cable in place.
- Continue this process along the entire route, spacing the staples approximately every 12-18 inches.
- If you encounter corners or turns, use additional staples to secure the cable in place, ensuring it remains taut and free from any bends or kinks.
By securing the cable with cable staples, you not only keep it neatly organized but also prevent any accidental damage or tripping hazards. Ensure that the staples are firmly secured to the wall without causing any damage to the cable itself.
In some cases, such as when the wall surface is not suitable for staples, you may need to use alternative methods such as adhesive clips or conduit to secure the cable. Always choose the method that best suits your wall surface and ensures the cable is held securely.
A clean and secured cable installation not only enhances the visual appeal of your space but also eliminates any potential interference or signal loss caused by loose or dangling cables. Take the time to secure your coaxial cable properly, and enjoy seamless connectivity for your entertainment needs.
Concealing The Cable
Once you have successfully run the coaxial cable through the wall, the next step is to conceal it. Concealing the cable not only makes your living space look tidy, but it also prevents the cable from being a tripping hazard or getting damaged. In this section, we will explore different options for hiding or disguising the cable, ensuring a seamless installation that prioritizes both functionality and aesthetics.
Options for hiding or disguising the cable
When it comes to concealing coaxial cables, there are various options available based on your specific needs and preferences. Here are some popular methods:
- Using cable management solutions: Cable management solutions are an excellent choice when it comes to organizing and hiding cables. You can opt for cable raceways, which are adhesive channels that can be easily mounted on your walls. These provide a neat and discreet pathway for your coaxial cable, keeping it neatly tucked away. Alternatively, you can also consider cable sleeves that allow you to bundle multiple cables together, providing a clean and organized look.
- Concealing the cable behind molding: Another popular method is to conceal the coaxial cable behind molding. This involves using cable clips or staples to secure the cable along the baseboards or crown molding. By running the cable along the wall’s perimeter, you can effectively hide it from plain sight, creating a seamless and uncluttered appearance.
- Installing the cable inside the wall: If you’re looking for a more permanent and professional installation, consider installing the coaxial cable inside the wall. This method involves cutting small holes in the wall, feeding the cable through, and then patching and painting over the holes. While this option may require more effort and skill, it offers the cleanest and most inconspicuous solution.
By choosing one of these methods for concealing your coaxial cable, you can ensure a clean and polished look while maintaining the functionality of your home entertainment system. Consider your specific requirements and the level of permanence you desire when selecting the best option for your installation.
Frequently Asked Questions
How Do You Get Coaxial Cable Through A Wall?
To get a coaxial cable through a wall, drill a hole slightly larger than the cable’s diameter, ensuring it aligns with the desired entry point. Next, thread the coaxial cable through the hole while being careful not to damage or kink it.
Finally, seal the hole to prevent air or moisture infiltration.
Do Electricians Install Coaxial Cable?
Yes, electricians can install coaxial cable. They are skilled in performing wiring tasks, including installing and connecting coaxial cables for various purposes. Their expertise ensures proper installation and efficient functioning of the cable.
Can You Install A Coax Cable Yourself?
Yes, you can install a coax cable yourself. It’s a straightforward process that doesn’t require professional assistance. Just connect the cable to the device and the wall outlet, ensuring a secure and tight connection. Remember to follow safety guidelines and handle the cable carefully.
Does Every House Have A Coax Outlet?
Yes, every house does not necessarily have a coax outlet. Availability depends on the house’s wiring and the desired TV or internet setup. It is recommended to check with a professional technician to determine if a coax outlet is available in your house.
Conclusion
Installing coaxial cable in your walls may seem like a daunting task, but with the right guidance, it can be a simple and efficient process. By following the step-by-step instructions provided in this blog post, you can ensure a smooth installation that will enhance your home entertainment experience.
Remember to plan your cable route, use the appropriate tools and techniques, and take precautions to avoid any damage to your walls. So go ahead, confidently install that coaxial cable and enjoy seamless connectivity in every room of your home.