To install chair rail moulding, measure and mark the desired height on the wall, cut the moulding to fit, and attach it to the wall using adhesive or nails. Adding chair rail moulding to a room can enhance its visual appeal and provide a touch of elegance.
It not only adds character but also serves as a protective barrier for walls. Installing chair rail moulding is a straightforward process that can be done with basic tools and materials. In this guide, we will walk you through the steps to install chair rail moulding properly.
By following these simple instructions, you can transform your space and achieve a polished and professional look. So, let’s get started on installing chair rail moulding in your room.
Understanding Chair Rail Moulding
Chair rail moulding is a decorative trim installed along the walls of a room, typically positioned at chair height. It not only adds visual appeal but also protects the walls from furniture damage. Whether you’re looking to enhance the elegance of your dining room or give your living space a touch of sophistication, chair rail moulding can be the perfect solution. In this section, we will explore what chair rail moulding is, the different types available, and the benefits of installing it.
What is Chair Rail Moulding?
Chair rail moulding, also known as chair rail trim or simply chair rail, is an architectural element that serves both practical and aesthetic purposes. Installed horizontally along the walls, it usually runs at a height between 30 to 36 inches from the floor, although this can vary based on personal preference and the overall design of the room.
Different Types of Chair Rail Moulding
Chair rail moulding comes in various materials and styles, allowing you to choose the perfect option for your home’s interior. Some common types include:
| Type | Description |
|---|---|
| Wooden Chair Rail Moulding | Provides a classic and timeless look, often crafted from hardwoods like oak or maple. |
| MDF Chair Rail Moulding | Made from medium-density fiberboard, it offers affordability and versatility. |
| Plaster Chair Rail Moulding | Offers a more refined and elegant appearance, typically found in older, historic homes. |
Benefits of Installing Chair Rail Moulding
There are several reasons why installing chair rail moulding can be advantageous for your home:
- Enhanced Visual Appeal: Chair rail moulding adds depth, character, and visual interest to any room, giving it an elegant and refined look.
- Wall Protection: It acts as a shield, protecting your walls from scuffs, scratches, and dents that can occur from furniture or accidental bumps.
- Definition and Division: Chair rail moulding helps to define and divide spaces, creating a sense of proportion and separating different areas within a room.
- Design Versatility: With a wide range of styles, materials, and finishes available, chair rail moulding allows you to customize your home’s interior to match your personal taste and decor.
- Increased Property Value: The addition of chair rail moulding can enhance the overall value and appeal of your home, making it more attractive to potential buyers.
By understanding the different types and benefits of chair rail moulding, you can make an informed decision about incorporating this elegant detail into your home’s interior design.
Tools And Materials Needed
When it comes to installing chair rail moulding, having the right tools and materials is essential. Having these items on hand will make the installation process much smoother and ensure a professional-looking result. In this section, we will discuss the essential tools for installation, the types of chair rail moulding materials available, and the additional supplies required for a successful installation.
Essential Tools for Installation
Before you begin installing chair rail moulding, you’ll need to gather a few essential tools. These tools will help you measure, cut, and secure the moulding to the wall.
| Tool | Description |
|---|---|
| Tape Measure | To accurately measure the length of the walls and the moulding pieces. |
| Miter Saw | A saw with a miter function to make precise angled cuts for corners. |
| Level | To ensure the moulding is straight and level along the wall. |
| Pencil | To mark where to make cuts and to indicate the height of the chair rail. |
| Hammer | To secure the moulding to the wall using finishing nails. |
| Finishing Nails | Nails with small heads that are used to attach the moulding to the wall. |
| Putty Knife | To fill any nail holes or gaps with wood filler or caulk. |
Types of Chair Rail Moulding Materials
Chair rail moulding comes in a variety of materials, each with its own unique characteristics and installation requirements. The material you choose will depend on your budget, personal preference, and the overall style of your space. Here are some of the most common types of chair rail moulding materials:
- Wood: Wood is a classic choice for chair rail moulding. It can be stained or painted to match your decor, and it adds a timeless, elegant look to any room.
- MDF: Medium-density fiberboard, or MDF, is a cost-effective alternative to solid wood. It is easy to cut and shape, making it a popular choice for DIY enthusiasts.
- Plaster: Plaster moulding offers a luxurious and decorative option for chair rail installation. It requires professional installation and is more expensive than other materials.
- Polyurethane: Polyurethane moulding is lightweight, durable, and easy to install. It is a great choice for high-moisture areas, as it is resistant to warping and rotting.
Additional Supplies Required
In addition to the essential tools and chair rail moulding material, you will need a few additional supplies to complete the installation:
- Wood Filler: Wood filler is used to fill any nail holes or gaps in the chair rail moulding for a seamless look.
- Caulk: Caulk is used to fill any visible gaps between the moulding and the wall for a professional finish.
- Sandpaper: Sandpaper is helpful for smoothing the edges and surfaces of the chair rail moulding before painting or staining.
- Paint or Stain: Depending on the material and finish you choose, you will need paint or stain to complete the look of your chair rail moulding.
With the essential tools and materials in hand, you’ll be well-equipped to tackle the installation of chair rail moulding in your home. In the next section, we will guide you through the step-by-step process of installing chair rail moulding, so stay tuned!
Preparing For Installation
Before you start installing chair rail moulding, proper preparation is essential. This will not only ensure a smooth installation process but also guarantee the best results. In this section, we will guide you through the necessary steps to prepare for the installation of chair rail moulding. From taking accurate measurements to determining the placement and creating a layout plan, we’ve got you covered.
Taking Accurate Measurements
Taking accurate measurements is crucial to ensure your chair rail moulding fits perfectly in your space. Here’s how you can do it:
- Begin by measuring the length of each wall where you plan to install the chair rail moulding. Use a measuring tape and record the measurements in inches.
- Measure the height of the wall from the floor to the desired height of the chair rail. Again, record this measurement in inches.
- If your walls have intricate features or corners, it’s essential to measure the distance between these elements accurately. This will help you make precise cuts and ensure a seamless installation.
Determining the Placement of Chair Rail Moulding
Once you have the measurements, the next step is to determine where to place the chair rail moulding on your walls. Here are some tips:
- Consider the height of your chair rail moulding and the overall aesthetic you want to achieve. The standard height for chair rail moulding is typically around 30 to 36 inches above the floor, but this can vary depending on your preferences and the style of your space.
- Visualize the chair rail in different positions on the wall, taking into account the furniture and other decorative elements in the room. You can even use painter’s tape to create mock-up lines on the wall to help you visualize the final result.
- Ensure that the chair rail moulding is not placed too high or too low, as it should complement the overall proportions of the room.
Marking the Wall and Creating a Layout Plan
Now that you have determined the placement of the chair rail moulding, it’s time to mark the wall and create a layout plan. Here’s what you need to do:
- Using a pencil and a level, mark the desired height of the chair rail on each wall. Make sure the marks are straight and consistent throughout the room.
- Measure and mark the distance of the chair rail from any corner or feature on the wall. This will help you create a layout plan and guide the installation process.
- Consider dividing long walls into equal segments to maintain a balanced and visually pleasing look. You can use the measurements you took earlier to divide the wall into sections.
By following these steps, you will have a clear plan and accurate markings for the installation of your chair rail moulding. In the next section, we will dive into the installation process itself, so stay tuned!
Installing Chair Rail Moulding
Installing chair rail moulding is a great way to add a touch of elegance and sophistication to any room. This decorative trim not only protects your walls from the daily wear and tear but also adds a distinct visual appeal. Whether you’re looking to enhance the charm of your dining room or create a statement in your hallway, chair rail moulding is an excellent choice.
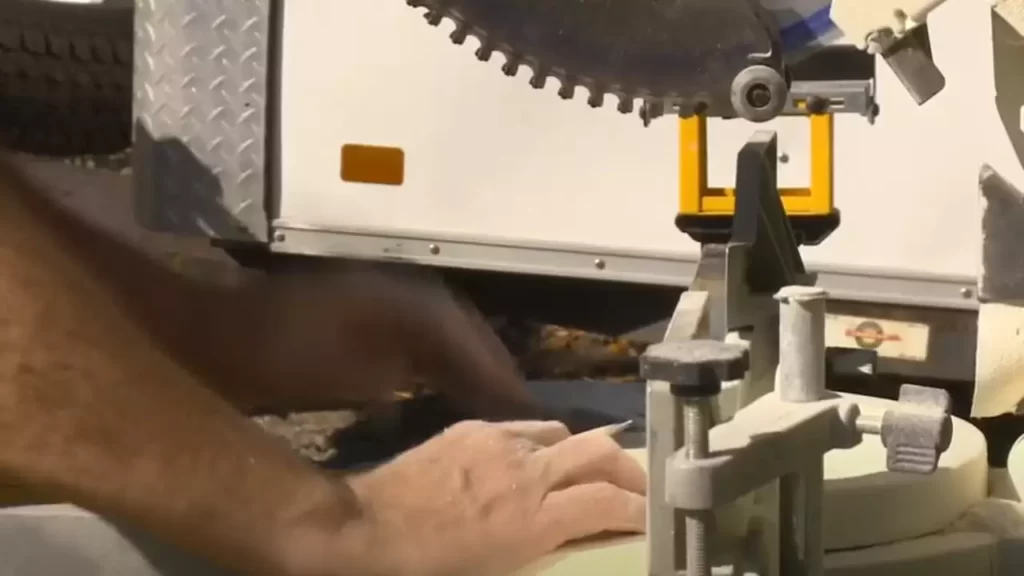
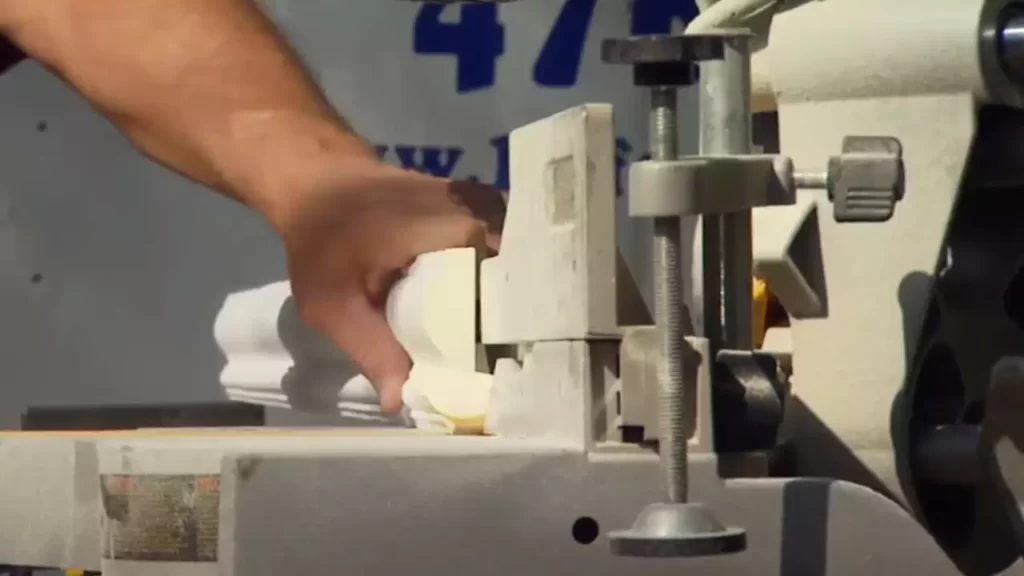
Cutting the chair rail moulding to size
Before you start the installation process, it’s crucial to measure and cut the chair rail moulding to the appropriate size. To accomplish this, follow these steps:
- Measure the length of your wall where you plan to install the chair rail moulding. Make sure to take precise measurements for an accurate fit.
- Transfer the measurements onto the chair rail moulding, ensuring that you are marking the correct end for each piece.
- Using a miter saw or a coping saw, carefully cut the chair rail moulding along the marked lines. Take your time to ensure clean and precise cuts.
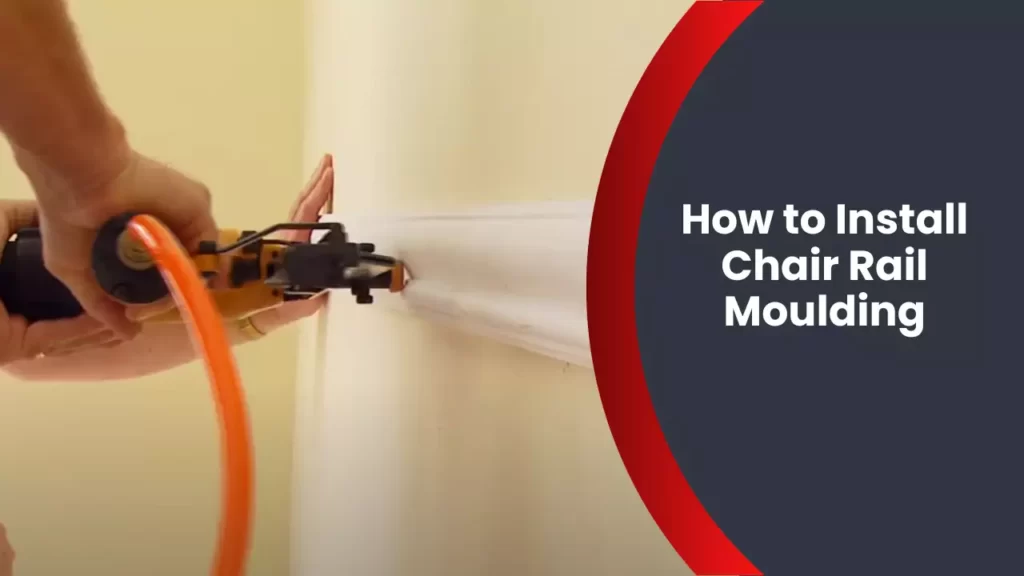
Applying adhesive or using nails for installation
Once you have the chair rail moulding cut to size, it’s time to consider the method of installation. There are two common approaches:
- Adhesive: For a seamless and nail-free installation, you can opt for adhesive. Apply a small amount of carpenter’s adhesive to the back of the chair rail moulding, following the manufacturer’s instructions. Press the moulding firmly against the wall, ensuring it is level and aligned with your measured markings. Use painter’s tape or clamps to hold it in place until the adhesive dries completely.
- Nails: If you prefer a more traditional approach, you can secure the chair rail moulding to the wall using nails. Pre-drill pilot holes into the moulding at regular intervals, ensuring they are evenly spaced. Align the moulding with your measurements and use finishing nails to secure it to the wall. Make sure the nails are countersunk so that you can easily cover them with wood putty.
Securing the chair rail moulding onto the wall
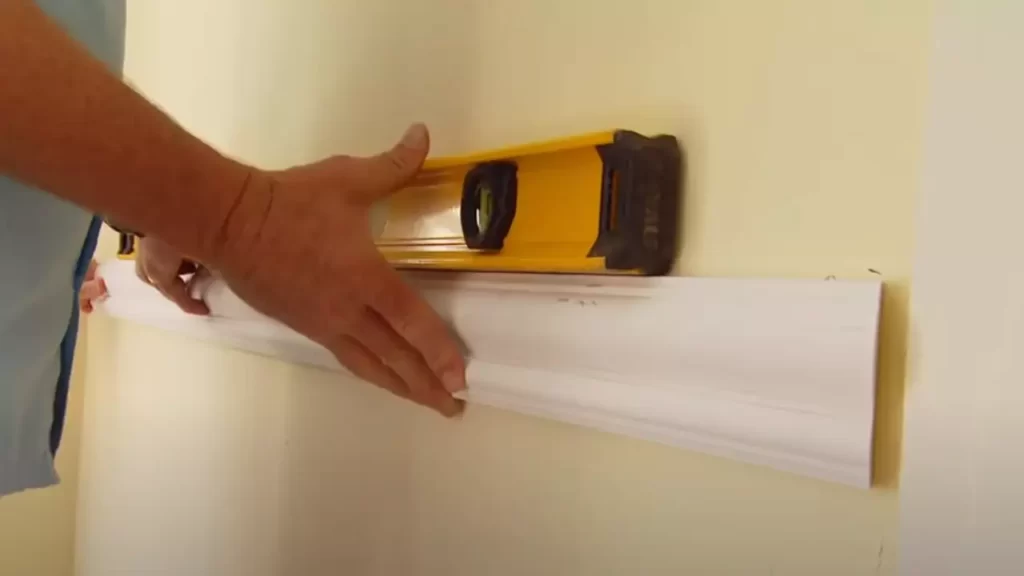
Regardless of the installation method you choose, it’s important to securely attach the chair rail moulding to the wall to ensure its longevity. Here are a few tips:
- For adhesive installation, avoid excessive use of adhesive, as it can damage the wall or leave residue.
- If using nails, make sure they are long enough to penetrate both the moulding and the wall, but not too long to avoid splitting the wood.
- Use a level to ensure the chair rail moulding is straight and aligned with your marks before securing it.
- Consider using an additional adhesive or caulk along the top and bottom edges of the moulding for added stability and a seamless finish.
- Once the chair rail moulding is in place, use a damp cloth or sponge to wipe away any excess adhesive or putty and allow it to dry completely.
By following these steps, you can confidently install chair rail moulding in your home. This simple yet effective method will transform your space and create a stunning visual impact. So, grab your tools and get ready to elevate the style of your walls.
Enhancing The Look And Finish
The installation of chair rail moulding not only adds architectural interest to your walls but also serves as a practical solution for protecting your walls against scuffs and dents caused by furniture. However, to truly enhance the overall look and finish of your chair rail moulding, there are a few additional steps you can take. From filling nail holes and gaps to sanding and smoothing the surface, as well as choosing the right paint or finish, these tips will ensure a polished and professional appearance.
Filling Nail Holes and Gaps
Before painting or finishing your chair rail moulding, it’s essential to fill any nail holes or gaps for a seamless look. Start by lightly sanding the area around the hole or gap to ensure a smooth surface. Then, using a high-quality wood filler or putty, fill the hole or gap. Remove any excess filler with a putty knife and allow it to dry completely. Once dry, sand the filled area until it is flush with the surrounding moulding. This step will ensure that your chair rail moulding appears flawless and professional when painted or finished.
Sanding and Smoothing the Chair Rail Moulding
To achieve a smooth and refined finish, it’s crucial to sand your chair rail moulding before applying any paint or finish. Start by using a medium-grit sandpaper to sand the entire surface of the moulding. Sand with the grain in long, even strokes to avoid any unevenness. Once you’ve smoothed the surface with the medium-grit sandpaper, switch to a fine-grit sandpaper to further refine the finish. Be sure to remove any dust or debris from the sanding process before proceeding to the next step.
Choosing the Right Paint or Finish for a Polished Look
To achieve a polished and cohesive look, it’s essential to choose the right paint or finish for your chair rail moulding. Consider the overall style and color scheme of the room when selecting your paint or finish. If you’re aiming for a classic and elegant look, a glossy or semi-gloss paint can work wonders. On the other hand, if you prefer a more rustic or natural appearance, a stain or clear coat can highlight the natural beauty of the wood. Whichever option you choose, be sure to apply the paint or finish evenly and allow it to dry thoroughly between coats for the best results.
Maintenance And Care
Proper maintenance and care of your chair rail moulding are essential to ensure its longevity and keep it looking its best. By following a few simple maintenance tips, you can keep your chair rail moulding in top shape for years to come.
Cleaning and dusting chair rail moulding
To maintain the beauty of your chair rail moulding, regular cleaning and dusting are necessary. Here are a few steps you can follow:
- Begin by using a soft, dry cloth or a feather duster to remove any loose dust and debris from the chair rail moulding. This gentle cleaning method helps prevent scratches or damage to the surface.
- If there are stubborn stains or dirt buildup, you can use a mild liquid cleaner diluted with water. Apply the solution with a soft cloth or sponge, carefully wiping the surface of the moulding.
- After wiping down the surface, make sure to rinse off any soap residue with a clean, damp cloth. Leaving soap residue can lead to discoloration or damage to the chair rail moulding over time.
- Finally, use a dry cloth to gently dry the chair rail moulding and restore its shine.
Repairing any damages or cracks
Even with proper maintenance, chair rail moulding may experience some damages or cracks over time. Here’s how you can repair them:
- If there are small cracks or gaps in the moulding, you can fill them with wood filler or putty. Apply the filler using a putty knife, making sure to smooth it over the damaged area. Allow it to dry completely before sanding it down gently.
- In case of larger damages or broken pieces, you may need to consider replacing the affected section. Measure and cut a new piece of moulding to fit, then attach it using adhesive or nails, ensuring a seamless connection.
Long-term maintenance tips to extend its lifespan
To maximize the lifespan of your chair rail moulding, consider these long-term maintenance tips:
- Avoid excessive moisture exposure, as it can cause warping or peeling of the moulding. Wipe off any spills or moisture immediately.
- Regularly check for any loose or damaged sections. If you notice any, take immediate action to prevent further damage.
- Protect the moulding from direct sunlight, as prolonged exposure can lead to fading or discoloration. Consider using window treatments or UV-resistant coatings.
By following these maintenance and care tips, you can keep your chair rail moulding looking beautiful and functioning properly for years to come.
Design Ideas And Inspiration
Incorporating chair rail moulding into your home decor is a fantastic way to add elegance and sophistication to any room. This classic architectural feature not only adds visual interest but also provides practical protection for your walls. Looking for design ideas and inspiration? We’ve got you covered with creative ways to incorporate chair rail moulding, tips for mixing and matching styles, and ideas for styling chair rail moulding in different rooms.
Creative ways to incorporate chair rail moulding into your home decor
If you are looking to go beyond the traditional use of chair rail moulding, here are some creative ideas to inspire you:
- Statement Wall: Create a stunning statement wall by installing chair rail moulding in a unique pattern or design. Consider using different colors or textures to make it stand out even more.
- Accentuate Artwork: Frame your artwork by placing chair rail moulding around it. This not only adds a decorative element but also draws attention to your favorite pieces.
- Functional Shelf: Install chair rail moulding a few inches above a shelf, creating a convenient space to display small items like books, plants, or decorative objects.
- Framing Mirrors: Enhance the look of your mirrors by framing them with chair rail moulding. This simple addition can transform a plain mirror into a stunning focal point.
Mixing and matching chair rail moulding styles
Mixing and matching chair rail moulding styles can create a unique and personalized look for your space. Consider the following tips:
- Contrast in Size: Combine different sizes of chair rail moulding to create depth and visual interest. Pair a wider chair rail with a narrower one to add dimension to the room.
- Blend Traditional with Modern: Mix traditional chair rail moulding styles with more contemporary ones to create an eclectic design that suits your personal taste.
- Experiment with Materials: Think beyond the usual wood chair rail moulding. Explore options like metal, plaster, or even decorative wallpaper borders to add a touch of uniqueness.
Styling chair rail moulding in different rooms
Chair rail moulding can be stylishly incorporated into various rooms of your home. Consider these ideas for styling different spaces:
| Room | Idea |
|---|---|
| Living Room | Paint the chair rail moulding and the area below it in a contrasting color to create a visual separation between the walls, making the room look more spacious. |
| Dining Room | Pair chair rail moulding with wainscoting to add a touch of elegance and formality to the space. Consider using a chair rail with intricate detailing for added visual appeal. |
| Bedroom | Install chair rail moulding at the height of a headboard for a polished and sophisticated look. Paint the wall above the chair rail in a coordinating color for a cohesive design. |
When it comes to styling with chair rail moulding, the possibilities are endless. Let your creativity flow and experiment with different ideas to find the perfect fit for your home.
Frequently Asked Questions
When it comes to installing chair rail moulding, many people have a few common questions. In this section, we’ll address some of the frequently asked questions about chair rail moulding installation. Whether you’re wondering about the suitability of textured walls, how to remove the moulding without damaging the wall, or whether professional installation is recommended, we’ve got you covered.
Can chair rail moulding be installed on textured walls?
Yes, chair rail moulding can be installed on textured walls. The key to a successful installation lies in ensuring that the moulding adheres securely to the wall. Regardless of the texture, there are a few steps you can take to ensure a strong bond. First, it’s important to use a construction adhesive that is suitable for your specific wall texture.
Secondly, consider using additional support such as finishing nails or screws to reinforce the installation. By following these steps, you can achieve a well-installed chair rail moulding, even on textured walls.
How do I remove chair rail moulding without damaging the wall?
Removing chair rail moulding without damaging the wall can be a delicate process. You’ll want to proceed with caution to avoid unnecessary repairs. Start by scoring the paint along the top edge of the moulding using a utility knife. This helps to prevent any paint or drywall from peeling off with the moulding. Next, insert a pry bar or putty knife between the moulding and the wall. Gently apply pressure to pry the moulding away from the wall, taking care not to damage the underlying structure. If necessary, you can also use a heat gun to soften the adhesive for easier removal. By taking your time and being careful, you can safely remove chair rail moulding without causing damage to the wall.
Is professional installation recommended for chair rail moulding?
While it’s possible to install chair rail moulding yourself, professional installation is recommended for those who may not have prior experience or who are unsure of their DIY skills. Hiring a professional ensures that the moulding is installed correctly, providing a polished and finished look.
Professionals have the necessary tools and expertise to handle any challenges that may arise during the installation process. Additionally, they have a keen eye for detail and can create precise and seamless installations. Investing in professional installation not only saves you time and potential frustration but also guarantees a high-quality result.
Frequently Asked Questions
Should I Glue Chair Rail To Wall?
Yes, you can glue a chair rail to the wall. It provides an attractive and decorative element while protecting the walls from chair damage. Use adhesive suitable for your wall material and ensure proper alignment for a secure and long-lasting installation.
How Do You Secure A Chair Rail To The Wall?
To secure a chair rail to the wall, follow these steps: First, use a level to mark the desired height of the rail. Then, drill pilot holes into the wall at regular intervals. Next, apply construction adhesive to the back of the chair rail.
Finally, press the rail firmly against the wall and secure it with finishing nails.
Do You Need To Glue Chair Rail?
No, gluing chair rail is not necessary. Chair rail can be installed using nails or screws. It is important to ensure a secure and level installation, but gluing is not required.
How Should Chair Rail Be Installed?
To install a chair rail, follow these guidelines: 1. Measure the desired height and mark it along the wall. 2. Use a level to draw a horizontal line along the marked height. 3. Secure the chair rail to the wall using nails or adhesive, following the line.
4. Use a miter saw to cut the rail at 45-degree angles for corners. 5. Install additional rails if desired, making sure they are evenly spaced.
Conclusion
To sum up, installing chair rail moulding is a simple yet impactful way to add elegance and character to your space. By following these step-by-step instructions and using the right tools and materials, you can achieve professional-looking results. Don’t be afraid to experiment with different styles and heights to find the best fit for your room.
So go ahead, embrace your creativity, and transform your walls with chair rail moulding. Happy installing!