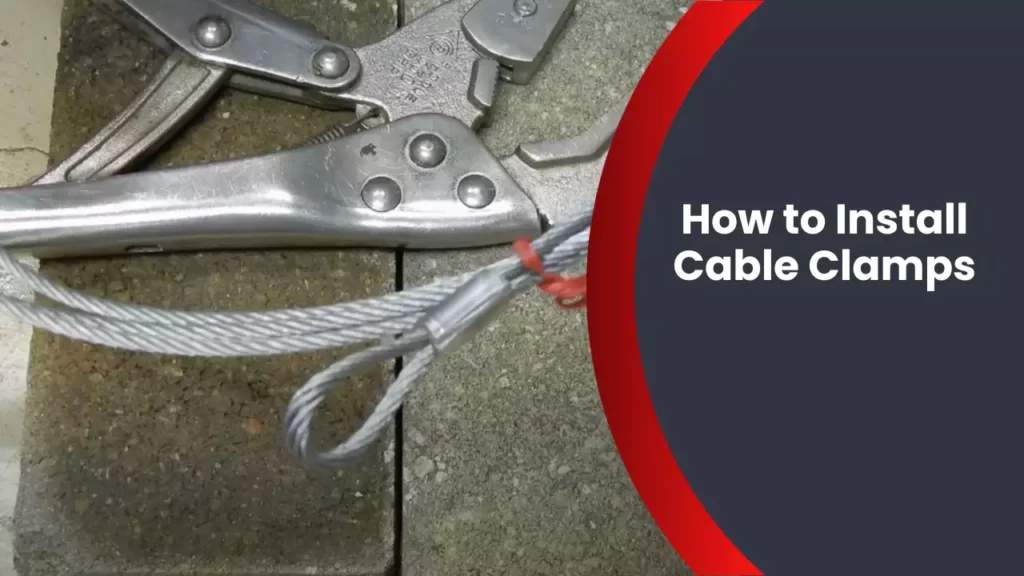
To install cable clamps, secure the clamp around the cable using a screw or adhesive and tighten it until secure. Cable clamps are an essential component in cable management systems, ensuring that cables are organized and secured.
Whether you are setting up a home theater system or working on an industrial project, knowing how to install cable clamps is a valuable skill. These clamps come in various sizes and designs, allowing you to choose the most suitable option for your specific needs.
We will provide a step-by-step guide on how to install cable clamps efficiently and effectively. By following these simple instructions, you can ensure that your cables are neatly secured and protected from damage. So, let’s get started and learn how to install cable clamps like a pro.
Understanding Cable Clamps: What They Are And How They Work
When it comes to cable management, cable clamps play a crucial role in ensuring safety and organization. In this section, we will dive into the definition of cable clamps, the different types available in the market, and the importance of properly installing them.
Definition of Cable Clamps and Their Importance in Cable Management
Cable clamps, also known as cable clips or cable holders, are devices specifically designed to secure and manage cables. They are commonly used in various applications, including electrical wiring, automotive installations, audio/video systems, and computer networks.
Importance of cable clamps in cable management:
- Prevent cable damage: Cable clamps help protect cables from strain, tension, and bending, preventing damage that can lead to signal loss or electrical short circuits.
- Ensure safety: Properly secured cables using cable clamps reduce the risk of tripping or accidents caused by loose cables. They also help prevent fires and electrical hazards.
- Promote organization: By keeping cables neatly organized and secured, cable clamps contribute to a clean and professional-looking workspace, making it easier to identify and manage cables.
- Facilitate easy maintenance: With cables held in place, it becomes more convenient to access and troubleshoot specific cables when needed, simplifying maintenance and repairs.
Different Types of Cable Clamps Available in the Market
Cable clamps come in various sizes, materials, and designs to accommodate different cable management requirements. Here are some common types:
| Type | Description |
|---|---|
| Nail-in cable clips | These cable clamps feature a nail or screw hole, allowing for easy installation on surfaces such as walls or wooden structures. |
| Screw-mount cable clamps | Similar to nail-in cable clips, these clamps use screws instead of nails to secure cables. They provide a more secure attachment on various materials. |
| Adhesive-backed cable clamps | These clamps have adhesive backing that enables quick and simple installation on smooth surfaces such as desks or walls, without the need for drilling or nailing. |
| Self-adhesive cable tie mounts | These cable clamps combine a clamp and cable tie mount in one. They have a sticky base that adheres to surfaces and include a flexible loop for securing cables. |
Importance of Properly Installing Cable Clamps for Safety and Organization
Proper installation of cable clamps is essential for maximizing the benefits they provide in terms of safety and organization.
Ensure safety and prevent accidents:
- Choose the right size: Select cable clamps that match the diameter and number of cables you need to secure. This ensures a snug fit, preventing cables from slipping out or being overly compressed.
- Positioning: Place cable clamps along the cable’s path at suitable intervals to prevent excessive cable movement and minimize tension on connectors.
- Avoid excessive tightening: While it’s important to secure cables, avoid over-tightening the clamps, which can damage cables or restrict their flexibility.
Promote organization and ease of maintenance:
- Label cables: Before installing cable clamps, label the cables to easily identify them during installation and subsequent maintenance or repairs.
- Bundle cables: Group and bundle cables before attaching them with cable clamps. This not only reduces clutter but also makes it easier to manage and trace specific cables when needed.
- Separate different types of cables: If there are multiple types of cables involved, consider using separate cable clamps or organizers for each type, ensuring clear segregation and ease of access.
By following these installation practices, you can harness the full potential of cable clamps, ensuring safety, organization, and accessibility in your cable management efforts.
Tools And Materials Required For Cable Clamp Installation
Before you begin installing cable clamps, it’s important to gather all the necessary tools and materials. Having everything at hand will allow for a seamless and efficient installation process. In this section, we will provide an overview of the tools and materials you will need to successfully install cable clamps.
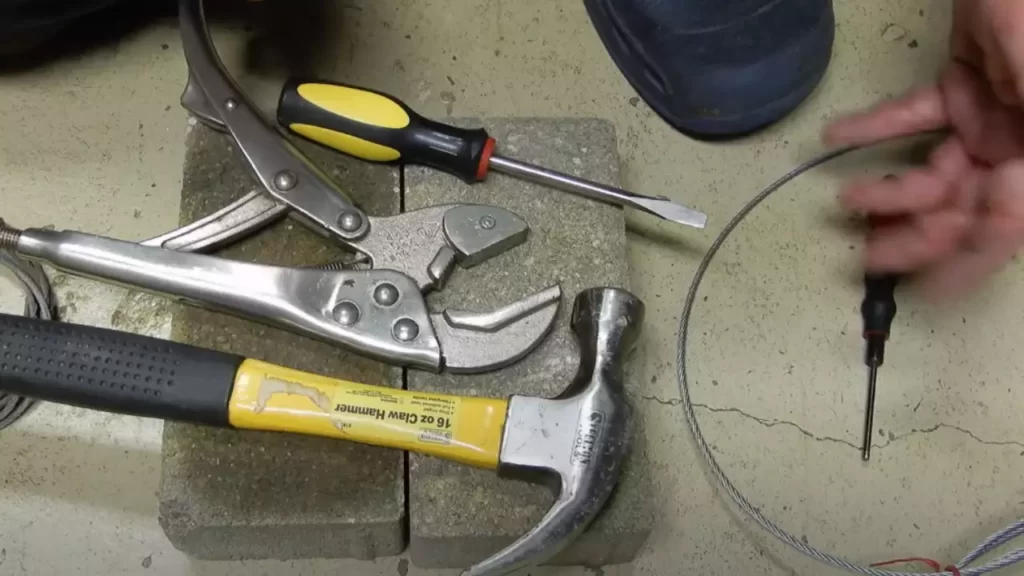
List of tools needed for the installation process
Installing cable clamps requires a specific set of tools to ensure a secure and professional installation. Here are the essential tools you will need:
- Wire cutters
- Wire strippers
- Adjustable wrench
- Flathead screwdriver
- Measuring tape or ruler
- Marker or pen for marking the positions
Overview of the materials required
In addition to the tools, you will need certain materials to complete the cable clamp installation. These materials are vital for the stability and durability of the clamps. Here is a brief overview of the materials required:
- Cable clamps – Ensure you have the appropriate size and type of cable clamps for the job. Different clamps are designed for specific cable diameters and applications.
- Screws – Select screws that are compatible with the cable clamps you are using. Make sure they are corrosion-resistant and sturdy enough to hold the clamps securely.
- Mounting surface – Determine the appropriate surface where you will mount the cable clamps. This can be a wall, ceiling, or any other stable structure. Ensure the surface is clean and capable of supporting the weight of the cables.
Recommended brands and types of tools and materials
While there are various brands and types of tools and materials available in the market, it’s important to choose reliable and high-quality options for your cable clamp installation. Here are some recommended brands and types:
| Tool/Material | Recommended Brands/Types |
|---|---|
| Wire cutters | Bahco, Klein Tools, Xuron |
| Wire strippers | Irwin, Klein Tools, Paladin Tools |
| Adjustable wrench | Crescent, Channellock, Craftsman |
| Flathead screwdriver | Stanley, Craftsman, Wiha |
| Screws | Spax, GRK, Hillman |
| Cable clamps | Electriduct, Morris Products, CablePro |
By opting for these recommended brands and types, you can ensure that your tools and materials will be reliable, durable, and provide optimal performance throughout the cable clamp installation process.
Step-By-Step Guide: How To Install Cable Clamps
Installing cable clamps may seem like a daunting task, but with the right approach, it can be a straightforward process. In this step-by-step guide, we will walk you through the installation process of cable clamps, from preparing the cable and clamp to securing it in the desired position. By following these instructions, you will be able to install cable clamps confidently and effectively.
Preparing the Cable and Clamp
Before you begin the installation, it is important to prepare the cable and clamp to ensure a proper fit and secure connection. Follow these steps:
- Measure the cable length accurately and identify the appropriate clamp size based on the cable diameter.
- Gather the necessary accessories, such as screws, anchors, and any other hardware required for the installation.
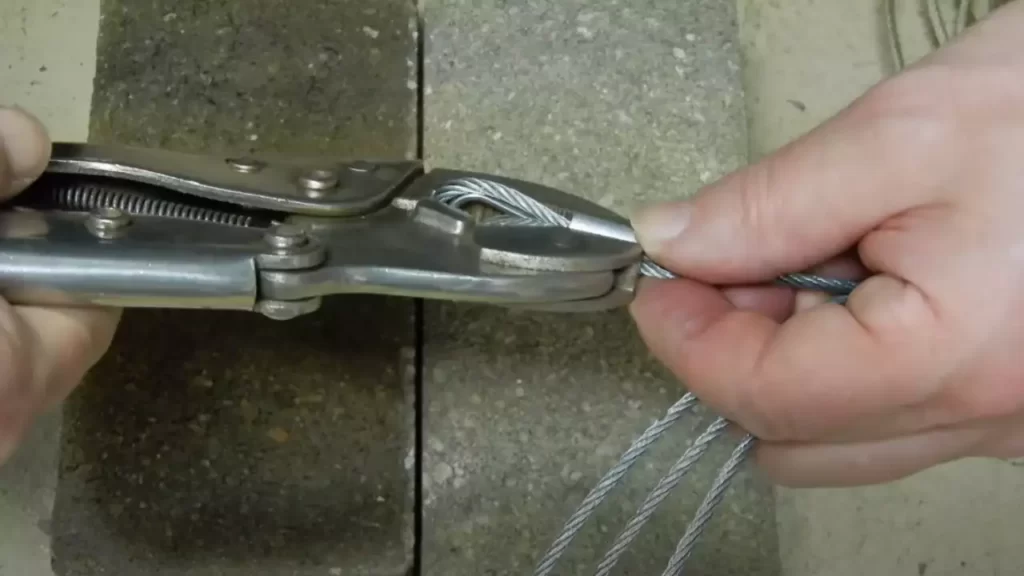
Positioning the Cable and Clamp
Now that you have prepared the cable and clamp, it’s time to position them for installation:
- Determine the ideal location for the clamp, taking into consideration the cable’s path and any structural elements that may provide support.
- Secure the cable in the desired position, ensuring it is straight and free from any twists or bends.
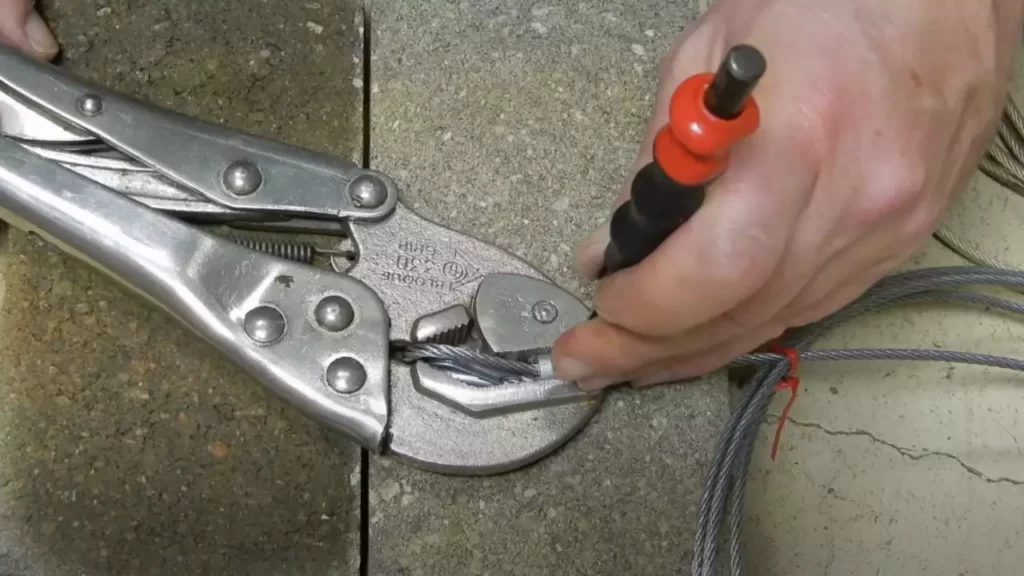
Installing the Cable Clamp
With the cable and clamp in position, it’s time to install the cable clamp itself. Follow these steps:
Step 1: Marking the Drill Points for the Clamp and Pilot Holes
Using a marker or pencil, mark the drill points on the surface where you will be installing the clamp. These marks will serve as a guide for drilling pilot holes.
Step 2: Drilling Pilot Holes and Installing the Clamp
Using an appropriate-sized drill bit, carefully drill pilot holes at the marked points. Once the pilot holes are drilled, align the clamp with the holes and fasten it securely using screws or other hardware included with the clamp.
Step 3: Securing the Cable in the Clamp and Tightening Screws
Once the clamp is installed, place the cable inside the clamp and ensure it is centered. Gradually tighten the screws or fasteners to secure the cable in place, making sure not to over-tighten and damage the cable.
By following these steps, you will successfully install cable clamps to securely hold your cables in place, providing a neat and organized solution for cable management.
Tips For A Professional And Effective Cable Clamp Installation
When it comes to installing cable clamps, following proper techniques is key to ensuring a professional and effective installation. From ensuring proper cable tension and support to strategically planning clamp placement, each step plays a crucial role in the overall performance and maintenance of the cables. In this article, we will discuss three important tips that will help you achieve a flawless cable clamp installation.
Ensuring proper cable tension and support
One of the most important aspects of a successful cable clamp installation is ensuring proper cable tension and support. This ensures that the cables are secure and effectively carry signals or power without any disruptions. To achieve this, follow these steps:
- Start by gently pulling the cable to remove any slack. This will help you determine the appropriate tension required for the cable.
- Carefully position the cable within the clamp, making sure it rests securely without any kinks or sharp bends.
- Tighten the clamp just enough to hold the cable in place. Avoid over-tightening, as it can cause damage to the cable or pinch it, causing signal interference.
- Test the tension by gently tugging the cable after installation. If it feels secure and doesn’t move excessively, you have achieved the correct tension and support.
Avoiding over-tightening the clamp
While it’s crucial to tighten the cable clamp adequately, it’s equally important to avoid over-tightening. Over-tightening the clamp can lead to various issues, such as:
- Pinching or crushing the cable, which can result in signal loss or damage.
- Putting excessive pressure on the cable, leading to stress on the connectors.
- Straining the clamp and causing it to crack or break.
To avoid over-tightening, ensure that:
- Use an appropriate torque wrench or tool to tighten the clamp to the manufacturer’s recommended specifications.
- Exercise caution while tightening, applying just enough pressure to securely hold the cable in place without causing any damage.
Strategically planning clamp placement for easy access and maintenance
Another important aspect of cable clamp installation is strategically planning their placement. This ensures easy access and maintenance whenever required. Here are some important considerations:
- Identify the key areas where the cables will need routine inspections, repairs, or alterations.
- Place the clamps in a location that allows easy access to these areas without the need for removing other clamps or cables.
- Consider the future requirements and potential expansion of your cable system and plan the clamp placement accordingly.
- Ensure that each clamp is placed at a suitable distance from any potential heat sources or excessive vibrations.
By strategically planning clamp placement, you can save time during maintenance and prevent unnecessary disruptions to your cable system.
Troubleshooting Common Cable Clamp Installation Issues
Properly installing cable clamps is crucial to ensure the safety and functionality of cable management systems. However, there are times when installation issues arise, leading to loose clamps, cable damage, or uneven spacing. In this section, we will address these common problems and provide effective solutions to troubleshoot them.
Problem: Clamp is loose or not securely holding the cable
A loose or insecure cable clamp can be a frustrating issue, as it may compromise the stability and security of the cable. Here are some possible causes and solutions to address this problem:
- Possible cause: Improper sizing of the cable clamp.
- Solution: Ensure that the cable clamp is suitable for the cable size. Use an appropriately sized clamp that provides a snug fit to securely hold the cable.
- Possible cause: Insufficient torque during installation.
- Solution: Use a torque wrench or a suitable tool to apply the correct amount of torque when tightening the clamp. This will ensure that the clamp securely holds the cable without being too loose or too tight.
- Possible cause: Incorrect positioning of the clamp.
- Solution: Double-check the placement of the clamp. Make sure it is positioned correctly and secured tightly around the cable, avoiding any gaps or slippage.
Problem: Clamp is damaging the cable or causing strain
It is essential to prevent any damage to the cable during the installation process. Here are some preventive measures and solutions to avoid damage or strain caused by cable clamps:
- Preventive measure: Use cushioned or rubber-lined clamps.
- Solution: Opt for cable clamps that have a cushioned or rubber lining. This helps to provide a protective barrier between the clamp and the cable, reducing the risk of damage or strain.
- Preventive measure: Properly route and secure the cable before installing the clamp.
- Solution: Straighten and align the cable neatly before installing the clamp. Ensure that there are no loops, kinks, or sharp bends that may cause strain or stress on the cable.
- Preventive measure: Avoid over-tightening the clamp.
- Solution: Be cautious not to apply excessive force when tightening the clamp. Over-tightening can damage the cable or cause strain. Use the appropriate amount of torque to secure the clamp without putting unnecessary pressure on the cable.
Problem: Uneven spacing or misalignment of multiple clamps
When installing multiple cable clamps, it is essential to maintain consistent spacing and alignment. To troubleshoot this issue, consider the following techniques:
- Technique: Measure and mark the desired spacing before installation.
- Technique: Use a ruler or measuring tape to mark the precise positioning of each clamp.
- Technique: Utilize a clamp spacing tool or template to ensure even spacing.
By implementing these techniques, you can achieve consistent spacing and alignment of multiple clamps, resulting in an organized and professional cable management system.
Safety Guidelines For Cable Clamp Installation
Importance of wearing appropriate safety gear
When installing cable clamps, it is essential to prioritize your safety by wearing appropriate safety gear. This not only protects you from potential injuries but also ensures that you can work effectively and efficiently. Some of the necessary safety gear includes:
- Safety glasses to shield your eyes from any flying debris or particles
- Gloves to protect your hands from sharp edges or cuts
- Steel-toed boots to provide stability and protect your feet from heavy objects
- Hard hat to safeguard your head from falling objects
Avoiding electrical hazards during installation
Electrical hazards are a significant concern when installing cable clamps, but with proper precautions, accidents can be prevented. Here are a few steps to help you avoid electrical hazards:
- Before starting any work, ensure that the power source is completely turned off and disconnected to prevent any electrical shock.
- Always double-check and use appropriate voltage test equipment to confirm that the area is free from live wires.
- Keep your hands and tools dry to minimize the risk of electrical shocks.
- When working in tight spaces, use insulated tools to avoid accidental contact with live wires.
- Do not attempt to install cable clamps near exposed wiring or in wet conditions.
Ensuring compliance with relevant safety regulations
Adhering to safety regulations is vital to maintain a safe working environment and ensure the longevity of your installation. To prevent accidents and comply with relevant safety regulations:
- Stay updated with the latest safety standards and guidelines set by local authorities or regulatory bodies.
- Familiarize yourself with the specific safety requirements related to cable clamp installations.
- Regularly inspect and maintain your tools and equipment to ensure they are in proper working condition.
- Dispose of any hazardous materials in accordance with the appropriate waste management guidelines.
- Conduct thorough risk assessments before starting any installation to identify potential hazards and implement necessary precautions.
By following these safety guidelines, you can not only minimize the risk of injuries but also ensure a successful and compliant cable clamp installation.
Frequently Asked Questions
Which Side Is The Saddle On A Cable Clamp?
The saddle on a cable clamp is meant to be positioned on the side that provides proper support and grip for the cable. It ensures secure fastening and protects the cable from damage.
How Do You Connect Cable Clamps?
To connect cable clamps, follow these steps: 1. Identify the type of clamp needed for your cable. 2. Position the clamp around the cable firmly. 3. Use a screwdriver or pliers to tighten the clamp securely. 4. Ensure the cable is secure and not loose.
5. Double-check the connection for safety.
How Is A Wire Rope Clip Installed Correctly?
To install a wire rope clip correctly, follow these steps: 1) Place the clip over the rope and adjust the saddle to align with the live end. 2) Tighten the nuts evenly, while making sure the U-bolt is parallel to the rope.
3) Retighten after initial usage to ensure a secure grip.
How Many Cable Clamps On Wire Rope?
There are typically one or two cable clamps needed for wire ropes, depending on the diameter of the rope.
Conclusion
Installing cable clamps is a straightforward process that ensures the organization and security of your cables. By following the steps outlined in this guide, you can easily install cable clamps yourself, saving time and money. Remember to accurately measure and plan the installation, choose the right materials, and use the proper tools for a successful outcome.
With cable clamps in place, you can enjoy a clean and organized space that promotes efficient cable management. So, go ahead and tackle your cable clutter with confidence!