To install a C wire, connect it to the C terminal on your heating or cooling system’s control board. Then, run the wire from the control board to the thermostat location, making sure to securely connect it to the C terminal on the thermostat.
This will provide a continuous 24V power supply, enabling your thermostat to function properly. Are you looking to install a C wire for your heating or cooling system? Having a C wire is essential for connecting smart thermostats or powering other smart devices.
We will guide you on how to install a C wire in a simple and straightforward manner. By following these steps, you can easily complete the installation process and ensure your thermostat has a continuous power supply. So, let’s get started and make your HVAC system smarter and more efficient by installing a C wire.
Installing A C Wire: A Step-By-Step Guide
Installing a C wire has become increasingly important for HVAC systems in modern homes. The C wire, also known as the common wire, provides a continuous flow of electricity to the thermostat, ensuring its proper functioning and preventing any power-related issues. In this step-by-step guide, we will walk you through the process of installing a C wire to help you optimize your HVAC system’s performance.
Importance of a C Wire in HVAC Systems
The C wire plays a crucial role in HVAC systems as it provides a dedicated source of power to the thermostat. Without a C wire, the thermostat may rely on batteries or steal power from other wires, causing system malfunctions and reduced efficiency. By having a C wire properly installed, you can ensure a consistent supply of power to your thermostat, allowing it to operate optimally.
Tools and Materials Needed for the Installation
Before starting the installation process, it is essential to gather the necessary tools and materials. Here are the items you will need:
| Tools | Materials |
|---|---|
|
|
Understanding the Existing Wiring Setup
Before you begin installing a C wire, it is crucial to assess your current HVAC system’s wiring setup. Take note of the wires connected to your existing thermostat and their corresponding labels. Common wire colors include:
- Rh or Rc – Red wire, which carries the 24-volt power
- W – White wire, which controls the heating system
- Y – Yellow wire, which controls the cooling system
- G – Green wire, which controls the fan
- C – Blue wire, which is the common wire
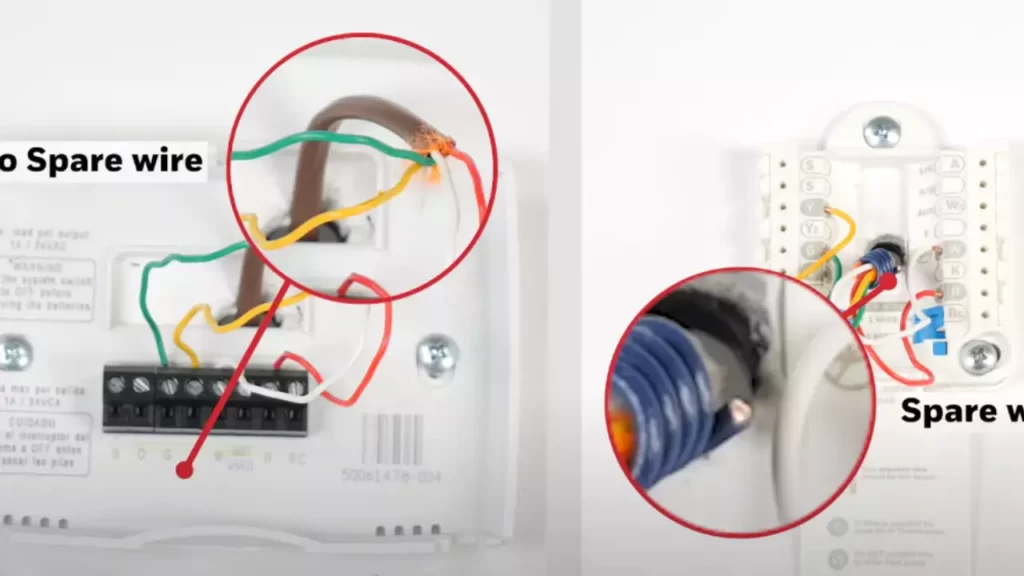
If your thermostat does not have a C wire, you may need to identify an unused wire in the bundle to serve as the C wire. Alternatively, you can run a new wire from your HVAC system to the thermostat location.
Once you have a clear understanding of your existing wiring setup, you can move forward with the installation process, ensuring a successful C wire installation.
By following this step-by-step guide, you can now confidently install a C wire for your HVAC system. Remember to shut off the power before starting and, if uncertain, consult a professional electrician or HVAC technician. A properly installed C wire will optimize your thermostat’s performance and contribute to the overall efficiency of your HVAC system.

Checking Compatibility And Hvac System Evaluation
Before installing a C wire, it’s crucial to check the compatibility of your HVAC system and evaluate its wiring diagram. This step will help you determine if a C wire is required for your particular setup. Let’s dive into the process in more detail.
Evaluating the HVAC System’s Wiring Diagram
The first step in determining if your HVAC system needs a C wire is to evaluate its wiring diagram. The wiring diagram is a visual representation of how the various components of your HVAC system are connected. To access this diagram, you’ll need to locate your HVAC system’s control board. Depending on your specific system, the control board may be found in the furnace, air handler, or even at the outdoor condensing unit.
Once you’ve located the control board, look for the wiring diagram. This diagram will provide valuable insights into the current wiring setup of your HVAC system. Pay close attention to the terminal connections and labels.
Determining if a C Wire is Required
After studying the wiring diagram, you can now determine if your HVAC system requires a C wire. The C wire, also known as the common wire, provides continuous 24-volt power to your thermostat. While not all HVAC systems need a C wire, many newer models and smart thermostats require it to ensure proper functioning.
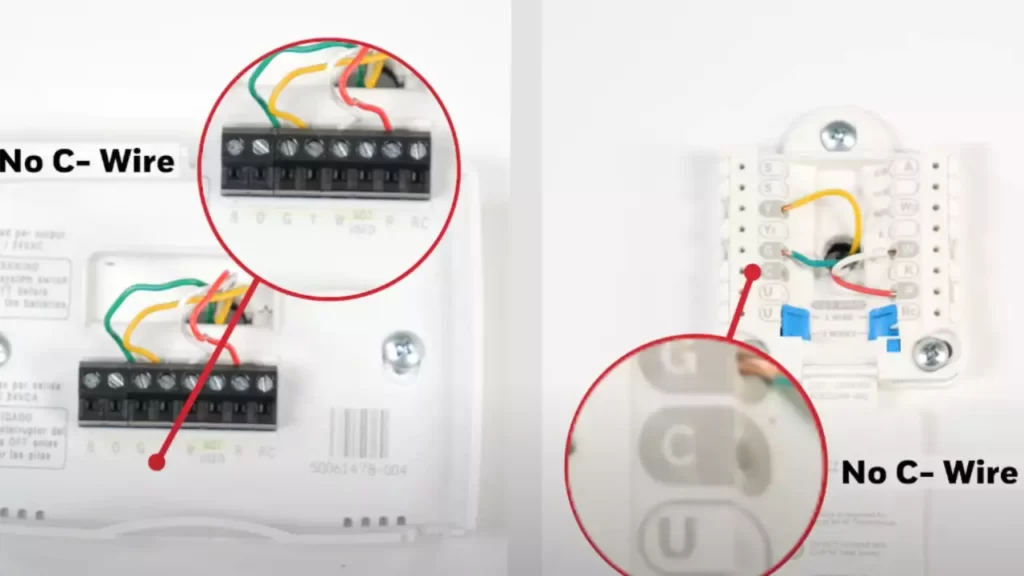
To determine if a C wire is required, look for the absence of the C terminal on your control board or thermostat. If the C terminal is present, this indicates that your system already has a C wire. However, if the C terminal is missing, you’ll likely need to install a C wire to power your thermostat.
Overview of Common HVAC System Models Requiring a C Wire
When it comes to specific HVAC system models that require a C wire, several popular brands and models fall into this category. Here is an overview of some common HVAC system models that typically need a C wire:
| Brand | Model |
|---|---|
| Carrier | Infinity Series |
| Lennox | iComfort Series |
| Honeywell | Lyric T6 Pro |
| Nest | Learning Thermostat (3rd generation) |
Why Some HVAC Systems May Not Have a C Wire
Now, you may wonder why some HVAC systems don’t come equipped with a C wire. The absence of a C wire can be attributed to older systems that were not designed to accommodate the power requirements of smart thermostats or advanced HVAC controls. Additionally, some systems rely on alternative methods for providing power to the thermostat, such as using batteries or a power-stealing feature.
It’s important to note that even if your HVAC system doesn’t currently have a C wire, it may still be possible to install one. However, this can vary depending on the specific system and its wiring capabilities. Consulting with a professional HVAC technician can provide valuable insights into your system’s compatibility and the best course of action for wiring a C wire.
By evaluating your HVAC system’s wiring diagram, determining the need for a C wire, and understanding common HVAC system models requiring it, you’re one step closer to successfully installing a C wire and enjoying the benefits of a reliable and efficient thermostat.
Preparations Before Installing The C Wire
Before you begin installing the C wire for your HVAC system, it’s important to complete a few essential preparations. These preparations will help ensure a smooth and successful installation process. In this section, we will walk you through each step to ensure you are fully prepared.
Turning off power to the HVAC system
Begin by turning off the power to your HVAC system. This step is crucial to avoid any potential injury or damage during the installation process. Locate the power switch or circuit breaker that controls your HVAC system and switch it off. Always prioritize safety when working with electrical systems.
Gathering necessary tools and materials
Next, gather all the necessary tools and materials you will need for the installation. Having everything readily available will streamline the process and minimize any delays. Here is a list of the tools and materials typically required:
| Tools | Materials |
|---|---|
|
|
Locating the C terminal on the HVAC control board
Once you have gathered the necessary tools and materials, it’s time to locate the C terminal on the HVAC control board. This is where the C wire will be connected. The C terminal is typically labeled and can usually be found near the R and W terminals. Consult your HVAC system’s user manual or online resources specific to your system to locate the C terminal accurately.
Preparing the necessary wires and cables
Before beginning the installation, it’s crucial to prepare the necessary wires and cables. Start by ensuring that the power is still turned off to the HVAC system. Strip the ends of the wires that will be connected to the C terminal and any other terminals according to the manufacturer’s instructions. If required, label each wire to ensure accurate connections. Once the wires are stripped and labeled, you are ready to proceed with the installation process.
By completing these preparations, you are now fully ready to start installing the C wire. The next section will guide you through the step-by-step process of connecting the C wire to your HVAC system.
Installing The C Wire
Installing a C wire, or common wire, is an essential step for many smart thermostat installations. The C wire provides constant power to the thermostat, ensuring it can function properly. In this guide, we will walk you through the process of installing a C wire for your HVAC system, with a focus on the three main steps: mounting and connecting the transformer, connecting the C wire to the HVAC control board, and properly routing the C wire through the walls or ducts.
Mounting and Connecting the Transformer
Before you can connect the C wire, you will need to mount a transformer near your HVAC system. The transformer converts the high voltage power from your HVAC system into a low voltage power suitable for the thermostat. Here’s how you can mount and connect the transformer:
- Choose a suitable location near the HVAC system to mount the transformer.
- Securely mount the transformer using screws or other appropriate fixtures.
- Connect the power wires from the HVAC system to the input terminals of the transformer.
- Connect the output terminals of the transformer to the thermostat cable.
- Ensure all connections are secure and properly insulated.
Connecting the C Wire to the HVAC Control Board
Once the transformer is properly installed, you can proceed to connect the C wire to the HVAC control board. This step will ensure that the C wire is properly connected to the power source of your HVAC system. Here’s how you can do it:
- Locate the control board of your HVAC system. It is usually located near the blower compartment or inside the furnace.
- Identify the C terminal on the control board. It is typically labeled and colored differently from the other terminals.
- Strip the end of the C wire and insert it into the C terminal.
- Tighten the terminal screw to secure the wire.
- Double-check that the wire is securely connected and not touching any other terminals.
Properly Routing the C Wire through the Walls or Ducts
Once the C wire is connected to the control board, you need to route it properly through the walls or ducts to reach the thermostat location. This step ensures that the C wire is safely and discreetly hidden from view. Here are some guidelines to follow:
- Plan the route for the C wire, considering the shortest distance and avoiding any obstacles.
- Use conduit or wall channels to protect and hide the wire along the route.
- Secure the wire at regular intervals using cable clips or staples.
- Avoid sharp bends or tight loops that may damage the wire or restrict the flow of electricity.
- Label both ends of the wire for future reference.
By following these steps, you can successfully install a C wire for your smart thermostat. Remember to consult the installation manual provided by the thermostat manufacturer for specific instructions related to your model. If you are unsure about any step of the process, it is always recommended to consult a professional HVAC technician for assistance.

Testing And Troubleshooting
Testing and troubleshooting your newly installed C wire is an essential step to ensure that your HVAC system is functioning properly. In this section, we will discuss how to test the newly installed C wire, troubleshoot common issues that may arise during installation, and check for proper voltage and connectivity. Let’s dive in!
Testing the newly installed C wire
Once you have successfully installed a C wire, it is important to test its functionality. Testing the newly installed C wire involves verifying proper voltage and ensuring proper connectivity with your HVAC system. Follow these steps:
- Prepare a multimeter – a device used to measure electrical voltage and continuity.
- Set the multimeter to measure AC voltage.
- Locate the C terminal on your HVAC system’s control board.
- Connect the black probe of the multimeter to the C terminal.
- Connect the red probe of the multimeter to the R terminal.
- Ensure the power to your HVAC system is turned on.
- Check the multimeter reading. It should display a voltage of around 24 volts.
- If the multimeter reading is significantly below 24 volts or displays no voltage at all, there may be an issue with your wiring or power supply. In this case, it is recommended to seek professional assistance.
Troubleshooting common issues during installation
During the installation process, you may encounter some common issues that can be easily resolved by following these troubleshooting steps:
- No power: If your HVAC system does not power on after installing the C wire, double-check the wiring connections and ensure they are secure. If the issue persists, check the breaker box to ensure the circuit is not tripped.
- Incompatible thermostat: If your thermostat is not compatible with a C wire, you may need to use alternative solutions such as a power extender kit or a plug-in transformer.
- Incorrect wiring: Ensure that the C wire is properly connected to both the HVAC system’s control board and the thermostat. A loose or improperly connected wire can cause connectivity issues.
Checking for proper voltage and connectivity
After installing the C wire, it is crucial to check for proper voltage and connectivity to ensure optimal performance of your HVAC system. Here’s how:
- Refer to the user manual or manufacturer’s instructions for your thermostat and HVAC system to identify the proper connections for the C wire.
- Visually inspect the wiring connections to ensure they are secure and free from any loose ends.
- Turn on the power to your HVAC system and thermostat.
- Verify that the HVAC system powers on and operates as expected.
- If you face any issues with power or functionality, check the voltage using a multimeter as described earlier.
By performing these checks, you can identify any potential issues early on and ensure that your C wire installation is successful.
Safety Precautions And Best Practices
When installing a C wire in your HVAC system, it is of utmost importance to prioritize safety precautions and follow best practices. Handling electrical components, working with the HVAC system, avoiding potential hazards, and adhering to local electrical codes and regulations are all vital aspects of a safe and successful installation. In this section, we will discuss these important considerations in detail.
Properly handling electrical components
Before beginning the installation process, it is crucial to handle electrical components with care to prevent any accidents or damage. Here are some best practices to keep in mind:
- Always ensure that the power to your HVAC system is turned off before handling any electronic components.
- Wear appropriate protective gear, such as insulated gloves and safety glasses, to minimize the risk of electric shock.
- Avoid using excessive force when connecting or disconnecting wires, as it may cause the wire or its terminals to break.
- Inspect the wires for any signs of wear or damage. If you notice any, replace them before proceeding with the installation.
Safely working with the HVAC system
While installing a C wire, it is essential to take necessary precautions when working with your HVAC system. Here are some key points to consider:
- Always shut off the power supply to the HVAC system at the main circuit breaker before starting the installation.
- Ensure that the HVAC system is completely turned off and not in operation during the installation process.
- Handle the HVAC components with care to avoid damaging sensitive parts or causing any malfunctions.
- If you are unsure about any aspect of the installation process, it is best to consult a professional HVAC technician for assistance.
Avoiding potential hazards during installation
Installing a C wire involves working with electrical components, and it is crucial to be aware of potential hazards to ensure your safety. Consider the following precautions:
- Keep the work area clean and free from any clutter or debris to minimize the risk of tripping or accidentally damaging components.
- Avoid installing the C wire in damp or wet areas to prevent electrical shock. Moisture can damage the wire and pose a safety hazard.
- Do not overload electrical circuits. Ensure that the circuit you are connecting the C wire to can safely handle the additional load.
- Regularly check for signs of overheating or excessive heat near the installed C wire. Elevated temperatures could indicate a potential issue that needs to be addressed.
Following local electrical codes and regulations
Adhering to local electrical codes and regulations is crucial for a safe and compliant installation. Failing to do so not only poses safety risks but can also lead to legal consequences. Here are some essential points to consider:
- Familiarize yourself with the local electrical codes and regulations that apply to your area before starting the installation.
- Ensure that the C wire installation meets the specific requirements outlined in the codes and regulations.
- Use appropriate wiring materials and techniques specified by the electrical codes.
- If you are uncertain about any aspect of the electrical codes, consult a licensed electrician or an HVAC professional in your area.
Additional Considerations And Alternatives
When it comes to installing a C wire for your thermostat, there are a few additional considerations and alternative methods that you can explore. Not all HVAC systems have a C wire readily available, which can make the installation process a bit trickier.
Exploring alternative methods for obtaining power
If your HVAC system doesn’t have a C wire, there are a few alternative methods for obtaining power. One option is to use a power extender kit, also known as a PEK. This kit allows you to use the existing wires in your thermostat’s cable to provide power to the C wire.
Another alternative is to utilize an extra wire in your thermostat’s cable and repurpose it to act as the C wire. This method may require some rewiring and can be more complex, so it’s important to have a good understanding of your HVAC system’s wiring before attempting this.
Using a smart thermostat without a C wire
If you prefer to use a smart thermostat but don’t have a C wire, there are some workarounds. Some smart thermostats are designed to work without a C wire by utilizing power-saving features and battery power. These thermostats may not provide all the functionalities of a C wire-connected thermostat, but they can still be a viable option.
It’s important to keep in mind that using a smart thermostat without a C wire may result in shorter battery life and potentially frequent battery replacements. Therefore, it’s essential to consider the convenience factor and whether you’re willing to accept these potential drawbacks.
Seeking professional help and guidance
If you’re unsure about how to install a C wire or if you’re uncomfortable working with electrical components, it’s always best to seek professional help and guidance. HVAC professionals have the knowledge and expertise to assess your HVAC system and determine the best method for installing a C wire.
Professional installation ensures that the C wire is installed correctly and safely, minimizing the risk of damage or electrical issues. Additionally, an HVAC professional can provide valuable advice and recommendations tailored to your specific system and needs.
Potential benefits and drawbacks of having a C wire
While installing a C wire can provide numerous benefits, such as improved thermostat performance and compatibility with a wider range of smart thermostats, it’s important to consider the potential drawbacks as well.
Some HVAC systems may not have an accessible C wire terminal, which could require additional wiring modifications or professional assistance. Additionally, installing a C wire may involve drilling or running new wires, which can be time-consuming and potentially costly.
However, the benefits of having a C wire often outweigh the drawbacks, especially for those looking to maximize their thermostat’s functionality. It’s crucial to evaluate your specific HVAC system, consider the pros and cons, and make an informed decision based on your needs and preferences.
Frequently Asked Questions
What If There Is No C Wire For Thermostat?
If there is no C wire for your thermostat, you can use alternative options. You can use a power adapter, install a new C wire, or use a smart thermostat that doesn’t require a C wire. It’s important to consult a professional for assistance in determining the best solution for your specific situation.
Where Does C Wire Go On Hvac?
The C wire on HVAC systems typically connects to the common terminal on the thermostat. It provides a constant power supply for Wi-Fi thermostats or other devices that require continuous power. Proper installation ensures reliable operation of your HVAC system.
Can You Use A Jumper For C Wire?
No, a jumper cannot be used for a C wire. The C wire, also known as the common wire, is a necessary power source for certain smart thermostats. It requires a dedicated wire for proper functioning and cannot be bypassed with a jumper.
How Much Does It Cost To Install C Wire?
The cost of installing a C wire can vary, depending on factors such as location, electrician rates, and the complexity of the installation. However, on average, homeowners can expect to pay around $150 to $300 for professional installation.
Conclusion
Installing a C wire is a crucial step in ensuring the smooth functioning of your HVAC system. By following the steps outlined in this blog post, you can easily set up a C wire and avoid any potential issues with thermostat compatibility or system malfunction.
Remember, a properly installed C wire provides a stable power supply and allows you to enjoy the full benefits of your smart thermostat. Don’t forget to consult a professional if you have any doubts or concerns during the installation process.