To install bearings on skateboard wheels, first remove the old bearings by prying them off. Then, align the new bearings with the wheel’s axle hole and press them in until they snap into place securely.
Skateboarding is not only about fancy tricks and manoeuvres, but also about maintaining your skateboard for optimal performance. One of the essential maintenance tasks is installing bearings on skateboard wheels. Bearings play a crucial role in providing a smooth and hassle-free ride.
While the process may seem daunting for beginners, it is actually quite simple and can be done with a few basic tools. We will guide you through the step-by-step process of installing bearings on skateboard wheels, ensuring that your ride is always smooth and enjoyable. So, let’s dive in and learn how to install bearings on skateboard wheels like a pro.
Tools Required
When it comes to installing bearings on skateboard wheels, having the right tools can make the process quick and easy. Here are the essential tools you’ll need:
Skateboard
The first tool you’ll obviously need is a skateboard itself. Make sure it’s clean and free from any dirt or debris, as this can affect the performance of your bearings.
Bearings
The next tool you’ll need is the bearings. These small, round metal components are what allow your skateboard wheels to spin smoothly. It’s important to choose high-quality bearings that are durable and built to last.
Skate tool or wrench
You’ll also need a skate tool or wrench to remove and install the bearings. This tool is specifically designed for skateboards and usually features different types of sockets that will fit the various components of your skateboard.
Tissue or rag
Having a tissue or rag handy is crucial. Skateboard bearings can often be quite greasy, and wiping them clean before installation can help ensure a proper fit and smooth rotation.
Bearing lubricant (optional)
Lastly, you may want to consider using a bearing lubricant during the installation process. This can help reduce friction and improve the overall performance of your skateboard. However, it’s important to note that not all skaters opt for lubrication, as some prefer a faster ride without it.
No matter which tools you choose to use, having them on hand will make the process of installing bearings on your skateboard wheels much simpler.

Preparing The Wheels
Remove the wheels from the skateboard
To install bearings on your skateboard wheels, the first step is to remove the wheels from the skateboard. This allows for easier inspection and cleaning of the bearings. To do this, follow these simple steps:
- Use a skate tool or a wrench to loosen the nuts holding the wheels in place. Turn the nuts counterclockwise until they are loose enough to be easily removed.
- Gently pull the wheels off the axle, making sure not to damage the bearings.
Clean the wheel bearings
Once you have removed the wheels from the skateboard, it is important to clean the wheel bearings. Dirty and debris-filled bearings can affect the performance of your skateboard, so thorough cleaning is essential. Follow these steps to clean the bearings:
- Wipe away any visible dirt or grime from the outside of the bearings using a clean cloth or paper towel.
- Remove the rubber or metal shields from the bearings. This can usually be done by prying them off gently with a small flathead screwdriver.
- Fill a container with a suitable cleaning solution, such as skateboard bearing cleaner or isopropyl alcohol.
- Place the bearings into the cleaning solution and swish them around gently. This will help to dislodge any dirt or debris that may be trapped inside.
- Remove the bearings from the cleaning solution and dry them thoroughly using a clean cloth or compressed air. Make sure they are completely dry before moving on to the next step.
Inspect the bearings for damage
After cleaning the bearings, it is important to inspect them for any signs of damage. This will help to ensure that your skateboard wheels will perform optimally. Follow these steps to inspect the bearings:
- Check for any visible signs of rust, corrosion, or wear on the bearings. If you notice any of these issues, it may be necessary to replace the bearings.
- Spin each bearing with your finger to check for smooth rotation. If a bearing feels gritty or does not spin freely, it may need to be cleaned again or replaced.
Apply lubricant (optional)
After cleaning and inspecting the bearings, you have the option to apply lubricant to ensure smooth and efficient performance. Follow these steps to apply lubricant to the bearings:
- Place a small drop of skateboard bearing lubricant onto each bearing.
- Spin the bearing to distribute the lubricant evenly.
- Wipe away any excess lubricant with a clean cloth.
By following these steps, you can properly prepare your skateboard wheels for bearing installation. With clean and well-maintained bearings, you’ll be able to enjoy smoother rides and better performance on your skateboard.
Removing The Old Bearings
Find the bearing spacer
To begin the process of removing the old bearings from your skateboard wheels, the first step is to locate the bearing spacer. This small metal tube is essential for maintaining the proper spacing and alignment between the bearings. Without the spacer, the wheels may wobble or not rotate smoothly. It is usually located in the center of the wheel, between the two bearings. Ensure you have a clear view of the spacer before proceeding to the next step.
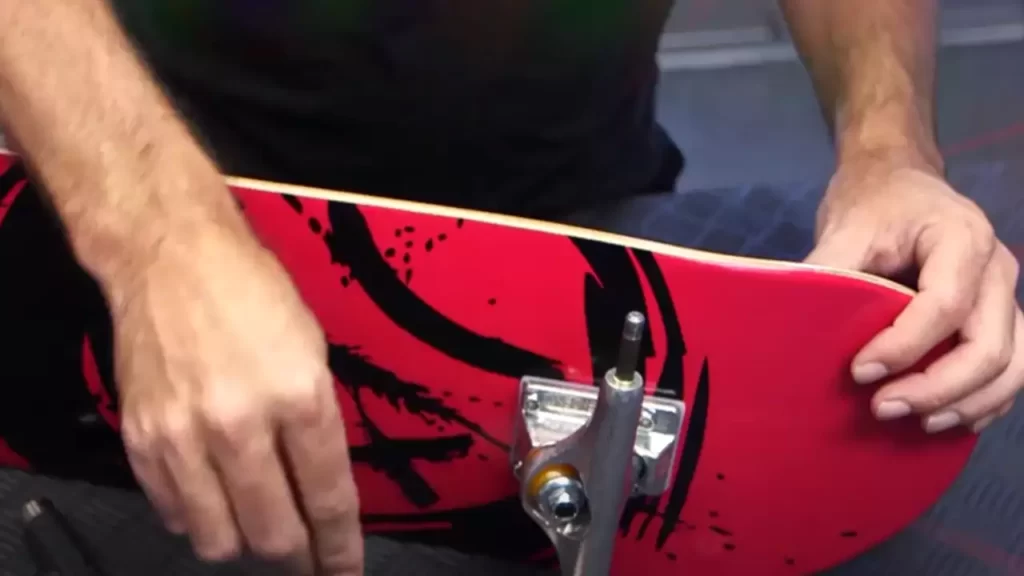
Use the skate tool or wrench to remove the axle nut
Once you have identified the bearing spacer, the next step is to use a skate tool or wrench to remove the axle nut. This nut is located on the end of the truck axle and holds the wheel in place. Using the appropriate tool, turn the nut counterclockwise until it is loose enough to remove. Be careful not to completely unscrew the nut yet, as it may cause the wheel to fall off.
Push down on the wheel to pop out the bearing
With the axle nut loosened, you can now proceed to remove the bearing. To do this, place one hand on the wheel and use your other hand to push down on the wheel. Apply firm pressure to the wheel, using your body weight if necessary, to pop out the bearing from its position. This might require some force, but be careful not to damage the wheel or the bearings in the process. Once the bearing is popped out, set it aside for cleaning or replacement.
Remove the bearing spacer
After removing the bearing, the next step is to take out the bearing spacer. The spacer should easily slide out from the center of the wheel now that the bearing is removed. Set the spacer aside with the bearing for cleaning or replacement. Properly cleaning the spacer will help maintain the smooth rotation of the bearings and extend their lifespan.
| Tools Needed | Steps |
|---|---|
| Skate tool or wrench | Remove the axle nut |
| Use the skate tool or wrench to remove the axle nut | |
| Remove the bearing spacer | |
| Repeat for all wheels, ensuring each H3 heading adheres to HTML syntax |
Repeat for all wheels
Finally, it’s important to repeat these steps for all the wheels on your skateboard. Remove the old bearings and their spacers one by one to ensure a thorough cleaning or replacement process. Be sure to adhere to the same steps for each wheel, following the HTML syntax for the headings. Taking the time to properly remove the old bearings will pave the way for a smoother installation process and better performance for your skateboard.
Installing The New Bearings
When it comes to installing new bearings on your skateboard wheels, it’s essential to follow the correct steps to ensure a smooth and safe ride. In this guide, we will walk you through the process of installing new bearings on your skateboard wheels, starting with cleaning the new bearings. Let’s get started!
Clean the new bearings
Before installing the new bearings, it’s crucial to clean them thoroughly. This not only removes any dirt or debris but also helps to ensure optimal performance. Here’s how you can clean your new bearings:
- Start by removing the bearings from their packaging.
- Use a solvent like isopropyl alcohol to clean the bearings. You can either soak them in the solvent or use a cleaning tool to scrub any dirt off the bearings.
- Once cleaned, set the bearings aside to dry completely.
By cleaning your new bearings, you’ll remove any manufacturing residues and ensure they are ready for installation.
Insert the bearing spacer onto the axle
Before installing the first bearing, it’s important to insert a bearing spacer onto the axle. The bearing spacer helps to maintain proper spacing between the bearings and prevents them from getting misaligned. Follow these steps to insert the bearing spacer:
- Take the bearing spacer and place it onto the axle.
- Make sure the spacer is centered and sits flush against the axle.
By correctly inserting the bearing spacer, you’ll ensure that your skateboard wheels roll smoothly.
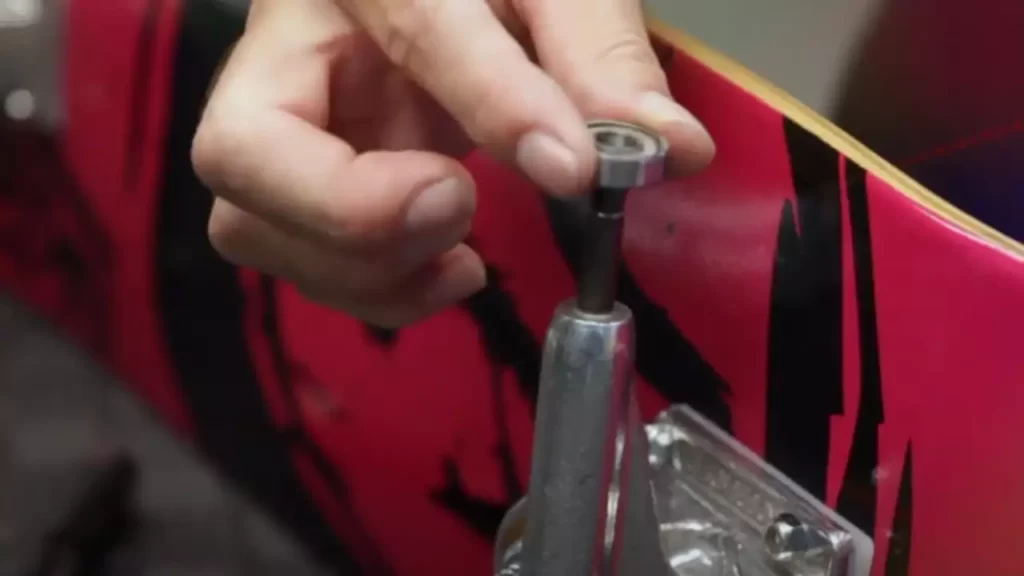
Place the first bearing onto the axle
Now it’s time to install the first bearing onto the axle. This step sets the foundation for your skateboard wheel assembly. Follow these steps to place the first bearing:
- Take one of the cleaned bearings and hold it with the open side facing up.
- Position the bearing onto the axle, ensuring that it sits flat and centered.
Properly placing the first bearing will ensure the stability and smooth rotation of your skateboard wheels.
Push down on the bearing to secure it
Once the first bearing is in place, it’s time to secure it onto the axle. By applying a little pressure, you’ll ensure that the bearing is snugly fit. Follow these steps to secure the first bearing:
- Use your palm or thumb to push down firmly on the bearing.
- Make sure the bearing is fully seated on the axle.
By pushing down on the bearing, you’ll ensure it is securely fastened and won’t come loose during your rides.
Add the second bearing onto the axle
Now it’s time to add the second bearing onto the axle. This step completes the bearing assembly for the skateboard wheel. Follow these steps to add the second bearing:
- Take another cleaned bearing and hold it with the open side facing up.
- Position the bearing onto the axle, making sure it aligns with the first bearing.
Adding the second bearing correctly will provide balanced support and ensure a smooth ride on your skateboard.
Push down on the bearing to secure it
Similar to securing the first bearing, it’s important to apply pressure to the second bearing to ensure a secure fit. Here’s how you can secure the second bearing:
- Use your palm or thumb to push down firmly on the second bearing.
- Verify that the bearing is fully seated on the axle and aligned with the first bearing.
Pushing down on the second bearing will ensure both bearings are tightly secured and ready for action.
Repeat these steps for all the remaining wheels, ensuring that each bearing is cleaned, inserted with a spacer, placed correctly, and securely fastened. By following these steps, you’ll have properly installed bearings on your skateboard wheels, ready to roll smoothly and effortlessly.
Reassembling The Skateboard
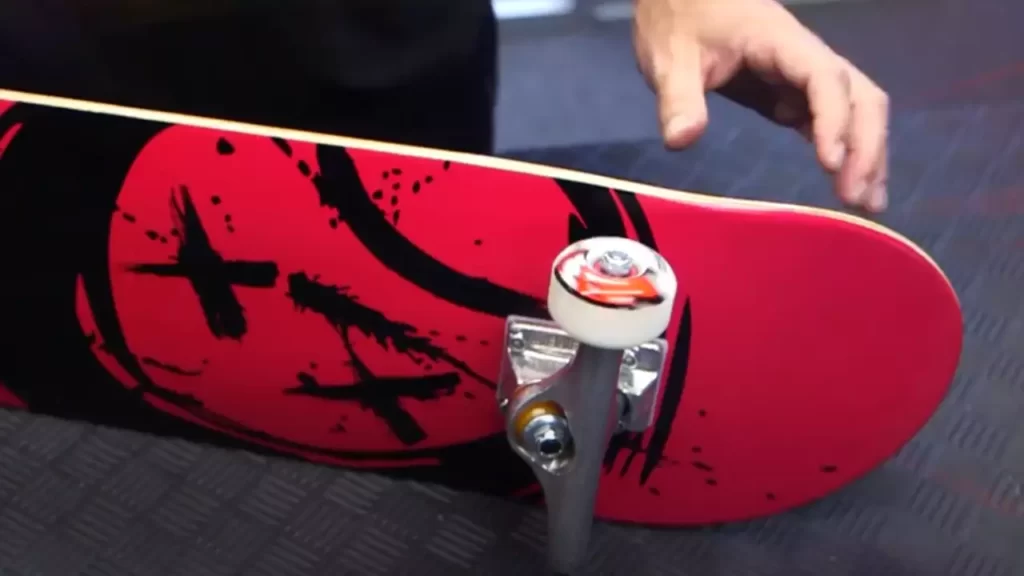
Place the wheels back onto the skateboard
After successfully replacing the bearings on your skateboard wheels, it’s time to move on to the next step: reassembling the skateboard. Start by placing the wheels back onto the skateboard. Take note of the different sizes and positions of the wheels, as they may vary depending on the skateboard design. Ensure that each wheel is properly aligned with its designated spot on the skateboard.
Tighten the axle nuts with the skate tool or wrench
Once you have placed the wheels back onto the skateboard, it’s crucial to tighten the axle nuts properly to secure the wheels in place. Grab your skate tool or a wrench and tighten the nuts by turning them clockwise. Make sure to tighten them evenly, so that the wheels are securely attached. Avoid overtightening, as this can cause resistance and affect the wheel’s ability to spin freely.
Test the wheels to ensure they spin freely
After tightening the axle nuts, it’s essential to test the wheels to ensure they spin freely. Give each wheel a gentle spin with your hand and observe its movement. The wheels should rotate smoothly and without any obstructions or wobbling. If you notice any difficulties in spinning the wheels or if they wobble excessively, it might indicate that the bearings are not installed correctly or that the axle nuts are too tight.
Adjust the tightness if necessary
If you encounter any issues during the wheel test, such as difficulty in spinning or excessive wobbling, you may need to adjust the tightness of the axle nuts. Using your skate tool or wrench, loosen the nuts slightly by turning them counterclockwise. Gradually adjust the tightness until the wheels spin freely without any obstructions or wobbling.
Remember, proper installation and adjustment of bearings are crucial for the performance of your skateboard. Making sure the wheels spin freely allows for smoother rides and better maneuverability. Don’t rush through the reassembly process – take your time to ensure each step is done correctly. Once you have successfully reassembled the skateboard and tested the wheels, you’re ready to hit the streets and show off your skills.
Tips For Maintaining Skateboard Bearings
Proper maintenance of your skateboard bearings is essential for keeping your wheels running smoothly and ensuring optimal performance. By following these simple tips, you can prolong the lifespan of your bearings and enjoy a smoother ride.
Regularly clean the bearings to remove dirt and debris
Over time, dirt and debris can accumulate in your skateboard bearings, causing them to slow down or even seize up completely. To prevent this, it’s important to regularly clean your bearings. Here’s how:
- Remove the wheels from your skateboard using a skate tool or wrench.
- Gently pry out the bearings using a bearing press or the edge of your skate tool.
- Fill a small container with a bearing cleaning solution or isopropyl alcohol.
- Place the bearings in the container and swish them around for a few minutes.
- Remove the bearings from the solution and dry them thoroughly using a clean cloth.
- Once dry, apply a few drops of skateboard bearing lubricant to each bearing.
- Reinstall the bearings into the wheels, making sure they are securely in place.
Use lubricant to keep the bearings running smoothly
Lubricating your skateboard bearings is an essential part of maintenance. By keeping the bearings properly lubricated, you can minimize friction and ensure a smooth ride. Here’s what you need to do:
- Remove the wheels from your skateboard.
- Gently pry out the bearings using a bearing press or the edge of your skate tool.
- Clean any dirt or debris from the bearings using a bearing cleaning solution or isopropyl alcohol.
- Dry the bearings thoroughly using a clean cloth.
- Apply a few drops of skateboard bearing lubricant to each bearing, making sure to distribute the lubricant evenly.
- Reinstall the bearings into the wheels, ensuring they are securely in place.
Avoid riding in wet or sandy conditions to prevent damage to the bearings
Riding your skateboard in wet or sandy conditions can cause significant damage to your bearings. Moisture and sand particles can get into the bearings, leading to rust and increased friction. To keep your bearings in good condition, it’s important to avoid these conditions whenever possible. If you do find yourself riding in wet or sandy areas, make sure to clean and lubricate your bearings as soon as possible afterward to prevent irreversible damage.
Replace bearings when they become worn or damaged
Skateboard bearings are subjected to a lot of wear and tear, and eventually, they will need to be replaced. Regularly inspect your bearings for signs of wear or damage, such as excessive noise, reduced speed, or a rough feeling when spinning the wheels. If you notice any of these issues, it’s time to replace your bearings. Fortunately, replacing bearings is a relatively simple process. Just follow the steps below:
- Remove the wheels from your skateboard.
- Gently pry out the old bearings using a bearing press or the edge of your skate tool.
- Insert the new bearings into the wheels, ensuring they are securely in place.
- Reinstall the wheels onto your skateboard.
By following these tips for maintaining your skateboard bearings, you can ensure optimal performance and extend the lifespan of your bearings. Remember to regularly clean and lubricate your bearings, avoid riding in wet or sandy conditions, and replace worn or damaged bearings when necessary. With proper care and maintenance, your skateboard will keep rolling smoothly for many rides to come.
Frequently Asked Questions
How Do You Put Bearings In Skateboard Wheels At Home?
To put bearings in skateboard wheels at home, follow these steps: 1. Remove the wheels from the trucks. 2. Use a bearing press tool or a screwdriver to pop out the old bearings. 3. Insert the new bearings into the wheels, aligning them with the holes.
4. Press down until they are secure. 5. Reattach the wheels to the trucks. Done!
How Do You Put New Bearings On A Skateboard?
To put new bearings on a skateboard: 1. Remove the old bearings from the wheels. 2. Clean the bearings and wheels with a solvent. 3. Lubricate the new bearings with skate bearing oil. 4. Place the bearings into the wheels.
5. Push each bearing firmly until they are fully seated.
How Do You Put Bearings On Skateboard Wheels Without Tools?
To put bearings on skateboard wheels without tools, hold the wheel and gently press the bearing onto the axle. Use your fingers to push it all the way until it sits snugly. Repeat for the other bearing.
Is It Easy To Replace Skateboard Bearings?
Yes, replacing skateboard bearings is easy.
Conclusion
Learning how to install bearings on skateboard wheels is a crucial skill for any skateboarder. By following these step-by-step instructions, you can ensure a smooth and enjoyable ride while prolonging the lifespan of your wheels. Remember to choose high-quality bearings and always use the proper tools for installation.
With practice and patience, you’ll be able to replace your bearings easily whenever necessary. Happy skateboarding!