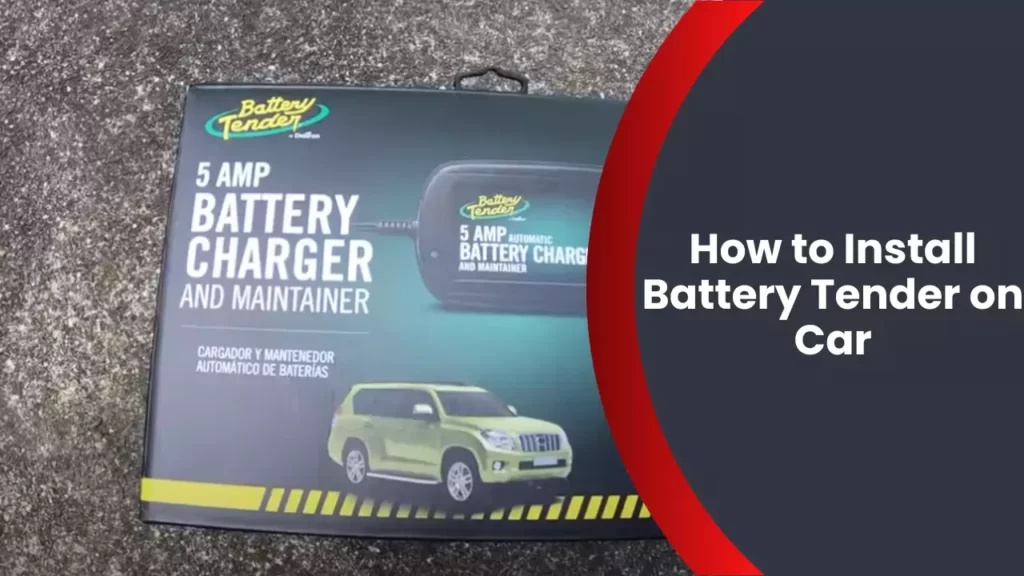
To install a Battery Tender on your car, follow these steps: First, connect the red positive clamp to the positive terminal of the battery. Then, connect the black negative clamp to the negative terminal of the battery.
If you want to keep your car battery charged and healthy, installing a Battery Tender is a simple and effective solution. By ensuring a constant flow of power to the battery, a Battery Tender extends battery life and prevents damage caused by discharge.
We will explain how to install a Battery Tender on your car in a few easy steps. Read on to learn more about this essential maintenance process.
Why Use A Battery Tender For Your Car
A battery tender is an essential tool for maintaining the health and longevity of your car’s battery. It provides a constant trickle charge to the battery, preventing it from discharging and ensuring it remains at optimal capacity. In this article, we will explore the importance of maintaining battery health and the various benefits of using a battery tender for your car. By understanding the significance of this device, you will be able to prolong the life of your battery and enjoy the peace of mind that comes with a reliable vehicle.
Importance of maintaining battery health
Maintaining the health of your car’s battery is crucial for its overall performance and reliability. A healthy battery provides the necessary power to start your car and ensures the proper functioning of various electrical components such as headlights, A/C system, and infotainment system. Neglecting battery maintenance can lead to a variety of issues, such as difficulty starting the engine, dim interior lights, or even complete battery failure.
Benefits of using a battery tender
- Enhanced battery life: By using a battery tender, you can significantly extend the life of your car’s battery. The constant trickle charge helps prevent sulfation, which is the most common cause of battery failure. Sulfation occurs when sulfur builds upon the battery plates, obstructing the chemical reaction that generates electricity. By ensuring a constant charge, a battery tender helps minimize sulfation and keeps your battery in optimal condition for longer.
- Convenience and ease of use: Unlike traditional chargers, battery tenders are designed to be left connected to the battery for an extended period without overcharging. Once connected, the battery tender automatically adjusts the charge rate based on the battery’s needs. This set-it-and-forget-it functionality saves you time and effort, allowing you to focus on other tasks while your battery remains in peak condition.
- Protection against self-discharge: Even when your car is not in use, its battery continues to lose charge due to self-discharge. This is especially true for vehicles that are parked for extended periods, such as during vacations or during seasonal storage. The constant trickle charge provided by a battery tender counteracts self-discharge, ensuring that your battery remains fully charged and ready to start your car whenever you need it.
Prolonging battery life
- Preventive maintenance: Using a battery tender as part of your regular maintenance routine can help significantly prolong the life of your car’s battery. By maintaining an optimal charge level and preventing sulfation, you can avoid premature battery failure and the inconvenience that comes with it.
- Cost savings: Long-lasting batteries reduce the need for frequent battery replacements, saving you money in the long run. By investing in a battery tender, you can extend the life of your battery and avoid the expense of purchasing new batteries more frequently than necessary.
- Reliability: A healthy battery is essential for reliable vehicle performance. By using a battery tender, you can ensure that your car starts easily, even after prolonged periods of inactivity or extreme weather conditions. This reliability gives you peace of mind, knowing that your car is always ready to go when you need it.
Choosing The Right Battery Tender
When it comes to maintaining your car’s battery health, a battery tender is a crucial tool. Not only does it prevent your battery from dying unexpectedly, but it also extends its lifespan. However, with the wide range of options available in the market, choosing the right battery tender for your car can be a daunting task. In this section, we will discuss the factors to consider when selecting a battery tender, including compatibility with your car’s battery and the types of battery tenders available.
Factors to consider when selecting a battery tender
Choosing the right battery tender requires careful consideration of several key factors. By taking these factors into account, you can ensure that the battery tender you choose is suitable for your car’s specific needs. Let’s take a closer look at these factors:
Compatibility with your car’s battery
One of the most important factors to consider when selecting a battery tender is its compatibility with your car’s battery. Different batteries have varying specifications and charging requirements. It is crucial to choose a battery tender that is compatible with your car’s battery type, voltage, and capacity. Failure to do so can result in inefficient charging or even damage to your battery.
To determine the compatibility, you can refer to your car’s owner manual or consult with a professional mechanic. Additionally, you can also check the specifications provided by the battery tender manufacturer. Look for compatibility information such as battery type (lead-acid, AGM, gel, etc.), voltage range (6V or 12V), and charging capacity (amps).
Types of battery tenders available
There are several types of battery tenders available in the market, each with its own unique features and capabilities. Understanding the different types can help you make an informed decision. Here are some common types of battery tenders:
- Maintainers: These battery tenders are designed to provide a low and continuous charge to your car’s battery, keeping it fully charged without the risk of overcharging. They are ideal for long-term storage or regular maintenance.
- Desulfators: These battery tenders not only charge your battery but also help rejuvenate sulfated batteries by breaking down sulfation, a common cause of battery failure. They are suitable for older or neglected batteries.
- Smart chargers: These battery tenders are equipped with advanced microprocessor technology, which allows them to adjust the charging process based on the battery’s condition. They provide efficient and customized charging, ensuring optimal battery health.
- Solar battery tenders: These battery tenders harness solar energy to keep your car’s battery charged. They are environmentally friendly and ideal for outdoor or remote locations where access to electricity may be limited.
Each type of battery tender has its own advantages and drawbacks. Consider your specific requirements, such as the intended usage, battery condition, and charging preferences, when choosing the right type for your car.
In conclusion, selecting the right battery tender for your car requires careful consideration of factors such as compatibility with your car’s battery and the different types of battery tenders available. By taking the time to choose a battery tender that meets your car’s specific needs, you can ensure optimal battery health and prolong its lifespan.
Installing The Battery Tender
Preparing your car and workspace
Before installing a Battery Tender on your car, it is important to prepare your car and workspace. Here are a few steps to follow:
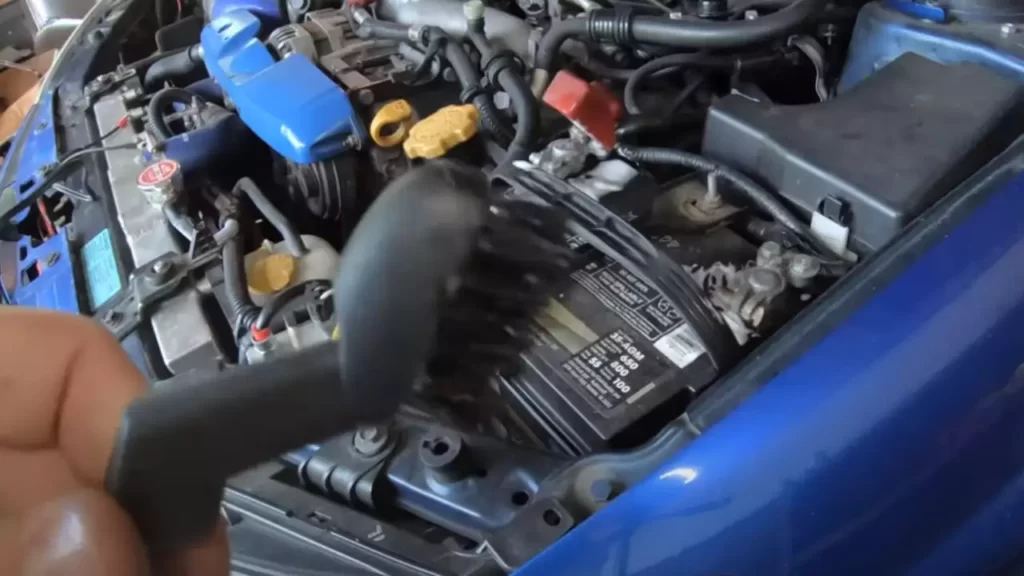
- Make sure your car is parked in a well-ventilated area. This will help to prevent any build-up of gases during the installation process.
- Ensure that the engine is turned off and the keys are removed from the ignition. Safety is crucial when working with car batteries.
- Open the hood of your car and locate the battery. It is usually situated towards the front of the engine compartment.
- Clear any debris or objects that may hinder your access to the battery. A clean workspace will make the installation process easier and more efficient.
Gathering the necessary tools
Before you begin, gather the following tools:
- A Battery Tender: This device will help keep your vehicle’s battery charged and maintained.
- A pair of safety glasses: To protect your eyes from any potential hazards, wear safety glasses during the installation process.
- Latex gloves: Wearing latex gloves will prevent any acid or chemical compounds from coming into direct contact with your skin.
- A socket wrench set: Depending on the type of car you own, you may need a socket wrench set to remove the battery cables efficiently.
- A wire brush: Use a wire brush to clean any corrosion or dirt that may have accumulated around the battery terminals.
- Baking soda and water mixture: This solution can be used to neutralize any acid present during the cleaning process.
- A clean cloth or rag: Use a clean cloth or rag to wipe down the battery terminals and surrounding area once the installation is complete.
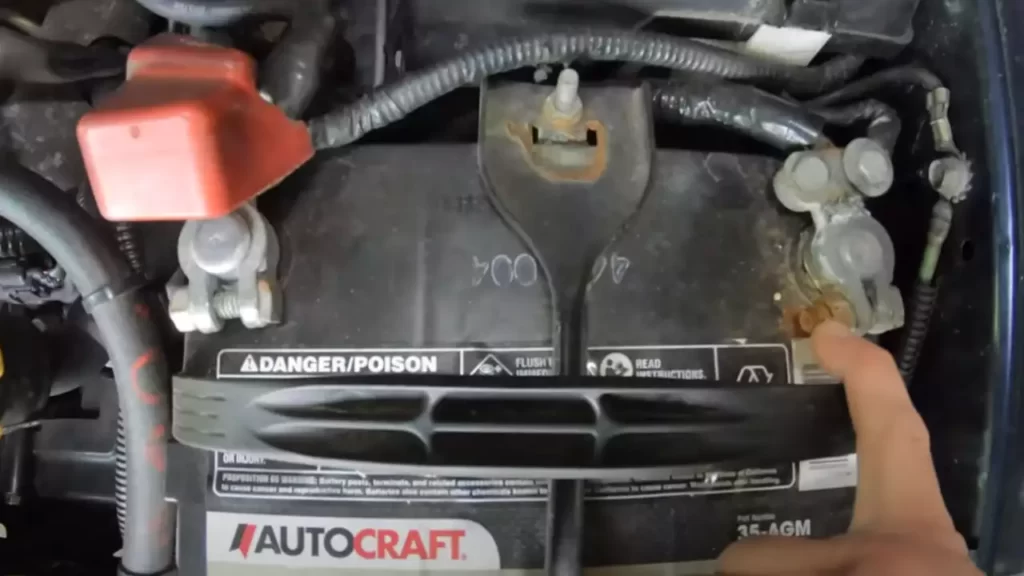
Locating the battery and disconnecting it
Now that you have all the necessary tools, it’s time to locate the battery and disconnect it. Follow these steps:
- Identify the positive and negative terminals on your car battery. The positive terminal is usually marked with a “+” symbol and the negative terminal with a “-” symbol.
- Start by disconnecting the negative battery cable first. Use your socket wrench to loosen the nut that secures the cable to the negative terminal.
- Once the nut is loose, remove the negative battery cable from the terminal and set it aside.
- Next, repeat the same process for the positive battery cable. Loosen the nut and remove the cable from the positive terminal.
- Once both cables are disconnected, carefully lift the battery out of the battery tray and place it in a safe location.
Congratulations! You have successfully located and disconnected your car battery in preparation for the Battery Tender installation. In the next section, we will guide you through the process of connecting the Battery Tender to your battery.
Steps For Installing The Battery Tender
Installing a battery tender on your car is a simple and important process that can help prolong the life of your battery. By maintaining a constant charge, a battery tender keeps your car’s battery ready for use at all times. In this guide, we will take you through the steps for installing a battery tender, ensuring that you can easily follow along to keep your car charged and ready to hit the road.
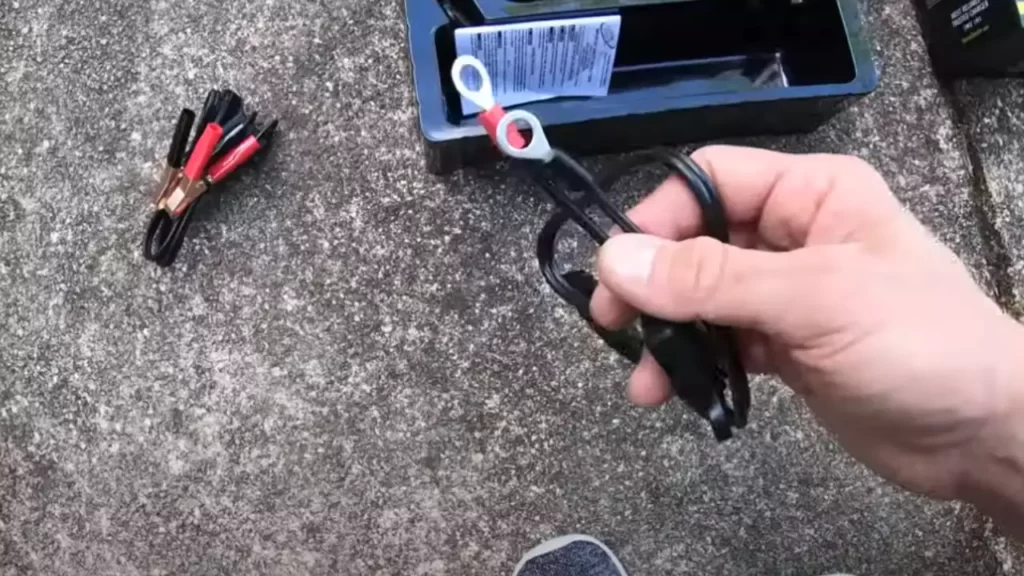
Step 1: Identifying the positive and negative terminals
The first step in installing a battery tender is to identify the positive and negative terminals on your car battery. These terminals are typically marked with the symbols “+” and “-” respectively. It is important to correctly identify these terminals to ensure a proper connection and prevent any damage to your car’s electrical system.
Step 2: Connecting the positive terminal
Once you have identified the positive terminal, it’s time to connect the battery tender. Start by loosening the nut or bolt that secures the positive terminal connector. Place the battery tender’s positive clamp over the positive terminal and tighten the nut or bolt securely. Make sure the connection is tight to ensure a good electrical contact.
Step 3: Connecting the negative terminal
With the positive terminal connected, it’s now time to connect the negative terminal of the battery tender. Loosen the nut or bolt that secures the negative terminal connector and place the battery tender’s negative clamp over the negative terminal. Tighten the nut or bolt securely, ensuring a tight connection.
Step 4: Securing the connections
After connecting both the positive and negative terminals, it is important to secure the connections to prevent any accidental disconnection. Make sure the clamps are positioned securely on the terminals and tighten any additional screws or knobs provided by the battery tender manufacturer to lock the clamps in place.
Step 5: Plugging in the battery tender
Once the connections are secure, it’s time to plug in the battery tender. Look for the charging port on the battery tender and connect it to a nearby power outlet. Ensure that the outlet is compatible with the battery tender’s voltage requirements. The battery tender should begin charging immediately, indicated by a light or display on the device.
Congratulations! You have successfully installed a battery tender on your car. By following these steps, you can keep your car’s battery charged and ready for use at all times. Regularly check the connections and charge status to ensure proper maintenance and longevity of your battery.
Maintaining And Monitoring The Battery Tender
Once you have successfully installed a battery tender on your car, it’s important to ensure that it’s properly maintained and monitored. This will not only maximize the lifespan of your battery but also ensure that your vehicle starts effortlessly whenever you need it. In this section, we will discuss the key steps to follow in maintaining and monitoring the battery tender.
Ensuring Proper Charging
Proper charging is essential to keep your battery in good condition. Here are some important points to remember:
- Make sure the battery tender is plugged into a reliable power source.
- Check that the charger’s indicator light shows a solid green, indicating that the battery is being properly charged.
- Monitor the charging process regularly, ensuring that the tender is charging the battery at the appropriate voltage.
- Keep an eye on the charging time. Excessive charging can lead to overheating and damage the battery.
If you have any doubts about the charging process or notice any irregularities, refer to the battery tender’s user manual or contact the manufacturer for assistance.
Periodic Battery Checks
Regular battery checks will help you identify any potential issues before they become major problems. Here’s what you should do:
- Inspect the battery terminals for any signs of corrosion or loose connections. Clean and tighten them if necessary.
- Check the battery’s electrolyte level if it’s a non-sealed battery. Top up with distilled water if needed, ensuring it reaches the appropriate level indicated by the manufacturer.
- Measure the battery’s voltage using a multimeter. A healthy battery should typically read around 12.6 volts.
- Monitor the battery’s overall condition, including any physical damage or leaks.
By conducting regular battery checks, you can catch potential issues early on and take necessary actions to maintain the optimal performance of your battery and battery tender.
Troubleshooting Common Issues
Even with proper maintenance, issues may arise with your battery tender. Here are some common problems and their possible solutions:
| Issue | Solution |
|---|---|
| No power indication on the charger | Check the power outlet and ensure it is functioning properly. If necessary, try a different outlet to eliminate any electrical issues. |
| Battery tender not charging the battery | Check the connections between the battery and the tender. Make sure they are securely fastened and free from corrosion. You may also need to test the charger’s output voltage to ensure it is within the appropriate range. |
| Battery tender overheating | Ensure proper ventilation around the battery tender during charging. Keep it away from flammable materials and avoid using it in extremely hot environments. |
If you encounter issues not listed above or need further assistance, reach out to the manufacturer or seek the help of a professional mechanic.
Maintaining and monitoring your battery tender is crucial for the overall health and longevity of your battery. By following the above guidelines and troubleshooting common issues, you can ensure that your battery tender operates optimally and keeps your car ready to hit the road whenever you need it!
Tips For Using A Battery Tender
Installing a battery tender on your car is a great way to ensure that your battery remains fully charged and in optimal condition. While the installation process itself is relatively simple, there are a few tips and precautions that you should keep in mind to make the most out of your battery tender.
Charging Duration and Frequency
One important consideration when using a battery tender is the duration and frequency of charging. It is recommended to keep your battery connected to the tender for an extended period of time to maintain a full charge. It is generally advised to charge the battery for at least 24 hours initially to bring it to a fully charged state. After the initial charge, it is best to keep the battery connected to the tender whenever the vehicle is not in use.
If you rarely use your vehicle, such as a classic car in storage or a recreational vehicle, it is recommended to charge the battery every 30 days. This ensures that the battery remains fully charged and prevents any eventual discharge that may lead to damage.
Safety Precautions
While using a battery tender is generally safe, it is important to take a few safety precautions to prevent any accidents or damage. Here are some tips to keep in mind:
- Ensure that the battery tender is compatible with the type and size of your vehicle’s battery. Refer to the manufacturer’s guidelines for compatibility before connecting the tender.
- Make sure to connect the battery tender to an outlet with the correct voltage. Using the wrong voltage can cause damage to both the tender and the battery.
- Keep the battery and the battery tender away from any flammable materials or liquids to avoid the risk of fire.
- Always connect and disconnect the battery tender in a well-ventilated area to prevent the buildup of potentially harmful gases.
- Inspect the battery and the battery cables regularly for any signs of damage or corrosion. If any issues are found, have them repaired or replaced before connecting the battery tender.
Storing the Battery Tender
When you are not using the battery tender, it is important to store it properly to ensure its longevity and functionality. Here are a few tips for storing your battery tender:
- Store the battery tender in a cool and dry place, away from direct sunlight, extreme temperatures, or moisture.
- Place it in a secure location to prevent any accidental damage or tampering.
- Before storing, disconnect the battery tender from the power source and the vehicle’s battery.
- If possible, store the battery tender in its original packaging or a protective case to shield it from any potential impacts or environmental elements.
By following these tips for using a battery tender, you can effectively maintain the charge of your car’s battery and extend its lifespan. Remember to always prioritize safety and proper storage to ensure the longevity and functionality of both the battery and the battery tender.
Frequently Asked Questions
How Do I Install A Battery Tender On My Car?
To install a Battery Tender on your car, start by locating the battery. Then, connect the black clamp to the negative terminal and the red clamp to the positive terminal. Plug in the Battery Tender and let it charge the battery for the recommended time.
It’s a simple process that helps keep your car’s battery in top condition.
Can I Leave My Car Connected To A Battery Tender All The Time?
Yes, you can leave your car connected to a Battery Tender for an extended period of time without any issues. The Battery Tender is designed to automatically switch to maintenance mode once the battery is fully charged. It will then keep the battery at the optimal voltage, preventing any overcharging or damage.
How Long Does It Take For A Battery Tender To Charge A Car Battery?
The time it takes for a Battery Tender to charge a car battery depends on the battery’s current state of charge. On average, it can take around 12 to 24 hours to fully charge a completely dead battery. However, if your battery only needs a top-up charge, it may take less time.
Is It Safe To Install A Battery Tender On My Car Myself?
Yes, it is safe to install a Battery Tender on your car yourself. The installation process is straightforward and can be done by following the manufacturer’s instructions. Just make sure to wear protective gloves and disconnect any electronic devices before connecting the Battery Tender to avoid any electrical mishaps.
Conclusion
Installing a Battery Tender on your car is a simple yet essential task that will help ensure your battery’s longevity and optimal performance. By following the step-by-step instructions outlined in this guide, you can confidently connect your Battery Tender and keep your car battery fully charged.
With regular use, you can maintain a healthy battery and avoid the frustration of a dead battery. So, go ahead and give your car the care it deserves by installing a Battery Tender today.