To install a battery kill switch, first disconnect the negative cable from the battery terminal. Then, connect the kill switch to the negative cable, ensuring a secure connection.
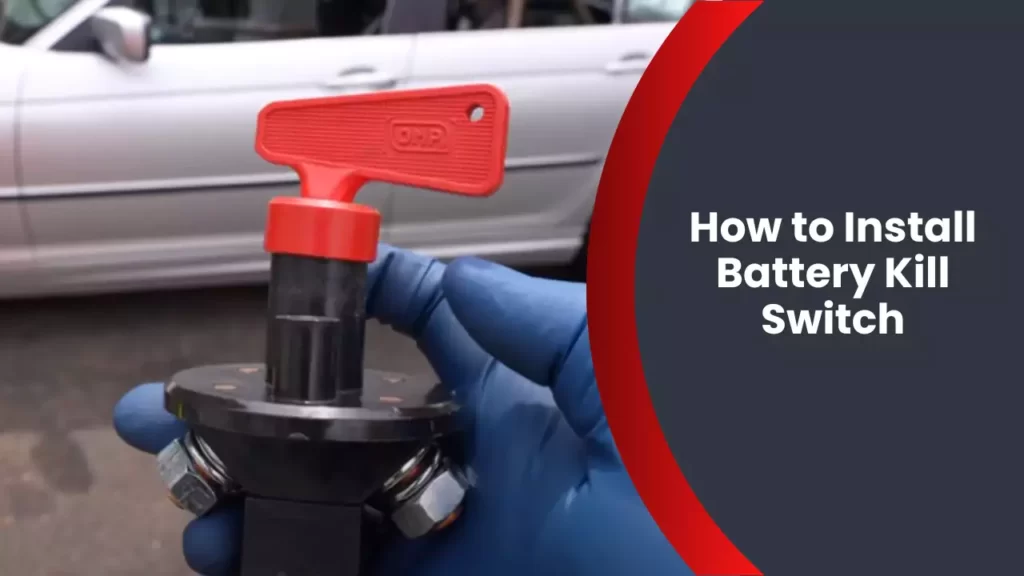
When it comes to battery safety and security, installing a battery kill switch is an important step. A battery kill switch, also known as a battery disconnect switch, allows you to easily disconnect the battery from the electrical system of your vehicle, preventing accidental drain or theft.
By disconnecting the negative cable and connecting the kill switch to it, you can quickly and effectively cut off power to your battery when needed. We will guide you through the process of installing a battery kill switch to ensure the safety and longevity of your vehicle’s battery.
Choosing The Right Battery Kill Switch
When it comes to ensuring the safety and security of your vehicle’s electrical system, installing a battery kill switch is an essential step. A battery kill switch allows you to completely disconnect your vehicle’s battery with a simple flip of a switch, preventing any unauthorized or accidental use. However, with so many options available in the market, choosing the right battery kill switch can be a daunting task. In this section, we will explore the factors to consider when selecting a battery kill switch and the different types available on the market.
Factors to consider when selecting a battery kill switch
Choosing the right battery kill switch largely depends on your specific needs and preferences. Consider the following factors before making a decision:
- Type of vehicle: The type of vehicle you own is an important consideration. Different vehicles may require different types of battery kill switches. For example, a heavy-duty truck may require a more robust and durable switch compared to a compact car.
- Amperage rating: The amperage rating of a battery kill switch is crucial for ensuring optimal performance and compatibility with your vehicle’s electrical system. Check the specifications of your vehicle and choose a switch with an amperage rating that can handle the demand.
- Installation method: Some battery kill switches require professional installation, while others are designed for easy DIY installation. Consider your level of expertise and the tools required for installation before making a decision.
- Additional features: Some battery kill switches come with additional features such as a key lock, built-in surge protection, or remote control capabilities. Evaluate these features based on your security requirements and convenience preferences.
- Budget: Like any other purchase, budget plays a crucial role. Determine your budget range and look for battery kill switches that offer the best value for your money without compromising on quality and performance.
Exploring different types of battery kill switches available in the market
Once you have considered the factors mentioned above, it’s time to explore the different types of battery kill switches available in the market. Here are some commonly used types:
| Types of Battery Kill Switch | Description |
|---|---|
| Master disconnect switch | A popular option that completely disconnects the battery from the electrical system, ensuring zero power flow. |
| Toggle switch | A simple on/off switch that can be easily flipped to disconnect or reconnect the battery. |
| Remote control kill switch | A convenient option that allows you to remotely control the battery’s power, usually through a key fob or mobile app. |
| Key lock switch | A switch that requires a key to turn on or off, adding an extra layer of security. |
| Push-button switch | A compact and user-friendly option that disconnects the battery when the button is pushed. |
Each type of battery kill switch has its own advantages and disadvantages. Consider your specific requirements and choose the type that best fits your needs and preferences.
Now that you have a better understanding of the factors to consider and the types of battery kill switches available, you can confidently choose the right one for your vehicle. Remember, investing in a quality battery kill switch not only enhances the security of your vehicle but also provides peace of mind.
Gathering The Tools And Equipment
Before you can begin installing a battery kill switch, it is important to gather all the necessary tools and equipment. This ensures that you have everything you need to complete the installation smoothly and efficiently. In this section, we will discuss the essential tools and equipment needed for the installation process, as well as the safety precautions you should take before starting.
Essential tools and equipment needed for the installation process
Here are the tools and equipment that you will need to install a battery kill switch:
| Tool/Equipment | Description |
|---|---|
| Battery kill switch | A device that allows you to completely disconnect the battery from the vehicle’s electrical system. |
| Wrench or socket set | To loosen and tighten nuts and bolts. |
| Wire cutters | To cut and remove any existing electrical wiring. |
| Wire stripper | To remove insulation from the ends of wires to ensure proper connections. |
| Electrical tape | To insulate and protect wire connections. |
| Crimping tool | To securely attach crimp connectors onto wires. |
| Screwdriver | To fasten screws or remove panels if necessary. |
Safety precautions to take before starting
Before you begin the installation process, it is important to take certain safety precautions to protect yourself and your vehicle:
- Ensure that the ignition is turned off and the vehicle is parked in a well-ventilated area.
- Wear safety goggles and gloves to protect your eyes and hands from potential hazards.
- Disconnect the negative terminal of the battery to prevent any accidental electrical shocks.
- Read and follow the manufacturer’s instructions carefully to avoid any damage to the vehicle’s electrical system.
- Avoid working near any open flames or sparks to prevent accidents.
- Keep a fire extinguisher nearby in case of any unforeseen events.
By gathering the necessary tools and equipment and taking the proper safety precautions, you are setting yourself up for a successful battery kill switch installation. In the next section, we will discuss the step-by-step process of installing the battery kill switch.
Locating The Battery And Identifying The Positive Terminal
Step-by-step guide to finding the battery in specific types of vehicles
When it comes to installing a battery kill switch, the first step is to locate the battery in your vehicle. This might seem like a straightforward task, but the placement of the battery can vary depending on the make and model of your vehicle. To help you with this process, here is a step-by-step guide to finding the battery in different types of vehicles:
1. Sedans and Hatchbacks:
In sedans and hatchbacks, the battery is typically located in the engine compartment. To locate it, start by popping the hood of your vehicle. Look for a rectangular or square-shaped plastic cover near the front of the engine compartment. This cover might have a battery symbol on it, making it easier to identify. Once you remove the cover, you should be able to spot the battery.
2. SUVs and Trucks:
In SUVs and trucks, the battery is usually placed in the engine compartment, similar to sedans and hatchbacks. However, it might be positioned in a different area. Look for a plastic cover near the front of the engine compartment or along the sides. Some SUVs and trucks have batteries located under the driver or passenger side seats, so be sure to check there as well.
3. Sports Cars and Luxury Vehicles:
Sports cars and luxury vehicles tend to have their batteries hidden in unique places for aesthetic reasons. In some cases, the battery may be located in the trunk or even behind a panel in the cabin. Consult your vehicle’s manual or do a quick online search to determine the exact location of the battery in these types of vehicles.
Understanding the positive terminal and its importance in the installation process
Now that we have located the battery, it is crucial to identify the positive terminal before installing the battery kill switch. The positive terminal is marked with a plus (+) sign and is usually red in color. It is essential to connect the battery kill switch to the positive terminal to ensure the desired effect when activating the switch. Contact with the negative terminal, marked with a minus (-) sign and usually black in color, should be avoided, as it can lead to electrical shock or damage to the electrical system.
Before proceeding with the installation, here are a few key points to keep in mind:
- Ensure that your vehicle is turned off and the key is removed from the ignition.
- Wear protective gloves and eyewear to protect yourself from any potential hazards.
- Inspect the battery terminals for any signs of corrosion or damage. If present, clean them thoroughly before proceeding.
- Make sure you have all the necessary tools and equipment needed for installation, such as a wrench, screwdriver, and battery kill switch kit.
By understanding the positive terminal and following these guidelines, you can move on to the next step of installing the battery kill switch with confidence.
Disconnecting And Removing The Battery Cables
When it comes to installing a battery kill switch, one of the crucial steps is to disconnect and remove the battery cables. This process needs to be done with caution and attention to ensure it is carried out safely and without causing any damage to your vehicle. In this section, we will discuss the safety measures you should follow before disconnecting the battery cables, as well as provide detailed instructions on how to remove them properly.
Safety measures to follow before disconnecting the battery cables
Before starting the process of disconnecting the battery cables, it is essential to take necessary safety measures to prevent any mishaps and protect yourself and your vehicle from potential harm. Here are some important steps you should follow:
- Turn off the engine: Make sure your engine is turned off and the keys are removed from the ignition. This will help minimize the risk of electrical shocks and other accidents.
- Park in a safe area: It is recommended to park your vehicle in a well-ventilated area with enough space to work comfortably around the battery. Avoid working in cramped or enclosed spaces to reduce the risk of accidents.
- Wear protective gear: Always wear appropriate protective gear before attempting to disconnect the battery cables. This can include safety gloves, goggles, and protective clothing to shield yourself from any potential hazards.
- Ensure tools are isolated: Make sure any metal tools or objects you use during the process are properly insulated. This will prevent accidental short circuits and electrical sparks that could potentially damage your vehicle.
Detailed instructions on removing the battery cables without causing any damage to the vehicle
Follow these detailed instructions to remove the battery cables without causing any damage:
- Identify the negative and positive terminals: The battery will have two terminals, one marked as positive (+) and the other as negative (-). Identify these terminals before proceeding.
- Start with the negative cable: Begin by removing the negative cable first, as this helps prevent any accidental electrical discharge. Use a wrench or a socket set to loosen the nut securing the negative cable to the negative terminal.
- Disconnect the negative cable: Once the nut is loosened, carefully detach the negative cable from the negative terminal. Inspect the cable for any signs of damage such as corrosion or fraying.
- Proceed with the positive cable: After disconnecting the negative cable, move on to the positive cable. Again, use a wrench or socket set to loosen the nut securing the positive cable to the positive terminal.
- Detach the positive cable: Once the nut is loose, gently remove the positive cable from the positive terminal. Take a moment to inspect the cable for any wear and tear.
- Dispose of the battery cables safely: After removing the battery cables, handle them with care and dispose of them properly. Check local regulations for safe battery cable disposal methods.
By following these steps, you can confidently disconnect and remove the battery cables without causing any damage to your vehicle. Remember to always prioritize safety and take necessary precautions throughout the process.
Installing The Battery Kill Switch
Installing the Battery Kill Switch
When it comes to ensuring the safety and security of your vehicle’s battery, installing a battery kill switch is a smart and effective choice. A battery kill switch allows you to disconnect the battery from the electrical system, preventing any unwanted draining or unauthorized use of your vehicle. In this section, we will explain the different installation methods for battery kill switches and provide you with a step-by-step guide on how to install one yourself.
Explaining the different installation methods for battery kill switches
Before we dive into the installation process, let’s take a look at the different installation methods available for battery kill switches. These methods vary depending on factors such as the location of the switch and the type of switch you choose. Here are the three main installation methods to consider:
- In-line installation: This method involves placing the kill switch in the battery’s negative cable, effectively interrupting the flow of current. It is a simple and popular installation method.
- Post installation: With this method, the kill switch is installed directly onto the battery post. It offers a convenient way to disconnect the battery without any additional wiring.
- Under-hood installation: This method involves mounting the kill switch under the hood, usually near the battery. It provides easy access and added security.
Step-by-step instructions for installing the battery kill switch
Now that we have covered the different installation methods, let’s move on to the step-by-step instructions for installing a battery kill switch. Follow these steps carefully to ensure a successful installation:
- Step 1: Begin by disconnecting the negative terminal of the battery using a wrench or pliers. This will ensure that there is no power flowing through the system during the installation process.
- Step 2: Choose the appropriate installation method based on your preference and the specifications of your vehicle.
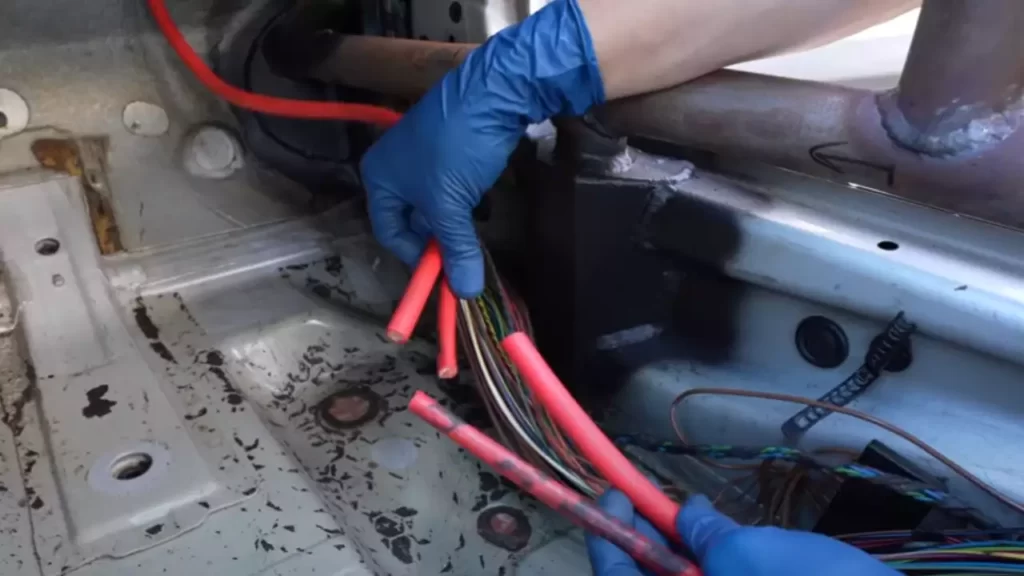
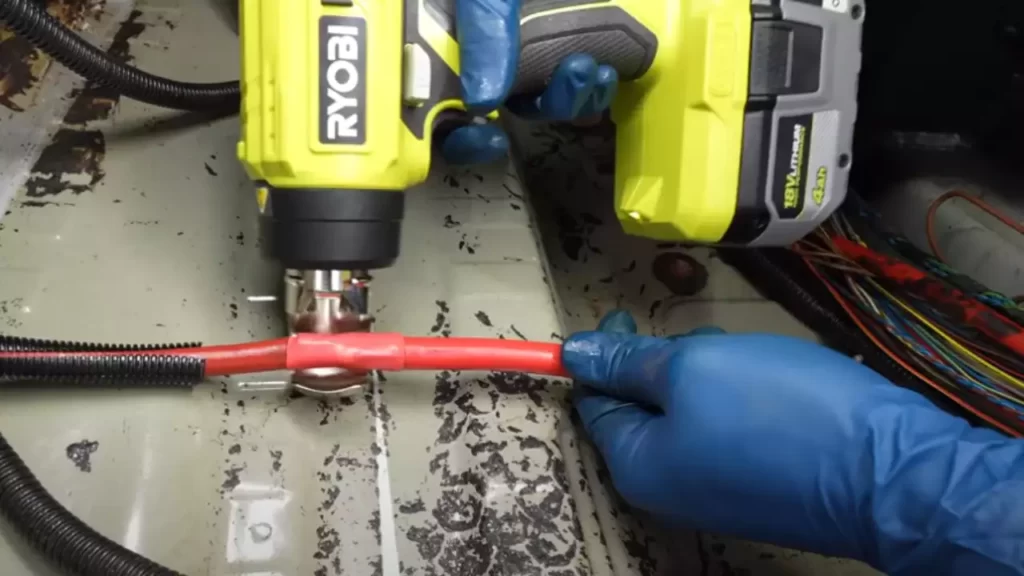
- Step 3: If you have chosen an in-line installation method, measure and cut the negative cable using a cable cutter. Insert the ends of the cable into the switch terminals and secure them tightly.
- Step 4: If you have chosen a post installation method, attach the switch directly to the battery post according to the manufacturer’s instructions. Make sure it is securely fastened.
- Step 5: If you have chosen an under-hood installation method, find a suitable location near the battery to mount the switch. Use screws or brackets to secure the switch in place.
- Step 6: Once the switch is installed, reconnect the negative terminal of the battery and tighten it securely using a wrench or pliers.
- Step 7: Test the switch by flipping it to the “off” position. If the electrical systems of your vehicle are completely disconnected, you have successfully installed the battery kill switch.
That’s it! By following these steps, you can easily install a battery kill switch for added safety and security. Remember to always consult the manufacturer’s instructions and seek professional assistance if needed. Now you can enjoy peace of mind knowing that your vehicle’s battery is protected from any unwanted use or draining.
Method 1: Inline Installation
One popular method for installing a battery kill switch is the inline installation. In this method, the switch is placed in line with the positive (+) battery terminal, allowing you to cut off the power flow to the entire vehicle with a simple flip of a switch. This provides a convenient and effective way to prevent unauthorized use of your vehicle and protect against battery drain when it is not in use.
Understanding the Concept and Benefits of Inline Installation
Before diving into the installation process, it is important to understand the concept and benefits of an inline installation. The battery kill switch essentially acts as a security measure for your vehicle. By cutting off the power flow to the battery, you can prevent theft, tampering, and unauthorized use.
Some of the key benefits of inline installation include:
- Enhanced security: A battery kill switch adds an extra layer of security to your vehicle, deterring potential thieves and preventing hotwiring attempts.
- Battery protection: When your vehicle is not in use for extended periods, such as during storage or a vacation, the kill switch helps to prevent battery drain, ensuring that your battery will still have charge when you return.
- Easy operation: With the flip of a switch, you can quickly and easily cut off the power flow to your vehicle, providing peace of mind and convenience.
Detailed Instructions on Installing the Battery Kill Switch in an Inline Configuration
Now that you understand the concept and benefits, let’s dive into the step-by-step process of installing the battery kill switch in an inline configuration:
- Gather the necessary tools: Before you begin, make sure you have all the required tools and materials. This may include a wrench, wire cutters, electrical tape, and of course, the battery kill switch.
- Select the installation location: Choose a suitable location for your kill switch. It should be easily accessible, yet discreet enough to prevent tampering. Ensure that it is away from any moving parts or hot surfaces to avoid potential damage.
- Disconnect the battery: Prior to installing the kill switch, disconnect the negative (-) battery terminal to cut off the power supply.
- Cut the positive battery cable: Use the wire cutters to cut the positive battery cable in the desired location. Ensure that you have enough length to complete the installation.
- Install the kill switch: Connect one end of the positive battery cable to one terminal of the kill switch. Attach the other end of the cable to the other terminal. Make sure the connections are secure, and use electrical tape to insulate them.
- Reconnect the negative battery terminal: Once the kill switch is securely installed, reconnect the negative battery terminal to restore power.
- Test the kill switch: Test the functionality of the kill switch by flipping it on and off. Ensure that the power flow to the vehicle is cut off when the switch is in the off position.
With these detailed instructions, you should be able to install a battery kill switch in an inline configuration successfully. Remember to follow all safety precautions and consult a professional if you are unsure about any aspect of the installation process.
Method 2: Post Installation
In this section, we will guide you through the process of installing a battery kill switch in a post configuration. Post installation is a popular method that involves mounting the switch directly onto the battery post itself. Understanding the concept and benefits of post installation will help you make an informed decision and safeguard your vehicle from battery drain and unauthorized use.
Understanding the concept and benefits of post installation
Post installation refers to the placement of the battery kill switch directly onto the battery post. This method offers several advantages, making it a popular choice among vehicle owners. By installing the switch in this manner, you can effectively disconnect the battery and prevent any current from flowing through the system.
The benefits of post installation include:
- Simplicity: Installing the battery kill switch directly onto the post is a straightforward process that does not require any additional modification to the vehicle’s electrical system.
- Convenience: With the switch mounted on the battery post, you can easily access it whenever needed, allowing for quick and hassle-free battery disconnection.
- Visual Deterrent: The presence of a prominent switch on the battery post serves as a visual deterrent against theft and unauthorized use of your vehicle.
- Enhanced Safety: In case of an emergency, such as a vehicle fire, you can swiftly disconnect the battery, reducing the risk of electrical hazards.
Step-by-step instructions for installing the battery kill switch in a post configuration
Follow these simple steps to install the battery kill switch in a post configuration:
- Step 1: Gather the necessary tools and materials: Before beginning the installation process, ensure you have all the required tools and materials. This may include a wrench or pliers, the battery kill switch, and any additional connectors or wiring as necessary.
- Step 2: Disconnect the negative terminal of the battery: Start by disconnecting the negative terminal of the battery to avoid any accidental electrical discharge during the installation process. This can typically be done by loosening the bolt or nut securing the negative cable to the battery post.
- Step 3: Prepare the battery post: Use a wire brush or a battery post cleaner to remove any corrosion or debris from the battery post. Ensure that the post is clean and free of any obstructions before proceeding.
- Step 4: Attach the battery kill switch: Place the battery kill switch onto the battery post, ensuring a secure and tight connection. Use a wrench or pliers to fasten the switch, making sure that it is positioned in a way that allows for easy access and operation.
- Step 5: Connect the negative cable: Reattach the negative cable to the battery post, ensuring a tight connection. Use a wrench or pliers to secure the bolt or nut, making sure that the cable is firmly in place.
- Step 6: Test the switch: Once the installation is complete, test the battery kill switch to ensure it is functioning correctly. Activate the switch and check that there is no power flowing through the system.
- Step 7: Final adjustments: Make any necessary adjustments to the switch’s position or connection to ensure optimal functionality and accessibility.
Congratulations! You have successfully installed a battery kill switch in a post configuration. Remember to periodically check the switch’s functionality and perform any necessary maintenance to ensure its effectiveness in protecting your vehicle’s battery.
Testing The Battery Kill Switch
When it comes to ensuring the effectiveness of your battery kill switch, testing is an essential step. Testing the functionality of the battery kill switch ensures that it has been installed correctly and it will effectively cut off power to your vehicle’s electrical system when needed. In this section, we will discuss two important aspects of testing the battery kill switch: ensuring that the installation has been done correctly and testing the functionality of the switch itself.
Ensuring that the installation has been done correctly
Before testing your battery kill switch, it is crucial to ensure that the installation has been done correctly. A poorly installed kill switch may not function properly and can put your vehicle at risk. Here are a few steps to take to ensure that the installation has been done correctly:
- Inspect the wiring: Carefully examine the wiring connections from the battery to the kill switch. Look for any loose connections, frayed wires, or signs of damage. Make sure the wiring is secure and properly insulated.
- Check the switch position: Verify that the switch is in the correct position. In most cases, this means that the switch should be in the “off” position, preventing power from flowing to the vehicle’s electrical system.
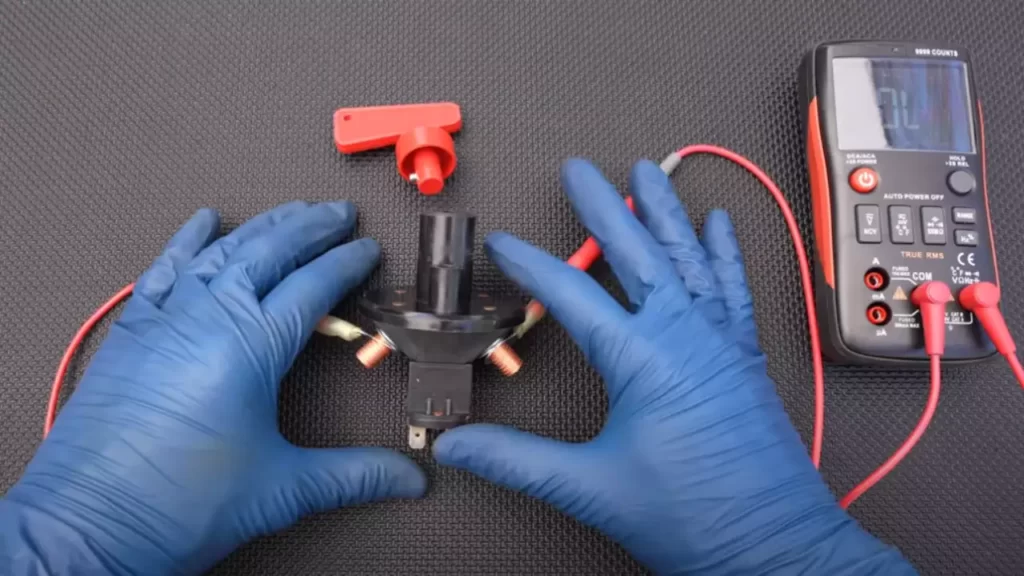
- Test the circuit: Using a multimeter, test the circuit to ensure that power is effectively cut off when the kill switch is engaged. Connect the multimeter to the appropriate terminals and check for zero voltage when the switch is in the “off” position.
Testing the functionality of the battery kill switch
Once you have confirmed that the installation has been done correctly, it is time to test the functionality of the battery kill switch. Testing the switch will give you the confidence that it will effectively cut off power when needed, providing an added layer of security for your vehicle. Here are a few steps to follow:
- Prepare the vehicle: Ensure that the vehicle is parked in a safe location with the engine off and the ignition key removed.
- Engage the kill switch: Flip the switch to the “off” position to cut off power to the electrical system. Verify that all lights and accessories are turned off.
- Test the starting: Attempt to start the vehicle. With the kill switch engaged, the engine should not start. If the engine starts, double-check the wiring connections and switch position.
- Disengage the kill switch: Flip the switch to the “on” position to restore power to the electrical system. Verify that all lights and accessories are functioning properly.
By thoroughly testing the battery kill switch, you can ensure that it will perform as intended in emergency situations. Remember to periodically test the switch to ensure its continued functionality and to address any issues promptly. With a properly functioning kill switch, you can have peace of mind knowing that you have taken an extra step to protect your vehicle from theft or unauthorized use.
Proper Handling And Maintenance Of The Battery Kill Switch
Installing a battery kill switch in your vehicle can provide added safety and security by cutting off the power supply to the battery when not in use. However, it is equally important to properly handle and maintain the battery kill switch to ensure its longevity and effectiveness. Here are some essential tips and common mistakes to avoid during maintenance.
Tips for maintaining and extending the lifespan of the battery kill switch:
- Inspect regularly: Regularly inspect the battery kill switch to ensure it is in proper working condition. Look for any signs of damage, corrosion, or loose connections. If any issues are found, take immediate action to repair or replace the switch.
- Keep it clean: Clean the battery kill switch regularly to remove any dirt, grease, or corrosion that may accumulate over time. Use a mild detergent and a soft cloth to gently clean the switch, taking care not to damage any electrical components.
- Apply dielectric grease: Applying a thin layer of dielectric grease to the electrical connections can help protect them from moisture, corrosion, and other environmental factors. This can significantly extend the lifespan of the battery kill switch.
- Test the switch: Periodically test the functionality of the battery kill switch to ensure it is working as intended. Follow the manufacturer’s instructions on how to test the switch and fix any issues that may arise.
- Secure the switch: Make sure the battery kill switch is securely mounted in a location that is easily accessible for operation. Check that all the connections are tight and secure, preventing any accidental disconnection while in use.
- Consult the user manual: Always refer to the user manual or manufacturer’s instructions for specific care and maintenance guidelines for your battery kill switch. Following these instructions will help maintain optimal performance and extend its lifespan.
Common mistakes to avoid during maintenance:
- Using excessive force: Avoid applying too much force or pressure when handling or operating the battery kill switch. Excessive force can damage the switch or cause it to malfunction.
- Ignoring signs of damage: In case of any visible damage, do not ignore or neglect it. Promptly address any issues to prevent further damage or potential safety hazards.
- Forgetting to disconnect the power: Before performing any maintenance or handling the battery kill switch, always remember to disconnect the power supply by turning off the vehicle and removing the key. This ensures safety during maintenance and prevents accidental electrical shocks.
- Overlooking loose connections: Loose connections can affect the performance of the battery kill switch. Regularly check for any loose connections and tighten them as necessary.
- Using incompatible parts or accessories: When replacing or repairing the battery kill switch, ensure that you use compatible parts and accessories recommended by the manufacturer. Using incompatible components may lead to compatibility issues or reduced effectiveness of the switch.
By following these tips for maintenance and avoiding common mistakes, you can ensure the battery kill switch operates smoothly and provides reliable functionality when needed. Proper care and handling of the battery kill switch will help extend its lifespan and keep your vehicle protected.
Troubleshooting Common Issues
Installing a battery kill switch is a great way to protect your vehicle’s battery from draining while it’s not in use. However, like any electrical component, the battery kill switch can encounter common issues that may prevent it from functioning properly. In this section, we will explore how to identify and troubleshoot these common problems, providing you with a step-by-step guide for resolving issues without the need for professional help.
Identifying and troubleshooting common problems with the battery kill switch
When your battery kill switch isn’t working as expected, it’s essential to pinpoint the root cause of the issue. Here are some common problems you may encounter:
| Problem | Possible Cause |
|---|---|
| The switch is not turning off the battery power | The switch may be faulty or improperly installed |
| The switch is not turning on the battery power | The switch may be defective or not connected properly |
| The switch is difficult to operate | The switch may be stuck or damaged |
By understanding the possible causes of these common issues, you can take the necessary steps to troubleshoot and resolve the problem.
Step-by-step guide for resolving issues without professional help
If you are experiencing any of the issues mentioned above, follow these steps to troubleshoot and potentially resolve them:
- Inspect the switch: Start by visually inspecting the battery kill switch. Ensure there are no visible signs of damage or loose connections. If there are any evident issues, consider replacing the switch.
- Check the connections: Verify that all the connections are secure and properly attached. A loose or disconnected wire could be the cause of the malfunction. Reconnect any loose wires and tighten the connections.
- Test the switch: Use a multimeter to test the functionality of the switch. Set the multimeter to the resistance or continuity mode and follow the manufacturer’s instructions. If the switch fails the test, it may need to be replaced.
- Clean the switch: Over time, dust and debris can accumulate on the switch, affecting its performance. Carefully clean the switch using a soft brush and electronic contact cleaner. Ensure the switch is dry before reassembling and testing it.
- Seek professional assistance: If you have followed these troubleshooting steps and the issues persist, it may be necessary to seek professional help. A qualified technician can diagnose the problem more thoroughly and provide expert solutions.
By following this step-by-step guide, you can troubleshoot and resolve common issues with your battery kill switch, ensuring your vehicle’s battery remains protected and your kill switch operates effectively.
Frequently Asked Questions
How Does A Battery Kill Switch Work?
A battery kill switch is a device that completely cuts off the power supply to the vehicle’s battery, preventing the battery from draining when the vehicle is not in use. It is installed between the battery and the vehicle’s electrical system, allowing you to easily disconnect the power when needed.
Why Should I Install A Battery Kill Switch?
Installing a battery kill switch can provide multiple benefits. It helps prevent battery drain when your vehicle is not in use for an extended period, improves security by disabling the electrical system, and allows you to easily disconnect the battery in case of an emergency or maintenance work.
Is It Difficult To Install A Battery Kill Switch?
No, installing a battery kill switch is a relatively simple process that can be done by anyone with basic knowledge of car wiring. However, it is crucial to follow the manufacturer’s instructions and take proper safety precautions while installing the switch to ensure proper functionality and avoid any damage to the vehicle’s electrical system.
Do I Need Any Special Tools To Install A Battery Kill Switch?
Installing a battery kill switch requires basic tools such as a wrench or pliers, wire cutters, electrical tape, and a screwdriver. These tools are readily available in most households and automotive toolkits. However, it is advisable to check the specific requirements mentioned in the manufacturer’s installation instructions.
Conclusion
After following the step-by-step guide provided in this blog post, you are now equipped with the knowledge to install a battery kill switch in a hassle-free manner. This essential safety feature not only provides protection against theft but also ensures the longevity of your vehicle’s battery.
By cutting off power when your vehicle is not in use, you can have peace of mind knowing that your battery won’t drain unnecessarily. So, get started on installing your battery kill switch and enjoy the benefits it brings.